How to Paint Furniture to Get Beautiful, Long-Lasting Results
Why buy new furniture when you can refresh?


Whether you picked up a vintage find or want to breathe new life into a family heirloom, learning how to paint furniture is a great way to update outdated pieces to fit your personal style. Follow these guidelines to paint furniture at home and refresh the look of your home.
Why Paint Furniture?
Painting furniture can be a great choice for both wood and metal pieces. Here are the main benefits of painting furniture:
Hides flaws and wear and tear
Preserves high-quality, well-built furniture
Protects and prolongs the life of sentimental pieces
Updates the style or color of a piece you love
Reduces the environmental impact of producing new furniture
Saves the cost of buying new furniture
Protects the wood, metal, or other material
Controls moisture levels
How Much Does It Cost to Paint Furniture?
The cost to paint furniture typically ranges from $80 to $800, depending on the size and type of furniture. For example, a small end table likely falls on the lower price range while painting a full bedroom set will cost toward the higher end of the price range.
How to Prep for Painting Furniture
Whether you’re painting a Victorian coffee table or a mid-century modern buffet, inspect the furniture before doing prep work. Determine if the piece is structurally sound, evaluate how much cleaning it needs before painting, and look to see if there are cracks or gaps that need wood filler.
For traditional wood or laminate furniture painting projects, pick a latex or oil-based paint. Due to its ease of use and wide availability, latex is usually the standard. However, due to its hard finish, oil-based paint works well if the piece is frequently used.
For metal furniture, determine the type of metal (ferrous or non-ferrous) and choose your paint type. Ferrous metals include steel and wrought iron. The furniture is usually heavy and sturdy. Non-ferrous metals include aluminum and are lighter weight. Ferrous metals can withstand more treatment, such as scraping it with a wire brush.
Pick an acrylic coating or alkyd coating when painting metal furniture. Acrylic coatings are water-based, faster-drying, and longer-lasting. Alkyd coatings are glossier, more scratch-resistant, and prevent rust. Choose the type of paint that better suits your project goals.

How to Paint Wood Furniture

Ready to transform your furniture with a fresh coat of paint? Follow these steps to get a silky smooth finish at the end. Be sure to wear eye protection, gloves, and a respirator when sanding and painting.
1. Prep for Paint
Choose an area to paint in that is well ventilated. Then, lay down a drop cloth to protect your floors from paint drips and splatter. Remove brass or metal hardware with a screwdriver, and set them aside to clean if you plan on reusing. Dust off the furniture (or use a shop vac depending on how dirty it is).
Make a cleaning solution of equal parts white vinegar and water with a few drops of dish soap mixed in. If this mild solution doesn’t remove the debris, try a commercial cleaner or mineral spirits. Test the cleaner on an inconspicuous area so you don’t risk damaging the finish.
Dip a sponge or cleaning cloth in the solution and scrub, paying close attention to any crevices in the piece. Allow the piece to fully dry. Using a chisel, fill in any cracks or gaps with sandable wood filler and allow it to fully set. Apply painter’s tape to places you don’t want painted, like upholstery, hinges, or carved details. You can even use tape to create a pattern with the paint.
2. Sand the Surface
Sanding creates an even surface so that you don’t have any peeling or chips in the new paint down the road. Sanding is a necessary step in most cases, especially if you’re painting lacquered or varnished wood. Choose an orbital sander for large surfaces without a lot of detail and a hand sander or block for smaller surfaces and embellished details.
For varnished furniture, begin with a coarse 60- to 80-grit sandpaper, and lightly sand following the grain of the wood. If you’re using an orbital sander, work in small sections at a time in a circular motion. Press lightly to avoid creating marks on the surface.
For wood pieces that aren’t varnished, you can start with 150-grit sandpaper. Work your way up to a finer grade sandpaper, like 200-grit and above, to get the surface as smooth and blemish-free as possible.
Once you finish sanding, run a duster or shop vac over the wood, then wipe it down with a tack cloth to fully remove all the dust.
3. Apply Primer
Next, it’s time to add primer. Because of wood’s porosity, you should apply primer to wood surfaces before painting them. Primer gives your topcoat a good surface to adhere to, and it increases durability while enhancing the vibrancy of the paint color.
Start by painting over any detailed areas using a thin paintbrush. Using a foam roller or angled paintbrush, apply primer on flat areas in even brush strokes, working in the direction of the grain.
Start with the edges, and work your way inward. Be sure to lightly go back over areas if you notice brush strokes to blend in the primer. Wait for it to dry, and apply a second coat if necessary.
4. Apply Paint
Once the primer is dry, you can finally start painting on your topcoat. Follow the same steps listed above in the primer section. If you’re using a paintbrush, be sure to apply the paint in thin coats to minimize the appearance of brush strokes.
If you notice bumps in the surface of the topcoat after painting, you may need to sand it down using a fine grit sandpaper before applying your next coat of paint.
5. Add a Protective Clear Coat
Extend the life of your newly updated treasure by adding a clear coat to seal in the paint. Without sealant, your painted furniture may be prone to scratches or blemishes. What’s more, this layer is easy to clean because it forms a hard enamel once it dries. Wait for your clear coat to fully cure before moving or using your furniture.
How to Paint Metal Furniture
Painting metal furniture can refresh an indoor or outdoor piece. The process involves careful prep, cleaning, priming, and painting. Spray paint is a good option, especially if there are divots, grates, or indents in the metal piece.
1. Prep Your Work Area
Choose a well-ventilated work area in case any metal shavings or powder comes off during the process. Place a drop cloth under your piece to protect the floors and make clean-up easier. Be sure to use gloves, eye protection, and a respirator when preparing the surface and painting.
2. Scrub With a Wire Brush
Next, gently scrape your furniture with a wire brush to remove loose pieces of rust or paint. Aim to remove larger chunks, as smaller bits can come off during sanding. If your piece has minimal rust, you can skip this step.
If there’s existing paint on your metal, you can remove the paint by sanding it, applying chemical stripper, or painting over the existing layer if it’s not peeling.
3. Sand the Surface
Buff the surface using a palm sander with 80- to 100-grit sandpaper on ferrous metals like steel or wrought iron and 180- to 220-grit sandpaper on non-ferrous metals like aluminum. Sand any hard-to-reach areas, such as the curves of a chair’s arm.
Once you've removed most of the rust, sand the entire surface of any ferrous metal pieces with 150-grit sandpaper so it's smooth to the touch. Skip this extra sanding when working with non-ferrous metals.
4. Clean the Furniture
Clean your furniture using a mild degreaser solution or acetone to remove remaining rust, grease, and oil. A heavy-duty degreaser may be necessary if there's excessive grime or it doesn't come off with a mild solution. Rinse with a power washer or a damp cloth and warm water.
Let your piece dry completely. Your metal furniture should be clean, dry, mostly rust-free, and dull before the paint.
5. Add Two or Three Layers of Primer
If your furniture is clean and rust-free, priming isn’t necessary. You can skip this step and go ahead with painting. But if not, start priming the surface of your piece using a rust-preventive primer to ensure your paint adheres to the metal. Opt for a white primer with light-colored paints and a dark primer for darker tones.
With a paint sprayer, spray evenly and slowly over the surface for consistent coverage. Avoid spraying too long in one area to prevent drips and unevenness. Follow any natural lines of the furniture. Prime all sides, including the back and underside. You can also use a roller and paintbrush, although spraying tends to be easier to apply and provides a smoother finish.
Wait the necessary dry time, then apply an additional one or two coats of primer. Sand the surface after your final coat of primer to gently smooth the surface before applying paint. Use a tack cloth to wipe off dust and debris.
6. Apply the Paint
It’s finally time to paint! Spray the paint in even coats on all sides of the furniture, spraying back and forth along the natural lines of the furniture. Hold the can 8 to 12 inches from the furniture to allow for a consistent spray without drips and overspray. Keep a chip brush or paintbrush nearby to even out any excess paint or drips. Let the paint fully dry before applying a second and optional third coat.
If you don't want to use a paint sprayer or canned spray paint, you can apply paint with a paintbrush and roller. Allow the final layer to fully cure before applying a sealant.
7. Add a Protective Seal
Seal your paint with a protective clear-coat spray to ensure your furniture remains durable and rust-free for as long as possible. Hold the can 8 to 12 inches away and spray in an even, back-and-forth motion. Follow the natural lines of the piece.
Check to make sure your sealant is appropriate for indoor or outdoor use. If it's an outdoor piece, aim for a sealant with UV protection to prevent fading. Allow the sealant to fully cure before moving or using the piece of furniture.
How to Use Unique Techniques to Paint Furniture
Each painting project varies depending on what you’re painting and the look you want to create. Learn some tips and tricks for painting furniture in these special circumstances.
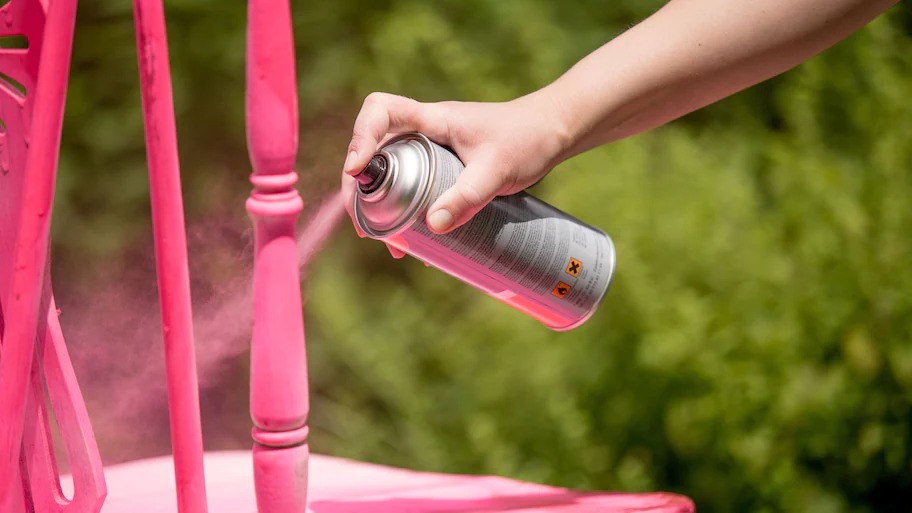
1. Spray Painting Furniture
Using spray paint is another way to paint wood furniture, plus it’s relatively inexpensive and widely available. Plus, spray paint works well for detailed or intricate pieces of furniture that would be difficult to use a paintbrush on.
Choose a spray paint with a satin finish, and be sure to work outside or in a well-ventilated area. You will still need to prep, sand, and prime, but the painting technique will differ.
Before applying, shake the can vigorously to ensure you have fully mixed the paint.
Spray the paint on in thin coats. Keep a paintbrush on standby to go over any splatter or drips before the spray paint dries.
Once all coats have been applied, use a spray paint sealant to preserve the life of your newly painted piece.
2. Painting Furniture With Chalk Paint
If you like the idea of painting a piece of furniture without the prep work, chalk paint is a great option. It is specifically designed to adhere to the surface without the sanding and priming steps.
Here’s how to chalk paint furniture:
Remove hardware and dissemble pieces, such as taking drawers out of a dresser or removing cabinet doors from a bathroom vanity.
Clean the furniture with a microfiber cloth and gentle all-purpose cleaner such as equal parts white vinegar and water to remove dust, grime, and build-up. Use as little water as possible to avoid moisture damage, especially on wood furniture.
Work in a well-ventilated area and place the furniture on a drop cloth to protect your floors. Stir the paint or shake the spray bottle.
Apply the paint evenly with back-and-forth motions with a sprayer, spray can, or paintbrush and roller. Let the layer dry.
Spray or paint on a second coat. Let it dry, and determine if you’d like to apply a third coat for full coverage.
Apply a protective coat of furniture wax to the surface. Cover the surface adequately to protect from damage and fading, but not so thick that there are visible smears.
Tips for How to Paint Furniture Black or White
While white and black paint are commonly used colors for revitalizing furniture, they can be tricky to use. Follow these tips and tricks for applying paint to furniture.
When using white paint, pay close attention to the cleaning stage, because stains and grime are more likely to show through white paint.
Spend extra time priming the furniture’s surface, especially if you are painting a darker piece of furniture white.
Seal black paint with a non-yellowing polycrylic or polyurethane protective clear coat.
Sand between coats and after primer to ensure each layer adheres well and looks smooth.
Take time to pick the right type of primers and paints for your surface to ensure beautiful, long-lasting results.
DIY vs. Hire a Pro
Painting furniture yourself can be a very rewarding DIY project. With the right tools, time, and patience, you can paint indoor and outdoor furniture with great results. Since the process takes time, some people prefer to hire a local professional furniture painter to handle the job for them. Most furniture painting experts charge between $40 and $60 per hour, but rates can go up to $100 per hour. Rates depend on the condition and size of your piece and the cost of living in your area. Professional painters have the skills and know-how to ensure your piece looks beautiful with maximum durability.
If you tackle the project yourself, you need cleaner, primer, and paint, along with any tools you don’t already have such as a sander or paint sprayer. Specific supplies costs depend on the size of your furniture and the type of primer and paint you choose.
Frequently Asked Questions
Chalk paint can be applied without sanding first. Keep in mind that while there are a lot of chalk paint color options available, there aren’t as many choices as latex or oil-based paint.
You can also learn how to paint furniture without sanding using a liquid deglosser, sometimes referred to as liquid sandpaper. This can remove any old paint, gloss, or varnish, without the need to manually sand. Apply the deglosser using a cloth, then wait for the chemical to penetrate through the surface. Once it soaks through, you should be able to wipe away the residue with a towel.
Sometimes you will need a stronger cleaning solution to thoroughly clean furniture before painting. It’s best to start with a mild solution to avoid damaging the surface, especially if it is an antique piece. If you need to use a stronger mixture, try a commercial cleaner or mineral spirits. Before applying any solution, do a test patch on an inconspicuous area so you don’t risk damaging the finish.
Depending on the piece, there are times when you can paint over painted furniture. Start by applying a high-adhesion primer so that the new topcoat will stick. However, if the paint is peeling or chipping, it’s best to sand it down, use a paint stripper, or try a deglosser to ensure your new paint will adhere.
Paint comes in a variety of finishes. In most cases, a satin or semi-gloss sheen is a safe bet because it’s easy to wipe down and clean, while hiding scuffs and scratches. However, if you’re looking for a statement piece, consider using a high-gloss sheen to bring drama and light into the space. Keep in mind, while visually striking, higher sheens are more likely to show imperfections.


- 6 Tips to Follow When Painting with Acrylics on Wood Furniture
- These Are the Best Types of Paint for Outdoor Furniture
- 10 Common Painting Mistakes Homeowners Should Avoid
- 11 Painting Tips and Techniques for Your Home Painting Project
- The Ultimate DIY Beginner’s Guide to Remodeling Furniture
- How to Prep a House for Exterior Painting in 8 Steps
- Essential Supplies to Paint a Room: What You Really Need
- How to Paint Hardwood Floors for the Best Results
- How To Make Paint Dry Smoother: 7 Tips
- 8 Secrets to Spray Painting Like a Pro


