Many scenarios can lead to bacteria and other contaminants in your well. Learn about how much it costs to shock a well so you can enjoy clean drinking water.
Talk about a high-pressure situation


Professional repairs for well pumps typically start at around $373, and hiring a pro will ensure a safe and efficient job.
Hiring a pro to increase water pressure from your well will avoid any accidental damage.
Incorrect pressure can cause serious problems, such as bursting pipes, damaging fixtures, or prematurely wearing out your pump.
Pros can adjust water pressure to perform better while staying within safety limits.
Using a well as your water source has several benefits, but it can also come with a common (and unpleasant) side effect: low water pressure. However, there are a few tricks you can try in order to boost your well’s water pressure without hiring a professional. Below, we’ll explain how to increase water pressure from a well for more enjoyable showers, easier dishwashing, and faster laundry cycles.
Wells provide lower water pressure than municipal water. In a municipal system, water pressure is around 60 pounds per square inch (psi). But in well systems, it ranges from 28 to 40 psi.
However, if your well water barely drips out of your faucets and fixtures, you may have an issue with your well system. Fixing it could be as simple as unclogging a pipe, or it might require you to replace the well pressure tank, change the well pump, or repair another component.
Sometimes, fixing a well’s low water pressure doesn’t cost anything. For example, the solution could be as simple as clearing out a blocked pipe or adjusting the pressure switch—both of which are approachable DIY tasks.
But when certain parts of your well system stop working, you’ll have to pay to replace them. The exact prices depend on the broken component and the amount of labor required to replace it. For example, a new well pressure tank costs between $300 and $700, but the cost of a well pump replacement ranges from $975 to $2,800.
Water dribbling out of your taps isn’t the only sign of low well water pressure. Here are some other indications:
Sputtering faucets
A pump that runs for long cycles
A pump that constantly turns on and off
Murky or odd-smelling water
In many cases, it’s possible to increase your well’s water pressure yourself with just a little elbow grease and some basic tools and supplies. Here are three methods to try before calling a professional.
Blocked pipes, faucets, and fixtures are common culprits of low water pressure in well systems. That’s because well water is more likely to have sediment, minerals, and hard water buildup—all of which can clog your plumbing system. If you’re struggling with low water pressure, check for these issues first.
Look at each faucet’s aerator—the piece of mesh in the tap. Use a wrench to pull it off and inspect it for chalky deposits, which indicate mineral buildup inside your pipes. You can try to clear it yourself with a drain snake and cleaning solution, or you can call a plumber to do a deeper clean of the entire well plumbing system.

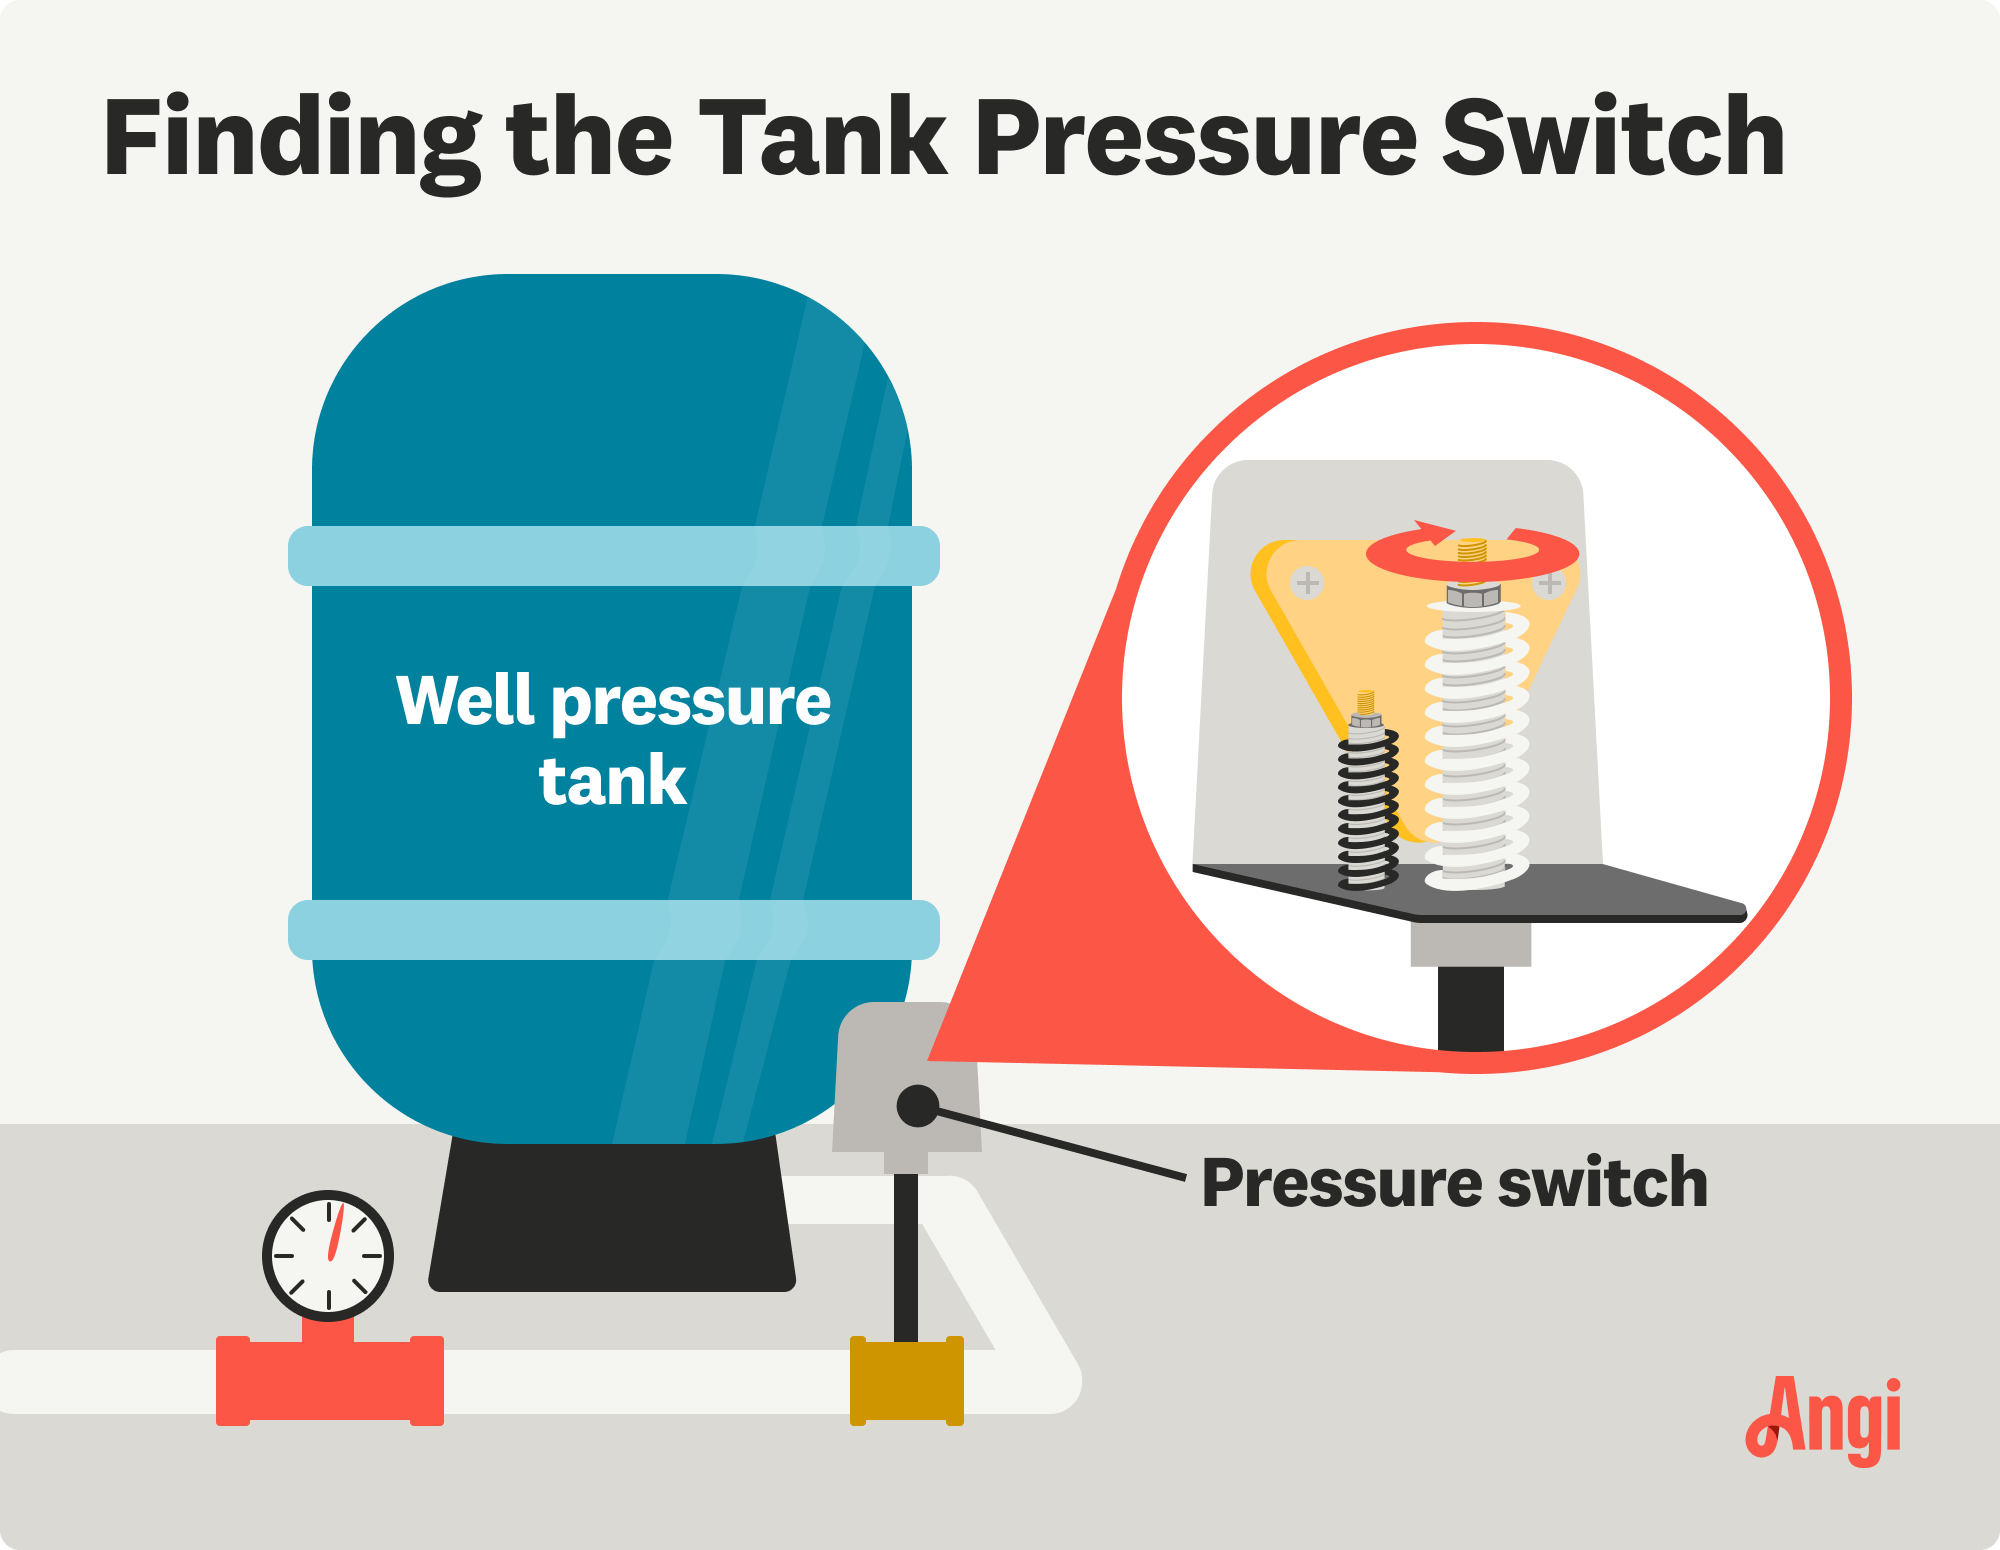
Pressure switches have three settings: 20/40, 30/50, and 40/60 psi. The cut-on pressure is the lower of the two numbers, and it represents the psi at which the pump will turn on. The cut-off pressure, on the other hand, is the psi at which the pump shuts off. By changing the pressure switch setting, you may be able to increase your well’s water pressure.
Here’s how to adjust the pressure switch on your well pump:
Switch off the power supply to your well pump.
Remove the pressure switch cover and find the air valve at the top of the tank.
Check the current psi with a tire pressure gauge. It should be 2 to 3 psi less than the cut-on pressure.
With a wrench or screwdriver, turn the large center nut clockwise to raise both the cut-on and cut-off pressure. Don’t adjust it above 40/60 psi.
To create consistent water pressure throughout your home, you can hire a pro to install a constant pressure system. These systems start to increase water pressure when it drops by more than 2 psi—much lower than the 20 psi threshold of traditional well pressure tanks.
Constant pressure systems come in a variety of designs. If you aren’t sure which one is best for your home, a plumber or well professional can point you in the right direction.
There are certain steps you can take to prevent low water pressure issues (and the pricey repairs that can accompany them). These include:
Installing a water softener to banish mineral-rich hard water from building up inside your pipes.
Inspecting your faucets’ aerators regularly and removing any chalky residue.
Replacing narrow pipes with wider ones, which are better at providing high water pressure. Your pipes should be 1/2 to 1 inch in diameter.
Book annual plumbing inspections and well inspections to make sure your system is in good condition and to identify problems early.
You may be able to improve your well’s water pressure on your own, depending on what’s causing it. For example, adjusting a water pressure tank switch and clearing blocked pipes are straightforward tasks that don’t require any specialized tools or equipment.
If these tips don’t fix your low-pressure problem, bring in a professional. A local well repair pro can pinpoint the cause of your low water pressure and determine the right solution to increase it without damaging your well or plumbing system.
From average costs to expert advice, get all the answers you need to get your job done.

Many scenarios can lead to bacteria and other contaminants in your well. Learn about how much it costs to shock a well so you can enjoy clean drinking water.

The cost of a well casing replacement depends on materials, well depth, and labor. This guide will help you find the right casing for your well and budget.

Well pumps require electricity to operate and can affect your monthly bill. Learn about the factors that impact the average cost to run a well pump per month.

Does a sump pump need a dedicated circuit? Find out the wiring and electrical requirements for installing a sump pump in your home.

Are you buying a home or looking to install new utilities, including a water line? Compare city water versus well water to find out which is right for you.

What’s the difference between utility pumps versus sump pumps? While they’re both useful for moving water, utility pumps are more versatile. Here’s how.