

Drywall texture can create an attractive finish and add dimension to your home’s walls. This guide breaks down the factors that influence the cost to texture drywall.
Sanding drywall mud properly is a challenging—but rewarding—skill to learn


This project requires a lot of experience, so we don’t recommend DIYing it. Hire a pro with the special skills and tools necessary to complete the job safely.
Hanging the drywall is often the easiest part of a drywall project. Learning how to sand drywall and drywall mud is often far more challenging. Doing the mudding job well takes plenty of skill and practice. Even if you master this part of the job, though, you can ruin it pretty quickly with a haphazard sanding job. With these six steps, learn how to sand drywall and ensure a smooth, durable finish.
Wait for your drywall mud to completely dry because sanding wet mud can result in gouging and ruining the mudding job, forcing you to start over. How long does drywall mud take to dry? Expect to wait 24 hours to allow everything to dry properly.
One clarification: When people talk about sanding drywall, they’re talking about sanding the drywall mud, not the paper covering on the sheet of drywall itself. By sanding, you remove slightly uneven spots and bumps in the mud, creating a flat wall that’s ready for paint. With proper sanding, you can achieve a level 4 drywall finish.
Drywall dust is infamous for getting everywhere in your home and is very time-consuming to clean. Secure plastic sheeting over all entrances to the room with painter’s tape and close all vents to limit dust moving through the air into other parts of your home.
Lay a drop cloth or plastic sheeting on the floor to protect it and reduce cleanup time. Cover your furniture with plastic sheeting, too.

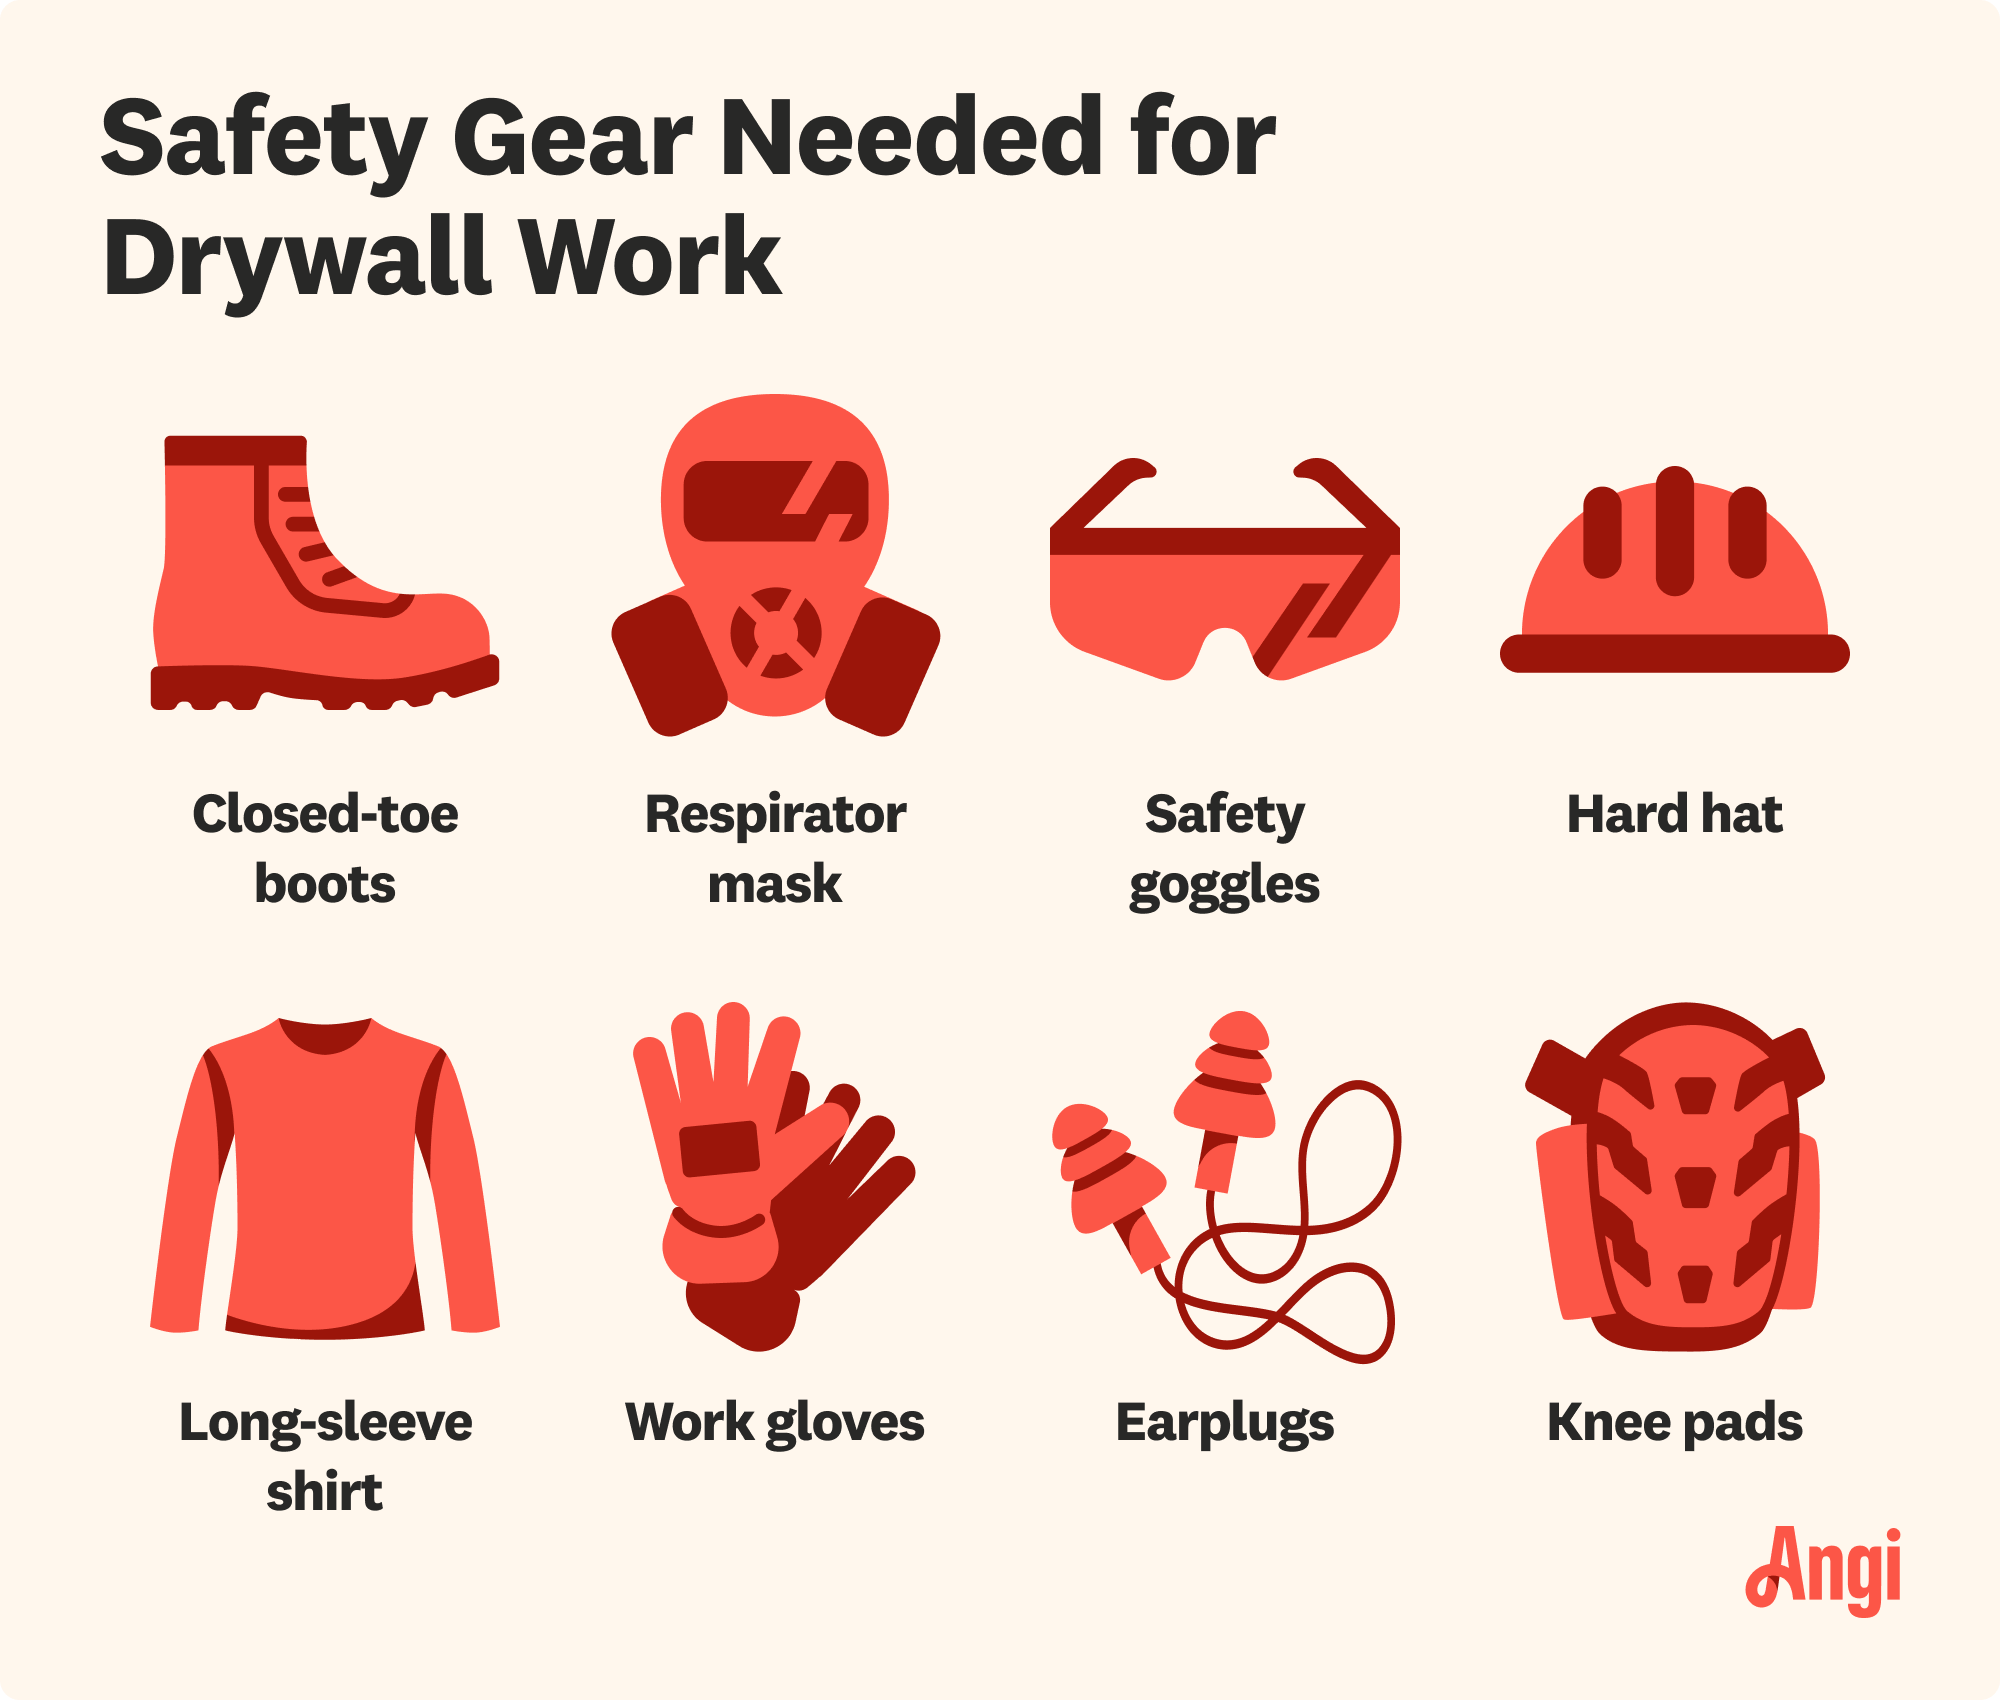
Always wear protective clothing, including safety goggles, work gloves, and a sanding respirator, when sanding. Sanding drywall puts silica dust into the air, which can cause lung irritation and shortness of breath (or worse with prolonged exposure). Wearing a sanding mask is absolutely critical.

With a drywall sponge, wet sand your drywall to smooth out ridges and gouges. Soak your drywall sponge in water and wring out the excess. Gently rub the sponge in a circular motion on the drywall mud until you have a relatively flat surface, including the edges. If the sponge dries out, rewet it and squeeze out the excess water.
Let everything dry to see what imperfections remain. Repeat the wet sanding process if necessary, or move on to dry sanding.
Wet sanding significantly reduces the dust in the air, and a sponge is the best tool to use in corners because sandpaper can cause gouges.

Place your sandpaper on a pole sander for high spots and on a sanding block for middle and low parts of the wall. Use 120-grit sandpaper when the mud is roughest (for instance, if you skipped the wet sanding step). Then, switch to 150-grit sandpaper for smoothing moderate roughness. Use 220-grit sandpaper for fine sanding and final touches.
Here are some tips for sanding drywall:
Apply light pressure and work in a push-pull motion in an overlapping pattern with even pressure.
Feather the edges to create smooth seams and a polished finish.
Use a very light touch across screw holes and seam tape.
Use fine-grit sandpaper to flatten areas with too much mud or where the mud has gouges.
Use a sandpaper block when finishing areas around electrical outlets and switch plates.
Vacuum the walls from the ceiling to the floor with a shop vac to remove drywall dust. Carefully remove the drop cloths and plastic sheeting. Vacuum the floors until the room is dust-free. Gently wipe down the walls with a slightly damp cloth to remove lingering dust. Once your walls are completely dry, they’re ready for priming and painting.
You may encounter some issues when attempting to sand drywall, such as:
Gouges: If you sand with too much force, you can gouge the mud, leaving it uneven.
Exposed tape: Removing too much mud through sanding may expose the drywall tape.
Low light: You may need to bring in additional lighting to be able to see any uneven spots in the mud, especially if working in new construction or remodeling areas where you don’t have electrical power.
Wet mud: If you try to sand mud that’s still wet, you will create a huge mess. Wait for it to dry.
Damaged paper: Drywall sheets have a paper covering that protects the drywall. What is drywall made of? It consists primarily of crushed gypsum with various additives. Sanding too hard could tear the paper and expose the gypsum, causing significant longevity issues.
Not sanding after priming: After you sand and prime the drywall, the paint may reveal areas with slight imperfections. After everything dries, you can sand again and then re-prime these individual areas.
Sloppily applied mud: Taking your time when applying each coat of drywall mud can save you time on sanding. If the mud is pretty smooth when it dries, you won’t need to sand as much as if you sloppily applied the mud.
Electric sander: Using an electric sander on drywall mud is extremely challenging, especially for a new DIYer. The pressure often removes too much mud, damages the drywall tape, or damages the drywall itself. Leave electric sanders to the pros.
By learning how to install drywall and sand drywall mud yourself, you are going to save quite a bit of money. Labor for drywall professionals can cost up to $100 per hour.
However, because sanding is such a challenging job to do well, it is going to take a novice significantly longer to do the job than a pro. If you make a mistake and sand too hard, you’ll have to start over with mudding and taping. In the long run, it may be cheaper and less frustrating to hire a local drywall contractor to do the work right the first time.
Crystalline silica is a toxic dust that's often generated during drywall installation, which can cause respiratory issues if exposed over time. A professional drywall installation company has the right tools to protect your home and ensure safe air quality after your project is completed.

There’s nothing wrong with learning how to sand drywall yourself to save some money, though. Just understand that it takes a lot of practice and patience. At the very least, reach out to a local drywall installer for a cost estimate, so you can weigh whether doing the job yourself is worth it.
From average costs to expert advice, get all the answers you need to get your job done.
Drywall texture can create an attractive finish and add dimension to your home’s walls. This guide breaks down the factors that influence the cost to texture drywall.

Pre-drywall inspection costs vary depending on the home size, build complexity, and reporting you receive. Estimate your budget with this cost guide.

Installing drywall is the most common way to finish your home’s interior. Use this drywall installation cost guide to see what your project is likely to cost.

Ceiling cracks along drywall seams come from improper installation, leaks, settling, and foundation issues. Read this to learn why you have ceiling cracks.

You're down to the nitty-gritty of drywall supplies and now you need to know if paper vs mesh drywall tape is the way to go. Here's how to choose.
You should not drywall over tile because it won’t attach securely. Plus, there’s a risk of moisture getting trapped, leading to mold or other damage.