
Discover flooded basement cleanup cost estimates, key price factors, and tips to save money. Learn what impacts your total cost and how to budget for cleanup.
Keep your basement a flood-free zone

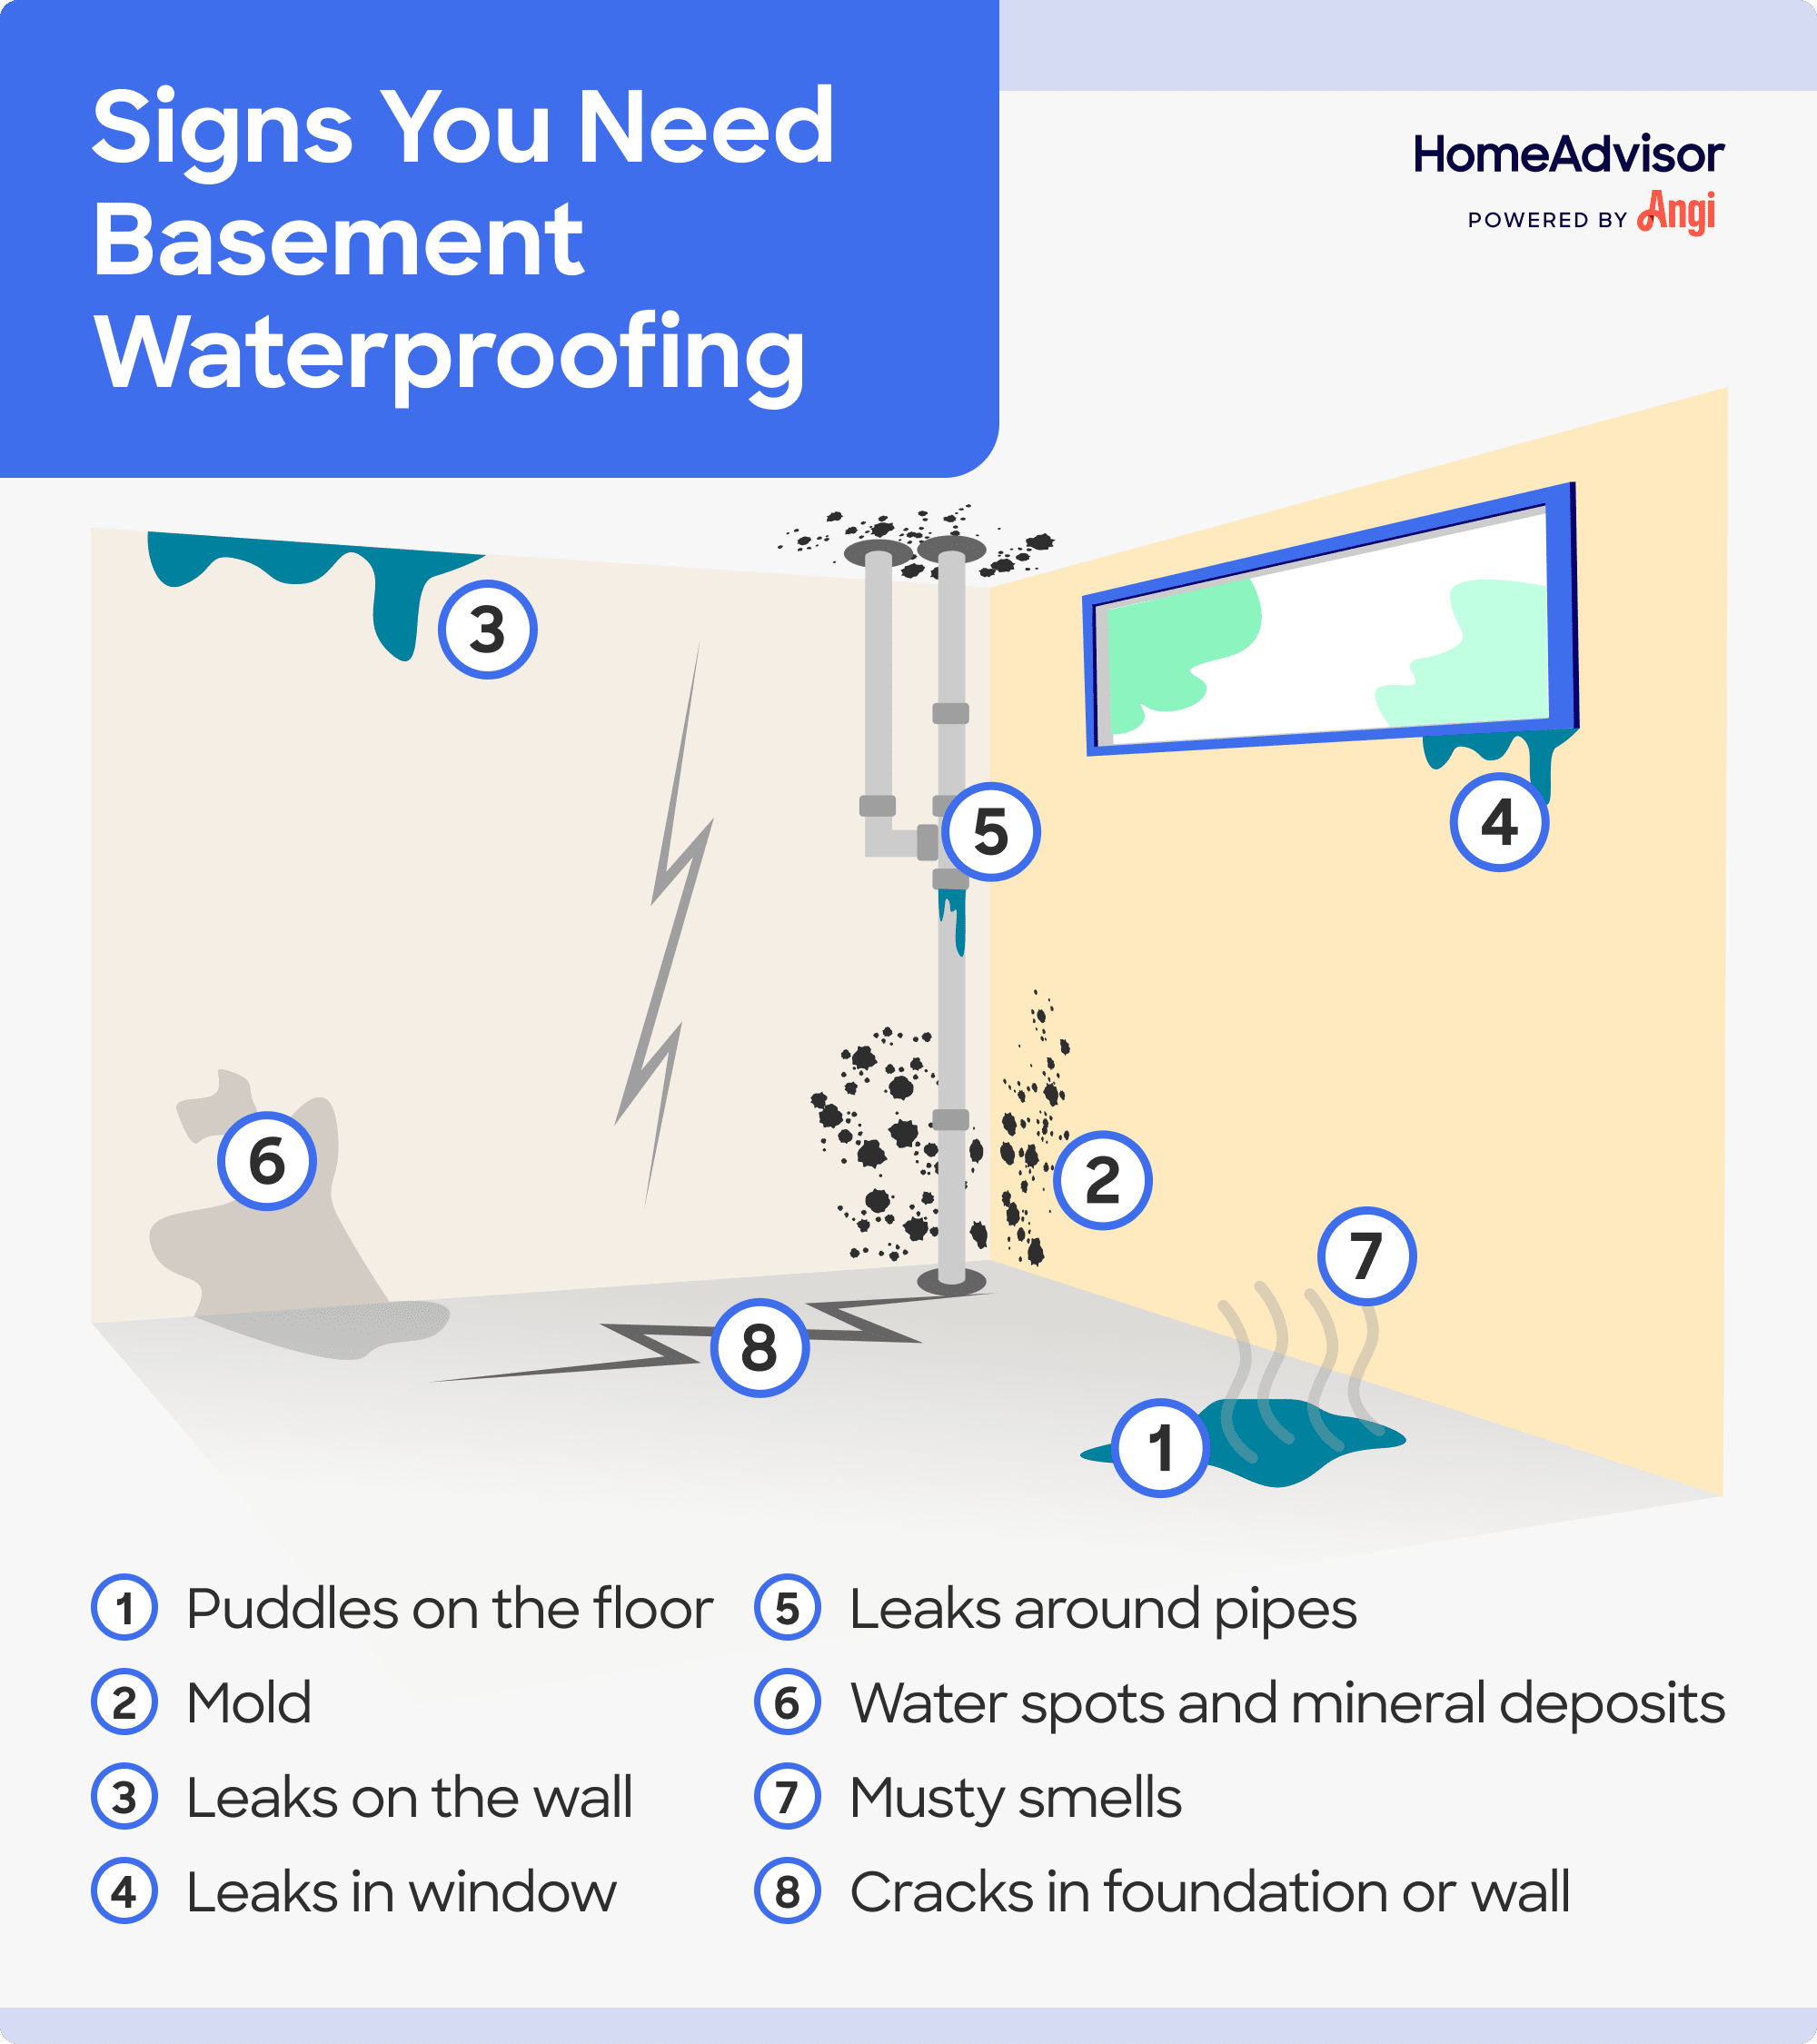
Basement flooding occurs when groundwater overwhelms your foundation, clogged gutters overflow, or sump pumps fail during heavy rain or rapid snowmelt.
Turn off your electricity and gas immediately before entering a flooded basement to prevent electrical shock, fires, or dangerous gas buildup from extinguished pilot lights.
Remove standing water quickly using pumps or wet-dry vacuums, then dry the space completely with fans and dehumidifiers to prevent mold growth and structural damage.
Hiring a local water damage restoration professional provides expert help with safe water removal, thorough drying, mold prevention, and identifying the root cause of flooding.
Here are 11 things you need to do when your basement floods so you can get back to living in a clean, dry home.
Before you do anything else, keep yourself and your family safe by turning off the gas and electricity before inspecting the basement. Rising floodwaters can extinguish pilot lights on water heaters and other appliances, allowing dangerous natural gas to build up, which could cause a fire or explosion. Electricity, when combined with floodwaters, poses a serious risk of electrical shock, which could be dangerous or even fatal.
Grab a flashlight, put on rubber boots and gloves, and get your phone or digital camera. Also, watch your step, especially if the water’s deep.
If you see any sparking electricity near standing water, leave the area immediately and call an electrician. Also, never stand in flood water while your home’s electricity is still on. Additionally, if you suspect that natural gas might have already begun leaking, leave your home immediately and call 911.
Move quickly to protect your valuables. Water can cause lasting damage to photos, paperwork, and family heirlooms, so move the irreplaceable items first.
Wet cardboard boxes disintegrate quickly, so don’t bother to save them. And beware of wet carpeting, rugs, soft furnishings, or clothes—they’re especially susceptible to mold and mildew from flooded basements. Move and dry what you can—the rest you’ll tackle in a later step.

Use your phone to take photos and videos to document the damage. If you choose to file a homeowners insurance claim later, your insurance adjuster may want to see pics, so make sure to capture everything clearly: floors, walls, windows, appliances, and storage, for starters.
Speaking of homeowners insurance, basement floods aren’t always covered by a homeowners policy, unfortunately. While policies often cover water damage, such as from a broken pipe, floods from groundwater may not be covered unless you have a separate flood insurance policy (and even those may not cover below-grade spaces).
Call your insurance company to get the specifics on your policy and to start the claim process if it applies. Even if you didn’t buy a house in a flood zone, knowing your flood coverage is important.
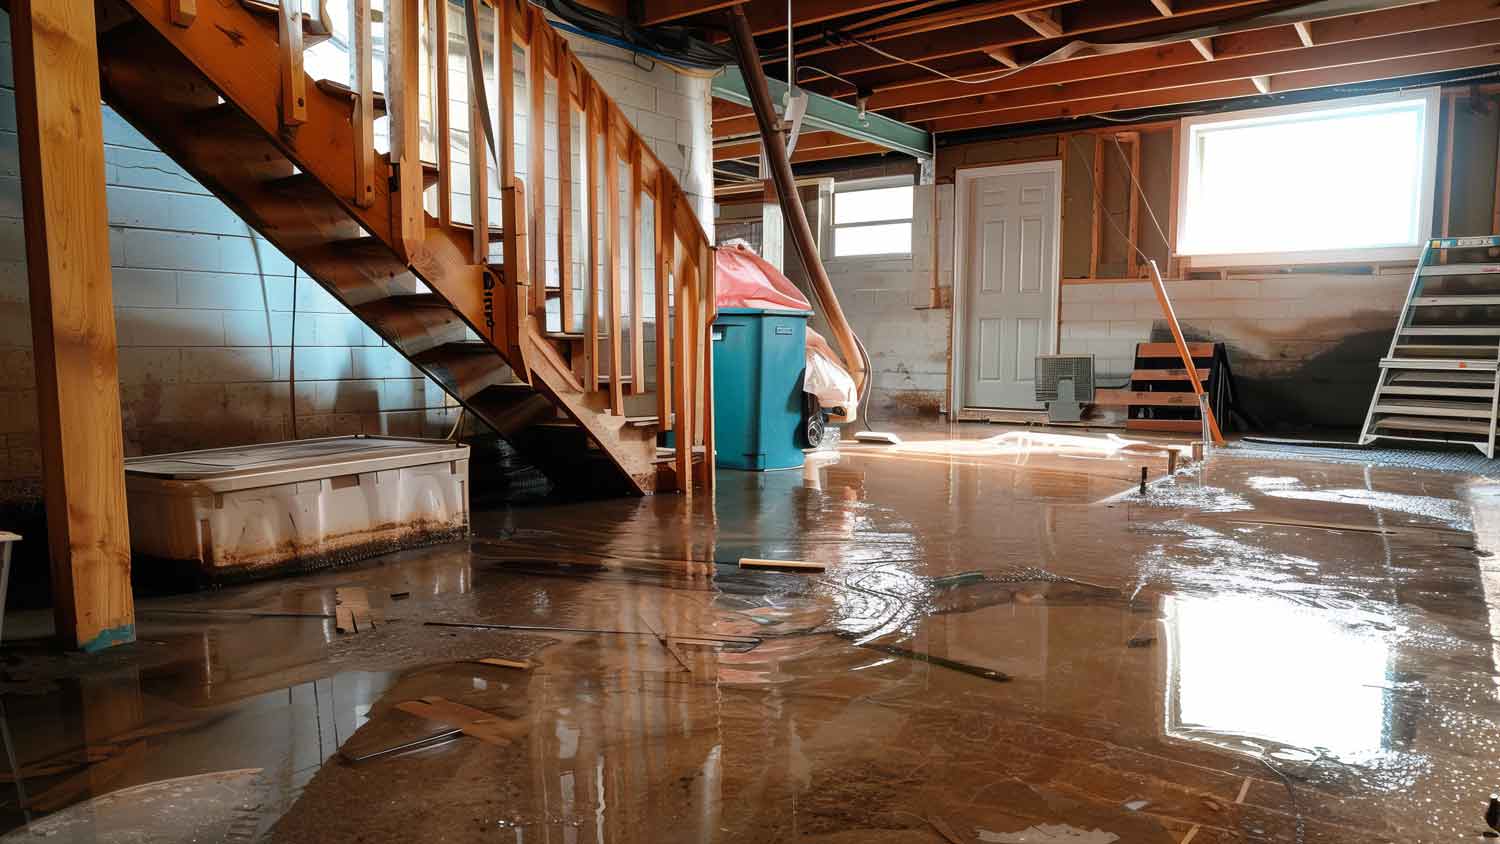
With the prep work out of the way, it’s time to bail—literally. How you remove the standing water depends on how much there is. If you have a sump pump that failed, you may consider renting a gas-powered basement pump to move large amounts of water quickly. You can also start removing water with a wet-dry vac or even just a mop and towels. For tough jobs or heavy damage, consider calling on a local water damage restoration company for help.
As you remove the water, evaluate what remains. You may need to chuck flooring, carpeting, or even drywall that has been soaked past the point of saving. While it might pain you to throw these things away, it’s the best way to outsmart the type of fungus that thrives on wet materials and can seriously negatively impact you and your family’s health.
With the bulk of the water gone and wet items removed, it’s turbo time. Set up fans (preferably several) to get as much airflow as possible moving through the basement to evaporate the remaining moisture. Add a dehumidifier if you can—it can address any remaining humidity and prevent mold from moving in. Check the filter and empty the drainage pan frequently as you continue the drying process.

When everything is dry, clean and sanitize the floors and walls. You can make a sanitizing solution with 1 cup of bleach to 1 gallon of water. Put on a face mask and scrub thoroughly, making sure you’re still wearing rubber gloves, too. Ventilate the room so that the chlorine vapors can dissipate. The bleach should help prevent mold from growing.
You might also want to add an air purifier with a HEPA filter to the basement to remove mold, mildew, and bacteria from the air so that it doesn’t circulate and land on your surfaces.
Before you begin putting your belongings back in place, check your drains for clogs. Remove the drain screen and clean it thoroughly. If the flood caused a clog, you may need to snake the drain. Also, check your French drains, if applicable—basement French drains last several decades but not forever. If they’re older than 30 or 40 years, you may need to replace them.
If faulty drains contributed to your basement flooding, plan to repair them immediately before the next big storm sweeps through.
Now that your basement is clean, clear, and under control, you can put your belongings back. This is a good time to reconsider what and how you store your belongings in the basement. Items like priceless heirlooms, family photo albums, and seasonal clothing might fare better in a closet, safe deposit box, or climate-controlled storage unit rather than in your basement.
For what does stay, try elevating your belongings off the floor using concrete blocks, bricks, or shelving. Plastic tote bins will survive another flood event better than cardboard boxes. (And maybe it’s time to see whether those old sweaters really do spark joy or if it’s finally time to give them the old heave-ho.)

Now that the storm has passed and you’ve cleaned up, you’re probably not eager to experience another flood anytime soon. This is the time to address the root problem that led to the flooding and take steps to prevent it from happening again.
If you can do so safely, grab a sturdy ladder and check your gutters. Clogged and overloaded gutters won’t drain rainwater properly and can lead to excess water around your foundation. Clear them out if necessary (or call in a pro to help). Also check the downspouts to be sure they’re connected properly, running clear, and not blocked at the end. Downspouts should direct rainwater at least 5 feet away from the foundation.
You’ll also want to make sure that the soil surrounding the house is graded away from the home properly to let groundwater drain freely away from the home instead of soaking your foundation. Lastly, take a look at your window wells and the foundation itself to make sure they’re in good condition—there should be no cracks, leaks, or bowing.
If you spot a problem, take swift action to prevent it from getting worse. Repairs and regular maintenance will go a long way toward making sure the next storm stays outside of your home. Consider installing a storm door and storm windows as well, to provide more protection.
If everything is solid and secure, the last thing to check is your sump pump. Replace it if necessary—most sump pumps only have a lifespan of five to seven years, so it could be time. You might even consider a backup sump pump (or two) if flooding has been a real problem in your home.
And while you have your home insurance paperwork out, call and ask whether you can add a sump pump failure rider. This addendum to your homeowners insurance policy could help cover your damages if another flood happens in the future.
Water damage can happen in many areas, not just the bathroom. Flooring is most commonly affected by water damage. Walls, windows, ceiling, and roofs are all also typical locations to find water damage.
Restoring your basement to its pre-flood state can be quite an effort. While you can do some water removal and restoration yourself, it can be very time-consuming and expensive. If you do it incorrectly, you can end up with mold growth down the line, which can do further damage. In most cases, especially if the flooding is severe, it’s worth hiring a water damage restoration pro to do the job.
When it comes to preventing future flooding with waterproofing, waterproofing requires advanced expertise and can become a comprehensive project. It’s best to hire a waterproofing pro to get the job done right and receive lasting waterproofing results. To make the best use of your budget, speak with multiple pros and compare their quotes, after-service options, financing possibilities, and company credentials to find the best match for your needs.
Positive experience. As previously stated, the replacement/repair could not be completed (no fault of the plumbing tech) b/c misinformation was rec?d by property management maintenance. Thanks to the plumbing tech for your efforts. Appreciate you!
 The Waterworks
Carpet repair done well. Scheduling was easy. Showed up on time.
As usual with ECO, tech Jordan was outstanding, very professional, very knowledgeable, and very thorough with repairs made to tankless water heaters. Very highly recommend ECO!!!
 Eco Plumbers, Electricians, and HVAC Technicians
I would recommend this company to anyone! He showed up on time, was friendly, completed a very difficult repair on our dryer vent cover, was responsive, and pricing was extremely fair and competitive. I would have him back to do any of our repairs or cleanings without hesitation!
Everything from initial contact to completion was absolutely top notch. We contacted the business during off hours to leave a message, and the owner still reached out to feel out the issue within minutes. We were scheduled and repaired within 48 hours. I cannot say enough about the...
 Supreme brick & chimney
Ace Fireplace Services came to the rescue for my chimney repair. They were quick to pinpoint the issue and worked their magic to fix it. My chimney is now in excellent shape, and I'm a satisfied customer.
 Ace Fireplace Services
On Sunday 2/26 I requested quotes via Angi from 4 refrigerator repair businesses. Northwest Appliance responded to me Monday morning (2/27) and my refrigerator was repaired by noon the same day. Great communication, they did everything they said they would. The technician had the parts on...
When we had the winter freeze, I called Quantum Waterworks Waterline & Drain Cleaning Services and within 1 hour I received an e-mail and he sent someone out the next day and he was on time, he was nice and did the job quickly and cleaned up after himself. We had a leak in our kitchen from...
On time, clean and finished fast. Windows seem sturdy and the finish is good. Caulking was done with no smudges. Would recommend.
Did a great job replacing the ice maker and water regulator on my refrigerator. He was quick and thorough, very friendly and professional. If I needed a heart transplant I'd want him to do it!!!
From average costs to expert advice, get all the answers you need to get your job done.
Discover flooded basement cleanup cost estimates, key price factors, and tips to save money. Learn what impacts your total cost and how to budget for cleanup.

Taking protective measures and reacting calmly and quickly are the best ways to reduce water damage and avoid electrical hazards in flooded basements.

Even small floods can wreak havoc outside and inside your home. Learn what damage a flood can cause, how to prevent the worst of it, and what to do after flooding.
A flooded basement can lead to lasting structural issues in your home. Discover what causes basement flooding and how to address the issue.

Even when you've properly installed your sump pump, flooded basements are not uncommon. Here's why you could still get into hot water.
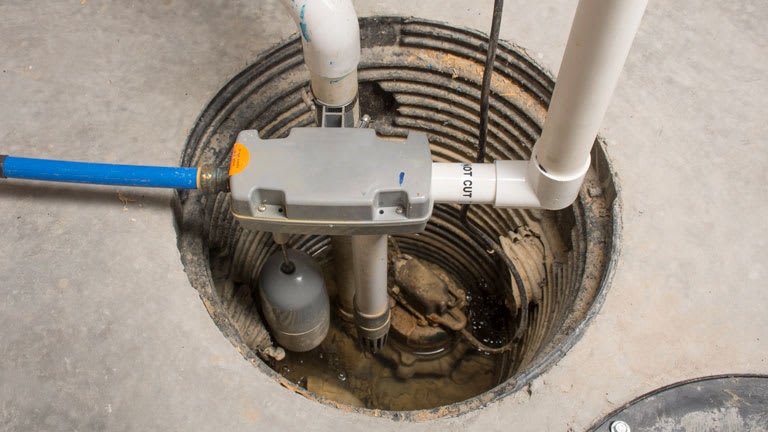
A sump pump is a must-have if your basement (or crawlspace) tends to flood—it will drain excess water and save your property from damage. Learn more about the different types of sump pumps and how they work to prevent flooding.