
.jpg?impolicy=leadImage)
This guide shows you what you can expect for garage door roller replacement cost if your rollers are sticking or screeching.
Restore your own door when your springs have sprung


While hiring a pro to replace garage door springs costs between $150 and $350, it’s the safest and fastest way to get the job done.
Garage door springs are under extreme tension and can cause serious injury if handled incorrectly, making this a risky DIY task.
A local garage door installer brings the tools and expertise needed to complete the job safely, which is especially important if you’re unfamiliar with spring mechanisms.
Your garage door is a heavy beast, weighing in around 100 to 300-plus pounds. Without springs to offset the weight of the door, opening your garage would require a great feat of strength—and closing it would put life, limb, and property at risk every time. Although replacing garage door springs isn’t particularly complicated, it can be very dangerous if you don’t follow the safety precautions and perform the replacement steps in the proper order. Here’s how to replace a garage door spring—or find a pro for it.
When dealing with heavy garage doors, it's crucial to regularly check and maintain the lifting mechanisms for safe and smooth operation.

Thousands of opening and closing cycles take a toll on your garage door springs, and eventually, they’ll need to be replaced. If you notice any of the following signs of impending garage door failure—or one of your springs breaks—it may be time to swap them out with a fresh pair:
One or both springs are broken or bent out of shape
The door is harder to open or won’t open all the way
The door won’t open at all, even after pulling the emergency release
The door suddenly slams shut
The door opens and closes crookedly
The door opener makes strained noises
A gunshot-like noise comes from the garage—a sure sign of a broken spring
The two types of springs most commonly used for the average-size garage are extension springs, which stretch and compress, and torsion springs, which wind and unwind.
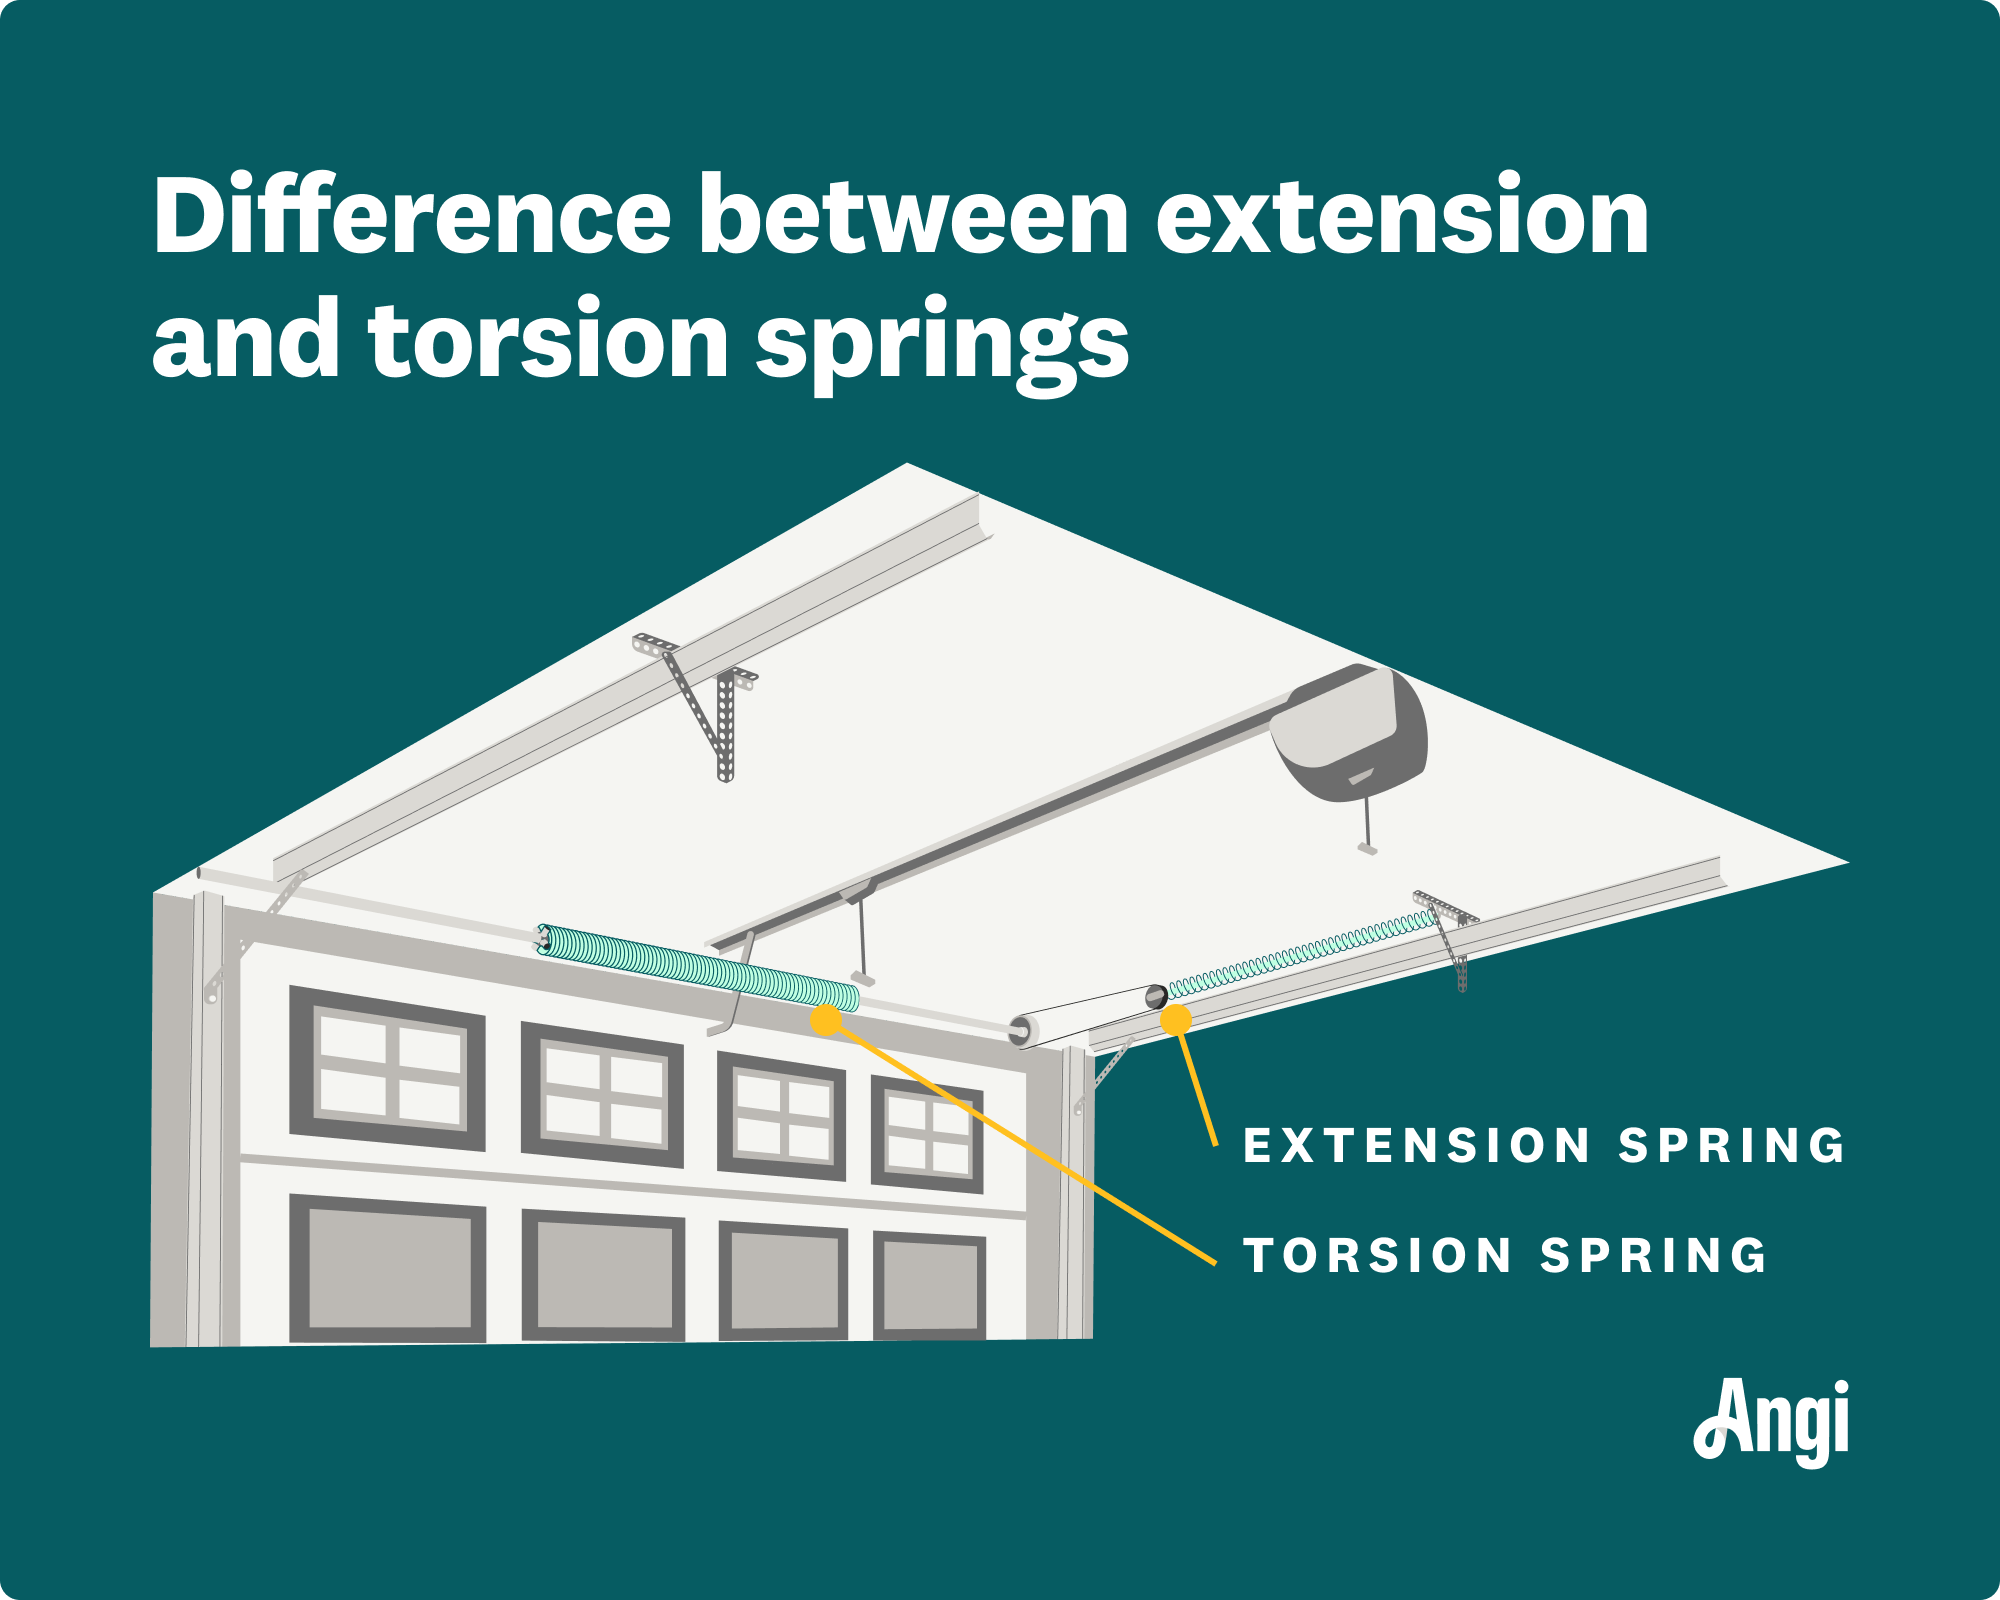
Extension springs are long, lightweight, and installed above and parallel to the horizontal door tracks on each side of the door. They work by expanding and contracting to counterbalance the weight of the garage door.
Modern garage doors with extension springs include a safety cable in addition to the lift cable. The safety cable passes through the center of the spring and is anchored on each end to track brackets. If a spring breaks, the safety cable prevents it from flying amok and causing property damage or bodily harm. If your garage door doesn’t have safety cables, consider installing them while you’re replacing your springs.
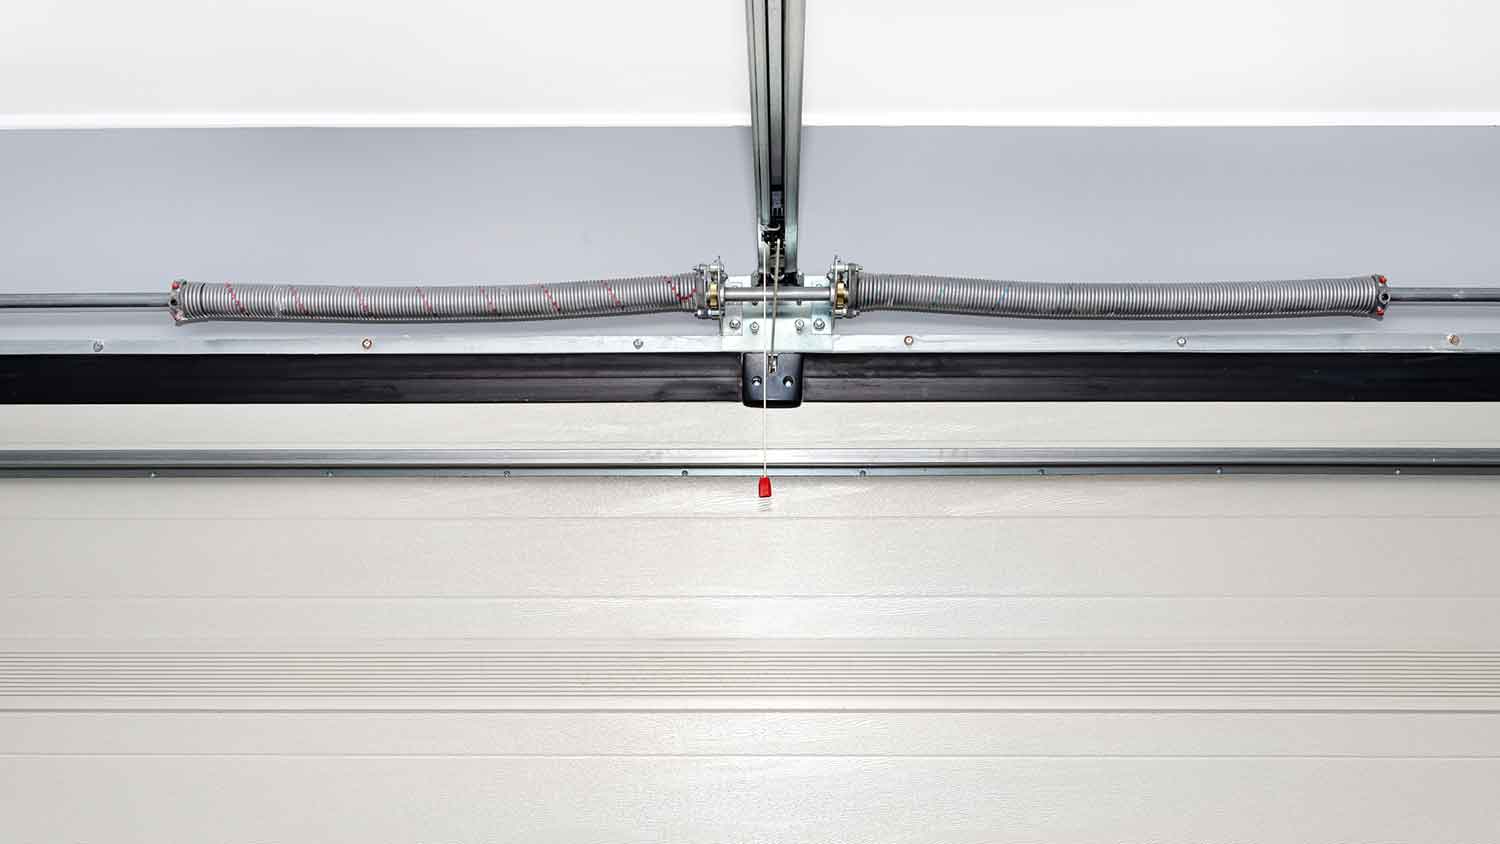
Most commonly used with heavier residential and commercial garage doors, torsion springs are mounted around a metal shaft, known as a torsion rod, that’s installed on the wall directly above the door and runs parallel to it. Set screws secure the springs to the torsion rod so that when the rod rotates, the springs either wind or unwind, off-setting the weight of the door as it opens and closes.
Gather your tools and materials, glove up, slide on your safety goggles, and follow these steps to replace your extension springs or standard torsion springs.

Extension springs are generally sold in pairs and come in three types:
Open-looped extension springs: The easiest type of extension spring to replace, open-looped springs don’t require you to open the eyebolt or disassemble the pulley.
Double-looped extension springs: Stronger than open-looped springs, double-looped garage door springs have two coils at each end of the spring, making them stronger—but a little harder to replace.
Clipped-end extension springs: The most durable type of extension springs, clipped-end springs are best for garage doors that weigh 200 pounds or more.
All types of extension springs have models for both 7- and 8-foot-high doors, and they’re color-coded based on the weight of the door. Unless they’re very old, your existing extension springs are likely painted on both ends with the appropriate color.
To choose the right replacement spring, know the height and weight of your garage door and what type of springs are currently installed.
Before you begin, fully open the garage door and securely attach a C-clamp to the door track on both sides to brace it open. Alternatively, you can prop the door open with long two-by-fours or similar. Unplug the garage door opener to prevent accidental activation while you’re working.
Locate the side of the spring that’s attached to the bracket on the back of the door track, furthest from the door. Unbolt the spring from the bracket.
Locate the end of the lift cable that’s attached to the door track, just above the opening of the door. Detach the spring from the moveable pulley, and unthread the lift cable from the pulley.
Disconnect and remove the safety cable that runs through the spring, then unhook and remove the old spring.
Repeat the first three steps for the spring on the other side.
Thread the safety cable through the first new spring, and attach the ends of the cable to the brackets. Attach the end of the new spring to the door track.
Attach the other end of the new spring to the moveable pulley. Thread the lift cable from the bracket attached to the door up and over the stationery pulley, loop it through the moveable pulley, and attach it to the track bracket.
Repeat Steps 4 and 5 for the spring on the other side.
Spray some garage door lubricant on the springs to help prevent them from rusting.
Remove the C-clamps or lumber holding the door open. Plug in the garage door opener, and push the button to test your work. Since the new springs are surely springier than the old ones, you may need to adjust the lift power of the opener.
Garage door torsion springs come in three general types: Standard, EZ-Set, and TorqueMaster. Standard torsion springs are the most common for residential garage doors, and they’re the ones we’re discussing here. Standard torsion springs feature a winding cone on the far end and require winding bars to wind and unwind.
To choose the right replacement torsion springs, measure the old springs—but avoid touching them with your hands or the measuring tape. You’ll need three measurements:
Length: With the garage door fully closed, measure the length of the spring from the first coil to the last—don’t include the winding cones at the end of the springs.
Inside diameter: The inside diameter may be indicated on the stationary cone on the end of the spring that’s bolted to the center bracket above the door. Otherwise, you’ll need to take the measurement after you remove the springs from the torsion rod.
Wire size: Measure the length of 10 and 20 coils to the nearest 1/16th of an inch. Write down these measurements to compare with a universal sizing chart you’ll find when you order the new springs.
Close the garage door and securely attach the C-clamps to the garage door tracks on both sides of the door, just above one of the lower rollers on the track, to lock it closed. Unplug the garage door opener to prevent accidental activation while you’re working.
To avoid serious injury if something goes awry, stand off to the side of the springs while you unwind them. Before you begin, make sure you have everything you need for this task:
A socket or adjustable wrench
Two torsion spring winding bars
Locking pliers
A metal file
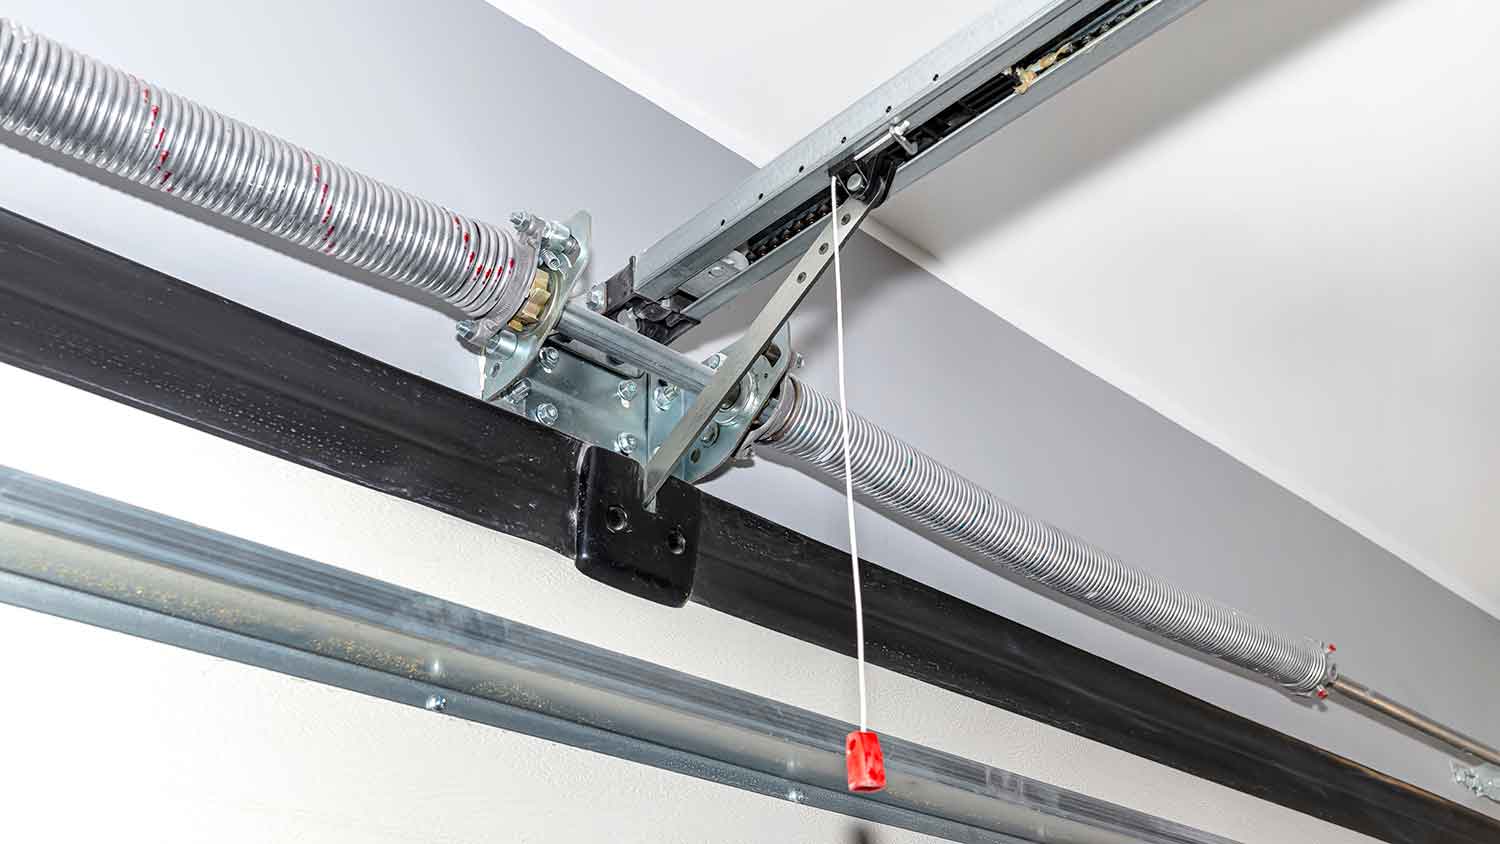
First, locate the winding cone at the end of the first spring. The winding cone is fitted with two set screws and two lug fittings, one above the other. Firmly insert the end of the first winding bar into the bottom lug fitting, and hold it tightly while you loosen the two set screws to release the spring from the bar.
Keep holding the first winding bar as you firmly insert the second winding bar into the top lug fitting. With a firm grip on the second winding bar, remove the first winding bar from the bottom lug fitting, and pull the second winding bar downward one-quarter of a turn until it’s resting against the garage door.
Insert the first winding bar into the lug fitting that’s now on top, and hold it firmly as you remove the bottom winding bar. Pull down the top winding bar one-quarter of a turn until it rests against the door. Repeat this sequence of alternating the winding bars and making downward quarter-turns until the tension of the spring is fully released, around 30 to 35 times.
Repeat Step 1 for the second spring.
Remove the bolts from the center mounting bracket that connects the torsion springs, and slide each spring along the torsion bar toward the end.
Loosen the set screws that secure each cable drum to the torsion bar. Remove the cable from the drum, and slide the drum a few inches toward the center of the torsion bar.
To remove the first spring, slide the torsion bar out of its mounting bracket far enough to enable you to remove the cable drum and slide the old spring off the torsion bar. File down any bumps on the bar that prevent the springs from sliding.
Slide the new spring onto the torsion bar, followed by the cable drum, then slide the torsion bar back into the bracket.
Repeat Step 4 to replace the spring on the other side.
Slide the new springs to the center of the torsion bar, line up the bolt plates, and reinstall the bolts that secure them together.
Slide the end of each lift cable into the notch on the drum, make sure the cable is situated in its channel, and slide the drum against the end bracket. Reinsert the first set screw, tighten it until you feel it make contact with the torsion bar, then give it another half-turn. Repeat with the second screw, then give the first and then the second screw a last quarter-turn.
Rotate the drum toward you so the cable is taut, then clamp a set of vice grips on the torsion bar so the handles rest against the ceiling or wall to prevent the bar from moving while you complete the installation.
As you wind the new springs, position yourself again so you’re off to the side of the springs.
Start with the spring on the left side. Insert the winding bar into the lowest lug hole, and give it a quarter-turn upward. Hold the winding bar firmly, insert the second winding bar into the lug hole beneath, remove the top bar, and give it a quarter-turn upward. For a 7-foot-high door, repeat this sequence 29 more times for a total of 31 quarter-turns. For an 8-foot door, repeat it 33 more times for a total of 35 quarter-turns.
After the last turn, insert the second winding bar into the bottom lug hole. Remove the first winding bar, and rest the second bar against the door to stabilize the torsion bar while you tighten the two set screws on the winding cone. When the first screw makes contact with the torsion bar, give it another half-turn, repeat with the second screw, then give the first and then the second screw another quarter-turn.
Insert the first winding bar into the top lug hole, and rotate it upward slightly to release the tension on the bottom winding bar resting against the door. Pull the bottom winding bar out of the hole. Slowly guide the top winding bar back down to its neutral position, and remove it.
Repeat Step 7 for the other spring.
Remove the vice grip from the torsion bar, and test the door manually. If the door still feels heavy or goes up too fast, follow the unwinding process in Step 1 or the winding process in Step 6 to adjust the tension of the springs—wind them by a quarter turn if the door feels heavy, or unwind them by a quarter turn if the door is too fast.
Once the door opens to your liking, plug in the garage door opener, and give it a test run. Adjust the sensitivity settings on the opener unit as needed.
To keep your springs in tip-top shape, lubricate them twice a year with a white lithium or silicone-based spray. While you’re at it, give your other garage door components a quick look—addressing potential problems right away helps you avoid common garage door repair costs that add up over time.
Depending on how heavily you use your doors, schedule a professional garage door tune-up every year or two. A tune-up includes a full inspection of the entire apparatus, from tracks and rollers to springs, drums, pulleys, and cables.
The cost of a typical garage door tune-up is between $100 and $200—far less than the cost of a garage door replacement.
Replacing garage door springs isn’t for everyone. It’s hard to overstate the potential dangers of working with tightly wound garage door springs that are locked and loaded under an enormous amount of tension. Only attempt this project if you’re a skilled and confident DIYer with a keen eye for safety, a knack for tools, and a solid understanding of how a garage door spring mechanism works.
In the event you encounter something unexpected while you’re replacing the springs—or you suddenly realize you might be in over your head—stop what you’re doing, secure the scene, and call your local garage door installer.
If you replace your garage door springs yourself, you can expect to pay around $20 to $150 for a pair of extension springs. Torsion springs cost anywhere from $75 to $150 for a pair—plus around $25 for a pair of winding bars.
While the cost of hiring a garage door pro is a little higher—around $150 to $350, including parts and labor—it’s the safest and easiest way to get the job done.
From average costs to expert advice, get all the answers you need to get your job done.
This guide shows you what you can expect for garage door roller replacement cost if your rollers are sticking or screeching.

If you live in a climate that experiences harsh winters and summers, you should consider an insulated garage door. Learn what impacts the costs and how it can help save you money over time.

Your garage door belt replacement cost depends on labor and material prices in your location, plus any other repairs needed to minimize belt wear.

If your garage door isn’t closing right, it might be time to align your sensors. Learn how to align garage door sensors in nine easy steps.
Wondering why your garage door light is blinking and not opening? Let’s look at three common causes, including an activated safety lock and blocked sensor.

This guide reviews the six main types of garage door openers—with tips for choosing the right one for your budget and your needs.