Your budget for moving an electrical panel depends on the type, labor, and more. Find out the average cost to move an electrical panel.
When it comes to measuring, accuracy is everything


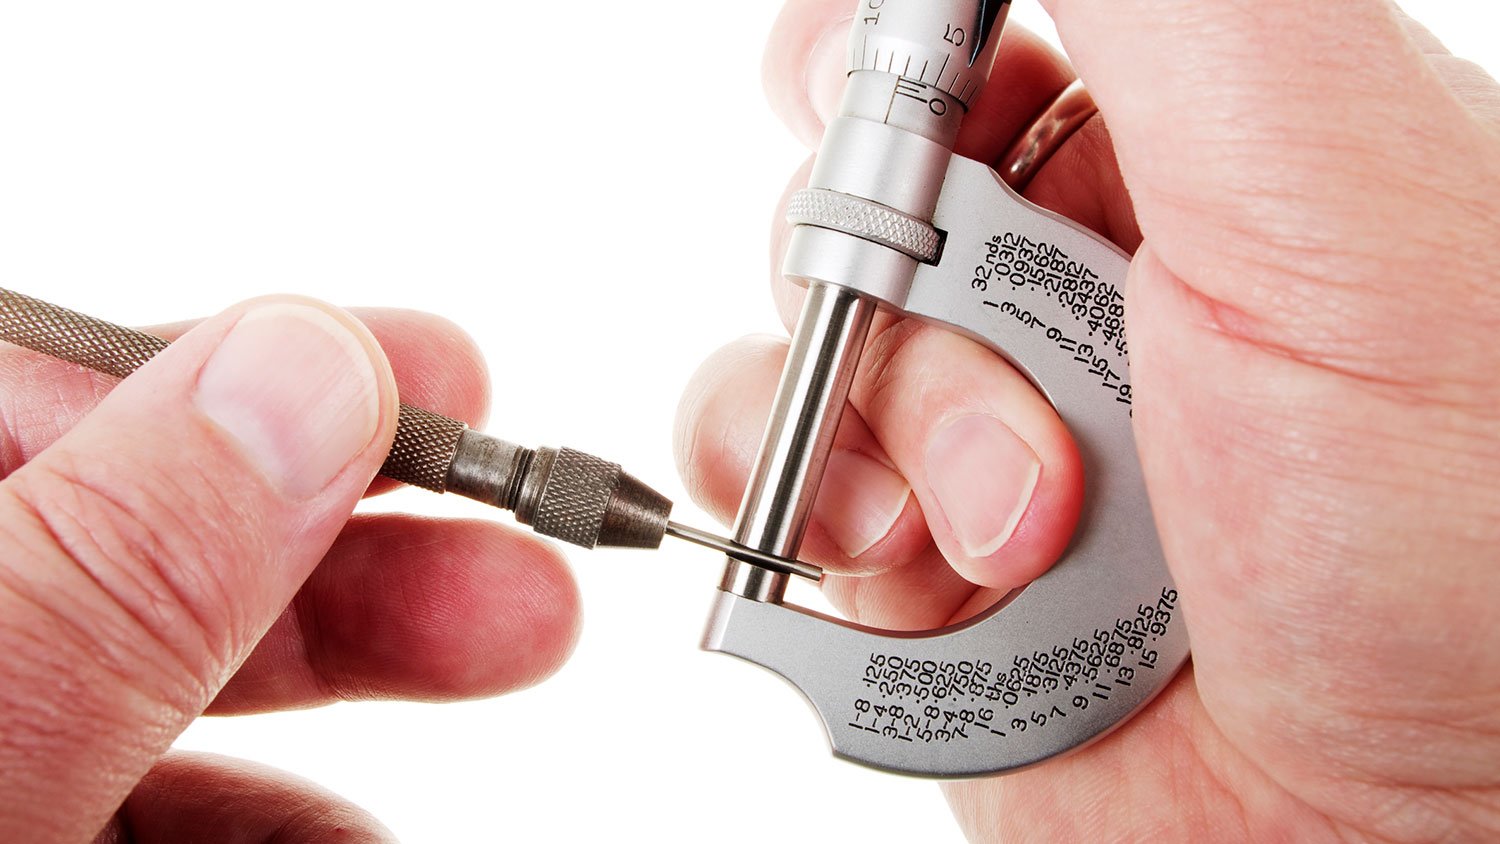
Micrometers are instruments used for precise measurement of small parts and components.
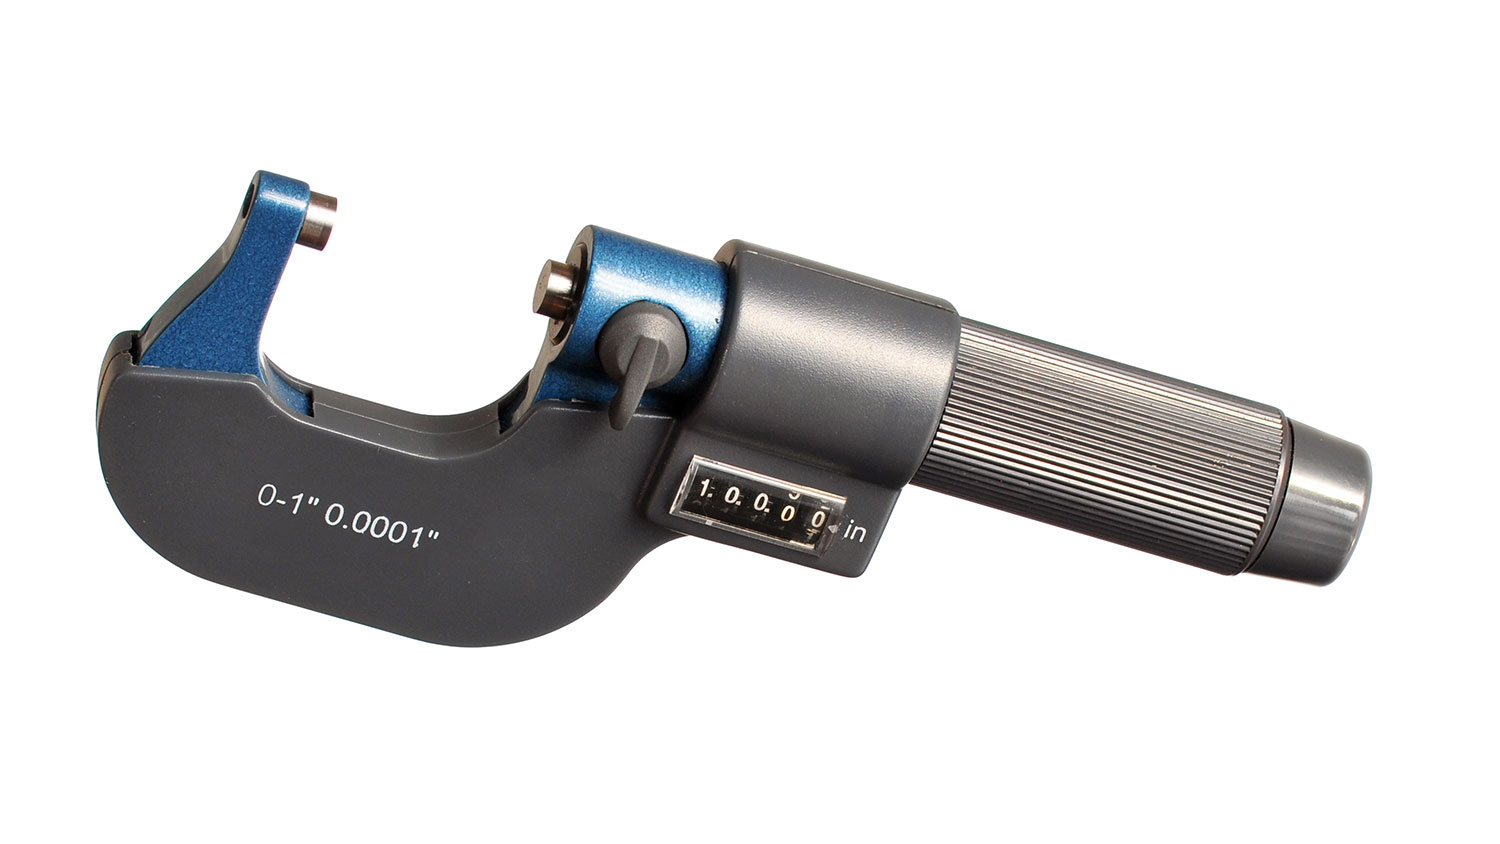
Some micrometers measure in metric units, while others measure in U.S. customary units.
These tools require regular maintenance, including cleaning and calibration, to remain accurate.
Micrometers are heavy and made to withstand mechanical and thermal stress.
Learn how to adjust and read a micrometer for projects requiring detailed measurements.
Professional-grade projects require professional-grade measurements. And to get very precise measurements of very small objects, a micrometer is the perfect tool. Properly using and reading a micrometer requires more advanced skills than the average DIYer possesses. If you fall into that category, now is the perfect time to build a new skill. Use this guide to learn how to read a micrometer like a pro.
A micrometer is an instrument with a calibrated screw that professionals used to precisely measure the diameter, thickness, or length of small components. The tool’s name comes from its accuracy. Some models can measure an object all the way to the nearest micrometer (μm) or one-millionth of a meter.
Most people will go their whole lives without using a micrometer; however, if you’re a machinist, electrician, mechanic, plumber, or manufacturing professional, knowing how to use a micrometer is sure to come in handy. Micrometer measurements work well for spheres, cylinders, discs, or other small objects when using a tape measure is not sufficient.

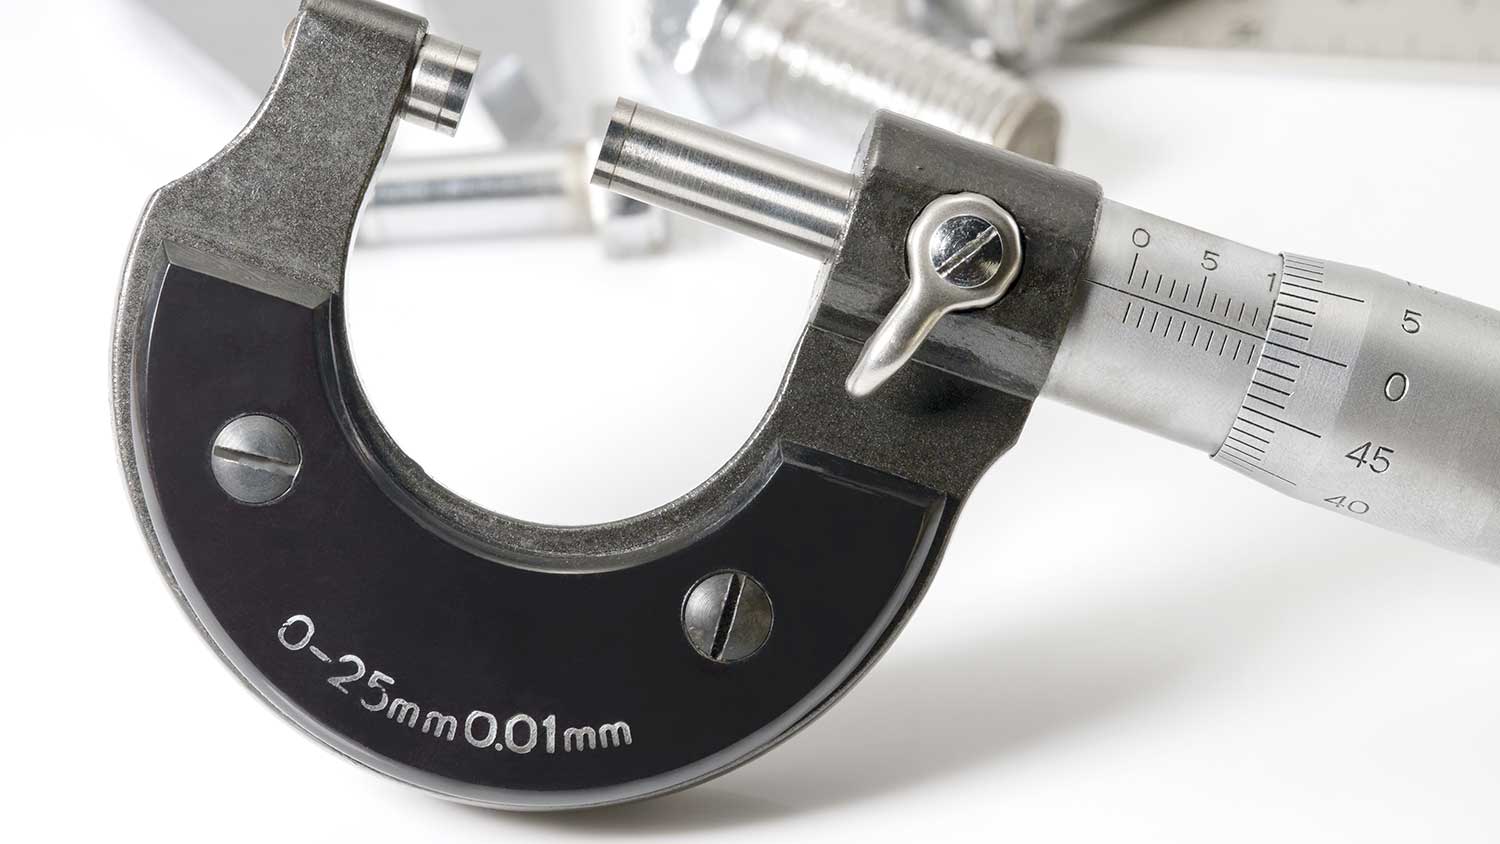
A micrometer is made up of unique parts that work together to ensure you get the most detailed measurement. Here are the key parts of a micrometer and what they do.
Frame: The frame is the “C”-shaped body of the instrument. It is durable and heavy, allowing it to withstand thermal and mechanical stress. The frame holds the anvil and the barrel together.
Anvil: The anvil is the shorter measuring face on the far end of the frame. It helps hold the object you’re measuring in place (along with the spindle).
Spindle: The spindle moves toward the anvil to secure the object for measurement when you rotate the thimble.
Sleeve or Barrel: The sleeve, also called the barrel, is cylindrical and located next to the lock. It has a scale (called the vernier scale) with graduations (numbered markings) to ensure accuracy at the smallest level.
Thimble: The thimble is cylindrical and has a tapered end with a scale. It’s located next to the sleeve. You can turn it with your thumbs to make the spindle move toward or away from the anvil.
Lock: The lock is located on the frame between the spindle and the sleeve. It helps hold the micrometer in place while measuring.
Ratchet Stop: The ratchet stop is at the end of the instrument opposite the anvil (near the thimble). It helps regulate how much pressure you apply to an object.
Using a micrometer is not for the faint of heart. It takes practice and persistence to develop the skill, and we’re here to help.

Once you’re comfortable with the parts of a micrometer, you can begin to measure an object. Again, getting precise measurements with a micrometer takes some getting used to. Follow this process multiple times and compare your measurement readings.
Make it a habit to clean the anvil and spindle before measuring to ensure your reading is as accurate as possible. Place a clean cloth or piece of paper on the anvil and gently twist the thimble to close the spindle. Repeat a few times to fully clean the surface.
Now, grab the object you wish to measure and place it on the anvil. Apply a little bit of pressure so that the object is firmly pressed up against the anvil, but don’t apply too much pressure (you don’t want to scratch the surface).
Spin the thimble counterclockwise so that the “0” on the thimble lines up with the central horizontal line on the sleeve. Tighten the thimble until the spindle is pressed against the object you are measuring. On some micrometer tools, the thimble will click when under pressure. Stop tightening the thimble after you hear three clicks.
Set the spindle position by locking the thimble lock. Keep in mind that the spindle can sometimes still move with this lock in place, so be careful not to accidentally bump your tool and alter the measurement.
Gently slide the object out from between the axis and spindle. Do not scratch the surface of either while removing the object, as doing so can affect the measuring accuracy of your micrometer.
You can now record the object’s measurement, then unlock the spindle. Make sure the spindle doesn’t move while measuring. If it does, restart the measuring process.
Continue reading to learn how to read a micrometer with both metric and U.S. customary units.

Metric micrometers measure in increments of 0.01 millimeters. Follow these steps to get a precise measurement with a metric micrometer.
The main scale on the sleeve measures whole number millimeters. Record the whole number on the sleeve that is visible and isn’t covered by the thimble. For example, if the last number visible on the sleeve is a 3, record 3 as your first measurement number.
In between each whole number millimeter marking on the sleeve are half-millimeter markings. Determine if a half-millimeter marking is visible (without being covered by the thimble) after the whole number. For example, if a half-millimeter line is visible after the whole number 3 marking, record 0.5 as your next measurement number. Don’t count a marking that is barely visible.
The graduation line markings on the thimble measure one-hundredth of a millimeter (0.01). Find the whole number on the thimble that lines up closest with the central horizontal line on the sleeve. If the markings don’t line up perfectly, choose the closest marking beneath the central horizontal line toward the bottom of the tool. For example, if the marking for the whole number 28 sits just below the central horizontal line, your measurement number will be 0.28.
The vernier scale is a vertical measuring scale located on the sleeve above the central horizontal line that measures to the one-thousandth of a millimeter (0.001). Not every micrometer will have this additional scale. If yours does, find the marking on the vernier scale that lines up the best with a corresponding line on the sleeve.
For example, if the marking for the whole number 2 on the vernier scale lines up the closest with a marking on the sleeve, your measurement number will be 0.002.
Add all of your measurement numbers together to determine the final measurement in millimeters. Using the example numbers above, the final measurement reading would be 3 + 0.5 + 0.28 + 0.002 = 3.782 millimeters.

Inch micrometers measure in increments of 0.001 inches. The steps for measurement are pretty similar; they’re just in a different measuring system. Follow these steps to obtain a precise measurement with an inch micrometer.
The scale on the sleeve measures one-hundred-thousandths of an inch (0.100). In between each one-hundred-thousandths whole number marking are smaller graduation lines that measure twenty-five thousandths of an inch (0.025).
Record the whole number on the sleeve first. Use the last whole number visible that isn’t covered by the thimble. For example, if the last number visible on the sleeve is a 4, record 0.400 as your first measurement number.
Next, determine the twenty-five-thousandths number. Determine how many twenty-five-thousandth markings are visible after the whole number before being covered by the thimble. If one marking is visible, your measurement number will be 0.025. If two are visible, the number is 0.050. If three are visible, it’s 0.075.
The scale on the thimble measures one-thousandths of an inch (0.001).
Find the whole number on the thimble that lines up closest with the central horizontal line on the sleeve. If the markings don’t line up perfectly, choose the closest marking beneath the central horizontal line toward the bottom of the tool. For example, if the marking for the whole number 3 sits just below the central horizontal line, your measurement number will be 0.003.
The vernier scale is a vertical measuring scale located on the sleeve above the central horizontal line that measures ten-thousandths of an inch (0.0001).
Find the marking on the vernier scale that lines up best with a corresponding line on the sleeve. For example, if the marking for the whole number 2 on the vernier scale lines up the closest with a marking on the sleeve, your measurement number will be 0.0002.
Add all of your measurement numbers together to determine the final measurement in inches. Using the example numbers above, the final measurement reading would be 0.400 + 0.075 + 0.003 + 0.0002 = 0.4782 inches.
For the most accurate micrometer measurements, you’ll need to perform regular maintenance tasks on your tool. Use these tips to keep your micrometer in tip-top shape:
Clean the micrometer before each use. Be careful not to scratch the surface.
Calibrate your micrometer by rotating the sleeve as needed. The central horizontal line on the sleeve should line up with the “0” on the thimble.
Store your micrometer in an environment free of heat, dust, humidity, and oil.
Store the micrometer in the open position.
Be sure to always unlock the thimble lock before attempting to rotate the thimble to avoid unnecessary wear.
Remove batteries from digital micrometers if you’re not using the tool regularly.
If you’re unsure about the details of your project, reach out to a local electrician or local plumber to assist. They’re experts at knowing how to read a micrometer because the tool is often an important part of their day-to-day job. They’ll be able to give you precise measurements so you can finish your project to perfection.
Brionna Farney contributed to this piece.
From average costs to expert advice, get all the answers you need to get your job done.

Your budget for moving an electrical panel depends on the type, labor, and more. Find out the average cost to move an electrical panel.

The cost to ground outlets depends on several factors. This guide will help you prepare for all of the costs involved with this project.

Considering replacing your home’s knob and tube wiring with a contemporary electrical system? Find out what costs and considerations may be involved.

Today’s polarized plugs and outlets have a hot and neutral side, which is important for any receptacle wiring. Here’s what that means, why it happened, and how to take advantage of it.

Discover how to upgrade your electrical panel for added convenience and to help increase the safety of the electrical system in your home.

When you want to control one light fixture from two switches—usually at either entrance to a hallway—you’ll need a three-way switch. It’s more complicated than installing a single switch, but an electrician can stall one for you easily.