

The cost of a well casing replacement depends on materials, well depth, and labor. This guide will help you find the right casing for your well and budget.
Don’t let weak water pressure get you down


The average price to fix a well pump is around $973, but hiring a professional ensures a job well done.
Messing around with water pressure can be tricky without experience, because too much or too little can cause leaks, damage pipes, or reduce system performance.
A pro can adjust levels to match your system and needs without the risk of causing damage.
If something does go wrong with a professional adjustment of a well pump, the contractor’s insurance can help pay for the damage.
Experts can diagnose long-term pressure problems, identifying issues with the system, mismatched pumps, sediment, or components that need to be replaced.
From a slow trickle to a hose jet stream, the wrong water pressure can take the comfort out of your shower. Fortunately, adjusting the pressure switch on your well pump is a quick and easy skill to learn that can bring peace back to your shower time. Whether you’re turning up or toning down, this guide will walk you through the steps to get your pressure switch set just right.
Calling in a professional to adjust the pressure can cost between $100 to $150 for a house call, whereas adjusting it on your own only requires a wrench.
If you have a non-automatic switch, you might need to adjust it to get the right level of water pressure in your faucets, sinks, showers, and other water fixtures. Even if you have an automatic switch, you can adjust it to change the pressure to something you find more comfortable.
Once you’ve grabbed your wrench, you can follow these steps to adjust your well pump’s pressure switch.
Always start by disconnecting the power to your pressure switch before you make any adjustments. Your pressure switch power supply can usually be found on your main power breaker, sometimes under a label like “well pump” or “water pump.”
If you’re not sure which switch connects to your well system, give your local electrician a quick call—it never pays to take risks when you’re working with electricity.
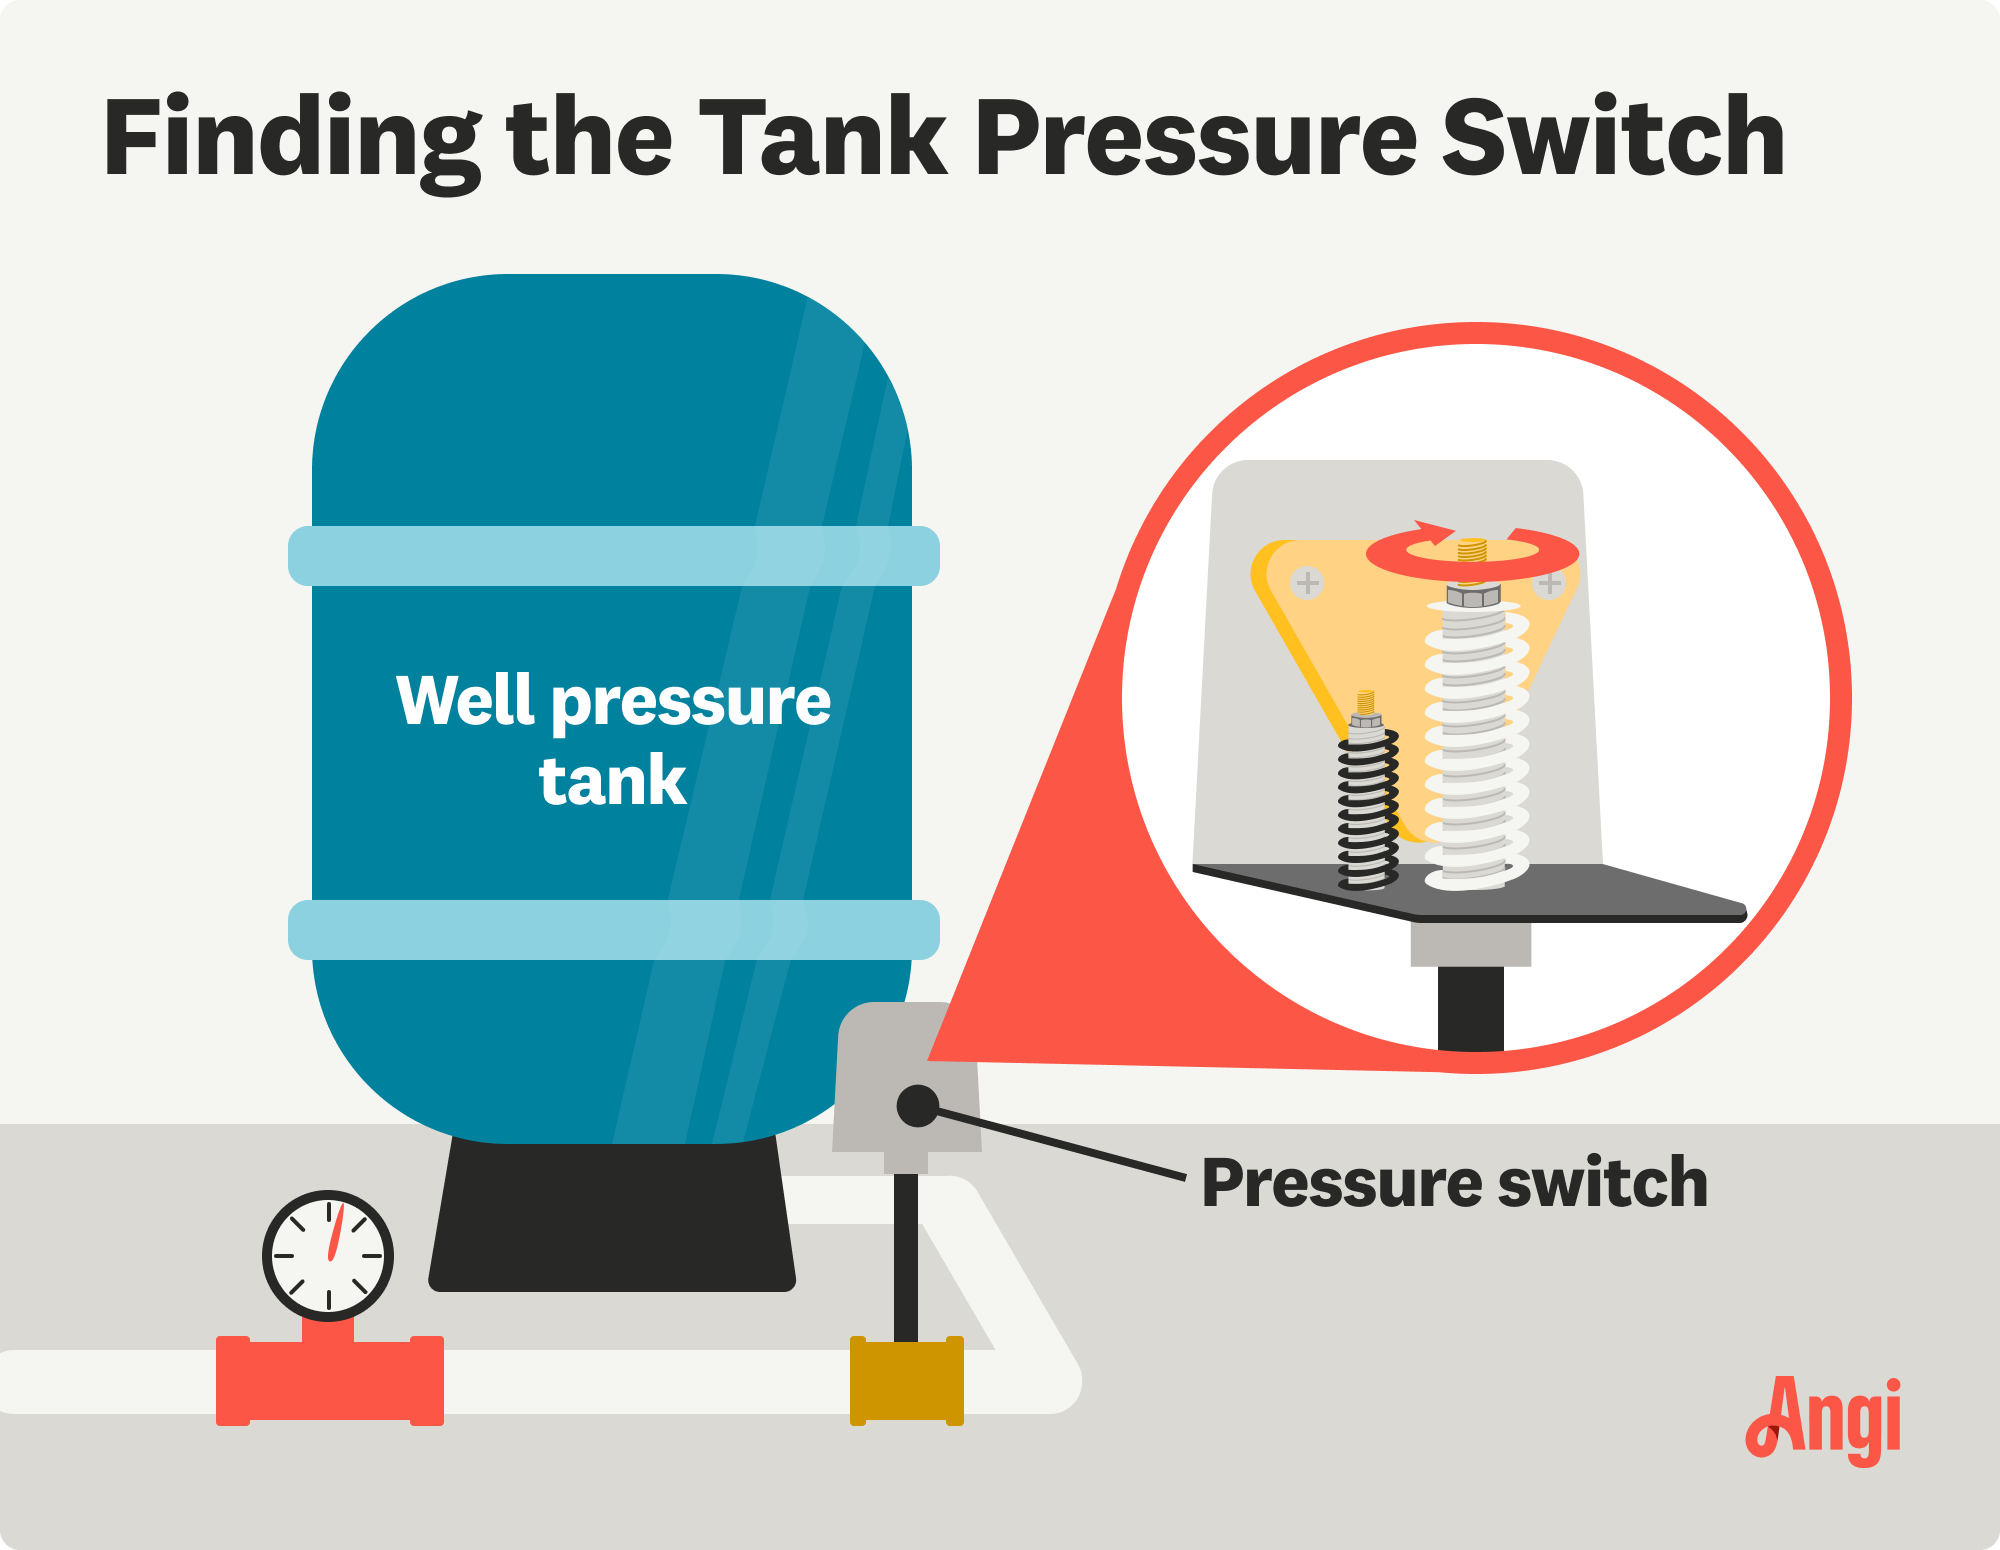
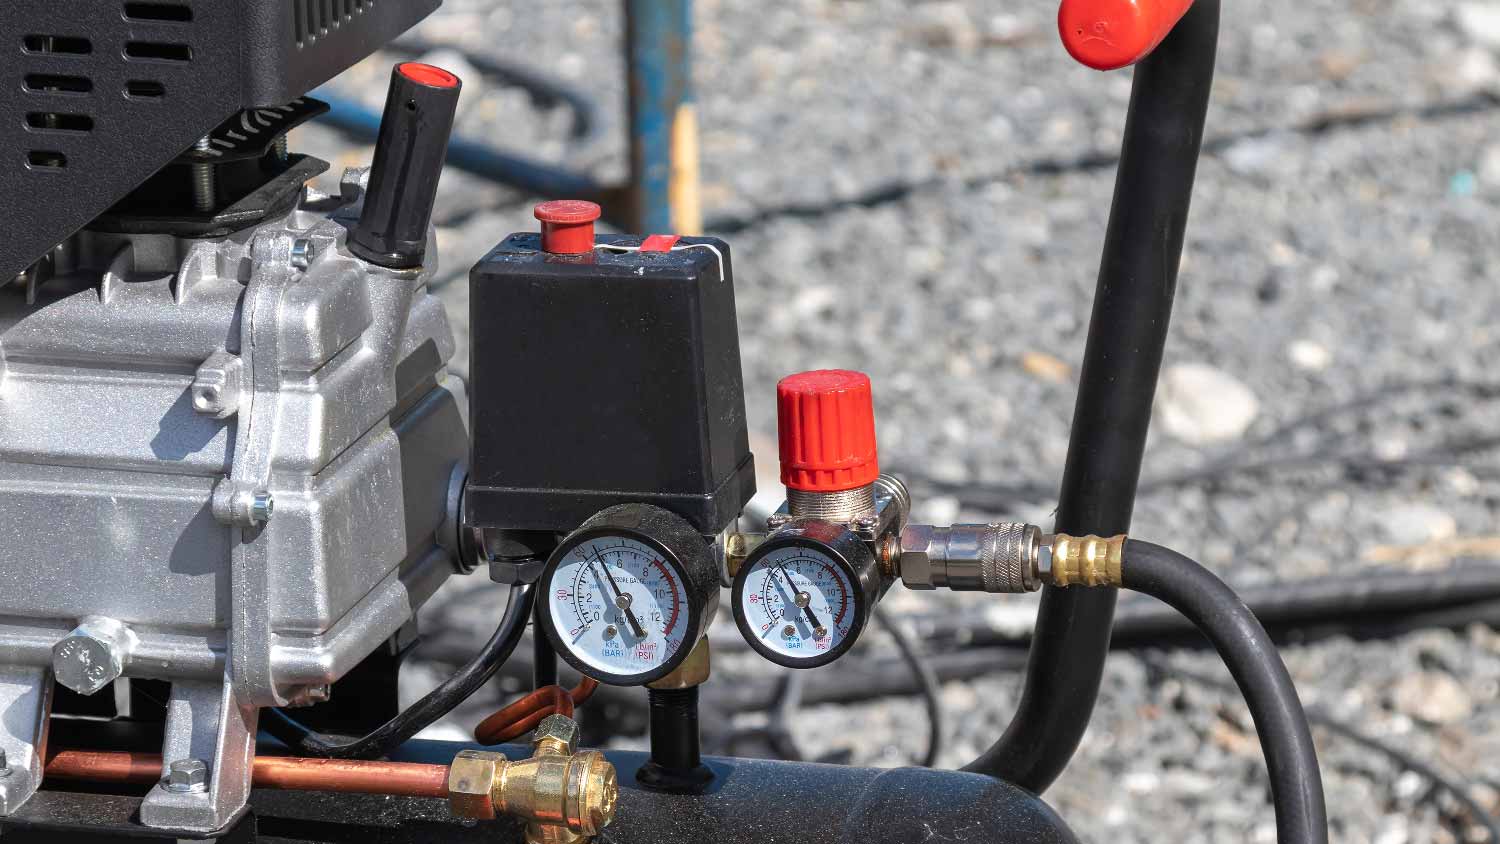
The pressure switch cover is typically a small plastic cube, usually gray or black in color. It’s often held in place by a nut that you can untwist by hand or with a wrench.
Inside the cover, you’ll find a guide to your pressure switch’s factory settings. This can also include important details like upper and lower pressure limits.
Well pump pressure switches include two settings: cut-in and cut-out. Cut-in pressure is the low-pressure point where your well pump starts, while cut-out pressure is the high point that turns off the pump.
There’s a range between these two points, called the differential. For example, it could go from 30 to 50 PSI (pounds per square inch). The standard differential is 20 PSI. Lowering the cut-in point reduces your water pressure, say from 30 to 50 PSI to 20 to 40 PSI, whereas raising it will give you a more forceful pressure.
You’ll usually find two nuts inside your pressure switch: a large center nut and a small nut above or below. It’s always a good idea to look at the inside of the cover to check which is which, but on most systems, the larger center nut controls cut-in and cut-out pressure.
Turning the large center nut will adjust both your cut-in and cut-out pressure, lowering or raising the overall pressure. You’ll still have the same differential (normally about 20 PSI).
Measure and record the nut position before you make any adjustments. This can help you track how many PSI you’ve adjusted and return to the factory settings if you ever want to reset your pressure switch.
To lower your pressure, turn the nut counterclockwise. To raise it, turn the nut clockwise. As a general rule, one full turn of the nut will change your pressure by about 2 to 3 PSI.
The second nut on your pressure switch changes the differential—for example, you could go from 30 to 50 PSI to 30 to 45 PSI. This is rarely used, and you won’t need it if you only want to raise or lower your water pressure.
Changing the differential can also prevent your pump from properly turning off, and can ultimately shorten the lifespan leading to a costly well pump replacement or pump repair. It’s generally not advisable to turn this nut unless you have a specific need, like if the previous owner had set the differential to something other than 20 PSI.
Once you’ve adjusted your pressure switch, replace the switch cover and turn the power back on. When the pump turns on, record the low PSI and then record the high PSI again when the pump turns off. This will show you your new cut-in and cut-out pressures.
It can sometimes take a few tries to get the pressure where you want it, but it’s always a good idea to start slow and then adjust more later. If you need to make any adjustments, remember to turn off the power before you start.
If you’re finding that even after a few tries you still can’t get the pressure to change, it may be a sign that it’s time for a new well pump.
Adjusting the pressure switch on a well pump takes less than half an hour and only requires a wrench, which makes it an approachable DIY task. However, to do this safely, you’ll need to switch your electricity on and off. If you aren’t comfortable with this, it’s better to call a professional to adjust your well pump’s pressure switch.
If you’re dealing with consistently low water pressure, a pump that switches on and off quickly, or a pump that won’t turn on or off, there might be a problem with your well pump pressure switch. Before calling a pro, you may be able to fix the issue with one of these troubleshooting tips:
Look for leaks: Sometimes, water can seep into the switch housing. If you notice any water in this area, cut the power immediately and call a pro to replace the switch. Otherwise, if the leak is near the plumbing connection, you may be able to tighten it yourself.
Clear the pressure sensor: With the power turned off, clear out any sediment or other debris in the tube that connects the switch to the water supply.
Test the water pump cycle: When the switch’s internal spring gets loose, it can prevent the switch from working. You can test this by opening a faucet and allowing the pump to complete a full cycle. If the switch fails to turn on, you might have a spring issue.
Dayton s work is amazing! He’s very skilled and proficient! There s nothing he can’t fix! I call and the job gets done! He’s very courteous and pleasant!
We had a very positive experience with Online Movers & Storage. The movers were very punctual, polite, and efficient. These guys made our moving day fantastic and our price paid was even lower than quoted. I would strongly recommend this company and these movers, and we were really...
 Online Movers & Storage
It was great work. He showed up on time, provided an excellent quote, his employees were professional and friendly, and completed the job as directed.
Mike came in for my washing machine and he determined that it was a bad drain pump and he returned and quickly fixed my washer. Very excited to have laundry again. Would highly recommend thanks so much!
Throughout the entire process, everything went smoothly with Abacus Builders. They successfully completed a kitchen remodel and flooring project, and I am extremely satisfied with their work. They provided excellent support and communication, guiding me through the process and assisting with...
 ABACUS BUILDERS
It was a great experience. ERS Construction is a very responsive ERS Construction, pays great attention to detail, is very honest and an all-around nice guy. His subcontractors are terrific. The person who does his tiles is a consummate professional. And his plumber and electrician and his...
We had hired them to repair some damaged walls resulting from some electrical work that required the walls to be opened up as well as screws marks resulting from a contracting job, repair and paint two ceilings that had received water damage, and fully repaint in new paint color two of the...
Unbelievable service and attention to detail… was an excellent choice and would highly recommend!!
Joe and crew met and dealt with numerous obstacles on our renovation in the North End - what ever could go wrong, did go wrong and they tackled each issue with patience and in many cases strategy that others would have just covered up and moved on. The unit has made a complete transformation...
 SILMAC Construction Inc.
Eli is a real professional. As soon as you meet him, you see you are dealing with a real professional contractor. We met with 4 different contractors and he was the only one with so much knowledge. I picked him for a full renovation project, we did full kitchen renovation, bathrooms, knocked...
 SES Builders inc
From average costs to expert advice, get all the answers you need to get your job done.
The cost of a well casing replacement depends on materials, well depth, and labor. This guide will help you find the right casing for your well and budget.

Dry wells are handy for anyone who’s experiencing drainage problems. But dry well installation costs can vary depending on its size, location, and volume.

When your water system isn’t working as intended, it’s time to repair your well pump. This cost guide will break down well pump repair costs and the parts involved.

A sump pump doesn’t remove water from your home on its own. Check out this diagram of a sump pump to see how it works with a sump pit, discharge pipe, and more.

Sump pump discharge lines come in a couple of diameters and a range of lengths. Here’s how to determine the right sump pump pipe size for your installation.

The right pressure tank size is important for maintaining your well pressure system’s efficiency. Learn how to size a well pressure tank with these steps.