
How much a water softener costs depends on your home’s size, and the system’s type and capacity. Our expert guide explores all the price factors.
Filter out your confusion on this important household system


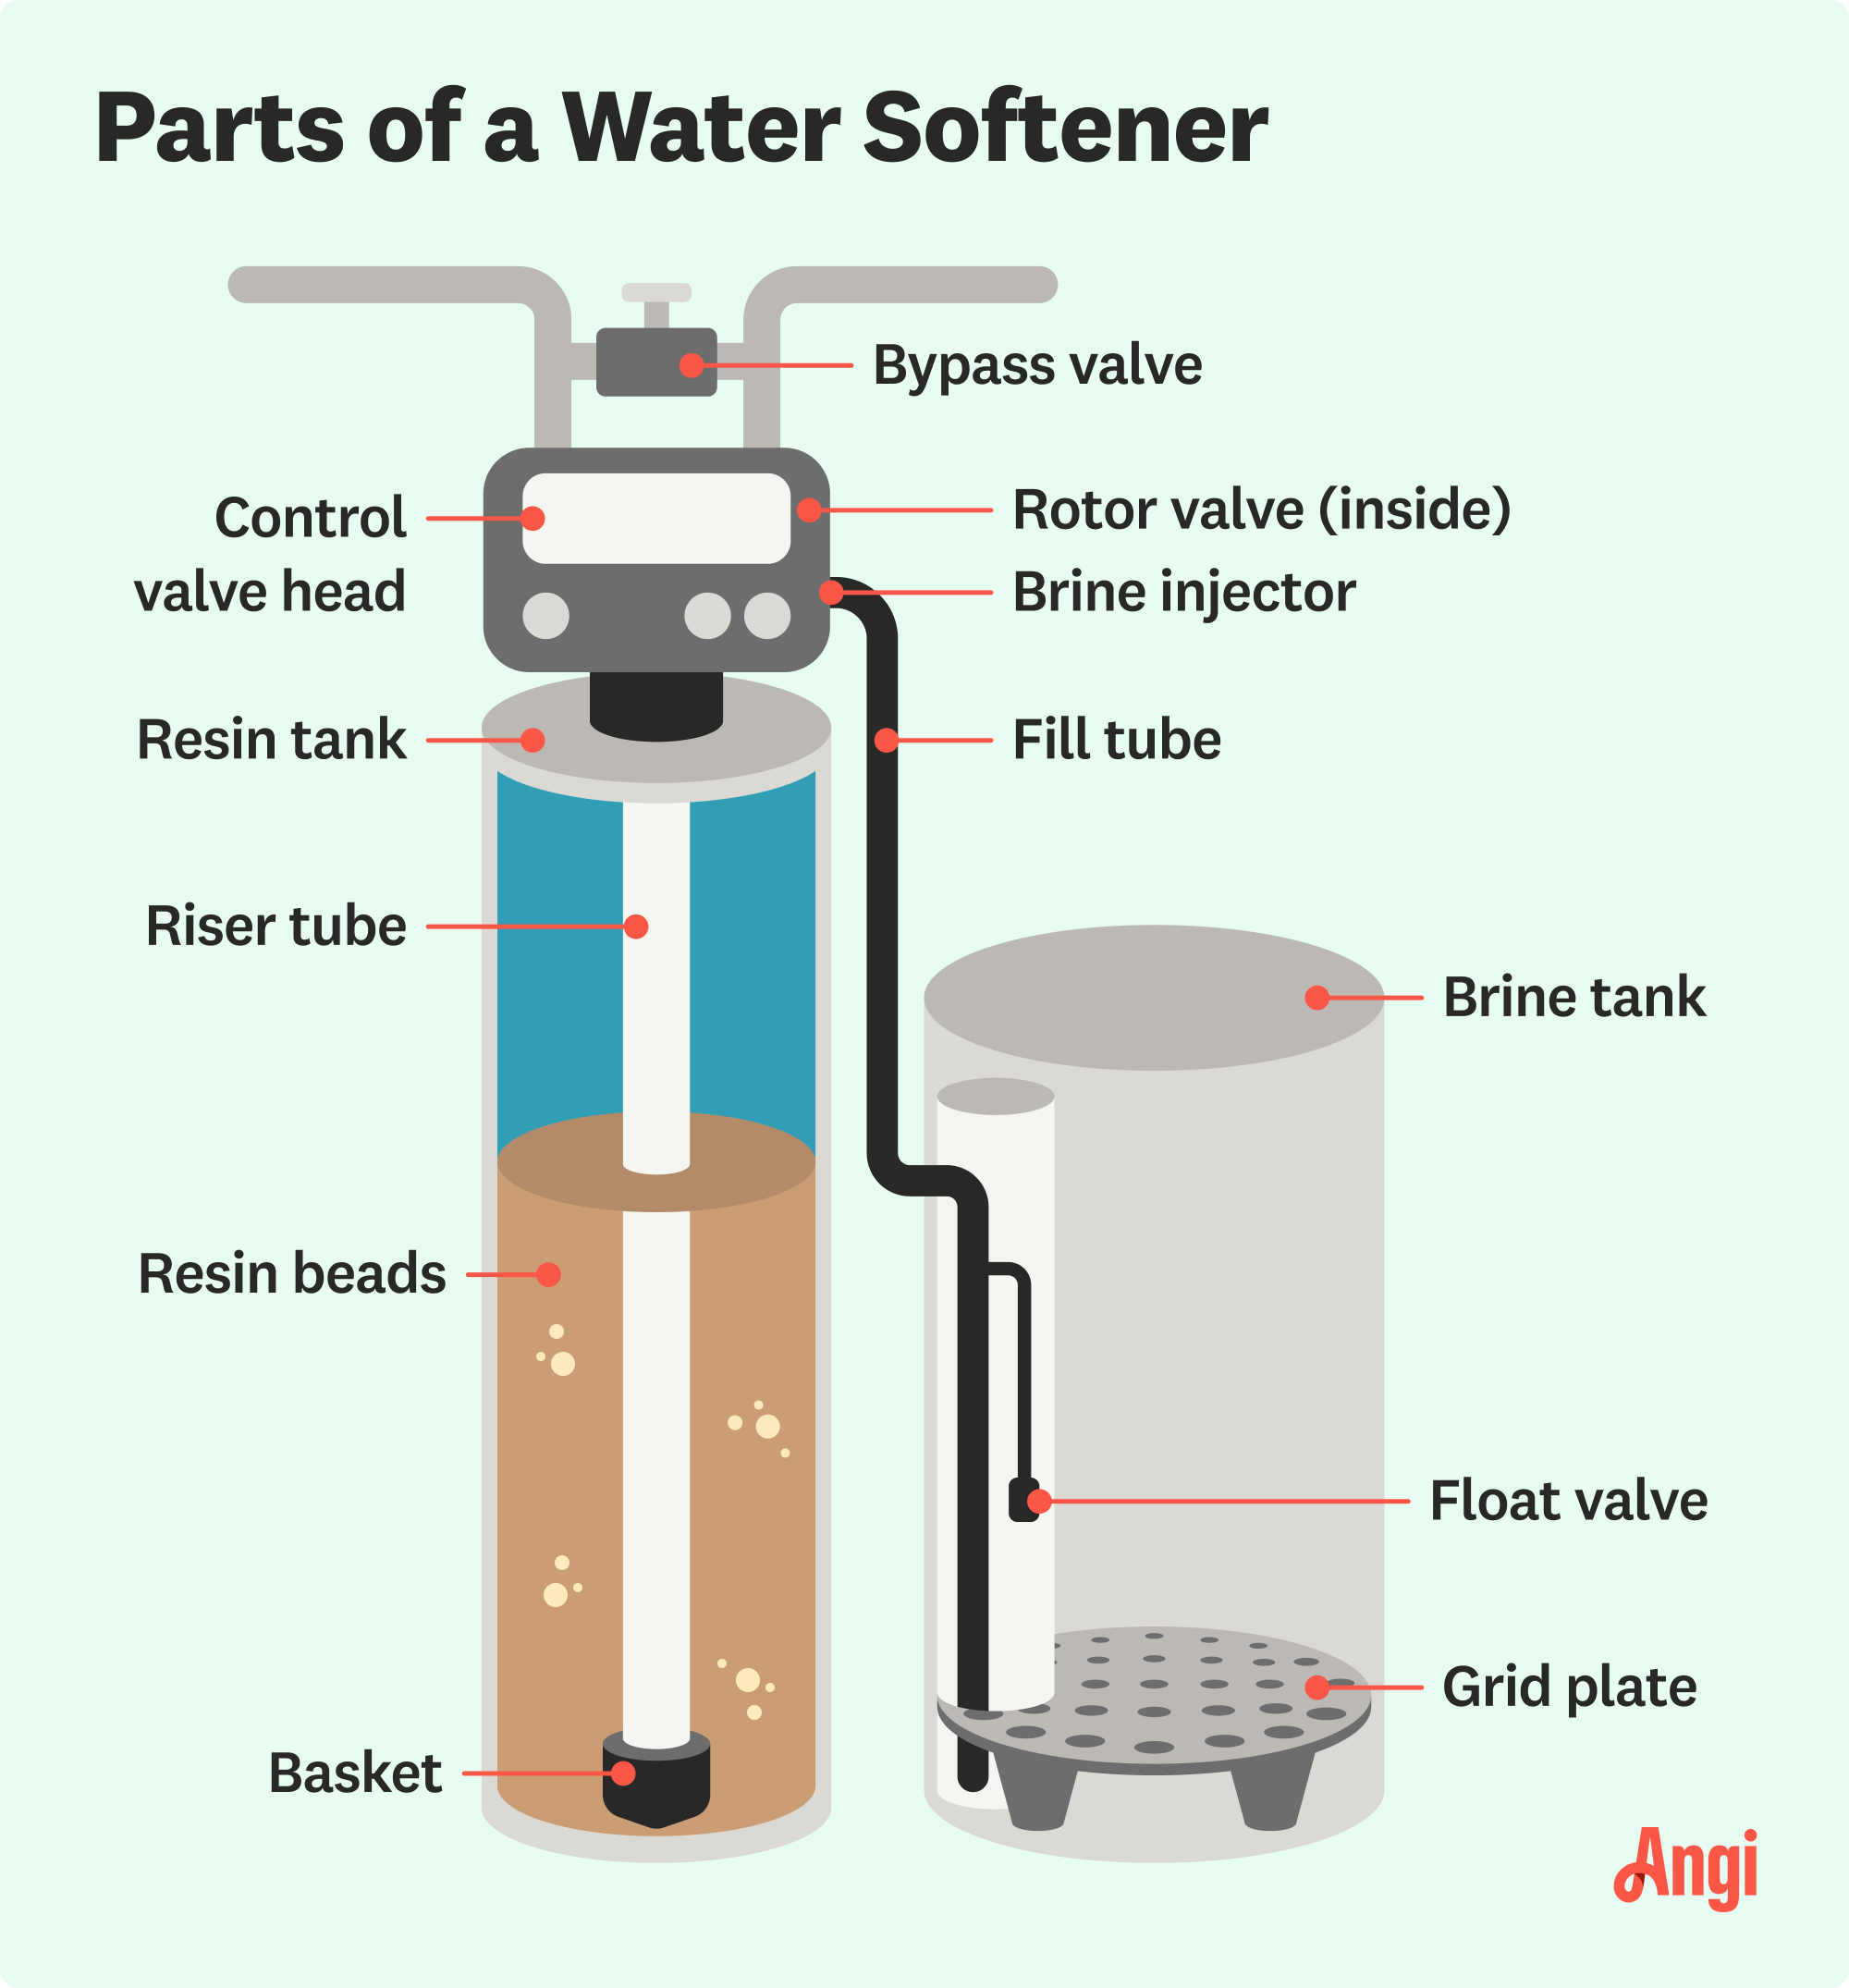
Three primary and important parts of a water softener are the resin tank, brine tank, and control valve.
The softening process takes place in the resin tank.
Brine flows from the brine tank to the resin tank to restore the resin beads’ sodium ions, which are needed to soften your home’s water.
The brine tank needs to be refilled with salt once every six to eight weeks.
You should inspect your water softener’s salt levels once a month and schedule annual professional inspections.
If your water softener stops working, it’ll leave you with hard water that leads to dry skin and mineral buildup in your plumbing fixtures and appliances—not cool. It helps to know the different parts of a water softener so that you can make simple repairs yourself or give more details to a pro for a quicker fix. Here’s everything you need to know about water softener parts and how they work.
A water softener is made up of many parts, including multiple different valves, two main tanks, and several tubes that work together to draw in hard water, remove the hard minerals from the water, and supply soft water to your faucets and appliances. To better understand how these systems work, join us as we get to know the different parts of a water softener.
The control valve head is one of the most important parts of a water softener because it manages the entire system. Water comes through an inlet at the control valve head, located at the top of the water softener’s resin tank, and the control valve measures how much water is coming into and out of the water softener.
Water softeners use a regeneration cycle to get rid of the excess minerals that collect in the resin tank from your home’s water supply, and the control valve is what signals the start of each regeneration cycle. The control valve uses the measurements it collects about water hardness and water usage to determine when to trigger a regeneration cycle.
Many, but not all, water softeners have a bypass valve. If your model has a bypass valve, it’s located on the top of the water softener near the inlet and outlet pipes that bring water in and out of the unit. The bypass valve allows you to change the water direction to flow directly into the house, bypassing the water softener (and giving the valve its very appropriate name).
Bypassing is helpful for maintaining water supply when the water softener needs to go through a regeneration cycle or anytime you need to handle water softener maintenance. This allows you to change the water softener filter or let it regenerate without having to turn off the water supply to your entire house.
The rotor valve, located at the top of the water softener or inside the control valve head, is what brings hard water into the resin tank for softening or for a regeneration cycle. The rotor valve is powered by a valve motor.
The fill tube, or brine line tubing, connects the control head valve to the brine tank, where regeneration cycles take place. The fill tube can allow more water into the brine tank as needed, or it can pull the brine (salt and water) into the resin tank for a regeneration cycle to flush away mineral buildup.
The brine tank holds a mixture of water and dissolved salt used for regeneration. The resulting brine flows from the brine tank into the resin tank once it reaches its maximum capacity for mineral buildup. The brine flows into resin beads inside the resin tank, restoring their sodium ions needed to soften the water. Without regeneration, the resin beads lose their ability to soften hard water.
Then, the remaining brine and the excess minerals are flushed away out of the resin tank.
The brine tank itself has a few components inside to help it operate, including:
The float valve, also known as a safety float, brine float valve, or brine float assembly, is a part that sits along one side of the brine tank interior. Water comes into and out of the brine tank through the float valve and the fill tube. The float valve will float in the water inside the brine tank, but once it floats too high, it blocks water from filling the brine tank further. This can help prevent overflows or leaks.
A grid plate sits at the bottom of the brine tank. It displaces water to allow more water into the brine tank, which is important to keep the right ratio of dissolved salt to water for the proper brine.
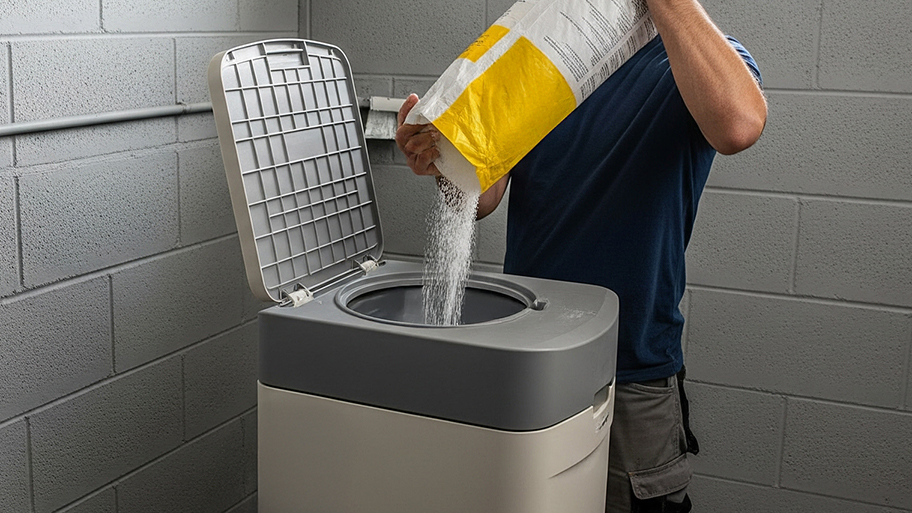
Brine tanks require salt to make the brine, and this salt helps flush away the buildup of minerals in the resin tank during a regeneration cycle. Homeowners will need to add salt pellets to the brine tank if the salt level is nearing less than 1/4 of the brine tank.
You’ll need to refill the brine tank with salt every six to eight weeks, but check the salt level once per month to make sure there’s enough.
The resin tank is next to the brine tank, and this is where the water softening process occurs. Hard water flows into the resin tank from the control valve, and the resin beads inside the resin tank attract the minerals, like magnesium and calcium ions, and swap them for tiny sodium ions.
The resin tank, or mineral tank, is filled with resin beads. The resin beads contain sodium ions and have a negative charge. Minerals that make water hard have a positive charge, so the minerals in the hard water are attracted to the resin beads. Sodium ions from the beads exchange places with the hard mineral ions.
Eventually, this can cause a buildup of the minerals in the resin tank and deplete the softening ability of the resin beads, which is where the brine from the brine tank comes into play for a regeneration cycle. During this cycle, the brine restores the sodium ions in the beads and flushes away the excess minerals.
The riser tube is located in the center of the resin tank. The softened water travels through the riser tube up to the control valve head, where it exits for household use.
At the very bottom of the riser tube, there is a basket that acts as a sort of filter. This basket keeps the resin beads from coming up through the riser tube with the softened water.
The brine injector, also known as the Venturi valve or the valve injector, uses a vacuum effect to draw brine up from the brine tank and into the resin tank when the control valve triggers a regeneration cycle.
The pre-filter or pre-sediment filter, is an optional addition to a water softener. This filter isn’t actually part of the water softener unit itself, but it can be a helpful addition to the overall softening process for your home.
A pro will install a pre-filter along the water lines before the lines that directly connect to the water softener. This way, the filter can trap any sediment and debris before it reaches the water softener. This can help extend the life span of the water softener, and it’s good to have for homes that rely on well water.
Because there is no government oversight of private wells, people relying on them are responsible for managing their own water quality to ensure it is safe (and enjoyable) to drink.
To extend the life span of your water softener and help it work efficiently, keeping up with a few water softener maintenance tasks can work wonders. From changing the occasional filter to refilling the salt, here are some items to add to your chore checklist.
Knowing how often to change your home water filters can help your water softener work as efficiently as possible. Many homes, especially with well water, have a pre-sediment filter, which should be changed every three to six months.
Brine tanks need more salt to replenish the brine lost in a regeneration cycle. Be sure to check with your water softener manual to determine which type of salt is best for your model. When filling the tank, make sure to leave at least 4 to 6 inches at the top of the tank. Many models will include a fill line to guide you.
Salt bridges can form in the brine tank, and this can lead to clogs and even leaks in your water softener. You can use the end of a broom handle to gently break apart a salt bridge inside the brine tank. But if it’s not coming apart easily, turn to the pros. If you whack away at the salt bridge too hard, you risk puncturing the brine tank.
There are several elements to inspect on a water softener. You’ll want to check the salt level in the brine tank once per month. When inspecting the salt level, check the control valve head to make sure the unit is set to the right water softener setting, too. Ensure that the unit isn’t in bypass mode after you complete any inspections. You should also hire a water softener specialist to inspect the entire system at least once per year.
Because a water softener relies on so many different parts to soften your home’s water, if even one part of the water softener is leaking or faulty, it can cause issues with the entire system. Some repairs, like tightening a loose hose or using a broom to break apart a salt bridge in the brine tank, are easy to DIY and can be done with tools you already have on hand.
However, it’s also easy to puncture different water softener parts when you try to poke around to find the problem. It’s best to call a local water softener installation company for any repairs because the pros have the training and special tools necessary to fix the issue—and fast. Hiring a pro for water softener repairs costs $160 to $975 on average.
From average costs to expert advice, get all the answers you need to get your job done.
How much a water softener costs depends on your home’s size, and the system’s type and capacity. Our expert guide explores all the price factors.
On average, a reverse osmosis water filter costs around $2,200, but there are a few variables that impact the total price. Learn about them in this guide.
Your cost to install an under-sink water filter will depend on the type and size of system you choose and whether you need professional installation.

Learn how to tell if you have hard or soft water, how to test your water yourself, and what to do if you have hard water.

A clogged water softener can reduce the system's efficiency and your water pressure. Here's how to identify problems with yours and what to do about them.

If you're worried that calcium buildup is causing your pipes to corrode, you need to learn about DIY and professional ways to remove calcium buildup in pipes before something major happens.