

A main water shut-off valve controls water flow for your entire home. Here we break down the cost to replace a main water shut-off valve.
Keep your washroom gurgle- and odor-free


The cost to install a plumbing vent is $900 to $3,000 if you hire a pro, but it’s the safest way to complete this job.
Improper venting can cause serious issues, such as sewage backups or a buildup of toxic, flammable sewer gas.
Pros understand the nuances of plumbing code, including proper pipe measurements, slopes, and connections that a DIYer may overlook.
Most of the time, you’ll use a 2-inch diameter vent pipe per uniform plumbing code, but you can go bigger if you have multiple fixtures on the same pipe.
This project involves cutting PVC or ABS pipe to exact measurements and putting them in the correct layout. A small mistake can require expensive repairs.
Proper venting is necessary for all the pipes in your home, but especially the ones that connect to your bathroom fixtures. The vents prevent blockages, allow dangerous odors and fumes to leave your plumbing system safely, and protect the traps on the drainpipes. If you’re adding a new bathroom to an unfinished area of your home or you suspect your current system is installed incorrectly, you’ll need to know how to vent your toilet, sink, and shower to get things flowing correctly.
Shaddai Plumbing team is great! They are very professional, they keep their word, they complete job without delays. Great quality. We had to replace old water pipes across 2-story home and their service was great. We asked to add additional water switches to be able to switch hot/cold water on and off in separate parts of home - and they did it. Now if it will be leak or other problem - we can switch off kitchen area, or second floor without impacting other parts of our home. Highly recommended!
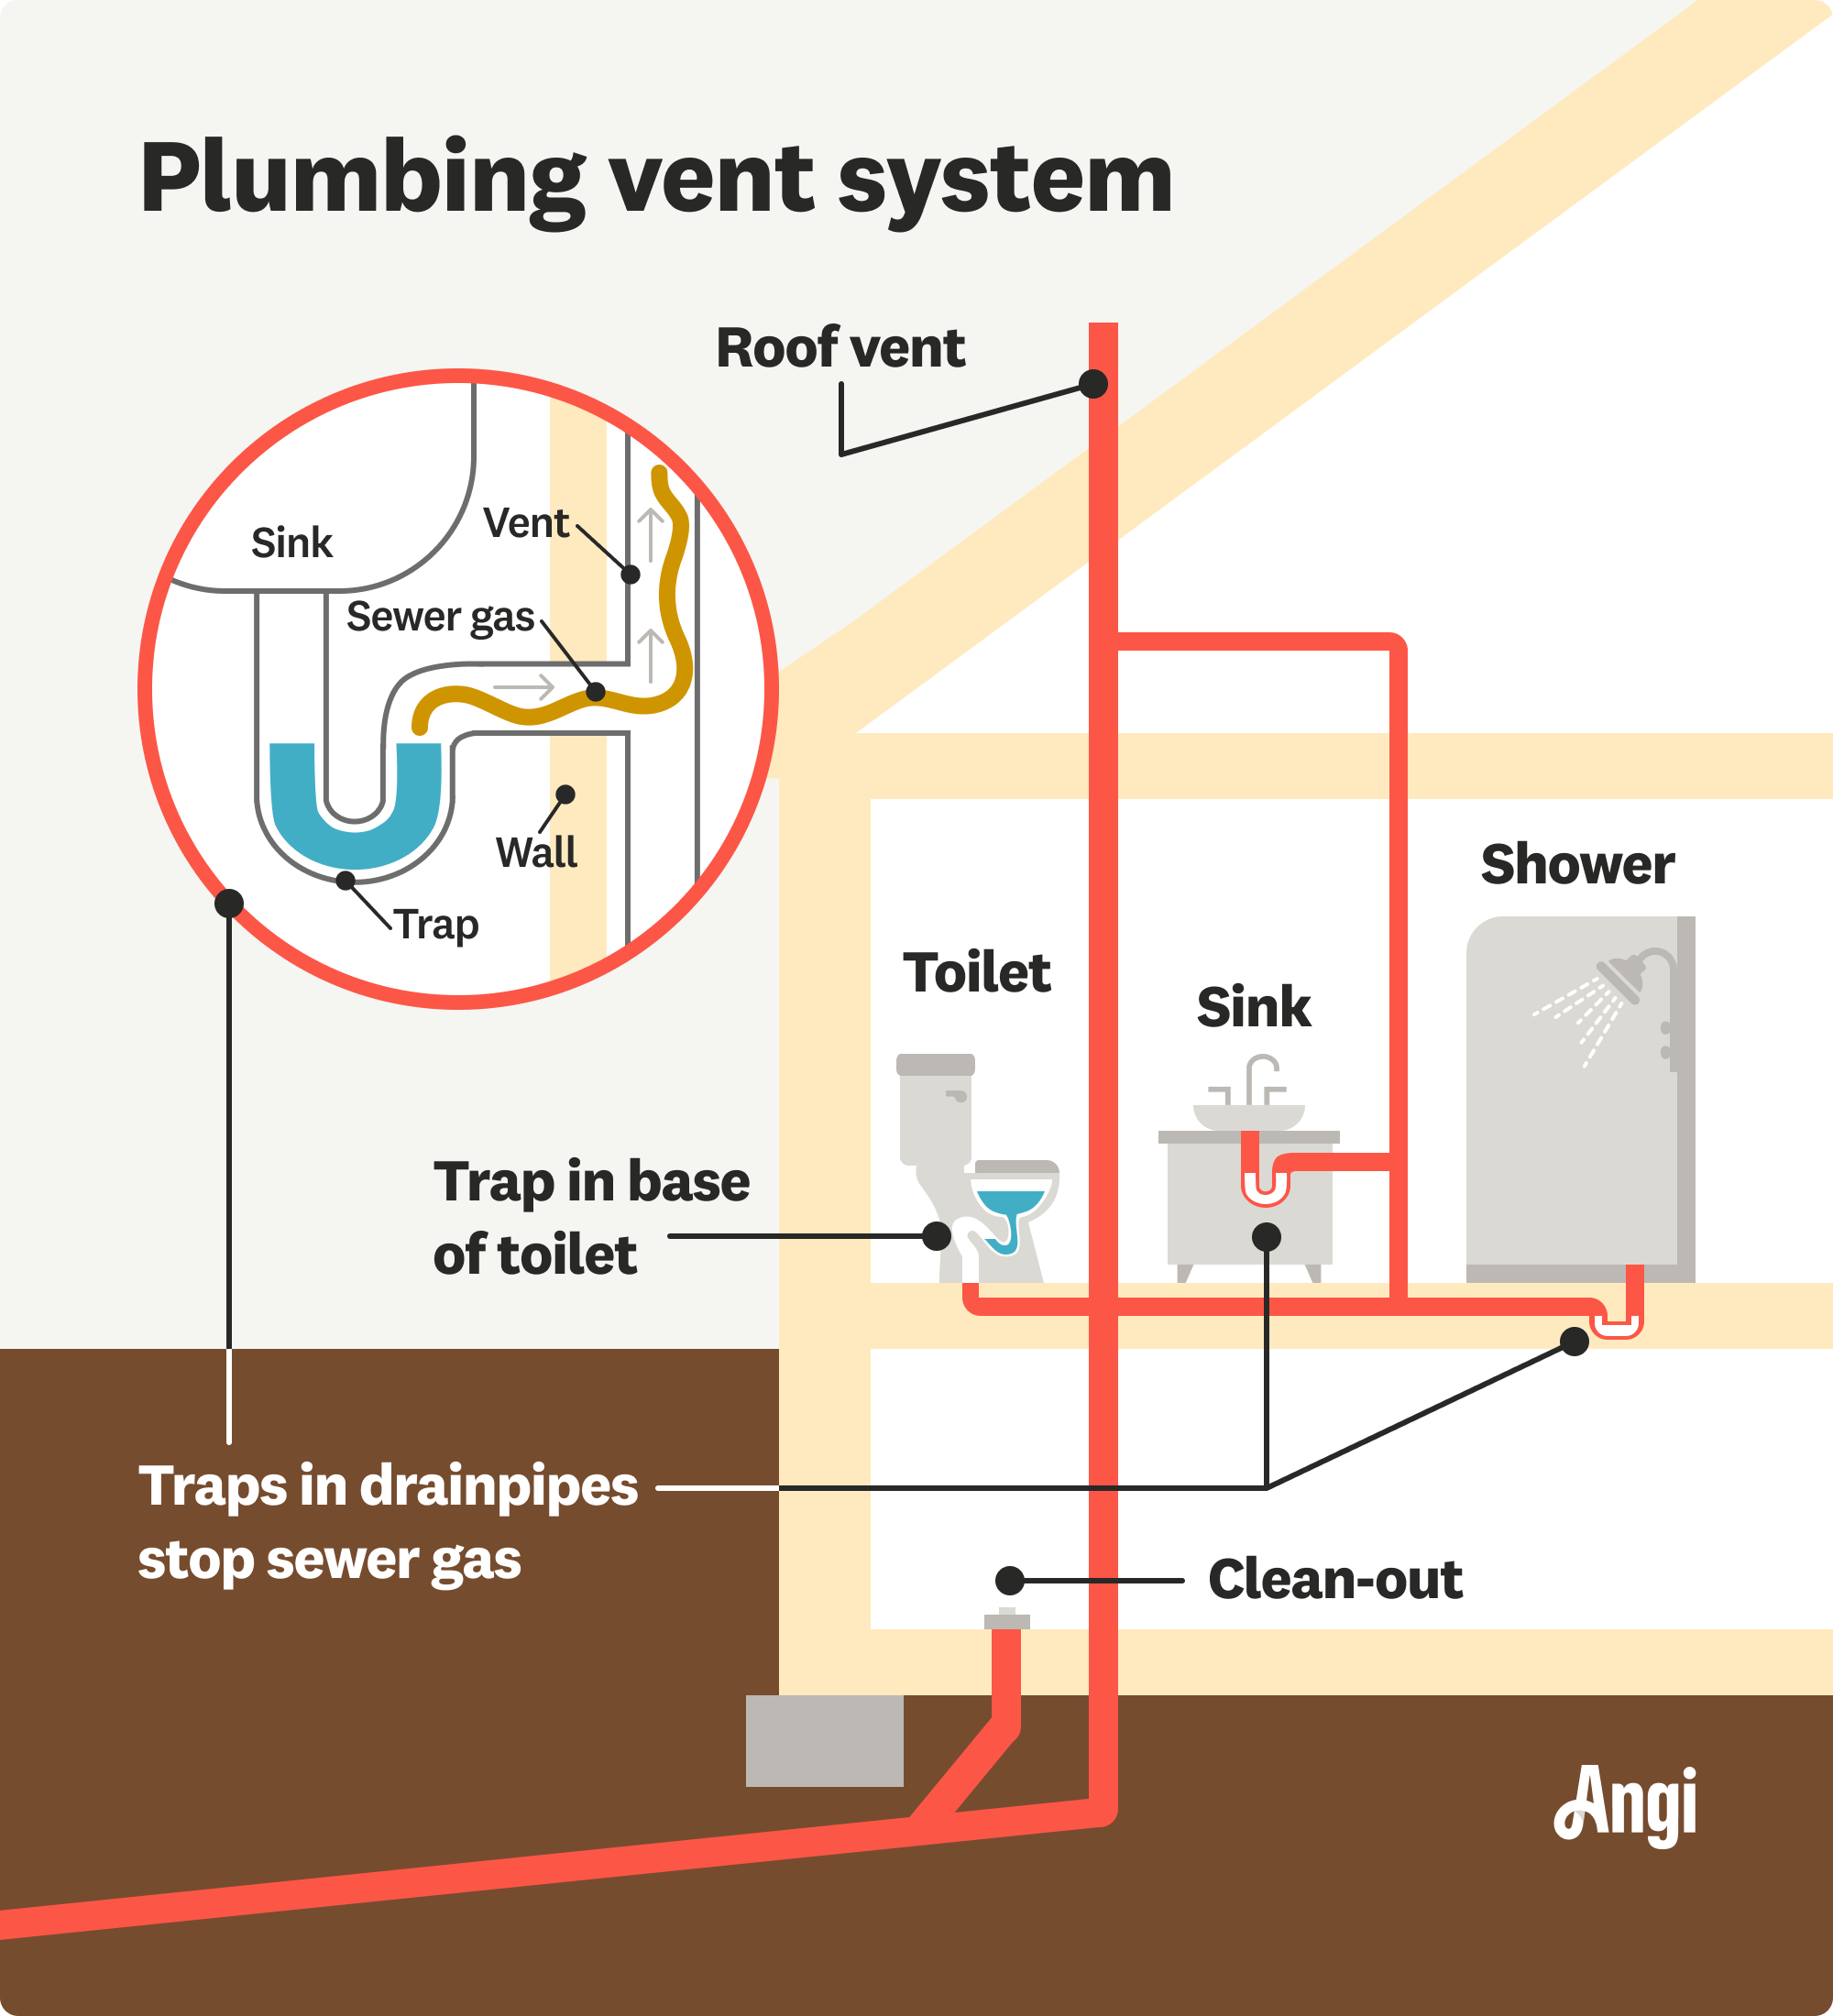
Plumbing vents, or plumbing stacks or drain-waste-vent (DWV) pipes, are vertical pipes that connect to home plumbing systems. They run up and through the roof to vent plumbing gases and odors to the outside. They also allow fresh air into the plumbing system, which regulates air pressure and improves drainage and water flow. All plumbing fixtures require ventilation to work correctly.
While the basics are the same, every plumbing system has unique features, so you’ll want to ask your plumber about your home system.
Most plumbing pros install 2-inch PVC vent pipes. However, if you’re using the same vent pipe for multiple fixtures, you may want a pipe with a larger diameter. Remember that plumbing codes vary. For example, uniform plumbing code (UPC) recommends 2-inch pipes, while international plumbing code (IPC) suggests using pipes with a 1 ½ diameter. Your plumber will recommend the right-sized vent pipe for your home based on local codes, your fixtures, and your specific job requirements.
UPC dictates that the distance between a toilet trap (the curved channel inside the base of a toilet where the water flows when you flush) and a toilet vent should be less than 6 feet. In other words, your toilet vent should meet the vent pipe drain line within 6 feet of the toilet trap. If the distance is longer, it can lead to gurgling sounds, problems with flushing, sluggish water movement, sewer gasses and smells leaking into the home, and more.
Standard toilet drainpipe sizes are 3-, 4-, and 6-inch diameter with most homes using 3-inch drain pipes. Your local plumber will know not only the correct drainpipe size, but also the material, drain line length, and bend size for your home.
Before you install your vent lines, you should have your pipe routing and plans checked and approved by a local inspector. Drain and vent lines must be installed precisely, so they will need to be placed before the supply pipes.
If your drainpipes must run over a floor, calculate the vertical space available. You’ll need to slope the drainpipe at a ⅛-¼-inch drop per foot. While not every inspector will care about the slope of horizontal vent pipes, some will, so it’s better to be on the safe side and plan to slope your vent pipes.
In addition, if you’re wondering how to vent a toilet, sink, and shower, you’ll need to ensure you have the right piping. No matter what, check local plumbing and building codes as there might be specifications about which size and material your pipes should be, the distance between certain fixtures and vent pipes, and the placement of the ventilation. Some municipalities may require that a professional plumber or contractor do the work.
To get it right, follow these steps when venting a combination of bathroom fixtures, such as a toilet, sink, and shower. You can also call a local plumber to ensure the job meets local building codes.
When many people think of plumbers, they are often associated with repairing faucets and toilets or unclogging pipes. However, due to the certifications and intensive training required for this trade, plumbers have diverse skill sets and can also assist in areas like HVAC, water testing, and appliance installation, among others.

Depending on your setup, you’ll need to decide how the vent lines will line up with the drain. If the toilet drain does not directly connect to a vent, use a reducing Y and a 45-degree street elbow to point the vent line toward the wall.
If the vent wall is parallel to the drainpipe, you can install a 45-degree reducing Y and a street elbow to point to the wall. If necessary, add a second elbow to position the vertical vent where you want it.
If the vent wall is opposite the drain line, you can use a reducing Y and a street elbow pointed straight at the wall or at an angle.
Measure the distance from the toilet drainpipe to the roofline, adding a few extra inches to accommodate adjustments. Use a saw to cut the vent pipe.
Create a hole at your chosen exit point on the roof; make sure it’s a smidge larger than the pipe’s diameter. Double-check that no obstructions, like rafters or wires, are in the way.
Connect the vent pipe to the toilet drainpipe using a PVC coupling or connector. Using PVC cement, seal the connection to prevent water from getting in or out. Extend the pipe through the hole in the roof. You can attach other fixtures to the same vent pipe using elbow and tee pipes as needed. The sink drainpipe and the shower drainpipe are vented with a 1 1/2-inch pipe that branches off from the PVC mainline.
Some people prefer to create independent vent pipes for each fixture—it might also be necessary if you have a lot of them. Remember that each vent pipe you add means you will need to find space for that pipe to exit the home through the roof.
Attach the vent cap on top of the vent pipe to prevent leaves, debris, and water from getting in. The vent cap should allow for airflow while also stopping rain, pests, and other hazards from entering.

After installing the pipe and cap, inspect the system and check all the connections to confirm they’re secure. Run water through the toilet and other fixtures to confirm the venting system is working as it should—there shouldn’t be any leaks, slow draining, or gurgling sounds.
From toilets to sinks to showers, your plumbing systems need proper ventilation. Here are some of the top tips to keep your plumbing fixtures working their best and the water flowing smoothly:
Plan for vent pipe placement when remodeling or building a new home. You can combine vents where possible to simplify your plumbing and limit the number of pipes that run through the walls and exit via the roof. Fewer vents will help you save on installation costs and help keep your roof watertight.
Hire a pro to do the job right from the start. Hire a licensed plumber who is insured and follows local plumbing and building codes.
Most plumbing ventilation pipes are made of PVC or ABS (acrylonitrile butadiene styrene, a tough, black plastic piping often used for venting and drainage) and measure between 1 1/2 and 10 inches in diameter.
Venting a toilet and sink together is possible. You’ll need wider ventilation pipes if you’re connecting more fixtures to the same vent.
Know the difference between wet venting and dry venting and the best uses for each. Wet venting moves wastewater, while dry venting only moves air. Wet venting and combination vents are prone to clogs and buildup, while dry vents are easier to maintain and rarely develop blockages. Dry venting gives each plumbing fixture its own vent pipe, so you’ll need more piping and vents.
Depending on local codes, vent pipes should extend at least 6 inches above the roofing and 12 inches away from vertical walls.
Vent pipes must stay dry, so they almost always stem off the top of drainpipes. Most are set completely vertical, but they should never be less than a 45-degree angle from horizontal to prevent water from backing up into them.
Signs of plumbing vent pipe problems include gurgling, low water flow, slow drainage, standing water in sinks and showers, and sewer gas smells like sewage or rotten eggs.
For a DIYer with some construction or plumbing experience, this is a project that can be completed in one weekend. That said, some cities have specific building codes for plumbing work, and if this project isn’t done perfectly, you could create a big problem—your sewage could back up, or you might cause leaking, to name two potential risks. If hiring a local plumber, the cost to install a plumbing vent pipe is between $500 and $5,000, depending on if any repairs are needed and the complexity of the plumbing. The average cost is $1,500.
C.E. Larusso contributed to this piece.
From average costs to expert advice, get all the answers you need to get your job done.
A main water shut-off valve controls water flow for your entire home. Here we break down the cost to replace a main water shut-off valve.

Whether you’re changing your home’s floor plan in a remodel or just replacing old, worn-out plumbing, this guide will help you estimate the cost of repiping a house.
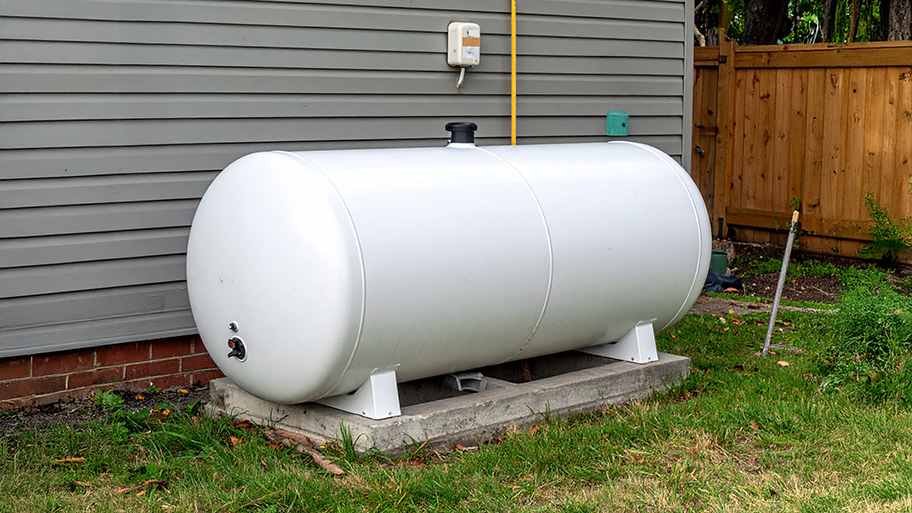
The average propane tank costs between $600 and $2,500, depending on the size, location, and more. Our expert guide explores all the factors.

A new showerhead is an easy, affordable way to upgrade any bathroom. Learn how to change a showerhead, from removing the old to installing the new.

Need to stop a plumbing leak quickly and minimize water damage in your home? Buy yourself some time with these temporary fixes for a leaking pipe.

Cutting pipes can be easy, but this job requires some safety measures. Learn how to cut metal pipes quickly and safely for any plumbing project.