
•
Get the latest snow removal cost estimates, including average prices, key cost factors, and tips to help homeowners budget for safe, efficient snow removal.
There’s snow place like home, especially when your pathways are free of the fluffy stuff


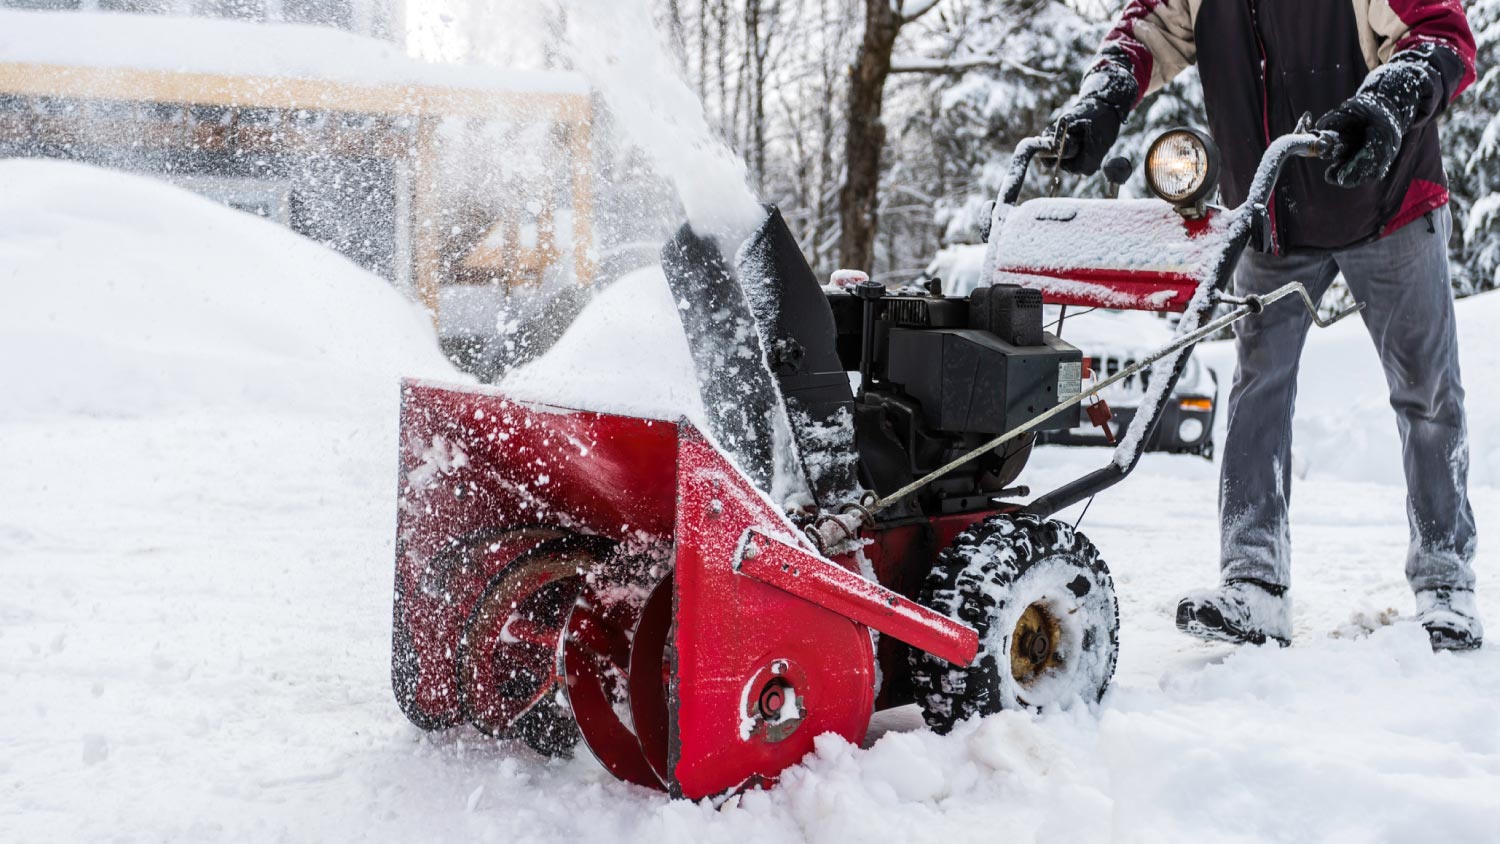
The first snow of the season can be magical, until it’s time to walk to your car and you’re slipping and sliding down your driveway. Luckily, learning how to use a snowblower can make the removal process quick and efficient so that you don’t dread when the forecast calls for a few more inches.
If you’re new to the snowblower game, the machines come in various sizes with many different features to fit your needs. Use our guide to figure out how to use a snowblower, how to prepare for snow removal, and how to maintain your snowblower when it’s not in use.
Winter conditions can make snow removal tasks treacherous due to the risk of slips, falls, and overexertion. To prioritize safety, it's best to hire professionals with the proper equipment and expertise to handle snow removal, reducing the potential for accidents and injuries.

For a quality snowblower, you’ll pay anywhere from $950 to $1,500, depending on the size and model. High-priced snow blowers have drive systems that match the pace of your walk and more power to move snow faster and further.
If you live in an area that gets heavy snow just a few months out of the year, you can spend closer to $500 for a smaller machine that won’t get as much use. On the flip side, a heavy-duty snowblower may cost more upfront but can be less expensive than an annual snow removal contract if you live in a region that gets heavy snow every winter.
Once you get the hang of it, using your snowblower can be as simple as mowing the grass or trimming your hedges, so long as you pay attention to the condition of the snow and prepare for snow removal in advance. Follow the steps below for safe, effective snow removal.
Snow blowers can blow snow around 20 feet in the air or more, and many feature a snow chute that blows snow straight ahead or to one side. Take a look at your driveway and choose where you want that snow to fall. Avoid blowing snow against exterior walls, fences, vehicles, tree limbs, and similar trouble spots. When possible, blow snow as far away as possible to avoid piling high snowbanks.
If you are using a corded snow blower, make sure the path always keeps the cord from getting caught in the blower’s path. Go lengthwise whenever possible to save yourself time. After the first few sessions, you can make adjustments to optimize your path.
If your snow blower is new or recently taken out of storage, you will need to add fuel, either gas or diesel. Some snow blowers are electric, in which case you can skip this step. If your snow blower has an oil tank, it’s a good idea to add new oil.
This is also a great time to quickly test the tires to see if any are flat or loose, and double-check the height of the snow blower to make sure the augur is at the proper level above the ground.
Blizzards can bring many unwelcome guests in snow drifts. Like tossing away pinecones before mowing the lawn, fish out any noticeable branches or trash from the snow before you begin. You don’t want anything tangled in the snow blower’s auger or lobbed like a missile at your home.
Prime the snow blower motor if necessary (if it has an external oil bulb) and test operation by starting the motor on a clean, smooth surface. It’s important to check everything is running properly, and the motor is turning smoothly. Give the snow blower a minute to warm up, then guide it into the snow.

Point your discharge chute in the direction you want the snow to go once it’s off your pathway and into the machine. This action determines where the snow will pile up once removed, so make sure it’s not in an area that gets heavy traffic or would block other sidewalks or pathways.

Engage the drive control and move slowly, pushing the snow blower in front of you to begin snow removal. Make sure to go at a steady, slow pace in order to prevent too much snow from getting inside the machine at once and causing clogs.
Many snow blowers come with throttles or gear settings that you can adjust up or down. Faster speed is more suitable for low snow levels that the blower can move through quickly. If the snow is higher than one foot, it’s a good idea to slow down and give the blower time to do its work. Adjust as needed while you work.
Once your first pass is complete, disengage the drive control and take a break from pushing the machine so that you can readjust the discharge chute. The last thing you want is to clear one way, and then have snow thrown out on the path you just cleared.
Snow blowers have come a long way, but thick or icy snow can still clog blower chutes, especially small models. If that happens, pull the snow blower back and shut it down. Wait a few seconds, then use a long, thin tool to dig in and unclog it. The same rules apply as with garbage disposals—don’t stick your own hand or fingers inside.

Continue your route, adjusting the discharge chute after each pass and keeping a slow pace. For wet, heavy snow, make sure to run the blower at full speed but move at an even slower pace to prevent clogs.
When finished, shut the blower down and use a small brush to quickly clear the chute and auger of any remaining snow. This is an essential snow blower maintenance step. Store the blower in a dry, enclosed space until you are ready to use it again or winterize it. Complete a final pass of the driveway and sweep or shovel any paths that were too small for the blower to reach.
Like lawn mowers or other outdoor machinery, yearly snowblower maintenance is crucial to keeping your machine in good shape and ensures it’s ready to use once winter rolls around.
Consult your owner’s manual and follow the steps below once you’re done using your snowblower for the season to make sure it stays in mint condition while it’s stored in your garage or shed.
Drain the fuel system.
Change the oil.
Grease the lubrication points.
Keep it covered when you’re not using it.
Store it away from water heaters, furnaces, or dryers.
If you have the extra time and can afford to pay the initial cost of a snowblower, tackling snow removal yourself will only cost what you decide to spend on the machinery, which is typically anywhere from $500 to $1,500. After you’ve purchased a snowblower, you’ll only pay for materials required for regular maintenance, such as gas and oil.
If you don’t have the time or energy to dedicate to regular cleaning and maintenance, you can hire a local snow removal company to perform annual tune ups on your snowblower. An expert in the snow removal field will be familiar with a variety of machines so they can fix any mechanical problems or repair or replace any parts that are worse for wear.
Professional snow removal services can charge around $350 to $450 each season, or an hourly rate of $25 to $75, depending on the area they’re plowing and how much snow has accumulated.
From average costs to expert advice, get all the answers you need to get your job done.
Get the latest snow removal cost estimates, including average prices, key cost factors, and tips to help homeowners budget for safe, efficient snow removal.
Discover the cost to install snow guards. Learn about average prices, key cost factors, and tips to save on your snow guard installation project.

Winter storms and blizzards are no joke, even if you are relatively snug at home. Follow these tips to survive and thrive during brutal weather events.

Snow and ice create a slippery hazard, so it’s important to address them. Learn the key differences between using sand vs. salt for snow.

If your winters pile on the snow, you need the right tool for the job. Here are all the types of snow removal equipment at your disposal, from handheld to high-tech options.

Homeowners in cold-weather climates reach for rock salt to de-ice their walkways and driveways. How does salt melt ice? It’s a matter of simple chemistry.