How to Replace Sprinkler Heads Like a Pro
Don’t let a busted head rain on your parade


- Shovel
- Trowel
- Pliers
- Adjustable wrench
- Screwdriver
- Replacement sprinkler head
- Dirt or sod
- Small container or bag
- Plumber’s tape (optional)
A well-functioning sprinkler system is crucial for keeping your lawn lush and green, but over time, individual sprinkler heads can become damaged or clogged. If you’re wondering how to replace a sprinkler head, the process is easier than you might think. With a few tools, some basic knowledge, and a little patience, you can swap out a broken sprinkler head in no time. This guide will walk you through the steps to ensure a smooth and efficient replacement.

Examine Your Sprinkler Heads
Before learning how to replace sprinkler heads, you should assess them to ensure that replacing the heads is the right fix and that there’s not some other sprinkler system repair you need.
Make Sure You Need a New Sprinkler Head
Here are some signs that you need to replace your sprinkler head:
The sprinkler is not spraying evenly or at all.
There are visible cracks or broken components.
Water is leaking from the base of the sprinkler.
The head doesn’t rise properly when activated.
You notice water pooling around the head even when it’s off.
Choose the Right Sprinkler Head
Sprinkler heads vary based on water pressure, spray patterns, and the type of lawn or garden they serve. Check the existing sprinkler head’s model number or take it to a local home improvement store to find a suitable replacement.
Dig Around the Sprinkler Head
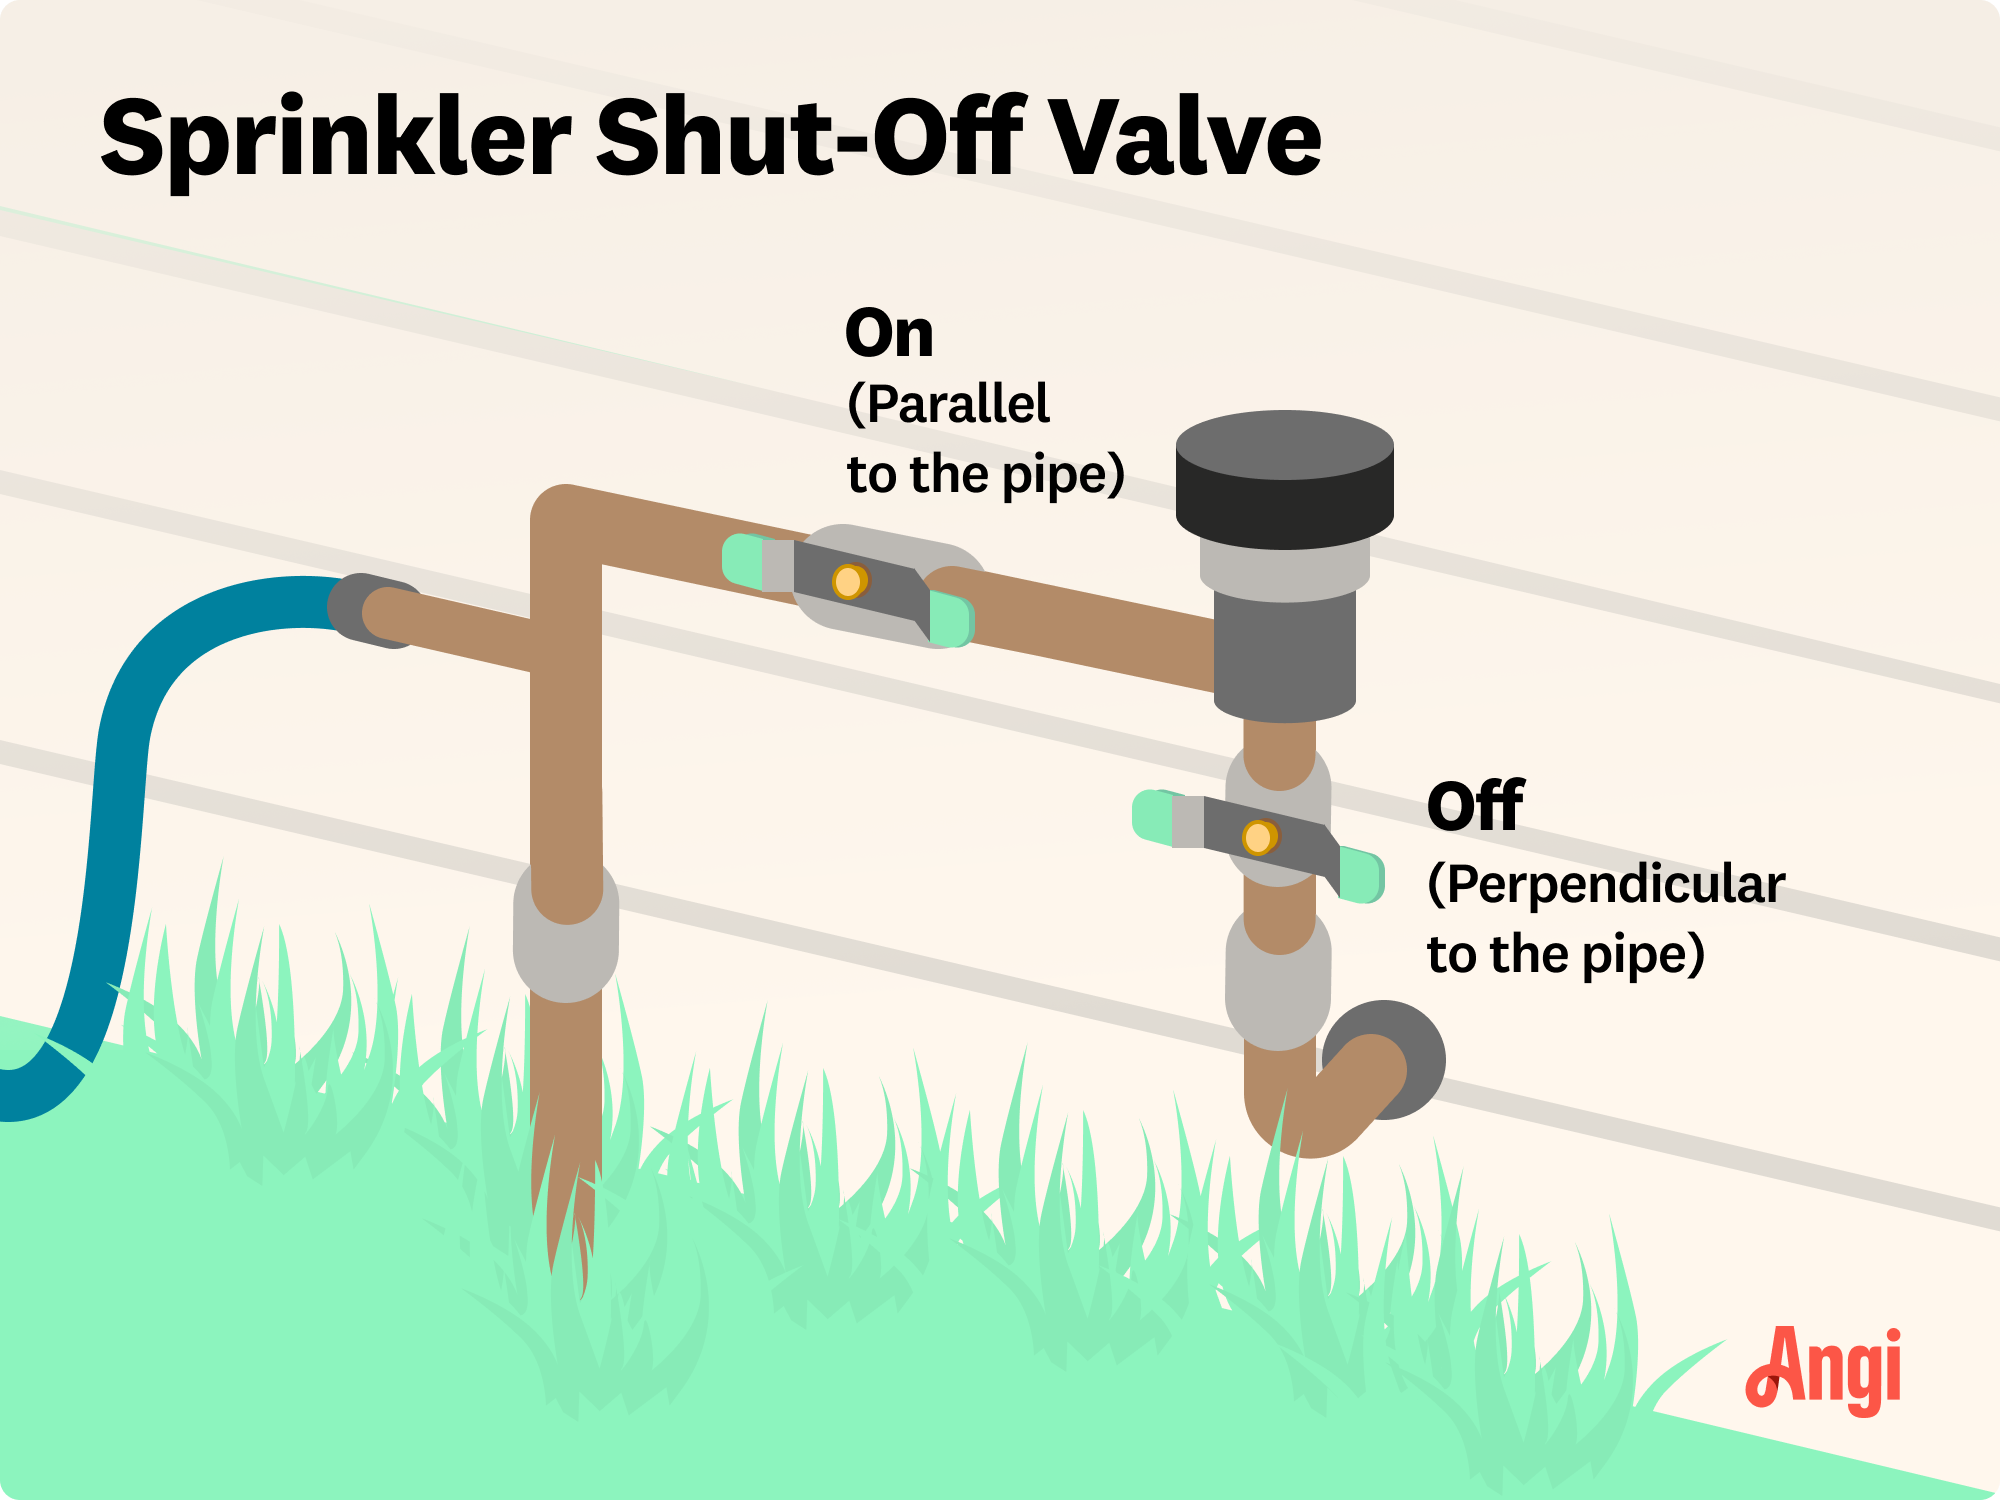
Turn off your water at the sprinkler shut-off valve. Then, it’s time to dig:
Use a shovel or trowel to carefully dig a circular hole around the sprinkler head. Aim for a radius of 2 inches.
Dig 4 to 5 inches deep, ensuring you don’t damage the underground piping.
Keep the removed grass and soil intact so that you can replace it later. You might find it helpful to set the grass on a piece of plastic or a small tarp.
If the soil is loose, gently compact the sides of the hole to prevent it from collapsing while you work. You can also pour a cup of water onto the top of the sprinkler head before removing it to help the soil compact itself a bit.
Remove the Old Sprinkler Head
Now that you’ve exposed the sprinkler head, you can remove it:
Grip the base of the sprinkler head and gently twist it counterclockwise.
If it’s stuck, use pliers or an adjustable wrench to loosen it.
Once it’s loose, carefully pull the entire sprinkler head, including the shell, out of the ground.
Inspect the connecting pipe for debris or damage before proceeding.
Install the New Sprinkler Head and Nozzle
With the old head removed, you can install the new one:
If you want to, you can wrap the threads of the new sprinkler head with plumber’s tape to prevent leaks, but this isn’t a requirement.
Align the new sprinkler head with the existing pipe and screw it in clockwise by hand.
Once snug, use pliers or an adjustable wrench to tighten the head, but avoid over-tightening.
Adjust the sprinkler head to ensure it’s level with the ground.
If your sprinkler head requires a nozzle, attach the correct size and adjust it to control the spray pattern.
Test the New Sprinkler Head
 Photo: Alexey Emelyanov / iStock / Getty Images Plus / Getty Images
Before calling it a day, make sure your new sprinkler head is working correctly:
Turn on the sprinkler system and watch the new head do its thing.
Check for leaks around the base.
Ensure the spray pattern covers the entire area you need to water, and adjust it as needed.
If the sprinkler isn’t performing like you think it should, recheck the nozzle size and alignment.
Replace the Grass
With the new head installed, you can put your lawn back in order:
Refill the hole with the removed soil, gently tamping it down to eliminate air pockets.
Place the grass or sod back over the hole, pressing it down firmly.
Water the area to help the grass settle and encourage regrowth.
Mistakes to Avoid
Even a simple sprinkler head replacement can go wrong if you’re not careful. Avoiding common mistakes can save you time, money, and frustration. Here are a few key errors to watch out for during the process.
Digging too deep: This can damage underground pipes and create unnecessary repair work.
Forgetting to check compatibility: Not all sprinkler heads work with every system. Ensure your replacement matches the existing setup.
Over-tightening the head: This can crack the fittings or damage the pipe.
Skipping the test phase: Always test before closing up the area to avoid having to dig it up again.
DIY vs. Hiring a Pro
Replacing a sprinkler head is a fairly straightforward DIY project that many can tackle on their own. It requires only basic tools and minimal effort, and it can save money. However, there are some risks involved, especially for those who are inexperienced with irrigation systems. Digging too deep or over-tightening the new sprinkler head can lead to costly damage, and selecting the wrong replacement head may result in inefficient watering.
If you’re unsure about your skill level or suspect larger system issues, such as low water pressure, leaks, or multiple malfunctioning heads, it may be best to call a sprinkler repair pro near you. A professional can diagnose underlying problems, ensure proper installation, and save you the hassle of troubleshooting potential mistakes.
Frequently Asked Questions
Replacing a sprinkler head takes between 30 minutes and an hour, depending on the complexity of the system and soil conditions. If the old sprinkler head comes out easily and the new one goes in without issues, you’ll be done quickly. However, if the soil is compacted, the head is stuck, or you need to troubleshoot alignment and water pressure, it may take longer. Proper preparation and having the right tools on hand can speed up the job.
Yes, you should always shut off your sprinkler system before replacing a sprinkler head. This prevents water from spraying unexpectedly and allows for a smoother, mess-free installation. If possible, turn off the specific sprinkler zone rather than the entire system to avoid disrupting other areas. Shutting off the water also helps prevent pressure buildup in the pipes, reducing the risk of damage or leaks when installing the new sprinkler head.
Yes, in some cases, you can replace just the nozzle instead of the entire sprinkler head. If the head itself is intact but the spray pattern is uneven, weak, or clogged, swapping out the nozzle may restore proper function. However, if the sprinkler head is cracked, leaking, or not rising correctly, a full replacement is the better option. Checking for debris or buildup inside the head before replacing the nozzle can also help improve performance.
Sprinkler heads last between five and 10 years, but their lifespan depends on factors like water quality, soil conditions, and overall system maintenance. Frequent exposure to harsh weather, foot traffic, or high water pressure can cause wear and tear, leading to leaks or malfunctions. The cost of regular sprinkler system inspections adds to your budget, but they can help identify issues early, allowing for timely replacements before major problems arise. If you notice uneven watering, low pressure, or physical damage, it may be time to replace the sprinkler head.


- How to Clean Sprinkler Heads and Filters to Keep Your System in Perfect Condition
- How to Adjust Sprinkler Heads in Your Irrigation System
- How to Find Sprinkler Heads Covered by Grass: 7 Easy Methods
- Sprinkler Head Isn't Rotating: 4 Common Reasons Why
- 5 Reasons Your Sprinkler Head Is Leaking
- 8 Types of Sprinkler Heads to Get Your Grass Growing
- Sprinklers 101: The Key Parts of the Sprinkler System
- Do You Know Who to Call for Sprinkler Repair? What to Do When Your Irrigation System Is Out of Commission
- Who Do You Call to Turn On a Sprinkler System? Hiring Guide and DIY Tips
- Can an Irrigation System Leak If Turned Off? 8 Signs Not to Ignore


