

Fire damage restoration costs vary widely based on the extent of the damage. Learn how to assess your home and estimate your total after a fire.
Make your water-damaged plaster look brand new


Large amounts of water can quickly soften and loosen your wall plaster, causing water damage to your walls. If a leak damages your ceiling or wall plaster, you will notice bubbling or bulging behind the top-layer paint or wallpaper. However, worry not. You can easily repair water-damaged wall plaster on your own unless the damaged area is too big to tackle independently.
Start by evaluating the situation. The most obvious signs of water damage are bubbled paint and wallpaper. You can gauge how big the affected area is just by looking or feeling with your hand. Next, you need to check for mold growth. Sometimes, leaks happen behind the wall, and more damage has been done before visible damage appears on the surface. If you confirm mold growth, hire a mold removal professional immediately. Don’t attempt mold removal yourself, as it can cause severe damage to your health.
Plaster is extremely vulnerable to moisture and water damage. Therefore, we recommend you purchase an oil-based primer, which costs $25 to $35 per gallon. Make sure you go with a trusted brand. You can also use an aerosol primer or a good wet wall primer.

Clean the affected surface using a damp cloth or a sponge with soap. Sugar soap works the best. This is also a good time to peel off surface paint or wallpaper that is already falling apart under the water damage. Before moving to the next step, you should also lay down some towels to protect your floor.
You can remove the damaged plaster once the surface is clean and dry. Usually, you can carve away damaged plaster using a putty knife. For larger areas, you may want to use a prybar. This step can be messy and dusty, so wear a mask to prevent breathing in plaster dust. Be sure to remove all damaged plasters. You will notice the difference as dry, undamaged plaster is much harder.

Use a stiff brush to clean dust off the surface you just worked on. You can also use a vacuum to remove any excess. Next, use a wet sponge to wash the surrounding area. Wait until the wall naturally dries before proceeding with the next step.
Once the wall is completely dry, apply your primer. Different primers may require different curing times. Most oil-based primers will cure in 30 to 60 minutes but are best left untouched for one to three hours before applying topcoats. You can also apply multiple primer layers for a stronger seal. Just make sure you let each layer cure completely before adding another.

Apply a few layers of joint compound once the primer fully dries. You can find a decent-sized patching plaster at any hardware store for less than $10. Spackle and drywall compounds are also acceptable options. Spread the compound evenly into thin layers and scrape off any excess with a putty knife. Once a layer is dried, smooth the surface before applying another layer. Repeat this process until the wall plaster is fully repaired.
The repair is complete at this point if you are okay with leaving the wall plaster bare. If you want to repaint the wall, move to the final step.

Once your final layer of compound is dry and sanded smooth, apply a fresh coat of paint to match your existing wall. You can also add a primer layer to seal off the paint for additional protection.
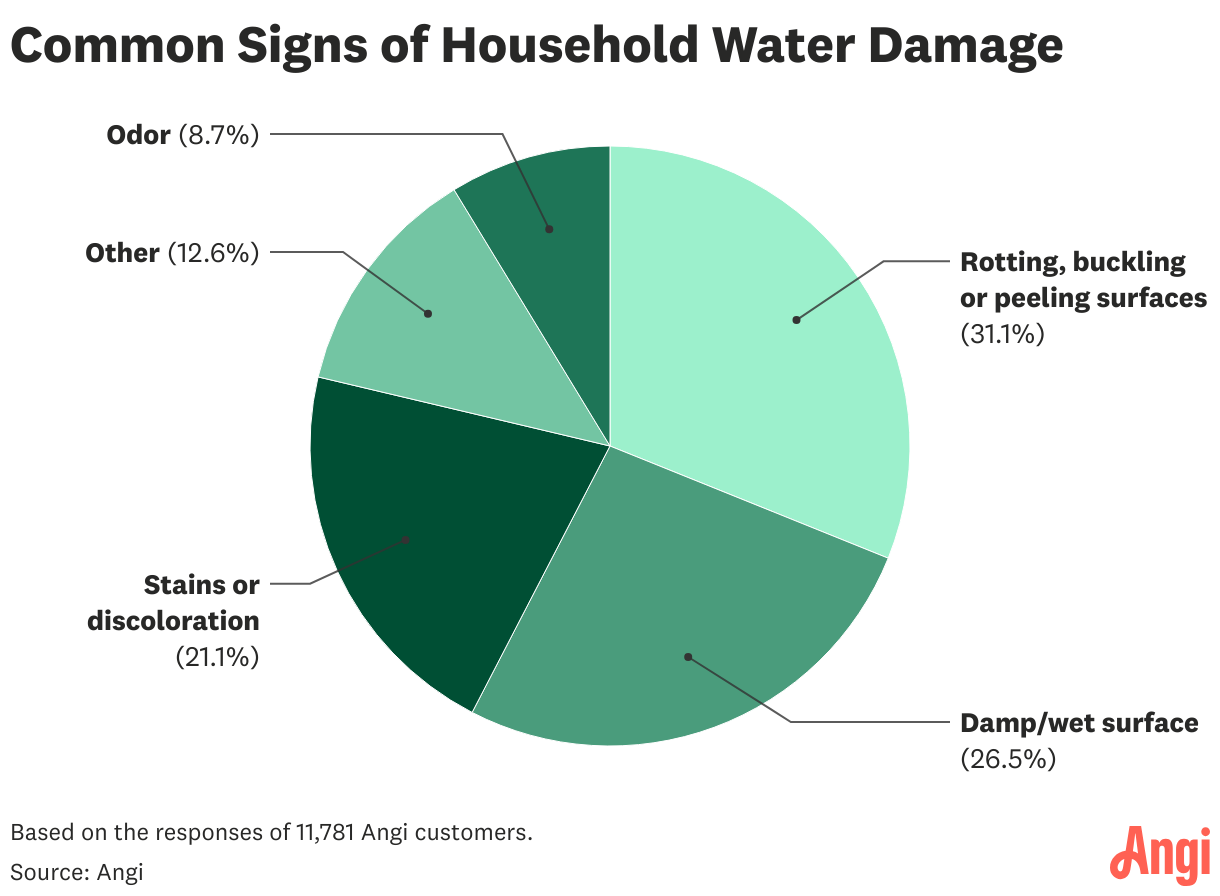
It’s important to catch water damage early. The most common signs that indicate you have a moisture problem are rotting, buckling, or peeling surfaces, which show up in 31% of cases. Damp or wet areas are also common indicators at 26.5%.
Before you attempt to repair water-damaged wall plaster, keep these common mistakes in mind:
Ignoring the Root Cause: Make sure you understand the underlying reason for the damage and resolve it as soon as possible. Otherwise, you could see further damage and more costly repairs in the future. Note that you might need to hire a water damage restoration pro to help solve the issue. Understand the cost of water damage restoration before you hire someone.
Skipping the Prep: While it may be tempting to dive into repairs without any prep, doing so can compromise its quality and lead to other issues down the road, such as paint bubbling on walls and water damage from mold. Don’t forget to clean the area and remove any dirt, debris, and loose plaster.
Using the Wrong Materials: Understand that plaster and joint compound are not the same. You’ll need to invest in the proper plaster mix as joint compound is designed for drywall and might not stick to the plaster well.
Disregarding Safety: Safety should be top of mind when you repair water-damaged wall plaster. Wear goggles, gloves, and other protective gear. Ensure proper ventilation in your work area as well.
Not Matching the Original Texture: One of the most difficult parts of a wall plaster repair project is finding the ideal match. You may have to use a sponge and experiment a bit to get the best match.
Rushing Drying: Plaster takes time to dry. If you try to speed up the process, you may increase the risk of cracks, discoloration, and other issues. Patience is key when you undertake a plaster repair.
Failing to Call a Pro: In some cases, especially when there is extreme water damage, it’s a good idea to outsource the whole project to a pro. They can answer all your pressing questions, such as how long water damage restoration takes and what to do after water damage.
You can usually repair water-damaged wall plaster on your own. However, if a large area is damaged by water and you need a full replacement of the damaged wall plaster, hire a drywall specialist to upgrade the old plaster to modern drywall. New drywalls cost $1.50 to $3 per square foot, and $50 to $100 per hour of labor.
Similarly, if the plaster damage is on the ceiling or other places that are hard to reach or too big to work with, hire a water damage restoration professional to do the job right. They will also tell you if mold is present and if you need to find a mold restoration company.
From average costs to expert advice, get all the answers you need to get your job done.
Fire damage restoration costs vary widely based on the extent of the damage. Learn how to assess your home and estimate your total after a fire.
Water damage restoration costs depend on the severity of the problem, the type of water, and the length of time the damage has been occurring.

Ozone treatment can help with lingering smoke odors. Learn about ozone smoke removal costs to get an accurate idea of how to budget for this service.

Buying a fire-damaged house can be a complicated process, so make sure you understand what you’re getting yourself into before you pull the trigger.

Are you in deep water and wondering who to call when your house floods? More than likely, the list includes a few different pros. Get the details in this guide.

Most homeowners don’t know how to deal with water damage. Use this guide to take the proper steps to minimize damage and keep your family and home safe.