How to Repair Rotted Wood in 6 Steps
Save your wood, save your wallet


- Putty knife
- Wood chisel
- Screwdriver
- Drill (optional)
- Safety goggles
- Wood filler
- Epoxy wood hardener
- Sandpaper
- Primer or paint (optional)
Rotted wood is a common issue in homes, especially in areas exposed to moisture, such as windowsills and door frames. If left untreated, wood rot can spread to other wood and even other materials in your home, potentially compromising the structural integrity and appearance and leading to costly repairs. If you're up to the task, savvy DIY homeowners can learn how to repair rotted wood and save some money rather than hiring a professional.

Inspect the Damage
 Photo: Mel Stoutsenberger / Adobe Stock
Using a screwdriver, inspect the area to determine the extent of the damage. Gently poke the area with the tool; if it's soft or spongy, you’re dealing with wet rot, sometimes referred to as white rot or soft rot. If the wood is crumbly or flakes off in cubes, you’re dealing with dry rot, sometimes called brown rot. If you notice that more than just the surface is damaged, replacing it would be a better option than repairing it. In that case, call a water damage restoration specialist near you for the best results.
Clean the Area
Clean the area thoroughly with a wire brush to remove dirt, debris, and loose paint and to expose the rotted wood. Ensure the area is properly ventilated before working and wear protective gear.
Remove the Rotted Wood
 Photo: soupstock / Adobe Stock
Use a wood chisel or putty knife to cut out all the rotted wood. Remove any soft or discolored material until only solid wood is left behind. If the extent of the rotted wood is deeper, you can use a drill to help expose and remove it.
Wood rot spreads quickly, so be sure you remove all damaged wood to avoid ongoing problems.
Treat the Remaining Wood
Apply a wood hardener to the solid wood surrounding the damaged area to stabilize and strengthen it. Allow the hardener to cure per the manufacturer's instructions. Wood hardener contains volatile organic compounds (VOCs), so it’s dangerous to inhale the fumes and should never come in contact with your skin or eyes. Ventilate the area well and wear full protection when applying wood hardener, including a respirator, safety goggles, long sleeves and pants, and nitrile gloves.
Fill the Damaged Area
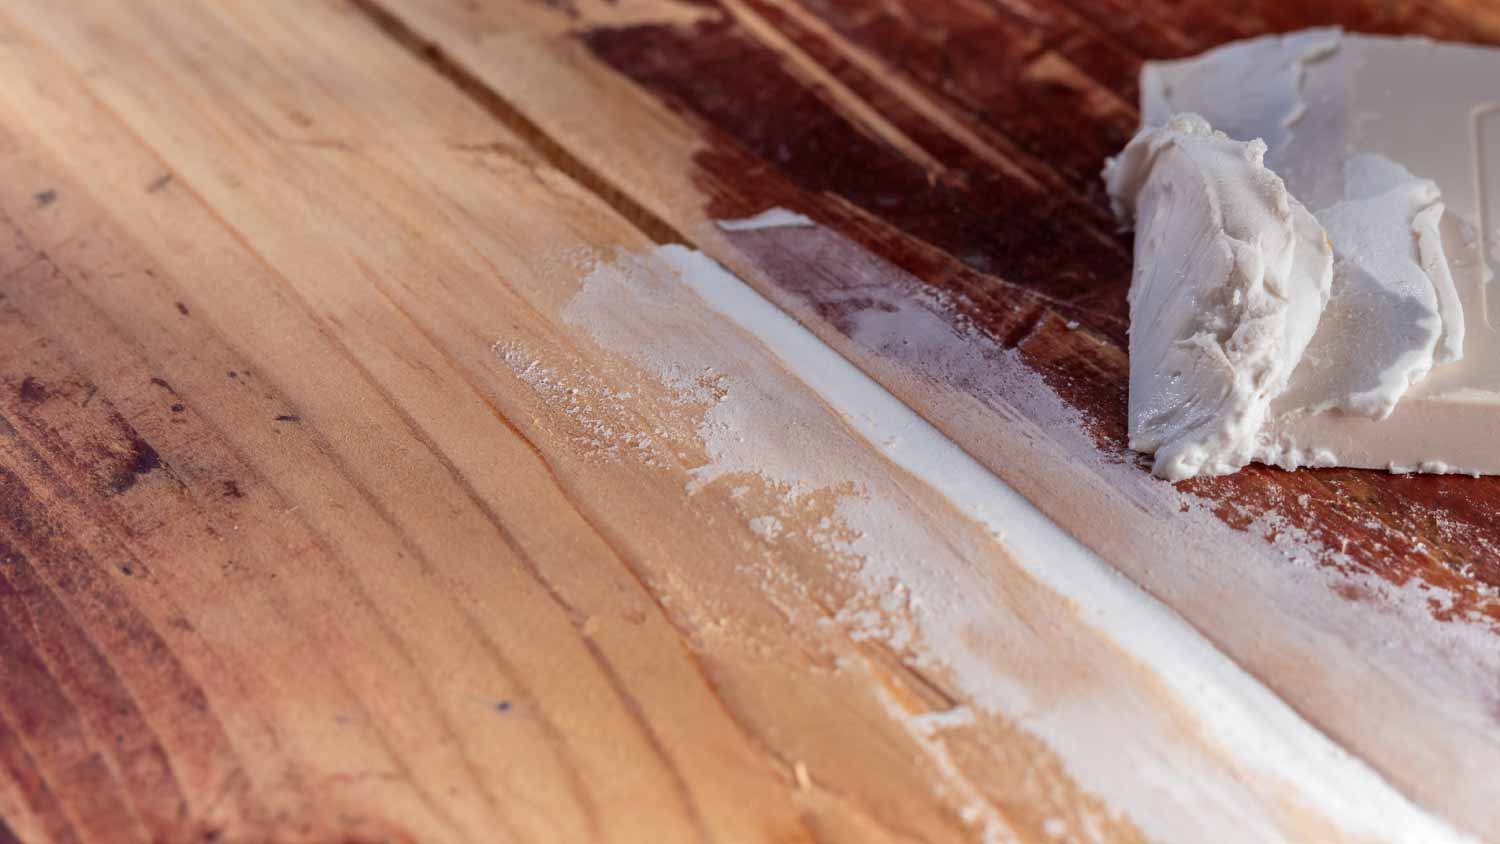 Photo: lassi meony / iStock / Getty Images Plus / Getty Images
Prepare the epoxy wood filler according to the instructions on the package. Use a putty knife to apply the filler, slightly overfilling the area to allow for sanding. Let the epoxy cure completely. Depending on the product, this can take a few hours to overnight.
Sand and Smooth
Use medium-grit sandpaper to smooth the filler. For a seamless surface, you can finish it off with fine-grit sandpaper. After sanding, sweep away any debris and clean the area before applying primer or paint.
Mistakes to Avoid When Repairing Rotted Wood
Repairing minor wood rot is a simple task that most DIYers should be able to tackle without too much of an issue. However, there are some important things to keep in mind and mistakes to avoid while you assess and fix the damage.
Failing to identify the type of wood rot. There are a few different types of wood rot, and you should always take some time to try to identify which type you’re dealing with before you begin repairs. Dry rot sets into moist wood but can continue spreading through dry wood, so you need to take more extensive steps to prevent dry rot from spreading. Wet rot will only persist in moist wood, so treating the underlying moisture issue is crucial.
Not treating the underlying issue before you start. Wood rot repair should always begin with an assessment of what caused the damage in the first place. Check for and correct roof leaks, clogged gutters, plumbing leaks, and water intrusion before repairing wood rot. Otherwise, your issue will only return.
Attempting to repair rot on structural components. If you know how to repair rotted wood, you can tackle the job on decorative pieces, like exterior trim and fascia. If you ever notice rot on structural components, like main beams, floor joists, or rafters, contact a pro immediately. Failing to address the problem in its totality can lead to expensive and dangerous structural damage over time, so that’s a job you’ll want to leave to an expert.
Neglecting to have a pro repair extensive damage. Even if the damage is on decorative wood, hiring a local handyman service or water damage specialist is best if the damage goes beyond the surface. If you start removing the rotted material and find that wood putty won’t do the trick to repair it, call a professional who fixes wood rot to replace the wood in its entirety.
DIY vs. Hiring a Pro
Repairing rotted wood is a manageable DIY project if you have basic carpentry skills and time to dedicate to the task. DIY repairs are suitable for small-scale damage or non-structural areas like window frames or trim. However, you should thoroughly remove all rot and use proper materials, as incomplete repairs could lead to recurring issues.
For extensive damage or structural components such as beams or load-bearing posts, hiring a water damage restoration professional is the better choice. Professionals bring expertise and can complete the job more quickly and efficiently. They can also ensure that repairs meet safety standards and are built to last. Expect to pay at least $500 on the cost of professional dry rot repair, though the average is $1,400. While the up-front cost of water damage restoration is higher when hiring a professional, it can save time, prevent mistakes, and avoid the need for future repairs.
Sometimes, mold is the cause of rotted wood or could escalate to a mold issue if it's not repaired. If you do have a mold issue, hire a professional. The average mold remediation cost ranges between $1,200 and $3,700.
Frequently Asked Questions
Expanding foam isn't a good material for filling rotten wood. It lacks the structural strength and durability required for long-lasting repairs. The material may temporarily fill gaps, but it doesn't bond well to wood or provide the necessary support for load-bearing or exterior areas. Expanding foam is better suited for insulation purposes or sealing gaps. Instead, use wood filler for topical damage.
Avoid using wood filler for structural repairs or areas with extensive damage. Wood filler is designed for cosmetic fixes like filling small holes, cracks, or surface imperfections, and it doesn't provide the strength needed for load-bearing repairs or large gaps. You also shouldn’t use wood filler in areas exposed to heavy moisture or extreme outdoor conditions unless it’s a product specifically rated for such environments. Wood replacement or a strong epoxy resin is a better solution for severe rot or structural damage.
Homeowner’s insurance coverage for dry rot depends on the cause of the wood rot. Most policies exclude damage caused by gradual issues like poor maintenance or long-term exposure to moisture since you can stop dry rot from taking root and spreading. However, if the dry rot results from a sudden and accidental event, such as a burst pipe or a storm or flood, the bulk of the damage may be covered. Review your policy or consult your insurance provider to understand your coverage and determine if dry rot repairs fall under your plan.


.jpg?impolicy=leadImage)
Get our Angi-powered app


