How To Build a Carport: 3 Different Styles to Suit Your Property
Building a carport is a big project, but it’s doable with some preparation


Carports can add value to your home while protecting your car and items in storage from the elements. Not only do they take less time to build than a full garage, but carports are also more affordable because they require fewer building materials. In this DIY guide, we’ll explain how to build a carport using three different methods for the various types of carports. Constructing a carport can be challenging, but with the information in this guide, you’ll be all set to tackle the project with confidence.
What Is a Carport?

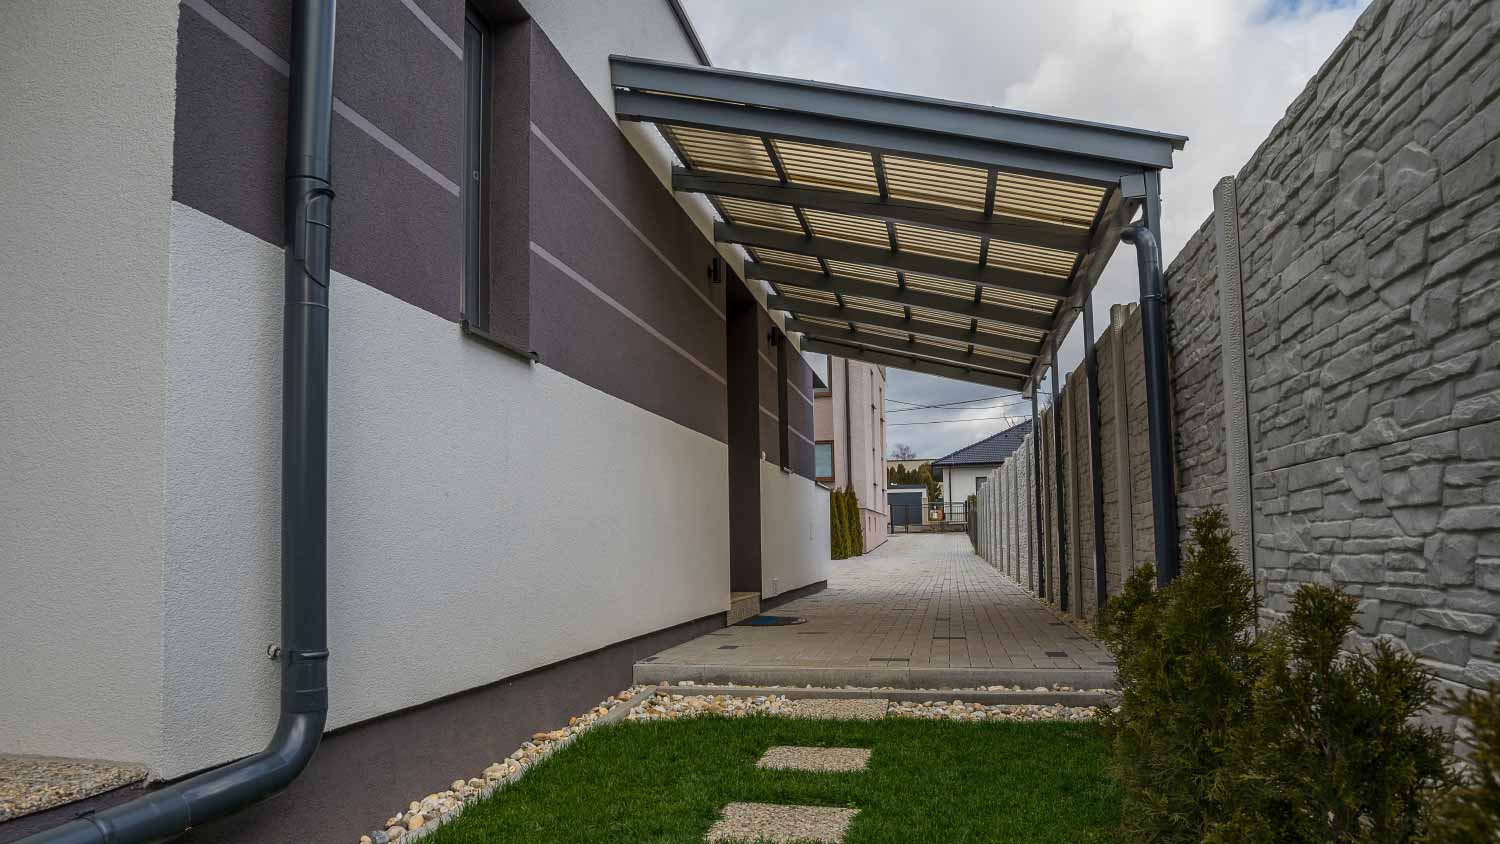
A carport is similar to a garage in that it protects your vehicle on your property, but it lacks the finished walls of a garage. Carports typically consist of support beams and a constructed roof, and they can stand on their own or attach to the side of your home. You can make carports out of metal or wood and can sometimes match them to the exterior aesthetic of your home for a more cohesive appearance.
While carports are similar to garages, they don’t provide the same security for your vehicle. The roof will protect your car from rain, snow, and damaging UV light. However, since carports don’t have solid walls and lockable doors, they won’t keep your car safe from theft or vandalism. Carports are much more affordable to install than garages, so that’s a point in their favor, even if they’re less secure.
How Much Does It Cost to Install a Carport?
The average metal carport costs between $2,000 and $4,900 to build. Constructing your carport out of wood and asphalt roofing material will push your cost to between $3,000 and $9,600.
How to Prep for Installing a Carport
There are a few crucial things to consider before installing your carport, both for maintaining your safety and for ensuring your carport is up to code.
Choose the Right Location
Find a location with enough clearance around the carport so you have room to work. If your home has a garage, consider adding the carport to the front or side of the garage area. Driveways or other home entry points are also great options for your carport. You want a flat surface to work on, so you might need to grade the ground before you can start building.
Be Aware of Buried Utility Lines
The most important thing you’ll need to do before beginning your carport installation is to confirm if and where there are any utility lines on your property. If you plan to dig post holes to permanently affix your carport to the ground, make sure you call 811 before you dig.
The utility line locating service will mark utility lines on your property to help you avoid cutting through buried electrical or water lines or, worse, cutting into a natural gas line.
Failing to call before you dig could be dangerous and even deadly.
File for the Appropriate Building Permits
In many municipalities, you’ll need a building permit for your carport. You can usually file for these yourself, but there might be restrictions depending on where you live. You can contact your local building department for more details.
Consider Your Skill Level
The three types of carports we’ll discuss below vary in complexity from super simple and suitable for any DIYer to advanced. We suggest you think about your skills and your comfort level when deciding what type of carport is right for you.
How to Install a Carport

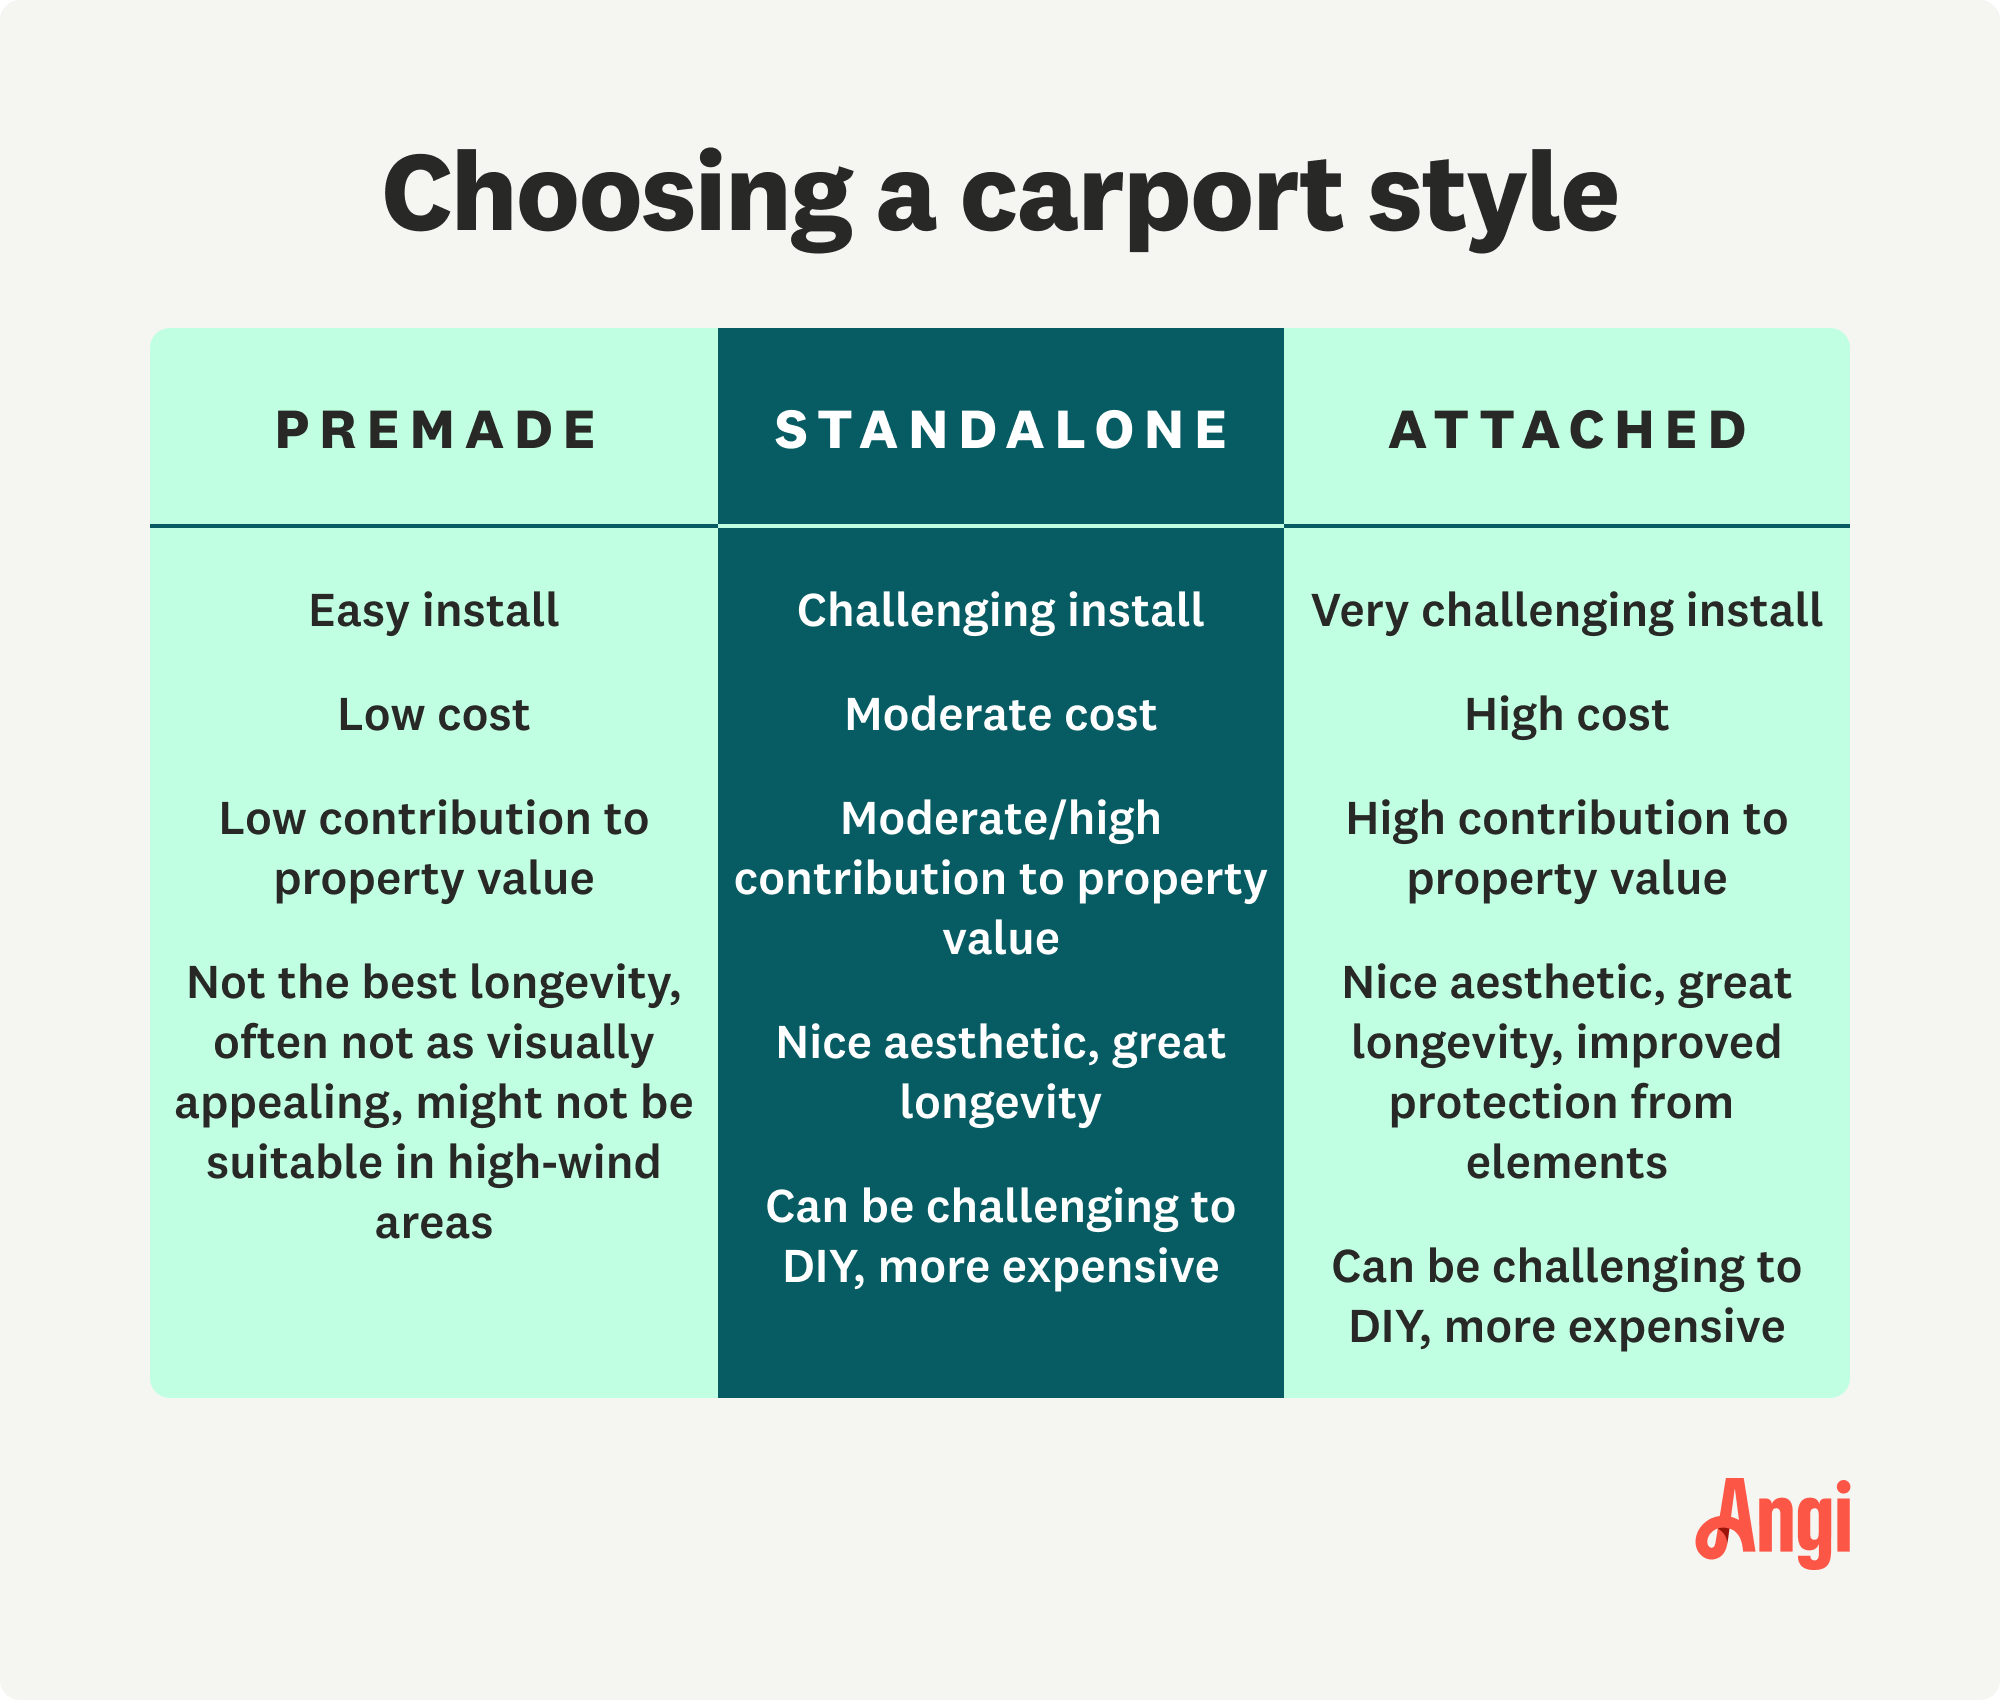
There are three main ways to build a carport, depending on the kind you want, your skill level, and your property layout.
Installing a Premade Carport
Premade carports are the simplest and most affordable option. It takes much less time to build and can be easily installed by someone without previous construction experience. However, premade carports rarely match your home’s aesthetic and often add the least value to your property.
1. Installing the Premade Carport
Gather all your tools and check the carport. Look at the manual and check to see if all components are present. Premade carports are easy to install, and you only need to follow the instructions.
2. Anchoring the Carport
Proper anchoring is crucial for keeping your new carport steady and safe. You can use metal wire to attach ground anchors and hammer them into the soil. If installed on concrete, you can use masonry bolts to tighten the carport down.
Building a Standalone Carport
One of the benefits of a standalone carport is that you can build it to your exact specifications. This is more challenging than a premade carport, but you can handle the project even if you have little construction experience. Wood and asphalt roof shingles will usually be easier to work with, but metal is an option as well if you have metalworking tools.
1. Gather the Tools
A standalone carport requires more tools and supplies than a premade carport, including detailed blueprints or building plans for the structure. Beginning construction without blueprints or building plans for your home addition is not advisable. Depending on the materials you are working with, you may also need metalworking or other specialty tools.
2. Dig Post Holes
After marking your utilities, you can start digging. Dig your post holes with a post digger at least two feet away from any marked utility lines. The holes should be three to four feet deep and around a foot in diameter.
Place cylindrical concrete molds into the post holes and fill the bottom with about six inches of crushed gravel or paver base.
3. Set the Posts
You have two options for setting your posts in the concrete. You can fill the entire mold with concrete and then push a base anchor into the top. If you do this, make sure the anchor is level in multiple directions. Alternatively, you can place the post into the unfilled concrete mold, ensure that it’s plumb, and then fill around the post with concrete. In either case, make sure the posts are plumb, and let the concrete cure fully before proceeding.
4. Build the Structure
Connect the front and rear beams with primary rafters. Then, install rafters that run the length of the carport down the sides. Attach additional rafters using construction screws and a drill according to your building plans. Install any additional pieces to produce a roof pitch, making sure to follow your building plans.
Lay down sheets of plywood, which will serve as the roof decking. These typically extend beyond the framing of your roof on all four sides. Caulk the seams between sheets of plywood. Install your roofing material according to the manufacturer’s guidelines.
Building an Attached Carport
An attached carport is the most cohesive when it comes to exterior appearance. It also provides larger coverage as it creates a covered walkway from your car to your home, keeping you dry until you’re inside.
Keep in mind, though, that an attached carport is the most challenging to install, as it requires cutting into the side of your home for an anchor point. If installed improperly, it can also promote leaking at the joint between your carport roof and your exterior wall.
1. Dig Post Holes
Measure out and mark where you want your posts to sit, and then dig three to four feet down and about a foot across using a post hole digger. Be careful to stay at least two feet from any marked utility lines.
Place cylindrical cardboard molds for your concrete into the post holes. Fill the bottom of each mold with about six inches of crushed gravel or paver base.
2. Set the Posts
You have two options to set your posts. First, you can fill the molds with concrete and set a post anchor into the top, making sure it’s level and situated at the exact spot you want your post to sit. Let the concrete cure. Alternatively, you can place your post into the mold, letting it sit on the crushed gravel. Have a family member or friend hold the post perfectly plumb and fill around it with concrete. Let the concrete cure.
3. Build the Carport Structure
Install a rafter connecting the two end posts, again ensuring that they’re plumb and the rafter is level. Figure out the pitch of your roof and mark on your siding where you plan on anchoring the angled rafters to your exterior wall. Cut into the siding along the entire length of your carport using a utility knife or a rotary tool. The piece you remove should be the length of your carport and the height of the entire carport roof, including the rafters and roofing material. Remove the piece of siding.
4. Install the Horizontal Rafters
Install a two-by piece of material to fill the hole in your siding. This will serve as the anchor point for your angled rafters. Screw this into the studs of your exterior wall. Connect the horizontal rafter connecting your posts to the anchor two-by material using slopable U-joist hangers and additional rafters.
5. Install the Roof
Install plywood sheets over the entire structure, allowing for overhang on the three non-attached sides according to your building plans. Caulk the seams between the plywood.
Install your roofing material according to the manufacturer’s instructions. Finally, install flashing to ensure any water running down your siding is directed out onto your carport roof rather than into your exterior wall.
Level the ground where you plan to install your posts, if necessary.
Gather tools and materials based on your blueprints.
Measure out and mark where you want your posts to sit, and then dig three to four feet down and about a foot across using a post hole digger. Be careful to stay at least two feet from any marked utility lines.
Place cylindrical cardboard molds for your concrete into the post holes.
Fill the bottom of each mold with about six inches of crushed gravel or paver base.
You have two options to set your posts. First, you can fill the molds with concrete and set a post anchor into the top, making sure it’s level and situated at the exact spot you want your post to sit. Let the concrete cure. Alternatively, you can place your post into the mold, letting it sit on the crushed gravel. Have a family member or friend hold the post perfectly plumb and fill around it with concrete. Let the concrete cure.
Install a rafter connecting the two end posts, again ensuring that they’re plumb and the rafter is level.
Figure out the pitch of your roof and mark on your siding where you plan on anchoring the angled rafters to your exterior wall.
Cut into the siding along the entire length of your carport using a utility knife or a rotary tool. The piece you remove should be the length of your carport and the height of the entire carport roof, including the rafters and roofing material. Remove the piece of siding.
Install a two-by piece of material to fill the hole in your siding. This will serve as the anchor point for your angled rafters. Screw this into the studs of your exterior wall.
Connect the horizontal rafter connecting your posts to the anchor two-by material using slopable U-joist hangers and additional rafters.
Install plywood sheets over the entire structure, allowing for overhang on the three non-attached sides according to your building plans.
Caulk the seams between the plywood.
Install your roofing material according to the manufacturer’s instructions.
Install flashing to ensure any water running down your siding is directed out onto your carport roof rather than into your exterior wall.
Tips for Choosing the Right Type of Carport
The three types of carports mentioned above all come with different benefits and installation challenges. Choosing the right one for your needs and skill level is critical for avoiding damage to your home and providing the kind of protection you need for your vehicle.
Consider Your Skill Level
One of the most important things to consider when building a carport is your skill level. If you have no DIY construction experience, you might want to consider a premade carport. You can install one of these with minimal time investment, even if you’ve never built anything before, and they pose no risk of damage to your home.
A standalone carport is more involved, but you can still tackle this project if you have minimal experience with DIYing similar projects.
An attached carport is the most challenging, and while it can be a suitable DIY project for some, we only recommend it for those with a significant amount of experience. Improper installation can put your home at risk of leaking, which can lead to expensive water damage repairs.
Think About The Aesthetic Appeal
Most homeowners prefer a wood carport with a roof that matches their home’s roofing material. This provides a more cohesive appearance and typically serves as a more permanent structure than a metal carport. It also tends to boost your home value more than a premade metal carport, in part because of how it looks.
Attached and standalone carports made out of wood are also generally more customizable, so if you have some carport decorating ideas in mind, you might want to stay away from a premade or temporary carport.
Optimize Durability and Protection
We recommend considering the longevity you’re looking for and the level of protection you want from the elements as you travel between your home and the carport. Attached carports provide the most protection if you have an exterior door leading to the covered area. They also provide one side with a solid wall that will remain entirely protected from the elements for storage.
Take Future Plans Into Account
Finally, it’s helpful to consider your plans for your carport—if any—in the future. If you ever want to enclose your carport to convert it to a garage, a premade carport likely isn’t the best option. You can only install permanent walls on standalone and attached carports.
DIY vs. Hiring a Pro
Installing a carport can range from super simple to quite challenging, depending on the type you want to install. If you’re looking to install a premade carport, we’d suggest a DIY installation if you have the time to commit to the project. If you want a detached carport and have some construction experience, a DIY installation is a great way to save some money.
If you don’t have experience with construction, we strongly recommend hiring a carport installation contractor near you to handle a standalone or attached carport. Especially with an attached carport, the money you’ll pay for labor can often pale in comparison to the repairs you’ll have to carry out if a DIY job leads to leaking and water damage in your home.
Additionally, we suggest hiring a professional to make your home addition idea a reality if you’re uncomfortable with filing for building permits, as these are often required for standalone and attached carports.
Frequently Asked Questions
Yes, in all cases, it should be more affordable to build your own carport than it would be to hire a professional to do the work. The material costs can sometimes cost a little more through a professional because they can mark it up for delivery and procurement costs. You’ll also save hundreds or thousands on labor fees if you install your carport yourself.
In many cases, yes, you’ll need building permits for a carport. The exact laws and regulations depend on where you live, but generally speaking, you’ll need a building permit for any carport that will be permanently affixed to the ground. Premade carports sometimes don’t require planning permission or permits, but standalone and attached carports usually do. We recommend you contact your local building department to find out before beginning any carport project.
Generally speaking, carports can extend to between five and ten feet of the side property lines and to between ten and twenty feet of the front and back property lines. These are just general numbers, and the specific laws for setbacks vary based on your location. We recommend you contact your local building department or check your local building code to see what the necessary setback requirements are for your carport.

- Who Can I Get to Build a Carport at My Home?
- 18 Carport Ideas That Will Protect Your Cars in Style
- Carport Sizes: A Complete Guide to Standard Dimensions
- What Is a Carport and What Are Its Pros and Cons?
- Carports vs. Garages: Pros, Cons, and Costs
- Here’s How to Enclose Your Carport and Transform It Into the Garage You’ve Always Wanted
- How to Build a House: Your Complete Guide to the Home-Building Process
- Which Home Projects To Put On Your To-Do List First After Moving
- 7 Tips for Building a House and Ensuring a Successful Build
- 14 Home Renovation Tips for a Stress-Free Project


