Gravel is an inexpensive paving material overall, but costs vary by type. Find out what average gravel prices will look like for your project.
Your trees just got a wardrobe makeover


We all want that perfect yard with vibrant, verdant trees that can handle rain or shine, heat waves or snow storms. One surefire way to keep your trees healthy no matter the season is mulch. Before you call in the pros to add mulch to your yard, there are some simple, albeit a little laborious, steps you can take to tackle this job on your own.
Mulch is a little like protective, yet stylish clothes for trees and other plants. It doesn’t just dress up your trees (effectively boosting your landscape’s curb appeal); it actually protects them, too. Mulch benefits your trees in the following ways:
Insulates roots
Prevents harsh solar UV radiation
Increases moisture retention
Controls weeds
Fertilizes trees
Increases good microbes
Decreases your maintenance efforts
Protects against harsh conditions like freezes and storms
Reuses waste like plant matter, furniture, and kitchen scraps if you decide to go that route
You’ll pay around $30 to $120 per cubic yard for the cost of mulch on average. The installation costs around $0.20 per square foot, while the delivery costs around $120 per truckload.
Before you start spreading any old mulch around your trees, there are a few things you need to know to best prep for the job.
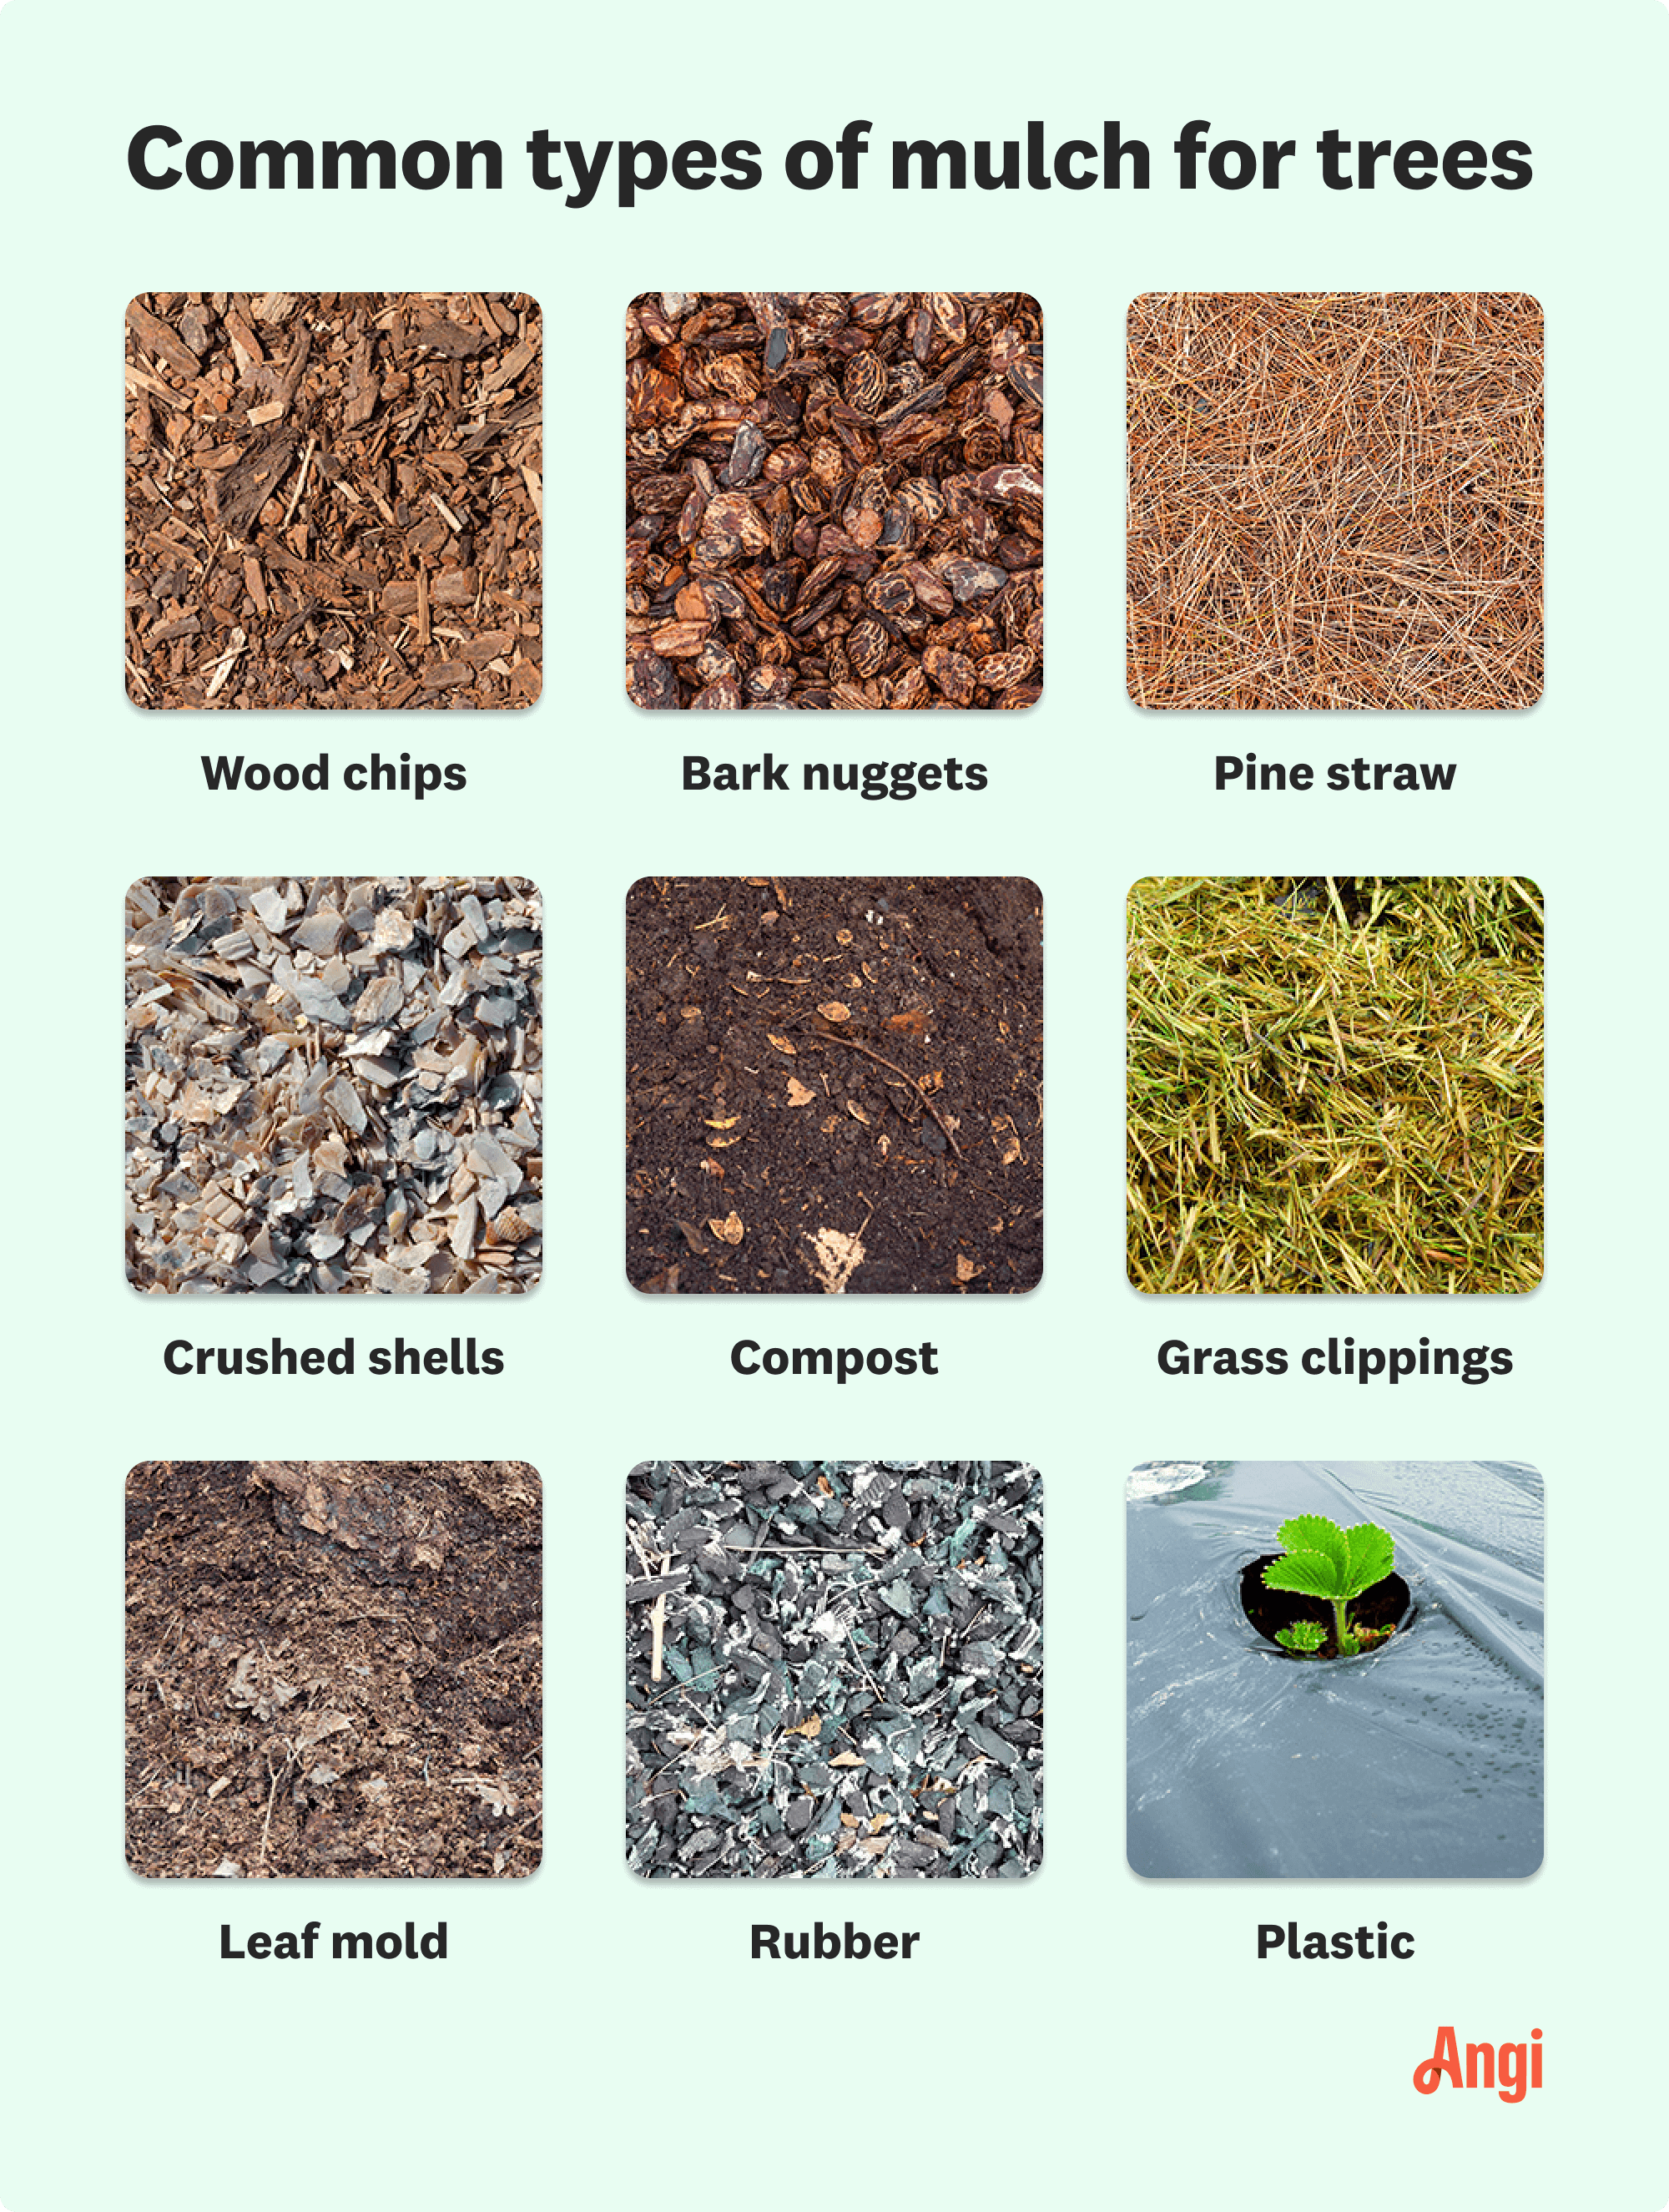
Mulch may seem like a straightforward material that you quickly purchase at your local hardware store without a second thought, but there are several types of mulch that can make choosing the right mulch tricky. The most common mulching materials include:

Wood chips: This standard mulching material comes from wood that’s gone through a wood chipper or shredder. Wood chips offer great nutritive value and moisture retention, making them ideal for most tree mulching projects.
Bark nuggets: Longer lasting than wood chips, bark nuggets come from tree bark and help prevent evaporation and weed growth. This material can easily float away in flood zones, however, and is best left to places that don’t experience heavy rainfall.
Pine straw: Made from pine needles, pine straw is a lightweight material that insulates the soil in the winter while keeping it cool in the summer. This mulch doesn’t keep weeds out easily, but it’s easier to spread than wood chips.
Crushed shells: Sea shell mulch adds calcium to your soil and a white landscaping aesthetic—all while deterring pests with its sharper texture. At the same time, this material can disrupt your soil’s pH if your plants thrive in acidic soil.
Compost: Compost is a readily available mulching material that promotes healthy microorganisms, earthworms, and insects. Homemade mulch, however, can contain seeds that lead to weed growth.
Grass clippings: Grass mulch can be a free mulch that offers nutrients to your yard. However, this mulching material breaks down quickly, is a poor weed deterrent, and can contain herbicides and pesticides.
Leaf mold: This mulch is another affordable option that you can make at home. Leaf mold adds nutrients to the soil, retains water, and improves the structure of your soil. Conversely, leaf mold may encourage weed growth and isn’t the best for trees that don’t tolerate moist environments.
Rubber: Rubber mulch is an affordable, long-lasting mulching material. However, it can look less attractive than more natural options and may contain industrial chemicals that break down over time.
Plastic: Plastic mulching is an inorganic material that can help protect trees in colder climates with heat-loving plants. Other than this exception, most trees do not benefit from plastic mulch.
The best types of mulch for trees contain organic matter—like compost, leaf mold, wood chips, or pine needles—rather than inorganic matter like stones, rubber, gravel, or rocks. While inorganic mulch is long-lasting, attractive, and can help retain water moisture, it doesn’t break down or decompose.
Organic mulch decomposes and releases beneficial nutrients like nitrogen, phosphorus, and potassium (NPK). Your trees will grow better with nutrient-rich soil aided by nutrient-rich organic mulch, which feeds the earthworms and microorganisms, all while improving the structure of your soil.
With that said, key factors could dictate which organic mulch you should pick for your particular yard.
Tree species: The type of tree you’re mulching impacts which type of mulch is ideal for your yard. For example, avoid using mulch made from pine if your trees need a more neutral soil pH because pine is acidic.
Common weather patterns: Avoid using leaf mold for stormy or windy climates, as your hard work might blow or wash away. Instead, choose heavier mulch like wood chips. Wood chips are also great for dry climates as they help your soil retain moisture.
Temperature: Trees that need winter protection benefit from shredded hardwood mulch, which helps retain heat. At the same time, cold climates with heat-loving plants may benefit more from plastic mulch.
Landscape design: Mulch comes in a variety of colors (think: black, red, tan, and brown) and materials, so you might want to consider your landscape design when you select a mulch type.
Mulch is sold in cubic feet or yards. To determine how much mulch you’ll need, multiply the square footage by your desired depth. Most people mulch an area of 3 to 5 feet in diameter around their tree and lay the mulch 1 to 4 inches deep. If you’re not sure about the math, you can use an online mulch calculator.
Too much mulch can hinder plant growth as it blocks the nutrients, sunlight, and water it needs to grow. One to four inches of mulch is your average mulch depth for most plants.

With your measurements on hand and the right mulch for your yard at the ready, here’s how to add mulch to your trees.
Most tree mulching needs to be between 1 to 4 inches thick, depending on the type of mulch material and climate. You should leave 3 to 6 inches of space between the trunk and the starting point for the mulch. Evenly distribute the mulch around the entire tree until the mulch is 3 to 6 feet wide or to the tree drip line.
With all of this in mind, here’s how to lay mulch depending on the type of mulch.
Using a mulching rake, spread a 2-to-4-inch thick layer of mulch a few inches away from the tree's trunk.
Continue to spread the mulch, tapering off slightly as you get further away from the trunk.
Keep spreading the mulch until you get to the dripline or to at least 3 feet in radius.
Gather leaves from your yard using a rake.
Create the leaf mold by placing your leaves in a leaf mold bin or trash bag.
Keep the leaves damp and adjust the moisture level if they seem dry.
Allow the leaves to decompose for a year before you can use them as mulch.
Lay the leaf mold at least 3 inches away from the trunk of your tree.
Use a mulching rake to distribute the mulch in a layer between 1 to 3 inches thick.
Continue to distribute the mulch until it’s 3 to 4 feet away from the tree.
Put on gardening gloves to protect your hands.
Untie the string or wire securing the bale and discard them in the trash.
Separate the pine straw layers.
Lay the straw in 3- to 4-inch even layers.
Leave a few inches of space around the trunk of the tree.
Water the pine straw to settle the needles.
Add an additional layer of pine straw so that it’s at least 3 inches thick.
Apply compost mulch around the base of your tree with a mulching rake.
Leave a few inches of space around the base of your tree trunk.
For cold climates, keep the mulch at 2 to 3 inches deep. For arid climates, aim for 2 to 4 inches.
Work your way outwards until you’ve reached the dripline or 3 to 6 feet in radius.
Wait for your grass to grow a few inches tall.
Set your lawn mower to mow only the top one-third of the grass.
Mow your lawn.
Leave 2 to 3 inches of space around the base of your tree trunk.
Spread the clippings in a thin layer with a mulching rake—no more than one-quarter inch thick. This step allows the clippings to dry and break down before rotting.
Make sure the clippings reach at least 3 to 4 feet outwards.
Wait for your grass to grow a few inches tall.
Set your lawn mower to mow only the top one-third of the grass.
Mow your lawn.
Rake the clippings into a pile or fill the bag that comes with your lawn mower.
For dry grass clippings, spread the clippings onto a shaded, dry, and flat surface.
Wait two to three days for them to dry.
Use a bucket or wheelbarrow to transfer the clippings to the tree.
Lay 1 inch of dried grass clippings around your tree, leaving 2 to 3 inches of space around the base of the tree trunk.
Rake or sprinkle the clippings 2 to 6 feet outwards.
Lay landscaping fabric around the stem of your tree, leaving 1 to 2 inches of space around the trunk.
Make sure the landscaping fabric extends out to the dripline or at least 3 feet away from the trunk.
Spread the rubber mulch between 1 and 3 inches thick over the landscaping fabric.
Replace rubber mulch before it decays—around the 10-year mark—to avoid contamination from its ingredients.
Using a mulching rake and gloves, spread 1 to 2 inches of crushed shells around the tree, leaving a few inches of space around the trunk.
Continue until you’ve reached the dripline or a minimum of 3 feet in radius.
Install an irrigation system like a soaker hose or drip irrigation to moisturize the ground underneath the plastic.
Lay the plastic mulch down, making sure it’s level as you go.
Cut 2 to 3 inches of the material around the base of the tree to keep the plastic away from the trunk.
Anchor the ends of the fabric with rocks, soil, or pins.

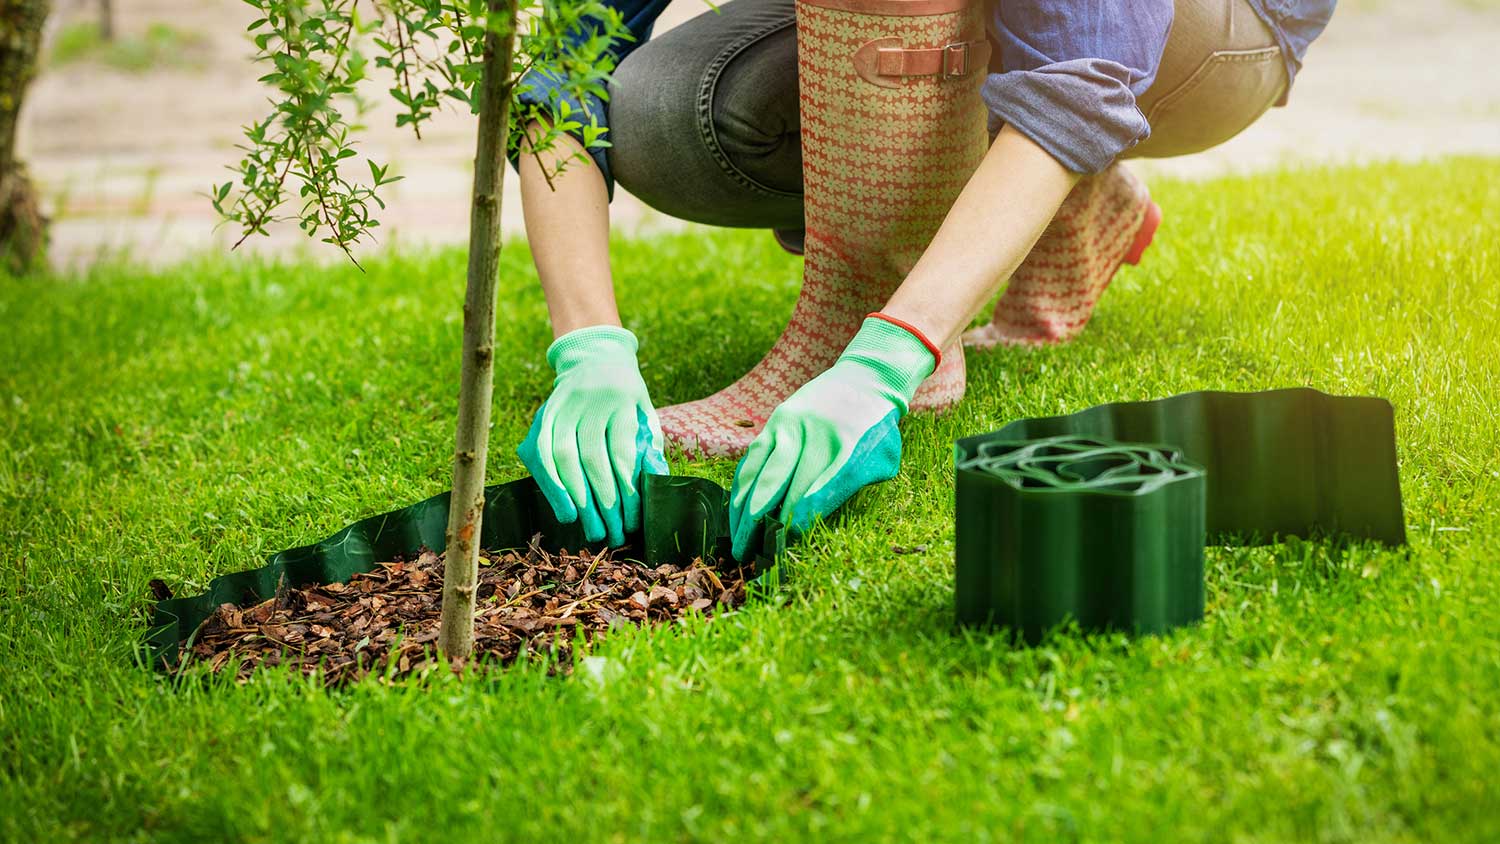
Another mulching tip to prevent your hard work from shifting over time is you can also make a barrier to keep your mulch in place. Grass, pine straw, and leaf mold, in particular, benefit from adding a border to your mulch ring. One of the most stylish ways to do this is to simply place a ring of paver stones or bricks around the perimeter of the freshly mulched tree.
Even with the nicest mulch barrier, organic mulch will break down over time or shift to where it’s against the trunk of your tree. As such, you’ll want to take maintenance measures to keep your tree thriving. Here are some best practices for maintaining mulch around your trees:
Inspect your mulch periodically for signs of obvious movement.
Scoot mulch away from the trunk if you notice it’s turned into a mulch volcano.
Pull up weeds as they appear in your mulch.
Add new mulch yearly until the mulch is at least 1 to 4 inches deep, depending on the type of mulch.
Rake your mulch to prevent compaction—especially after heavy rain, snow, or hail.
Use aged wood chips for saplings. Fresh wood chips have higher levels of carbon and temporarily deplete nitrogen from the soil, which can negatively affect the growth of young trees whose roots depend on the nutrients directly above them.
Choose an organic mulch if possible, but avoid makeshift or DIY organic mulch that’s been treated with pesticides.
While mulch benefits trees, too much of a good thing can actually be bad for your trees. Over-mulching, or putting down too much mulch, can lead to a host of problems, like the following:
Dying roots from decreased oxygen levels in the soil
Rot around the base of the trunk from water retention
Discolored foliage
Stunted leaves, branches, or flowers
Decreased fruit or flowers
Fungal and bacterial infections
Infestations from beetles, borers, and other disease-causing insects
Common over-mulching practices include applying mulch all the way to the base of the trunk and applying too thick of a layer of mulch.
The first practice is also called “volcano mulching,” as the mulch will look like a volcano with a tree shooting out. If you don’t leave around 2 to 3 inches of space around the base of the trunk before applying mulch, your tree could rot from too much moisture and overheat, resulting in an unhealthy tree. If your tree looks like a volcano at the base, use a mulching rake or hand shovel to excavate the mulch around the circumference of the base to encourage air circulation.
Likewise, the second practice of adding too much mulch to your tree can suffocate it, overheat it, or prevent water from reaching the roots, killing the tree over time. Most mulch should be between 1 and 4 inches thick—no more. If you see piles of mulch that look taller than 4 inches, it’s a good idea to get out your mulching rake and spread the mulch more thinly.
As long as you don’t mind a little dirt and some manual labor, mulching trees yourself can be a fun project that also saves you money. You could save approximately $0.20 per square foot if you choose to DIY the job.
Mulching trees isn’t for everyone, however. If you have a big project at hand but don’t have wheelbarrows or a truck for picking up and transporting the mulch—or you just don’t have the time or desire to do it yourself—then your best bet might be to work with a pro.
A local mulching company has all the tools, experience, and convenience to make your yearly mulching a quick and easy process.
Mariel Loveland contributed to this piece.
From average costs to expert advice, get all the answers you need to get your job done.

Gravel is an inexpensive paving material overall, but costs vary by type. Find out what average gravel prices will look like for your project.

Find out how much a soil test costs and what you get for your money with our expert guide. Know what to budget for different types of soil tests.

Discover the average sand delivery cost, key price factors, and tips to save on your next project. Get transparent, up-to-date estimates for sand delivery.

From wood chips to grass clippings, we like to throw around the word mulch. But what is mulch, and how do you use it properly? Let's break it down.

Forestry mulching is one of the most effective ways to clear acres of land. While it’s relatively cheap, it may not be the best solution for everyone.

Wondering if you should mulch in the fall to protect your plants from the colder weather? Chances are, you probably should. Here’s why.