How to Install a Dishwasher Air Gap Properly
Gravity and engineering keep your dishwasher sparkling clean


If you have ever wondered what that extra knob is next to the kitchen faucet, wonder no more—it is an air gap. Dishwasher air gaps prevent dirty water from backflowing into the dishwasher or entering your clean water supply. Dishwasher air gap installation is not difficult. In fact, it is an essential step in optimizing the appliance’s operation and, in some locations, a requirement for meeting the local building code.
What Is an Air Gap for a Dishwasher?
A dishwasher air gap is a valve that prevents contaminated water from flowing back into the dishwasher. It creates a literal gap of air between wastewater and fresh potable water.
One end of the air gap attaches to the dishwasher, while the other connects to the garbage disposal or waste line. The top of the air gap, which typically has a decorative covering, sits strategically above the counter. The covering has vents to allow backflow to drain rather than return to the dishwasher. Water draining through the air gap means there could be a clog in the air gap or an issue elsewhere in the dishwasher’s drainage system.

How to Prep to Install a Dishwasher Air Gap
Air gap installation may not be hard, but you need to do a little prep work based on your kitchen setup. Gather your supplies, which could include the dishwasher air gap, hose or tubing, a screwdriver, stainless steel hose clamps, and wrench.
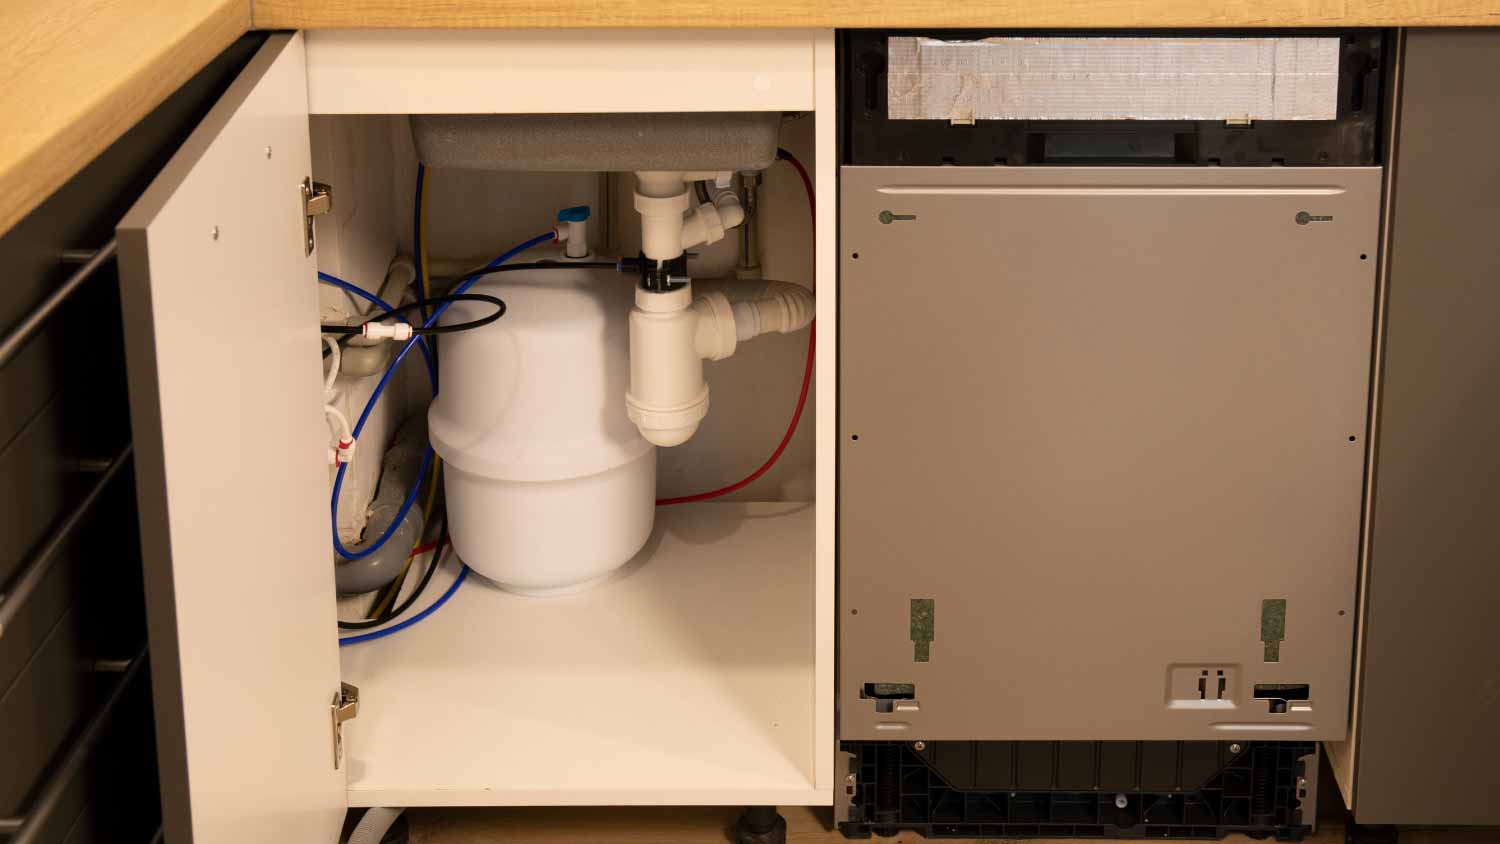
Next, determine proper placement. The air gap must be placed above the dishwasher for air and gravity to do their work. Consequently, the air gap is usually installed on the countertop, either near or as part of the kitchen sink. It should be placed close enough to the sink that any water draining through the air gap vents goes into the sink rather than the counter.
How to Install a Dishwasher Air Gap
Air gaps are simple devices that rely on basic physics to prevent backflow. They are placed at cross connections, points where wastewater can come into contact with potable water. Do not run your dishwasher until you have completed all of the following steps.
1. Locate or Make Hole in Counter for Air Gap
Most countertops and sinks have a precut hole for the air gap with a flat cover over top; however, it is possible that your countertop or sink does not have one. If that is the case, tape off the counter around the area where you want to make the hole, in order to protect the countertop from scratches.
Check the manufacturer’s instructions for the hole size needed to fit the air gap. Then, create a hole using a drill fitted with a properly sized paddle bit or another bit designed for your countertop material. Place the hole close to the sink’s rim so any draining water flows into the sink. Keep in mind that some countertops, like marble or granite, may require contacting a local plumber or contractor to drill through the countertop for air gap installation.
2. Connect Drain Hose to Air Gap
From underneath the countertop, connect the ⅝-inch inlet (the smaller leg) of the air gap to the dishwasher’s ⅝-inch drain hose. Secure the connection with a stainless steel hose clamp or plumber’s tape.
3. Measure and Cut Tubing to Connect to Waste Line (Sink Drain) or Garbage Disposal
Measure the distance from the air gap to either the waste line of the sink or the garbage disposal. Cut a length of tubing to this length. Note that most dishwasher air gaps have a ⅞-inch outlet, so you would need ⅞-inch tubing.
4. Connect Air Gap Outlet to Drain Hose or Garbage Disposal
Attach the outlet (the ⅞-inch leg of the air gap) to one end of the tubing, and secure it with a stainless steel hose clamp. Attach the other end of the tubing to either the waste line of your sink or to the garbage disposal. Secure the connection with a stainless steel hose clamp.
If your garbage disposal has not previously been attached to an air gap, you may need to remove a metal plug inside the tube where the air gap’s tubing connects to the disposal. Then, proceed by attaching the hose to the garbage disposal and securing the connection with a stainless steel hose clamp.
5. Remove Vanity Cover and Press Air Gap Through Countertop Hole
If you have not done so already, remove the vanity cover from the air gap. Push the air gap through the hole in the countertop. Check the manufacturer’s instructions, as there may be a piece that adjusts the fit of the air gap in the countertop. Tighten the retainer nut on the underside of the air gap. You might need an assistant to hold the air gap if it spins while you tighten the nut. Tighten by hand before using a wrench to secure the connection.
6. Secure Hose Ends and Replace Vanity Cover
Check all of the hose connections to ensure they are secure. Each of these connections is a place for a potential leak. Replace the vanity cover over the top of the air gap. You may need a screwdriver to attach the vanity cover, depending on the design.
7. Run the Dishwasher
Run a complete dishwasher cycle. Check the air gap for leaks on top of and underneath the countertop. Make adjustments as needed.
Taking Care of a Dishwasher Air Gap
Over time, dishwasher air gaps can get clogged with debris, slowly reducing flow through the valve. Watch for signs of a growing clog, which could include slow draining from the sink, water pooling around the air gap, and bad odors in the dishwasher. If you notice any of these signs, a simple cleaning often fixes the problem. You can clean the air gap by:
Gently removing the vanity cover, which may require loosening screws depending on the design.
Wipe away surface debris or use a soft brush or bottle brush to remove stubborn debris. You may also want to cover the brush in an all-purpose cleaner before scrubbing the air gap for added cleansing power.
If needed, disconnect the air gap and soak in a solution that is equal parts water and vinegar to remove mineral deposits.
Use a pipe cleaner to remove clogs within the air gap.
Finally, rinse and run water through the air gap to wash off any cleaners or solutions.
Reinstall the air gap if you removed it for cleaning. Put the vanity cover back on.
DIY vs. Hiring a Pro
Installing a dishwasher air gap is not a difficult or lengthy process. Most people can do it even if they lack DIY experience. It requires simple tools (a wrench and screwdriver) and minimal supplies.
You might need to call in a local plumber or contractor if you have to cut a hole in a delicate countertop or if you have a more serious dishwasher clog that is unrelated to the air gap. If the air gap is part of installing a new dishwasher, a pro can do the air gap installation alongside the dishwasher installation. Keep in mind that, including the cost of the dishwasher, pro dishwasher installation costs between $1,000 to $1,500.
Frequently Asked Questions
A clogged air gap can cause a dishwasher not to drain. There are, however, other potential issues that can lead to improper drainage. For example, if you have attached the air gap to a garbage disposal and forgotten to remove the knockout plug, wastewater may backflow into the dishwasher. Check that the air gap is installed properly, and then look for clogs in the air gap and dishwasher filters.
If water comes out of the air gap, it is time to clean it. The air gap is doing its job and prevents water from going back into the dishwasher. Go through the above steps of removing the vanity cover and cleaning away debris and mineral deposits. Do not run your dishwasher until you have cleaned the air gap, or you will end up with more water draining out of it.
Air gaps get clogged by a few different means. Over time, food and grime can collect in the air gap, leading to a blockage. Mineral deposits from hard water are a common problem. Mineral buildup creates a film in the air gap and tubing, which can cause flow issues, as well as attract debris. Homeowners with hard water may want to remove mineral deposits regularly to keep the air gap clean and clear.
Yes, a dishwasher needs an air gap to prevent backflow. Additionally, in many locations, air gaps or another measure to prevent backflow are required for building code compliance. There are alternatives to an air gap, like a Studor vent or a loop and trap design, but an air gap is the simplest and most popular solution.


.jpg?impolicy=leadImage)

- Appliance Repair Companies
- Washing Machine Repair
- Dryer Repair
- Refrigerator Repair
- Dishwasher Repair
- Oven Repair
- Wood & Pellet Stove Repair
- Freezer Repair Services
- Wood Stove Services
- Gas Stove Repair
- Emergency Appliance Repair Companies
- Ice Maker Repair
- Gas Appliance Repair
- GE Appliance Repair
- GE Refrigerator Repair
- GE Dryer Repair
- GE Dishwasher Repair
- GE Washing Machine Repair
- Samsung Appliance Repair
- Samsung Refrigerator Repair
- Samsung Dryer Repair
- Samsung Washer Repair
- Samsung Dishwasher Repair
- Samsung Oven Repair
- Whirlpool Repair
- Whirlpool Refrigerator Repair
- Whirlpool Washer Repair
- Whirlpool Dryer Repair
- Whirlpool Oven Repair
- Maytag Appliance Repair
- Maytag Refrigerator Repair
- Maytag Washer Repair
- Maytag Dryer Repair
- Maytag Dishwasher Repair
- Kitchenaid Appliance Repair
- Kitchenaid Oven Repair
- Kitchenaid Refrigerator Repair
- Kenmore Appliance Repair
- Kenmore Dishwasher Repair
- Kenmore Washer Repair
- Kenmore Dryer Repair
- LG Refrigerator Repair
- Bosch Appliance Repair
- Kenmore Refrigerator Repair
- LG Appliance Repair Services
- GE Microwave Repair
- Electrolux Appliance Repair
- Electrolux Washer Repair
- Kitchenaid Dishwasher Repair Services
- Wood Stove Inspection
- Dishwasher Installation
- Trash Compactor Repair
- What Is a Dishwasher Air Gap?
- Why Your Dishwasher Is Not Filling Up With Water and What to Do
- Parts of a Dishwasher: Learn What They Are and How They Work
- Why Your Dishwasher Won’t Turn On and What to Do About It
- How to Clean a Moldy Dishwasher
- Air Duct vs. Air Vent: Learn the Differences Between These HVAC System Parts
- How to Tell If the Return Air Is Working With These Simple Tips
- Condensation on Ductwork: Causes and Potential Solutions
- 9 Types of Air Conditioners: Pros, Cons, and How to Choose
- What Is a Portable Dishwasher?
Get our Angi-powered app


