
Get clear answers on how much radon remediation costs, including average prices, key cost factors, and tips to save money on your home’s radon mitigation.
Breathing safe indoor air is worth the effort

Installing a radon mitigation system yourself is not recommended because radon exposure is hazardous and the system requires professional knowledge to work correctly.
Expect to pay $800 to $1,500 for professional radon mitigation system installation, with costs reaching $4,600 for unfinished basements and up to $15,000 for crawl spaces.
You can prepare for professional installation by clearing your basement workspace and learning how to test for radon levels in your home beforehand.
Hiring a local radon testing professional provides reliable help with air quality testing and system installation, keeping your home safe from this radioactive gas.
If you’ve recently discovered high radon levels in your home, you may wonder if building a mitigation system on your own is a good idea. But can a homeowner install a radon mitigation system using DIY methods? With the risks involved and the scope of work required, most of the project should be left to a professional—but there are some parts you may be able to do yourself.
Learn how far you can go without the help of a pro and when you should defer to the experts instead.
Radon is a radioactive gas derived from natural uranium found in soil. It can be dangerous to humans over long periods of exposure. In fact, exposure to this substance is the number one non-smoking cause of lung cancer in the United States.
A natural byproduct of the decaying uranium in rocks and soil, radon can enter and build up in homes without preventative measures in place. What’s worse, it’s colorless and odorless which makes it difficult to detect without proper radon testing.
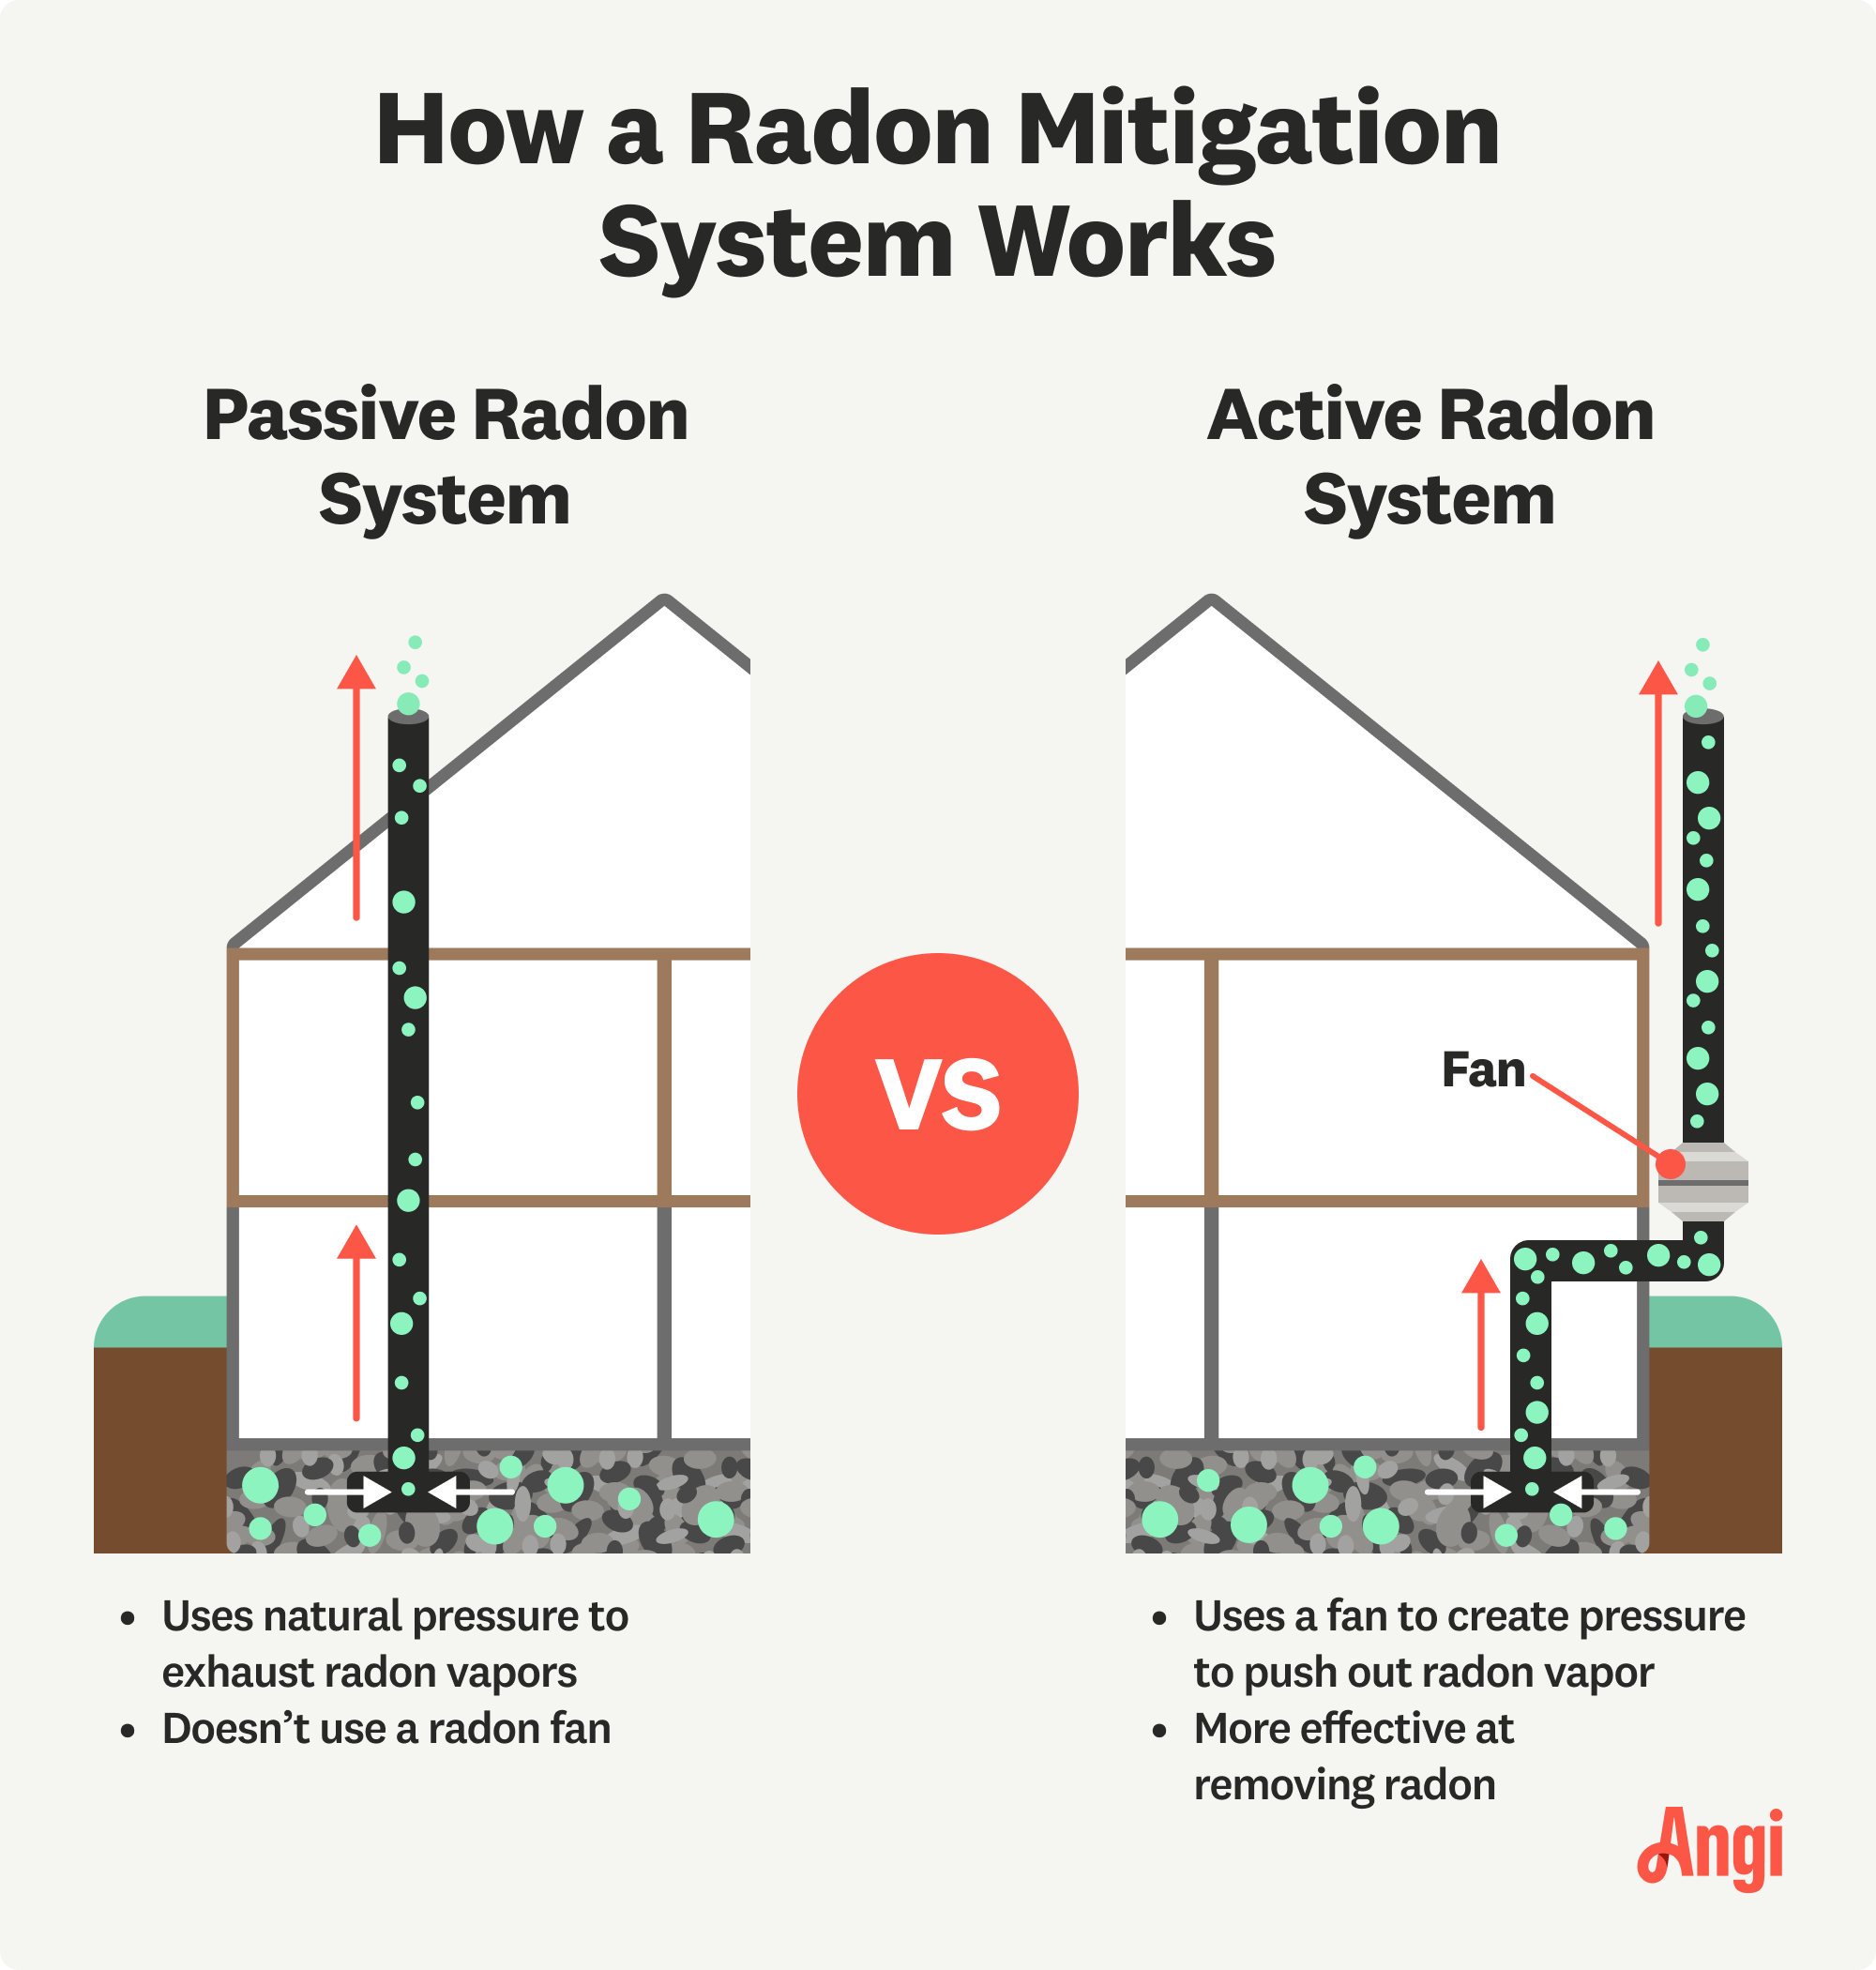
As for how to get rid of radon, a mitigation system is your best and only option. There are three types of these systems—sub-slab suction, drain-tile suction, and sub-membrane—and they all do the same thing: pull radon out of your home through a series of vents and pipes.
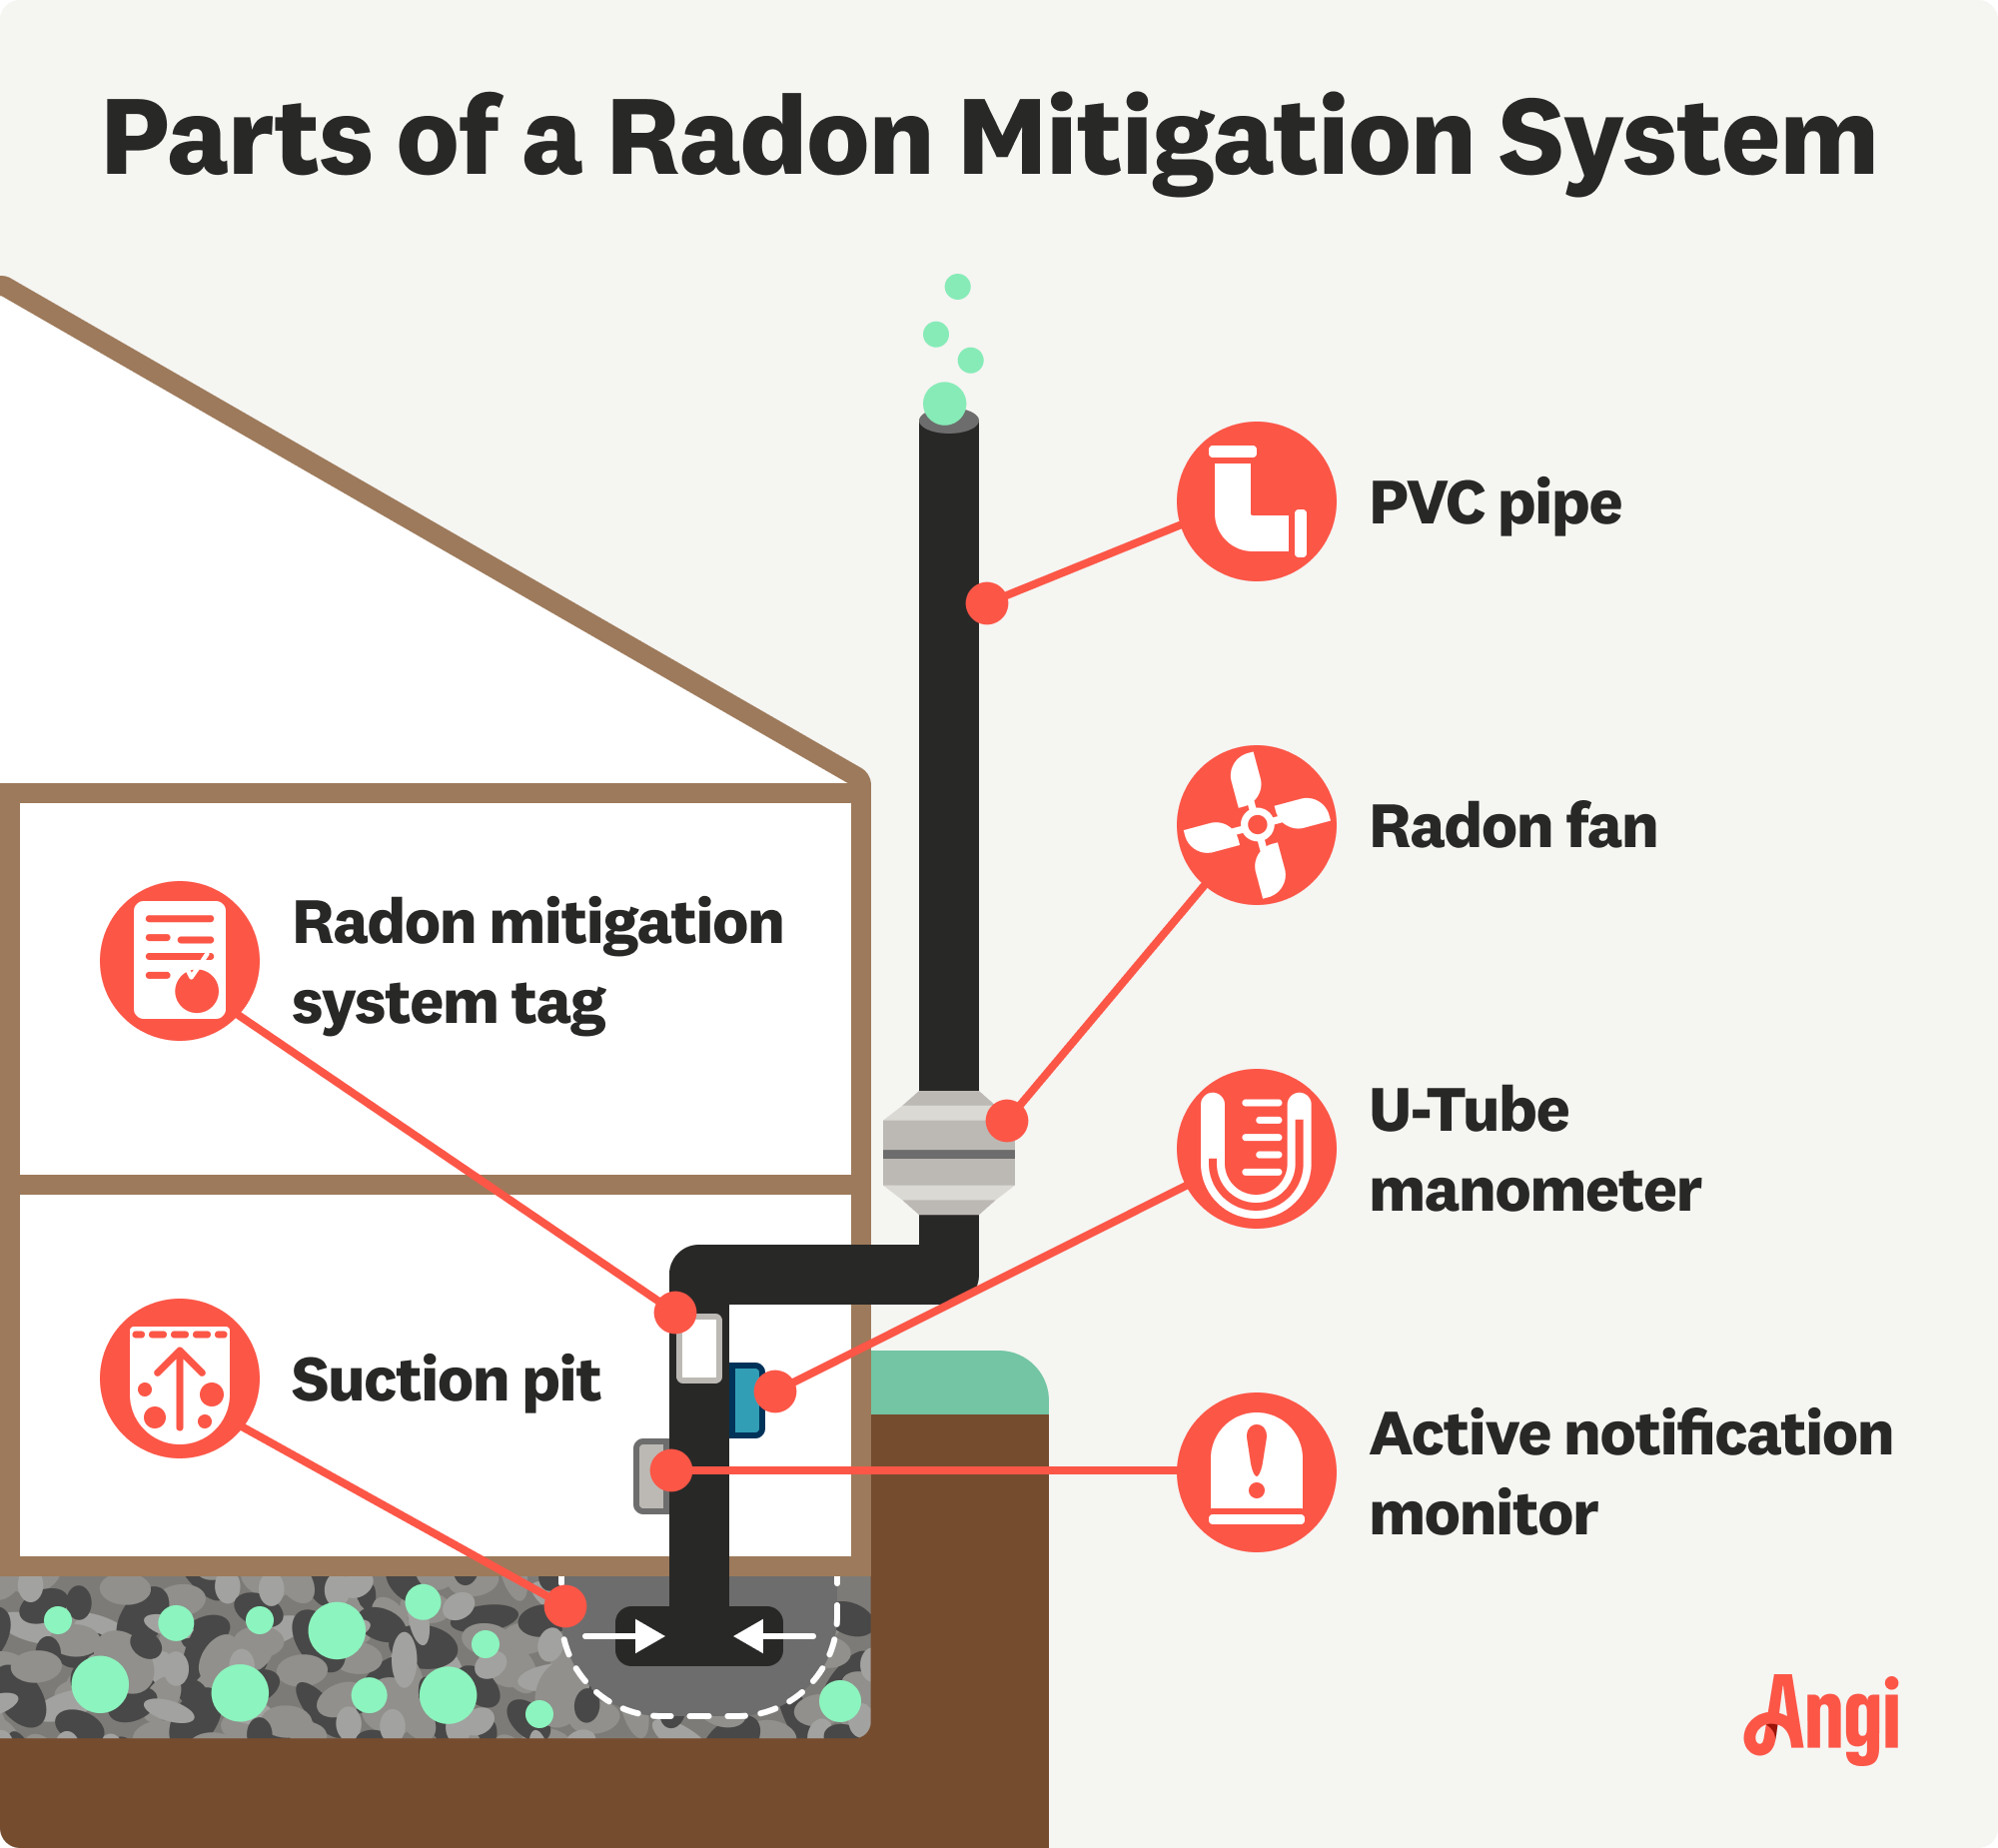
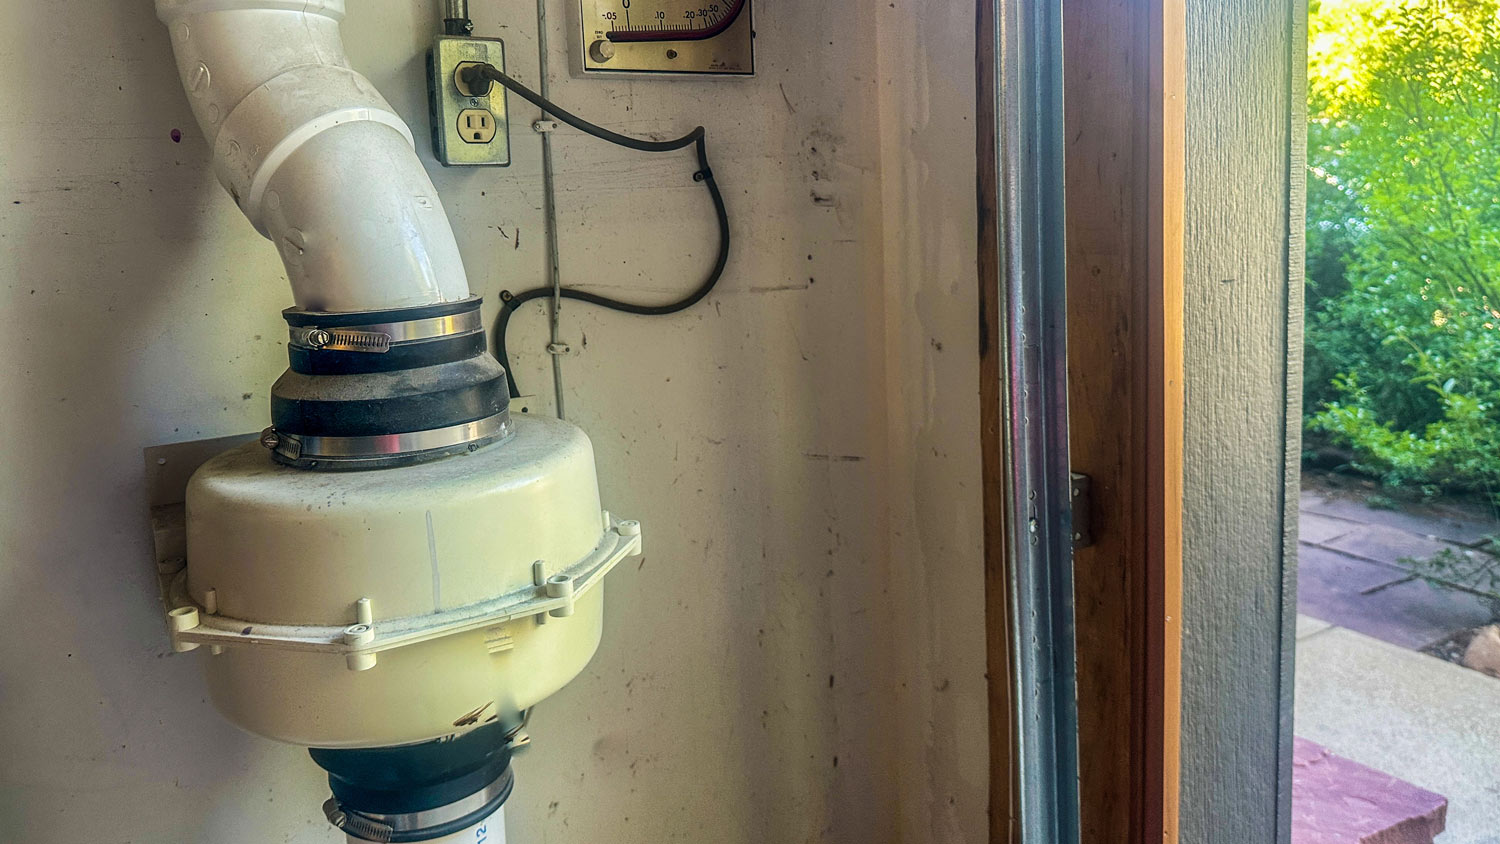
No matter which radon mitigation system you opt for, these are the components you’re most likely to find in each one and what they do.
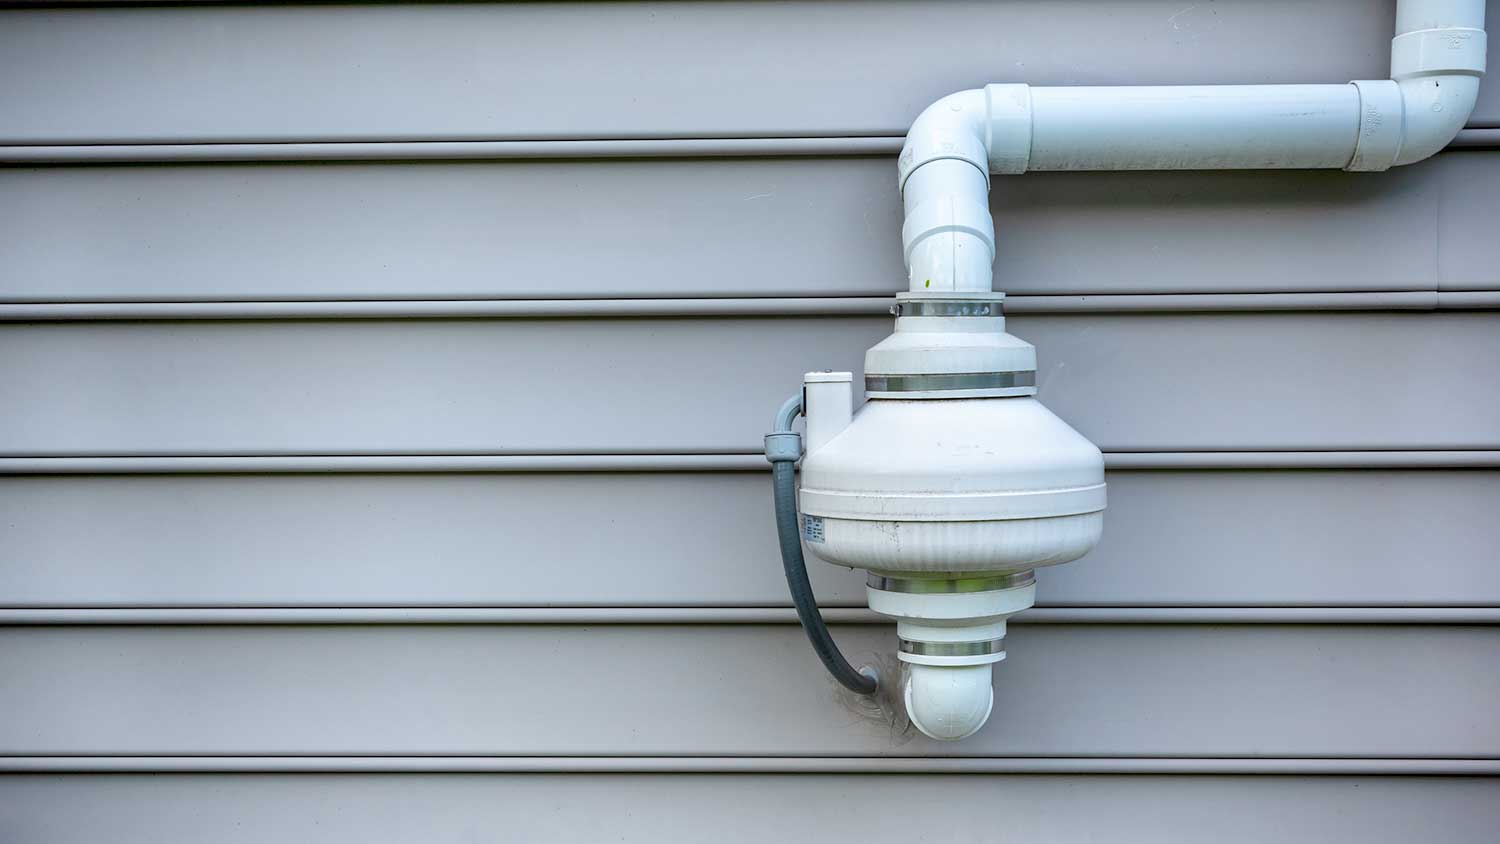
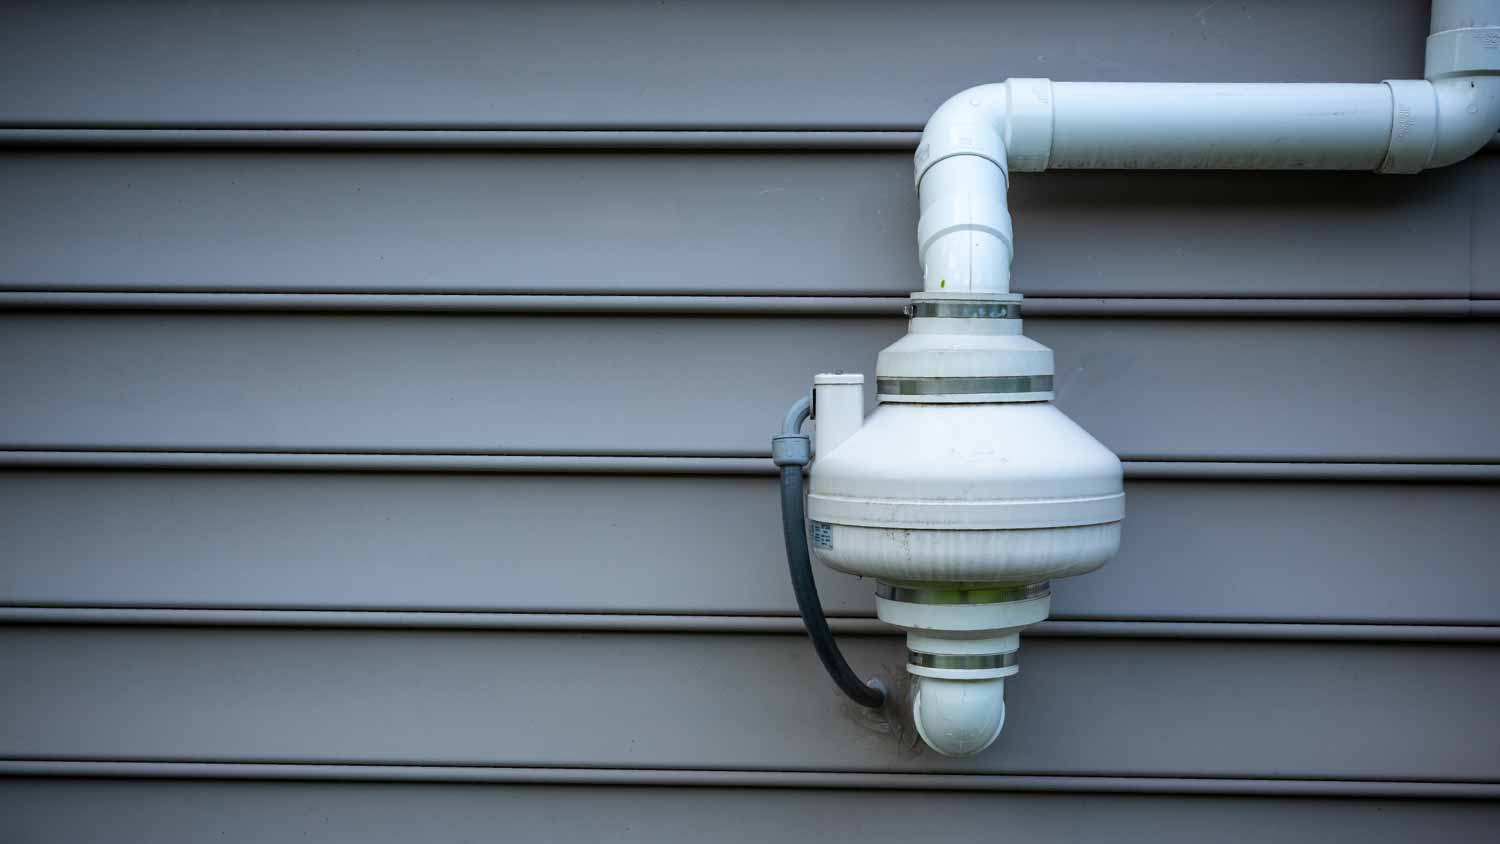
Radon fan: This feature is installed in a cavity in the roof or an attic and carries radon from the inside to the outside of a home. Because its job is so important, radon fan replacements cost more than replacing other broken parts.
U-tube manometer: This part is placed in an easily visible location and will signal to homeowners whether or not the radon fan is working.
Radon mitigation system tag: Located below the U-tube manometer, this tag contains all of a system’s pertinent information, like when and who installed it, plus their phone and license number.
Active notification monitor: This alarm will ring if the radon fan isn’t working properly.
PVC Pipe: This pipe connects the radon fan at the top of a home to the suction pit at the base.
Suction pit: Located in or near the home’s foundation, this part pulls radon from the soil below and carries it up through the PVC pipe to the radon fan, which moves it outside.

Radon is a hazardous gas that comes with a number of risks when improperly handled, and there’s no way to avoid contact with it when building a system like this.
What’s more, the system needs to be installed correctly for it to work at all, which can be difficult to do if you don’t have all the right skills, equipment, and knowledge of local codes and regulations. But who installs radon mitigation systems? You should hire a radon reduction specialist near you. They can provide radon testing to see how high your home’s levels are and install a mitigation system if necessary.
Here’s a look at what the pros will do throughout the process:
Conduct a radon air quality test to see how high the gas levels are in your home.
Create a suction point where radon levels are highest.
Dig a sub-slab pit, which will create a larger surface area and enable the radon fan to remove radon most efficiently.
Install the PVC pipe from the bottom to the top of the house.
Construct an exit vent in the roof or attic and install a radon fan.
Test the system and make adjustments as necessary.
Although DIYing a radon mitigation system isn’t recommended, there are some things you can still do—like clearing an area of your basement for the pros to work or learning how to test for radon yourself.
Exposure to radon over a long period of time can cause serious health problems, including lung cancer. Lowering radon in your home requires professional knowledge and skills only available by hiring a radon mitigation pro.
One of my old tall evergreen trees was suddenly leaning toward the busy street in front of my house. I submitted a request for an emergency tree inspection, and Alejandro, owner of Cajete Tree Service, contacted me immediately and arrived to look at it just 20 minutes later. We agreed the...
Great company! Price was competitive, technician showed up on time and completed the job (exterior electric Radon fan replacement) quickly. Would hire them again.
1 tree was cut down and 5 others including a large willow tree were trimmed. The Grant Tree Service men were professional and cleaned up afterwards. The cost of the 6 trees were affordable. I am very happy with the results. I would hire them again.
It went so well! They were prompt and efficient! They were patient with last minute changes and the work was worth the money
 Security Doors and Shutters
D1 Roofing delivers outstanding service from beginning to end, backed by a strong warranty and expert teams. I highly recommend them for their excellence in meeting and surpassing expectations with unmatched communication. Choosing D1 Roofing was flawless decision
Seth was very professional, prompt in responding to queries about the work required , gave sincere advice as to what would be best for tree trimming and did the job timely.
I conferred with 2 other contractors before Armstrong Electric. Nick and his crew showed me that the project was not as convoluted as the other contractors made it appear to be. They completed the entire project on time. They were professional, friendly and cleaned up after at completion. I...
The technician was very professional and friendly. He answered all my questions and was very thorough. He left the fireplace area very clean . He inspected from the roof and advised me as to other work that might need to be done. There was no pressure there. I was very satisfied with the...
 Supreme brick & chimney
I had Ace Fireplace Services install custom chimney caps for my home, and the results are stunning. They fit like a glove and have added a touch of sophistication to my chimney. I can't recommend their services enough.
 Ace Fireplace Services
The techs on my project, Shawn and Cliff, were great. They were prompt, courteous, and efficient. I am very happy with the results and would definitely contact Mr. Electric for any future electrical projects.
From average costs to expert advice, get all the answers you need to get your job done.
Get clear answers on how much radon remediation costs, including average prices, key cost factors, and tips to save money on your home’s radon mitigation.
Find out the average cost of radon fan replacement, key price factors, and ways to save. Get expert tips to budget for your radon mitigation system.

The cost of a radon mitigation system depends mostly on the type of system being installed. Use this guide to learn about your options.
Radon can seep into your home through cracks and small openings. Here's how to get rid of radon and why you need to do it.
During a severe storm, wind mitigation can keep your family safe and your home protected—but what is wind mitigation? Learn more in this guide.
Radon is a radioactive gas that can enter a home from the ground. Prepare yourself for mitigation by answering these questions before hiring a pro.