

•
Discover the cost to stain cabinets, including average prices, key cost factors, and tips to help you budget and save on your cabinet staining project.
Your cabinet glow-up starts with a bit of grit


Even though professional cabinet painting costs an average of $430 to $1,460, they’ll also sand or strip your cabinets as needed.
Sanding is a laborious DIY task, and inhaling wood dust can cause respiratory symptoms.
You might need more supplies than just sandpaper, such as power tools, chemical paint strippers, and personal protective equipment.
Mistakes can damage your cabinets and form visible imperfections, which a cabinet painting pro will know how to avoid.
We’ll be honest: Sanding cabinets is not a thrilling part of a kitchen refresh. But if you skip the process, your fresh coat of paint or stain will not adhere properly, spotlighting any surface flaws. For homeowners who want a pro-level finish, it all starts with grit. Here’s how to sand cabinets for painting.

While sanding is labor-intensive, it sets the stage for a successful project with professional results. The process strips off old paint or wood stain and any grimy buildup that cleaning alone won't remove. The resulting surface allows fresh primer, paint, or stain to adhere correctly, creating an even and long-lasting finish.
Sanding is also mandatory on unpainted wood if you notice the wood grain is raised and uneven. If sanding is not possible, there are ways to restore kitchen cabinets without sanding, but it is not highly recommended.
DIYers can sand their cabinets after investing between $100 and $500 in tools and materials like an electric sander, sanding pads, and protective gear, including goggles, gloves, and a respirator or dust mask. If DIY is not your thing, you can hire a local cabinet painter.
The cost of professional cabinet painting can range from $425 to $1,460, depending on your home’s location and the number of cabinets in your kitchen. The significant upside is that pros have all the gear to do a stellar job and will handle ventilation issues related to sanding.
There are several ways to sand your cabinets. Each method uses different tools and techniques and offers various benefits, but they all begin with prep work.
Remove all cabinet doors, drawers, including their hardware, like hinges, handles, and knobs. It is a good idea to place small pieces like these in baggies and then label them or snap a few photos with your phone for later reference.
Next, clean the surfaces you plan to sand. Grab a degreaser made for cabinets, or use a mix of warm water and dish soap, then wipe down with clean towels or rags. Experts suggest allowing the cabinets to dry in a well-ventilated area for 24 to 48 hours.
Finally, place drop cloths or plastic sheeting on all exposed surfaces to catch dust. This will make cleanup after sanding much more manageable.
DIYers must wear goggles, gloves, and a mask or respirator to shield themselves from harmful dust particles and fumes.
Hand sanding is the most accessible and budget-friendly method, especially if you have a small kitchen with few cabinets. You will not need power tools—just elbow grease, patience, and a few supplies. One of the most significant advantages of hand sanding is that it can get into tight spots that an electric sander could easily damage.
You have a few choices regarding what to sand with. You can purchase a manual hand sander, which you attach to different pieces of sandpaper. They typically come with a handle that makes gripping the sander much easier.
DIYers can also consider sanding sponges, which resemble thick rectangular dish sponges covered with a gritty finish. They are great for wet and dry sanding and delicate or hard-to-reach areas. We suggest using a manual hand sander on flat surfaces and a sanding sponge on decorative or hard-to-reach spots for the best results.
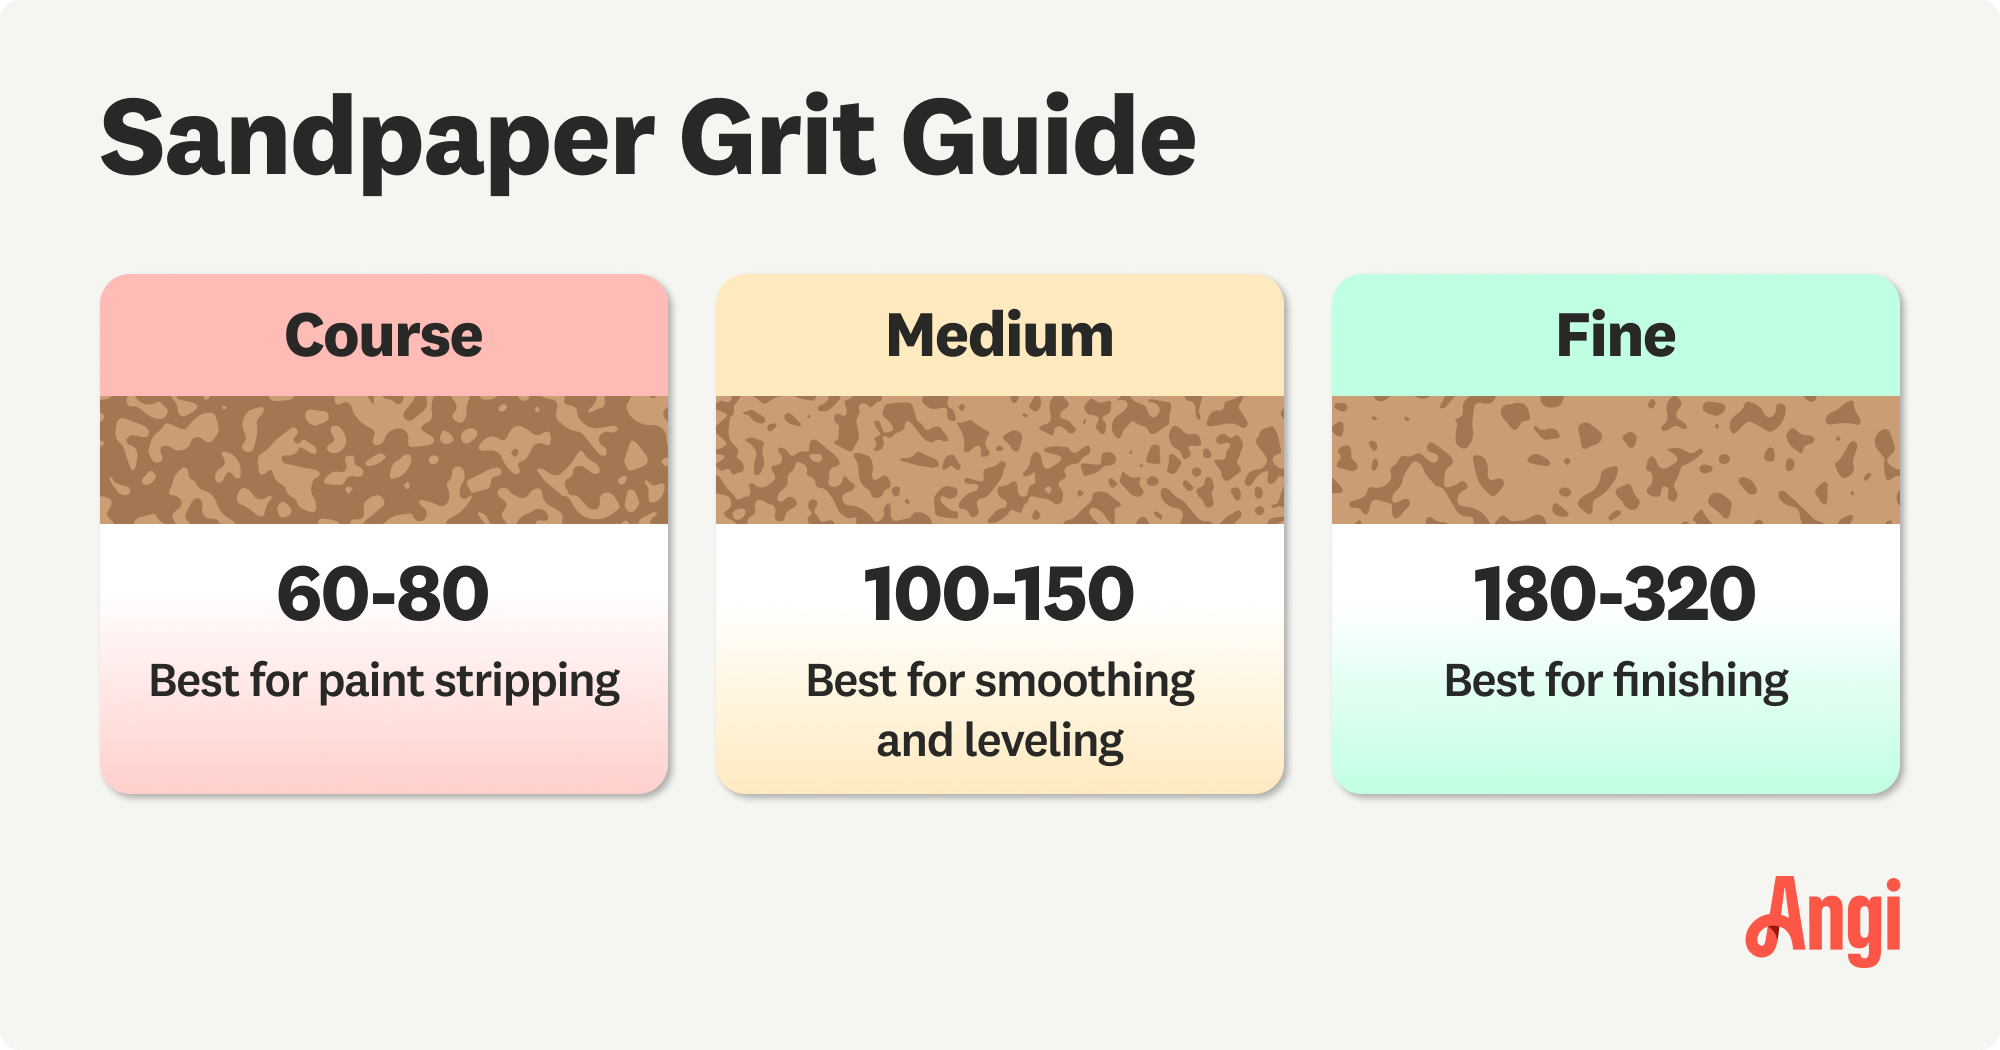
Here's how to determine what sandpaper grit to use on your cabinets:
Start with coarse-grit sandpaper to remove the old paint or stain.
Follow up with medium grit to smooth the surface and make it less gritty.
Continue with a finer grit to refine the surface.
Finish with extra fine grit to create a pristine and polished finish.
Remember, while hand sanding is labor intensive, it does offer unmatched control, meaning you are less likely to sand excessively or, just as bad, accidentally gouge the wood.

If you are a homeowner with flat-front cabinetry, consider an orbital sander. This electric tool is excellent for quickly removing old finishes. Unlike similar items like a belt sander, it is less aggressive and much easier to control. It moves in small circular patterns, significantly reducing visible sanding marks or uneven spots on the surface.
As with hand sanding, start with a coarse grit to remove the existing paint or stain finish. Afterward, you will switch to a medium grit and progress to a fine and extra fine grit before painting or staining.
Be mindful of edges or corners. Orbital sanders can chew through delicate wood or veneer quickly if you apply too much pressure or let it linger in one spot. Always keep the sander moving in a steady, overlapping pattern to prevent gouging or creating uneven, low spots.

Thanks to their small, compact size, detail sanders are easy to maneuver and have a pointed tip perfect for sanding contoured areas, corners, or grooves.
These electric tools often come with a kit of interchangeable sanding pads in various grits, allowing you to move quickly from coarse to extra fine. This handy tool is much faster than hand sanding and works nicely on intricate cabinetry.
These small attachments, which you use with a drill or oscillating tool, are suitable for sanding decorative finishes and detailed edging on cabinets.
You will find them in all grits in barrel, cone, and disc shapes. However, these tiny attachments are not ideal for large surfaces. Additionally, inexperienced DIYers can risk damaging decorative flourishes, so it is best to practice before sanding anything of value in your home or leave delicate areas to a pro.
In some instances, you need a chemical paint stripper to remove any sticky residue and smooth the wood grain before sanding, such as when lifting off a heavy finish, such as multiple layers of old paint, stubborn varnish, or shellac.
Apply the stripper evenly with a brush or sponge according to the manufacturer's instructions. When the finish starts to bubble or soften, grab a plastic scraper to remove the layers without damaging the wood underneath. Once most or all of the finish is gone, sand the surface to prep it for paint or stain.
Only use chemical strippers in well-ventilated areas, or even better, outside, while wearing protective gear.
These tips can make or break your cabinet refinishing project. Here's how to avoid common pitfalls so any DIYer can achieve great results.
Protect your space and health: Work in a well-ventilated area, use drop cloths or plastic sheets to catch debris, and seal off doorways so the mess doesn't spread to other rooms.
Don’t skip prep work: Remove hardware, doors, and drawers, and clean the cabinets thoroughly before sanding.
Use the right grit: You’ll need a variety of sandpaper grits for the different stages of this project. Start with coarse grit to strip existing paint and finish with extra fine. Sand with the grain, not against it.
Sand carefully: Don’t press too hard on cabinet surfaces, or you risk creating an uneven surface that paint or stain will only highlight later. Lighten your touch, especially around corners, edges, and decorative areas.
Many ambitious DIYers might think sanding cabinets is a straightforward project. But if you are new to sanding, it is more demanding and labor-intensive than expected. Achieving a smooth, even surface requires great technique regardless of the tools used. One minor slip-up can easily lead to visible imperfections, which may require cabinet replacement.
Hiring a local cabinet painter ensures the job is done quickly, cleanly, safely, and flawlessly. Experts have experience working with different cabinet types and understand how to sand decorative details. Paying for expert craftsmanship is more cost-effective in the long run than fixing a DIY misstep.
From average costs to expert advice, get all the answers you need to get your job done.
Discover the cost to stain cabinets, including average prices, key cost factors, and tips to help you budget and save on your cabinet staining project.

Discover the cost of resurfacing kitchen cabinets, including average prices, key cost factors, and tips to help you budget and save on your next kitchen update.

Learning about problems with refacing kitchen cabinets can help you avoid common errors before and during your kitchen upgrading project.

Are you ready to give your kitchen a makeover? Learn how to refinish cabinets to a look you love with these top methods.

What’s the cost of refacing kitchen cabinets vs. replacing them entirely? We break down the many factors to consider when deciding between the two.

You can bring your cabinets back to life without all the hassle. Here’s how to restore your kitchen cabinets without sanding or varnishing.