14 Different Types of Door Weather Stripping to Keep the Elements Out
Choose between these 14 types of weather stripping


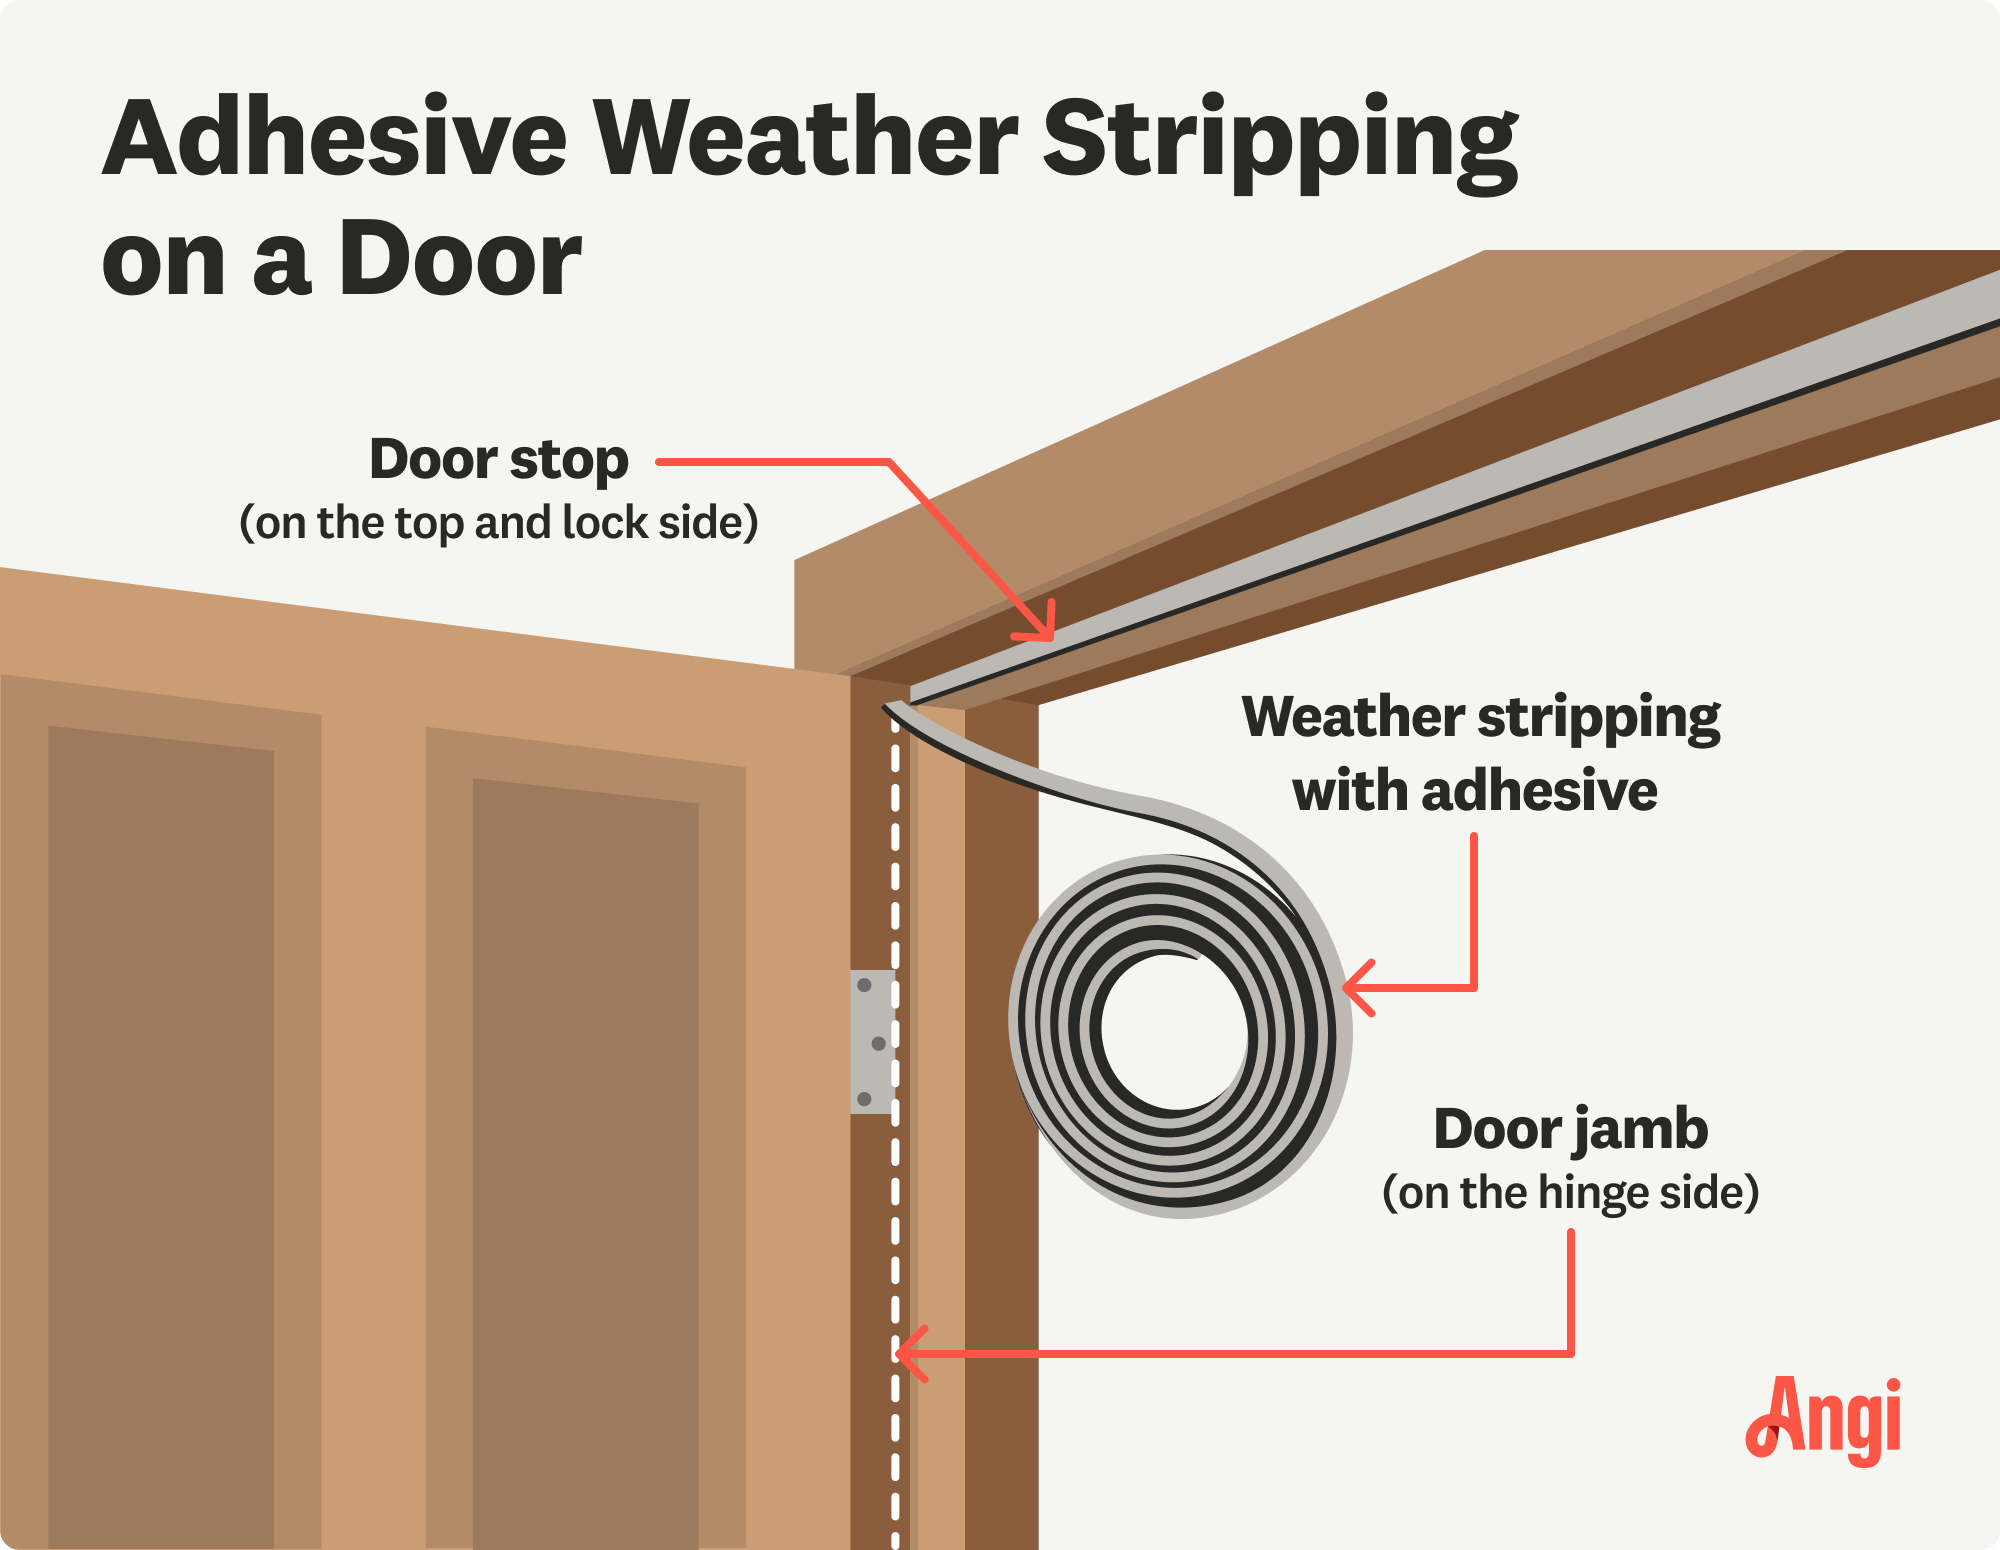
Weather stripping is a strip that goes around windows, doors, and garages to keep Mother Nature out of your home. It keeps the unconditioned air outside at bay, prevents snow or rain from entering, and helps seal air leaks to prevent your HVAC from overworking. Choosing the best type of door weather stripping for your situation is crucial for maximizing energy efficiency and keeping your living space comfortable.
Whether you’re planning to DIY replacement weather stripping or hire a pro for the job, this article explains 14 types of weather stripping for you to consider.
1. Tension Seal
A tension seal is one of the most common types of weather stripping. You might also find this type of weather stripping called a “V-Strip.” This type of weather stripping is made out of vinyl, but you can also find it in aluminum, bronze, and stainless steel.
You’ll find this type of seal around the top and sides of a door or sliding window. A tension seal is “invisible” because it’s hidden in your window track or inside your door frame. One side has a peel-and-stick surface for installation, and the other presses against your door or window to create a seal against air and water.
Pros
Long-lasting
Not visible once installed
Quite effective at blocking drafts
Relatively affordable
Cons
Only suitable for flat and smooth surfaces
Challenging to install properly, especially around corners
Can make doors and windows a little harder to close
Best For: Side tracks of sliding windows, top and bottom tracks of sliding doors, and tops and sides of standard doors

2. Felt
Unsurprisingly, felt weather stripping is made from felt, and the strip sometimes includes a flexible metal strip to add some rigidity. Rather than the peel-and-stick method, you’ll need to use staples or glue to install the felt.
While relatively inexpensive compared to a tension seal, felt weather stripping requires more frequent replacement. Opening and closing doors repeatedly causes the flexible metal strip to bend, which can render the weather stripping useless.
Pros
Easy DIY installation
Affordable
Easy material to work with
Cons
Not the best for blocking drafts or water
Won’t stand up to friction
Visible when installed
Needs regular replacement
Best For: The hinge side of doors or the bottom of a window sash
3. Reinforced Foam
Reinforced foam is another fairly common material for sealing wall openings. This type of weather stripping goes at the bottom of a door or window, which means you’re likely to pair this one with another type. It’s made up of closed-cell foam that compresses to prevent air or water from entering your home.
For reinforced foam, you need to saw the material and then nail it into the area. This creates quite a bit of durability and tends to fare well against even the highest winds. Because of the material, though, it tends to stick out like a sore thumb.
Pros
Very efficient
Affordable
Cons
Visible once installed
Can be challenging to install
Won’t stand up to much friction
Best For: Bottom of window sash or door and on door or window stops
4. Tape
Tape weather stripping is made from durable rubber that’s slightly compressible to create a good seal, or from closed-cell or open-cell foam, depending on the intended application. You’ll only want to use it in areas where you notice wear and tear on existing weather stripping. Consider this a temporary solution when none of the other options are feasible.
For extra reinforcement, staple the tape into the frame for best results.
Pros
Simple installation
Affordable
Provides decent protection in a pinch
Cons
Visible once installed
Not as durable as other options
Best For: Around window sashes and doors, as needed for quick repairs, and for sealing irregular areas
5. Rolled or Reinforced Vinyl
With reinforced vinyl, you’re getting a relatively solid weather stripping option. This one does require that you have a metal or wood strip already present before installation, though. Because it’s vinyl, you get quite a few options for colors and painting, but the difference in texture can still make it visible.
Use reinforced vinyl weather stripping when you already have metal or wood stripping and want to minimize the air flowing into your home. It comes in a strip with a self-adhesive side for easy installation.
Pros
Easy to install
Can be somewhat hidden if the color matches your window or door
Cons
More expensive than other types
Must have a preexisting wood, vinyl, or metal strip for installation
Best For: Door or window stops and bottoms of doors or windows
6. Door Sweep
Door sweep weather stripping only goes on the bottom of a door to make the door more energy-efficient. If it’s an interior door, place it on the side of the door that swings open.
There are different materials to choose from for door sweeps. The strip that attaches to your door is usually aluminum or stainless steel, and the sweep that hangs down to create a partial seal is either vinyl, sponge, flexible plastic, or felt.
The big problem with door sweep weather stripping is that it tends to hang too low on the bottom part of the door. So, if you have carpet in the area, there’s a high chance it catches when the door opens.
Sealing gaps and weatherstripping can save up to 20% in annual energy bills according to the U.S. Department of Energy.

Pros
Various designs and materials
Easy to install
Suitable for sealing against uneven surfaces
Cons
Visible
Expensive
Can snag on carpet
Can require door removal to install
Best For: Bottom of exterior door
7. Magnetic
Magnetic weather stripping attaches magnetically to the tops and sides of doors and windows. It’s extremely easy to install and uninstall, and it creates a great seal. However, it does come with a high up-front cost.
Pros
Very efficient
Super easy to install and adjust
Cons
Expensive
Best For: Sides and tops of windows and doors
8. Tubular Rubber and Vinyl
Tubular rubber weather stripping only goes on doors, but you can install it on certain types of windows, including basement hoppers and other styles that hinge closed. It comes with the benefit of surrounding the entire door or window. This way, you don’t have to pick two weather stripping types to accomplish the task. You’ll want to hire a door repair specialist for this one, as DIY installation tends to be tricky if you’ve never worked with it before.
Pros
Great for sealing against air
Works as standalone weather stripping
Cons
Expensive
Challenging to install
Best For: Around doors and windows that hinge closed
9. Reinforced Silicone
Reinforced silicone is similar to tubular rubber but includes a metal strip to add rigidity and durability. It creates a solid seal against drafts for areas that pinch closed, like a window stop or the sides of your door frame. However, it tends to be more expensive than its vinyl counterpart.
Pros
Great for blocking air drafts
Durable
Cons
Expensive
Hard to install
Best For: Side jambs on doors and window stops
10. Door Shoe
Door shoes go on the bottom of a door and work similarly to a door sweep. Instead of strips extending down to meet the door threshold, they use a C-shaped piece of silicone or plastic to create a better seal.
This type of weather stripping is perfect for those in a rainy climate. The angle prevents water from entering the door frame and coming into your home.
With door shoes, you’ll have a combination of aluminum and vinyl inserts. You can switch out the inserts easily, which cuts costs in the long run.
Pros
Great for blocking water from coming inside
Some have replaceable inserts to cut down on replacement costs
Suitable for uneven flooring or threshold
Less likely to catch on carpet than a door sweep
Cons
Expensive
Difficult to install
Requires you to remove the door to install
Best For: Bottom of exterior door
11. Bulb Threshold
A bulb threshold is a tubular piece of vinyl with a T-shape that you insert into your threshold to seal door gaps along the bottom. It’s pretty easy to install, which is good because it wears down rather quickly from foot traffic. Since it sits on the threshold rather than the underside of your door, it does create an effective seal against water. It’s also decent at sealing against drafts.
Pros
Easy to install
Great for sealing against water
Cons
Expensive
Wears easily
Requires frequent replacement
Best For: Door thresholds
12. Frost-Brake Threshold
Frost-brake threshold weather stripping is perfect for those in cold climates, as there’s less heat transfer through the various materials, such as wood, aluminum, and rubber. They run into the same problems as bulb threshold weather stripping in that they wear down relatively quickly from foot traffic and you’ll need to replace this weather stripping more often.
Pros
Good seal against water and air
High thermal value for cold climates
Cons
Can be difficult to install
May have to replace the entire threshold when you install a new one
Expensive
Best For: Exterior door thresholds
13. Fin Seal
If a sliding glass door needs weather stripping to keep severe weather out, a fin seal—also called pile weather stripping—is probably your best bet. It’s made of an aluminum or vinyl strip with wool fibers or another kind of fiber extending outward to brush against your window jambs or the tracks of sliding doors.
These are very durable since the fibers are ultra-pliable, but they’re difficult to install if they wear down.
Pros
Great for sealing sliding windows and doors
Durable
Cons
Challenging to install
Not the best protection from water
Best For: In sliding channels for sliding doors and window sashes
14. Interlocking Metal Channels
Interlocking metal channels are weather stripping that’s only active when the door is closed. They interlock to create one of the strongest seals possible and go around the door’s perimeter. One side has a channel with a particular shape, and the other has a protruding piece of aluminum that fits snugly into the channel.
Though this type of weather stripping offers some of the best performance, it does require professional installation and has a high up-front cost.
Pros
One of the best seals for doors
Durable
Cons
Expensive
Demands professional installation
Can make your door slightly harder to open
Best For: Around exterior doors
Benefits of Weather Stripping for Your Home
Weather stripping your home provides many benefits, the most important of which are energy savings. While every home will differ, sealing gaps around doors and windows can prevent drafts and keep air out, saving 5% to 15% on your energy bills.
Besides saving on utility bills, here are some other benefits you may enjoy:
More comfortable home: When your home maintains a consistent temperature, you’re likelier to be comfortable instead of hot in the summer and cold in the winter.
Longer life on your HVAC: When your home has fewer air leaks, you don’t have to use your furnace or AC as often, elongating their life span.
Reduced risk of moisture: When your windows and doors are properly sealed, you don’t have to worry about moisture accumulating and the potential for mold growth.
Quieter environment: Sealing spaces around windows and doors helps eliminate outside noise, keeping your home more peaceful.
Cost to Install Door Weather Stripping
The price of installing weather stripping ranges between $130 and $430 for each project. Your location, the type of materials selected, labor, and the total number of doors and windows you need to seal will influence what you pay.
The upshot for homeowners is that investing in quality weather striping materials means better energy savings and a more comfortable indoor environment. For most folks, this project is worth the expense.
DIY vs. Hiring a Pro
Going the DIY route for less intensive, peel-and-stick weather stripping projects is ideal for handy homeowners looking to save. While it could be a satisfying weekend project, remember—you'll need to be precise to ensure you're keeping drafts out.
If DIY isn't your thing or you want to be certain it's done right, hiring a door repair specialist near you is the best option. A pro can get everything done efficiently and fairly quickly, so you can enjoy the energy savings as soon as possible.
Frequently Asked Questions
Inspect your weather stripping twice a year to ensure there are no missing pieces or damaged areas and so you’ll know when it’s time to replace it. Check it after severe weather to be safe.
Weather stripping should last around five years on average, depending on the type of weather stripping you use. Plan to replace your weather stripping when it reaches that age. If you live in a particularly cold or hot climate, replacing your weather stripping every two to three years will help boost efficiency even more.
A door sweep seals the gap between the bottom of a door and the threshold, preventing drafts, dust, pests, and moisture from seeping inside. Weather stripping refers to various materials used to seal gaps around doors and windows, block air leaks, and improve insulation. Put simply, door sweeps are for the lower part of the door, while weather stripping covers the gaps around the door or window frame.
The best weather stripping for an older door would be interlocking metal channels. These are expensive and require professional installation, but they’re great for older doors that aren’t plumb or level anymore. The channels are also highly insulative when installed properly, meaning they quickly restore the efficiency of older doors. A more affordable option would be a tension seal around the top and sides of the door, coupled with a bulb threshold seal. These kinds of weather stripping are more suitable for DIY installation as well, which can bring down installation costs even more.


- Sliding Glass Door Insulation: Tips and Tricks
- 5 Ways To Make Your Front Door Energy Efficient
- How to Seal Windows for Winter: A Complete Guide
- 6 Essential Sliding Glass Door Parts and How They Work
- How to Insulate a Door
- All the Parts of a Door: The Homeowner’s Guide
- Why Water is Leaking Through Your Sliding Glass Door and How to Stop It
- Door Sweep vs. Door Bottom: Get the Clarity You Need on This Door Part
- How Long Do Front Doors Last?
- How to Fix a Door That Sticks: 5 Different Methods
Get our Angi-powered app


