

Screen door installation costs depend on size, type of frame material, and the number of doors. Here’s everything you need to know.
You’ll want this helpful how-to in your back pocket when tackling this project yourself


This project requires a lot of experience, so we don’t recommend DIYing it. Hire a pro with the special skills and tools necessary to complete the job safely.
Pocket doors add character and charm to a home, and they can free up valuable floor space in a room that is otherwise crowded. While many older homes already have pocket doors, you can have pocket doors in modern homes, too, even if they weren’t originally designed to accommodate them.
We’ll walk you through how to install a pocket door, with one major caveat: While this is a possible DIY task, we advise working with a professional if you plan to add a pocket door to a load-bearing wall.
Before you can actually install a pocket door, you need to make sure the project is feasible. The biggest concern you’ll face is determining if the wall on which you’ll install the pocket door is load-bearing. If it is, installing a pocket door (on your own) is out of the question. Here’s how to tell if a wall is load-bearing before you start construction.
If the wall is not load-bearing, you’re almost good to go. You still need to ensure there is no electrical wiring or plumbing within the wall that will house the pocket door. If there is, you’ll either need to give up this project or hire a local plumber or electrician to reroute the plumbing or rewire this area of your home, respectively.
Can’t install the wall because it’s load-bearing, or because rerouting pipes and wires is too heavy of a lift? Consider installing a barn door instead of a pocket door for a similar aesthetic.
Technically, you can install pocket doors in load-bearing walls, but we recommend leaving this work to licensed professionals.
If you can move forward with installing the pocket door, you’ll next need to measure and record the height and length of your wall and existing door frame. You’ll also need to measure the depth of the wall and drywall to make sure you buy the proper pocket door frame kit. Review our guide to measuring a door if this is your first time attempting a project like this.
Next, measure the area where the rough opening will be located. This is usually twice the width of the existing door, plus an additional inch for a door stop and clearance. However, if you’re extending the door opening to accommodate dual pocket doors, like for a grand dining room entry, you’ll need additional measurements.
Put on your safety equipment and begin dismantling the existing infrastructure. Start by taking the existing door (if there is one) off its hinges. Then remove the hinges themselves, as well as the latch plate.
To remove the molding, cut along the outside of the existing door frame’s molding with your utility knife to break the seal. Remove the door head and side molding, carefully using a pry bar or the back of your hammer, as needed.
You can then loosen or cut the nails (with a reciprocating saw) that affix the door jamb to the frame. Finally, remove the drywall itself with the oscillating tool. You may only need to remove the drywall on one side, but it’ll be easier to remove the studs and install the frame in subsequent steps if you remove the drywall from both sides.
Even if you’re confident there are no wires or pipes behind the drywall, be delicate during this process—just in case. The last thing you want to budget for is the cost of water damage restoration or the cost to rewire your home due to a simple mistake.
Now is a good time to triple or even quadruple check that your wall is not load-bearing. Structural engineers can check to see if a wall is load-bearing if you’re not sure and could be well worth the cost.
Assuming the wall is absolutely not load-bearing, you can cut away the studs with a reciprocating saw. These studs must be removed, as they will otherwise be in the path of the pocket door when it’s in the wall.
Remove any screws, and sand rough edges on the top and bottom to ensure a level installation of the track at the top and to ensure the edges don’t snag the pocket door at the bottom as it slides in and out.
Your pocket door frame kit likely includes instructions for installation, so defer to those before any other pocket door installation how-tos, including this one.
That said, here are the general steps needed to install the frame and hardware:
Adjust the frame height if needed: If the height of your pocket door frame doesn’t match the height of the current opening, you’ll need to make some adjustments to the frame. Most frames are wooden or composite, meaning you can easily make cuts with your reciprocating saw.
Install the frame hardware: This includes affixing brackets to the split studs and door track. Secure all the hardware using the screws or nails that came with the kit. Use a level to ensure everything is flush and plumb.
Install the frame: You’ll likely need a second person to help with the actual frame installation. Insert the frame into the rough opening you’ve created. The friend or relative will need to hold the frame in place while you ensure it is properly aligned, using wood shims to square it as needed. Secure the frame to the existing wall frame and studs as instructed in the kid.
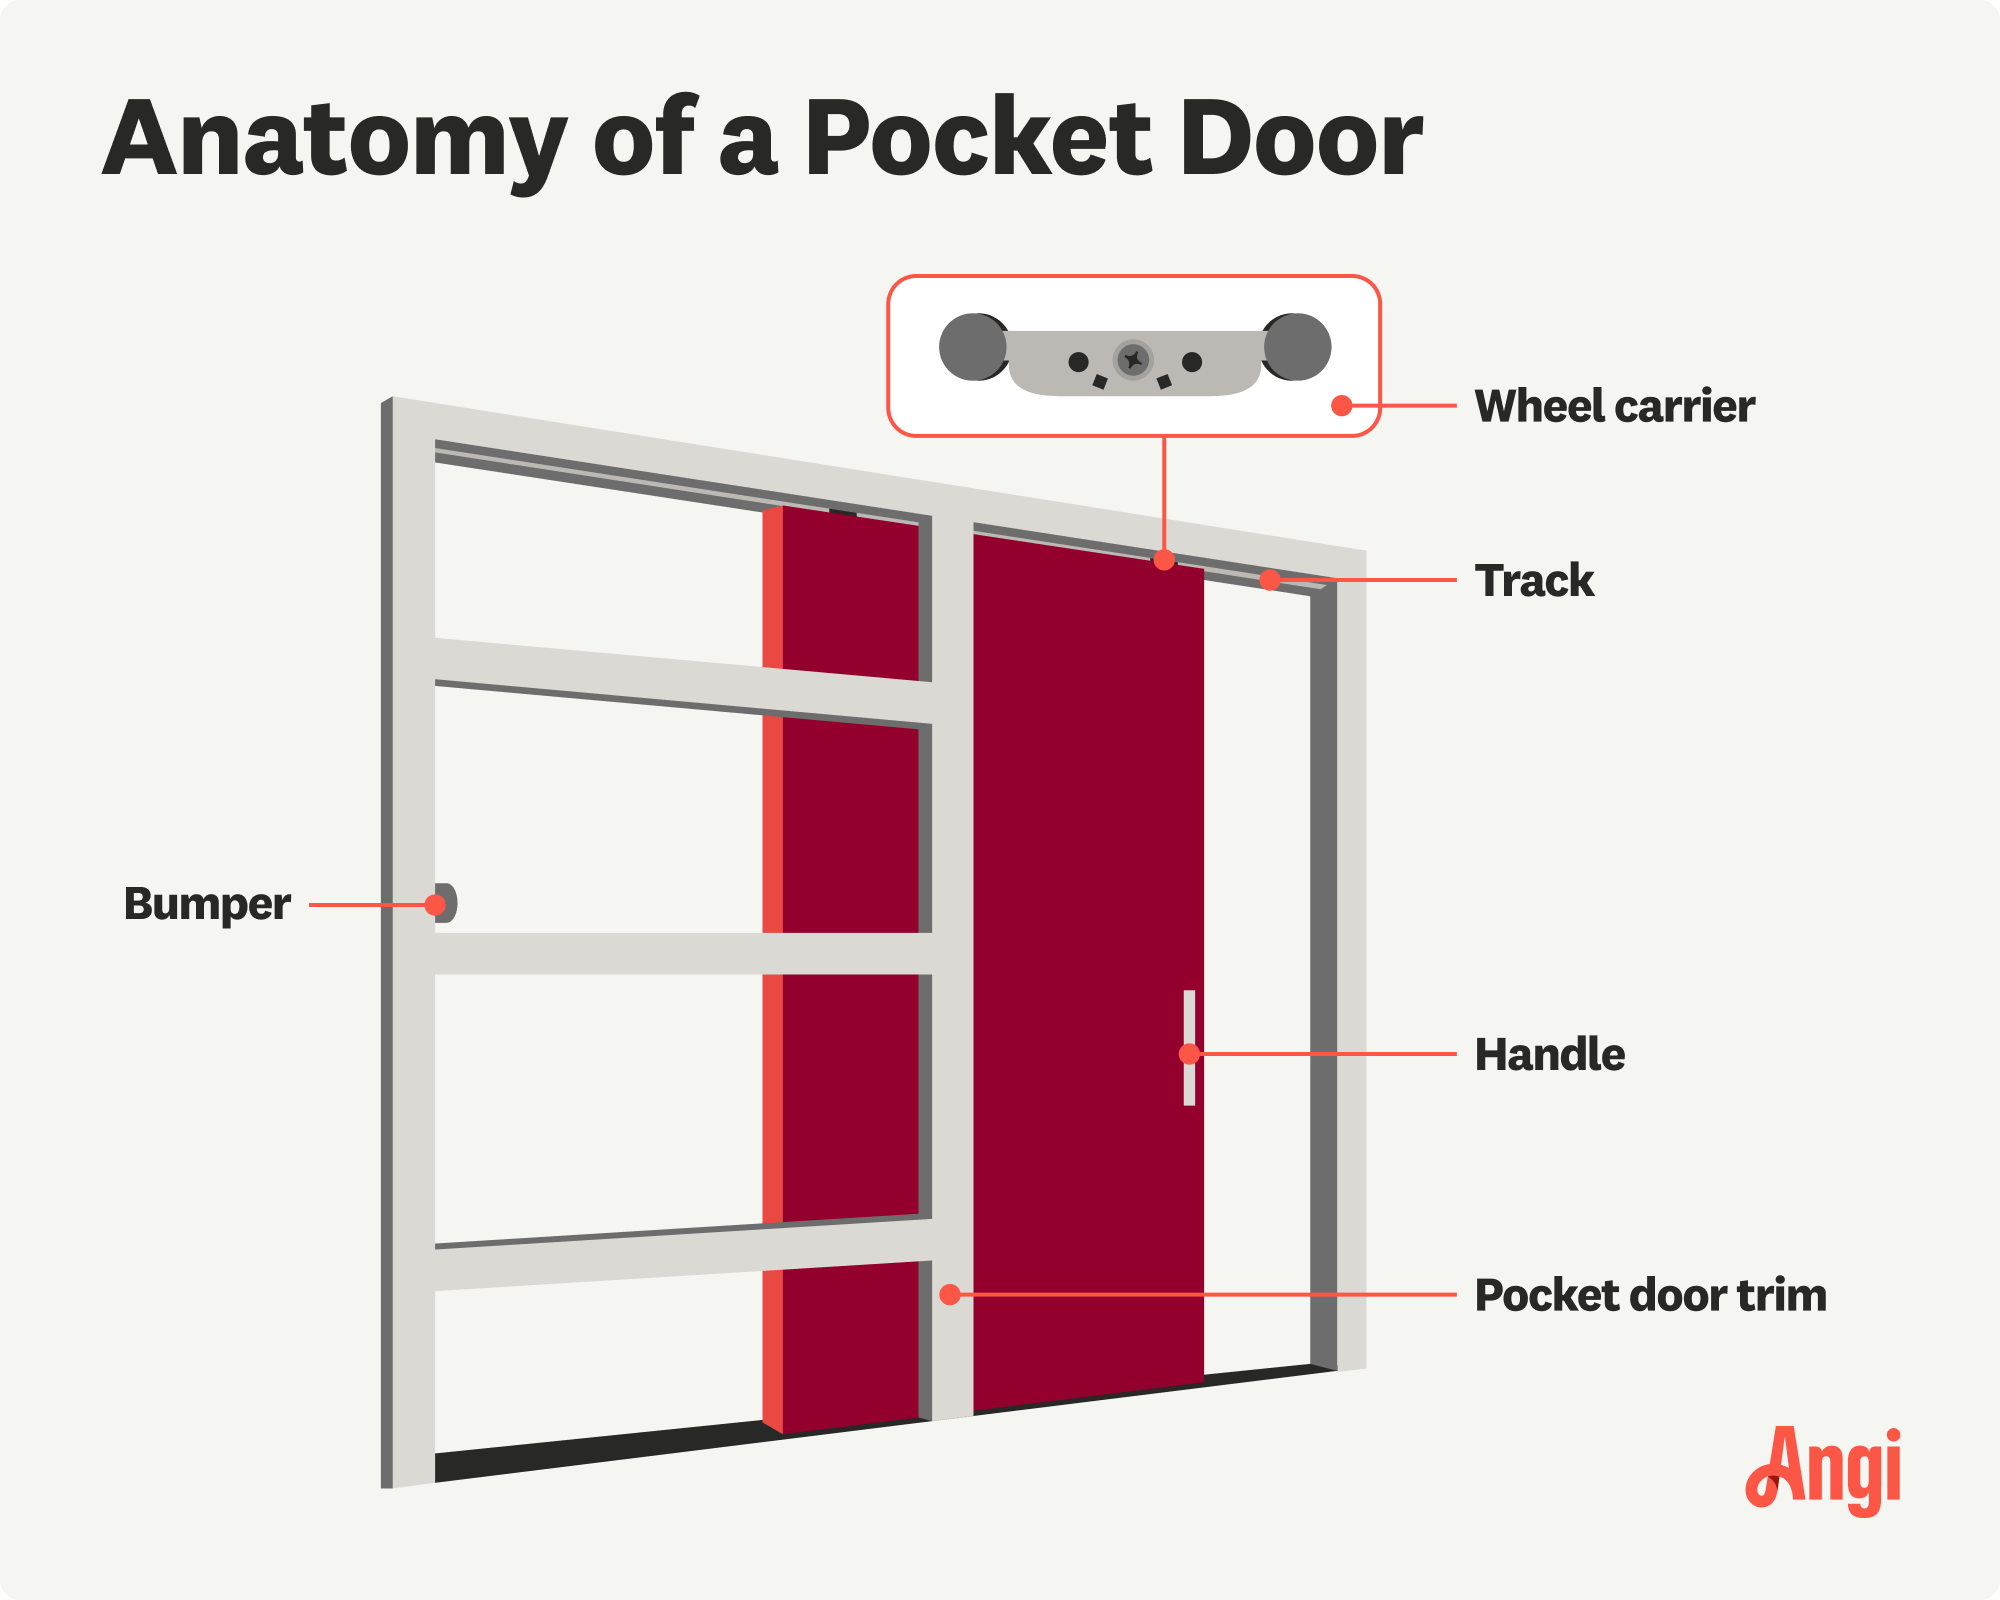
Install the hardware: The hanging hardware (track) should be roughly 2 ½ inches from the edge of the door on either side. Attach this to the frame first. Then install the bumper, which ensures the pocket door stays quiet when opening and closing, and the roller brackets, following the kit instructions closely.
You’ll need your assistant again to actually hang the door. Together, lift the door and insert it into the frame, locking the hanging hardware to the roller brackets. You can adjust these brackets up and down as needed to level the door. The kit should have a small tool to help you adjust it. Test the newly hung door to ensure it operates smoothly.
Once the door is correctly hung and operational, you can install new drywall to close up the wall. Make sure none of the drywall screws protrude past the new pocket door frame. A standard 1 ¼-inch drywall screw should do the trick, but always measure. Use joint tape and joint compound for a successful installation.
Put the finishing touches on your new pocket door by installing any hardware, such as a lock, door guides, and latch. You’ll also want to install new trim around the door opening.
Paint the new drywall and trim to match the paint color of other walls and trim in the room. Make sure the door is out of the way when painting.
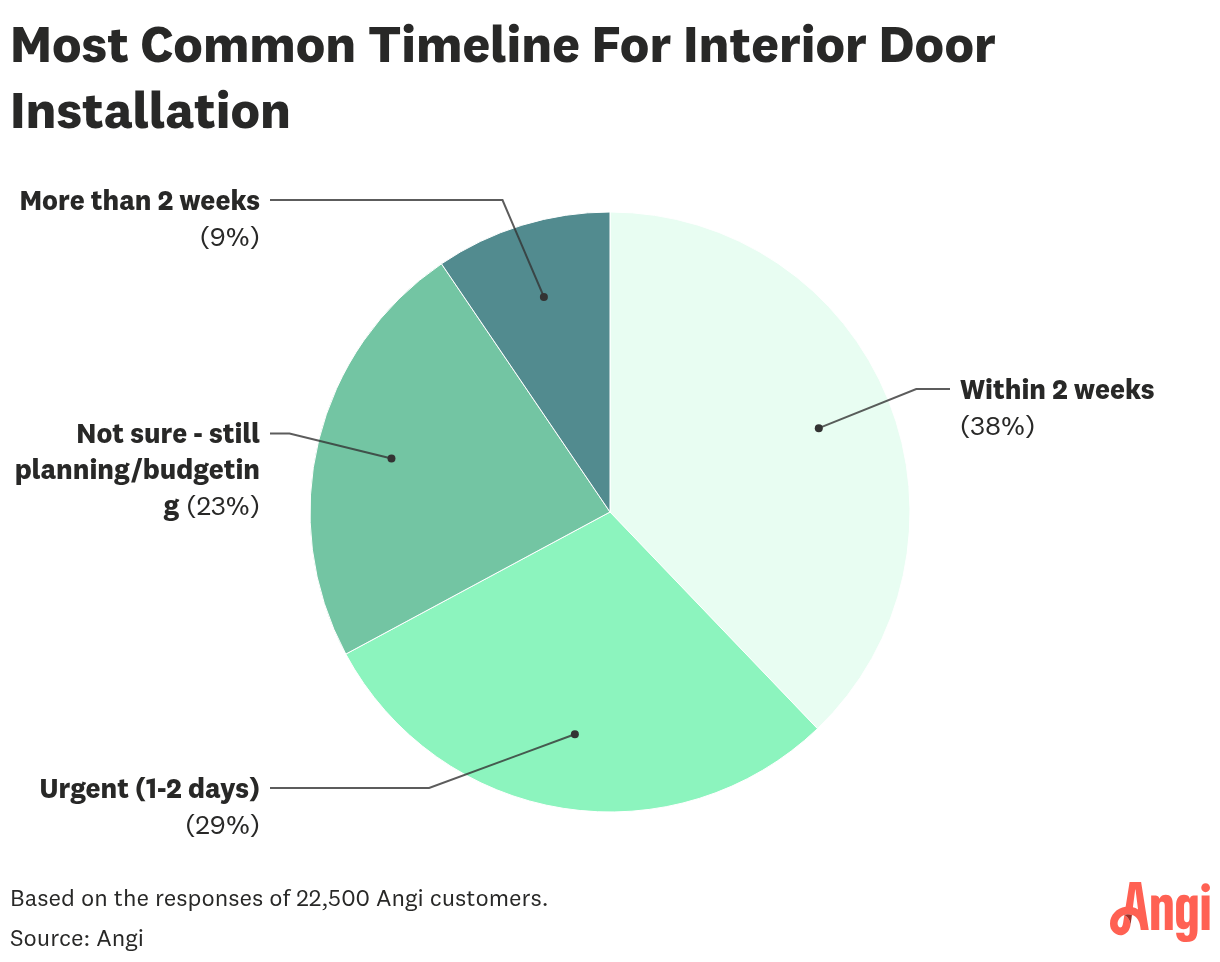
According to data from Angi, 38% of homeowners are looking to install an interior door within two weeks, while 29% of homeowners need door installation within one to two days. The remaining homeowners are either still planning or can wait more than two weeks.
Installing pocket doors is challenging, and it’s easy to make several mistakes along the way. That said, if you’re up for the task, possess the proper tools at home, and have a weekend to dedicate to the project, it’s possible to tackle the installation on your own and save yourself all the labor charges that make up the cost to install a pocket door.
That said, inexperienced homeowners should not attempt to install a pocket door themselves. And no one but an experienced local door installer should install a pocket door into a load-bearing wall. You’ll also want to work with local electricians and plumbers to reroute wiring and plumbing as needed, and you may want to call a drywall expert and painters if you need help putting on the finishing touches after installing the door frame and door itself.
From average costs to expert advice, get all the answers you need to get your job done.
Screen door installation costs depend on size, type of frame material, and the number of doors. Here’s everything you need to know.
A storm door can protect your front door and let in more fresh air. Find out how much storm door installation costs for materials, labor, and more.

Whether you’re installing a new door or replacing an existing one, the cost of door installation varies based on location, door type, framing needs, and other factors.

If you’ve ever wondered, “What is a fire door, and do I need one?” check out our all-encompassing guide on fire doors and their pros and cons.
Find out the average shower door repair cost, key price factors, and ways to save. Get estimates to plan your shower door repair project confidently.

Do you have sliding patio doors at home? Learn about some common problems with sliding patio doors, their causes, and how to fix them.