

Wondering how much it costs to reroute plumbing? We have the information you need to learn about plumbing vent pipes and cost considerations when installing them.
Understanding your kitchen sink plumbing shouldn’t be draining


The most well-known parts of kitchen sink plumbing are the visible components: the faucet, spray head, sink basin, and drain.
A kitchen sink’s strainer, garbage disposal, and P-trap work together to ensure no food and other debris get stuck in your pipes.
To maintain your kitchen plumbing, clean the drain regularly, check for leaks, and avoid pouring grease down the drain.
The average cost to install a new sink ranges between $216 and $648, but the final cost depends on labor, location, and the type of sink.
When it comes to your kitchen sink, most homeowners are familiar with the basics — the faucet and drain. These familiar components are at the center of your daily routines, like washing dishes and preparing dinner. However, just beneath the surface lies a complex system of plumbing parts that are just as important but often overlooked.
Use this guide to familiarize yourself with all the parts of your kitchen sink plumbing so you can decide when to tackle repairs and when to call in a professional.
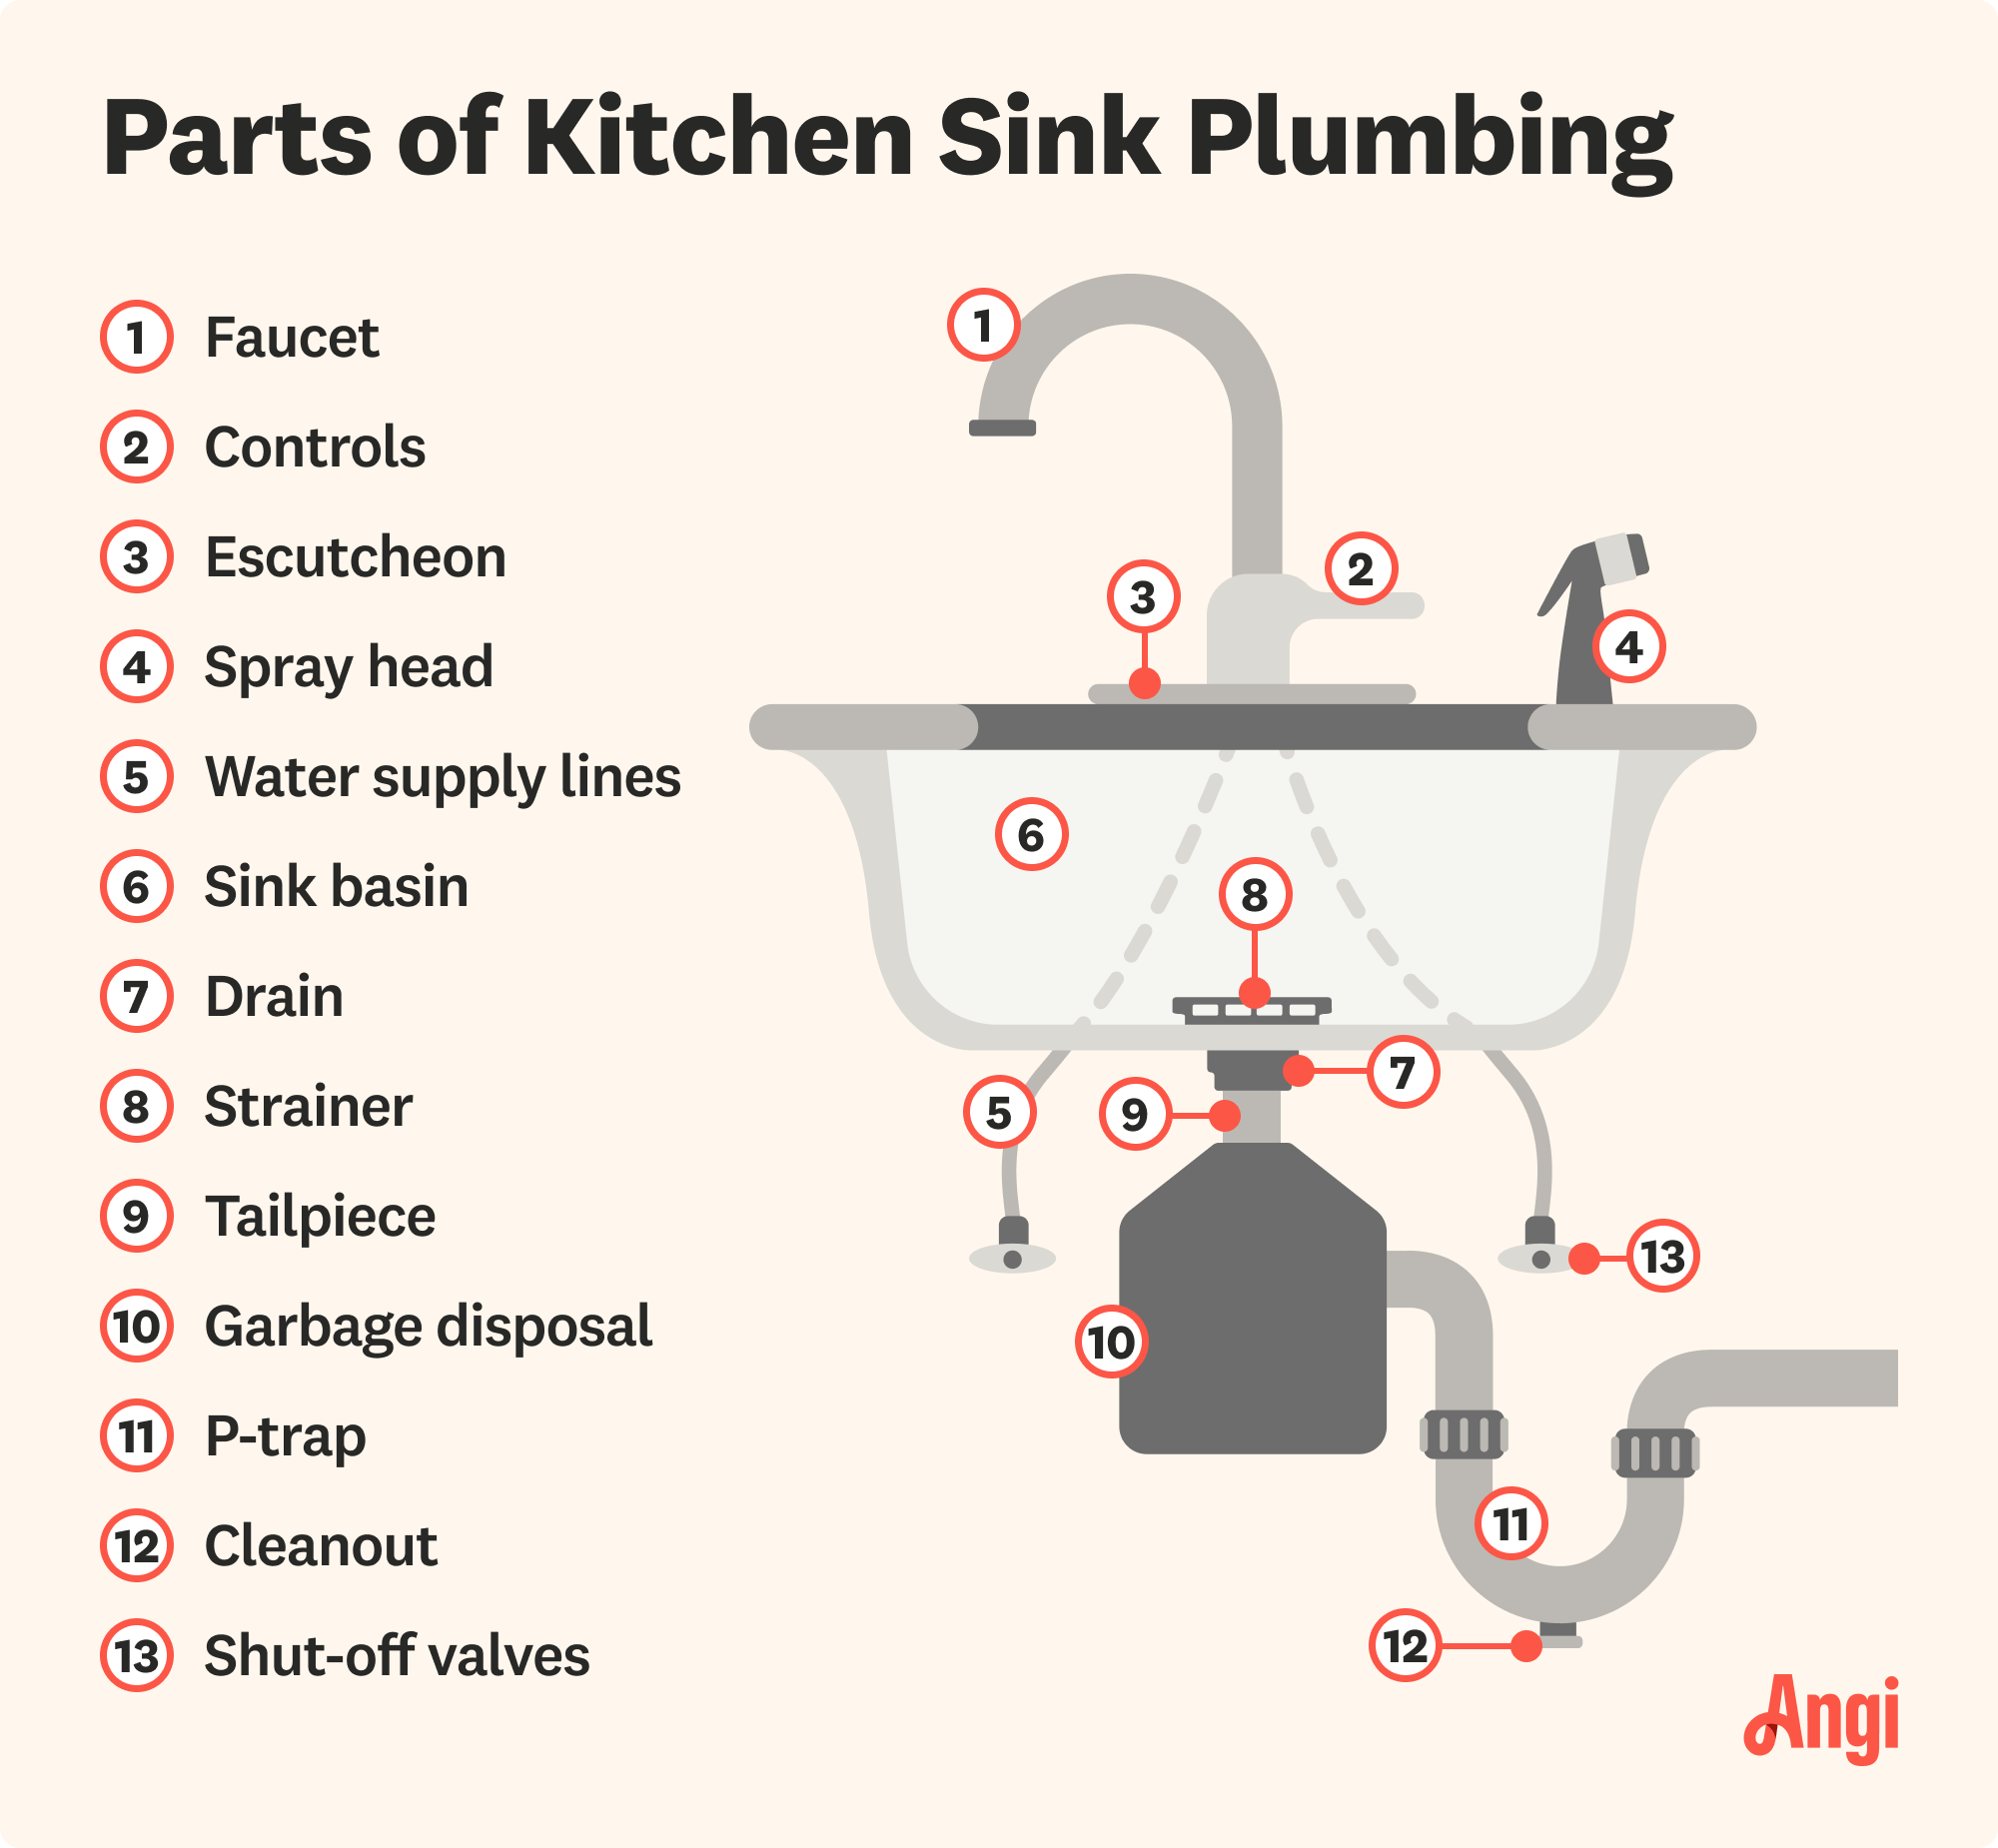
Understanding both the well-known and hidden parts of your kitchen sink plumbing gives you the ability to tackle minor issues on your own or know when to call in reinforcements for more complicated repairs. From the faucet that delivers fresh, clean water to the P-trap that keeps smelly sewer odors out of your home, understanding the essential parts of your kitchen sink plumbing will give you the confidence to navigate the entire system.
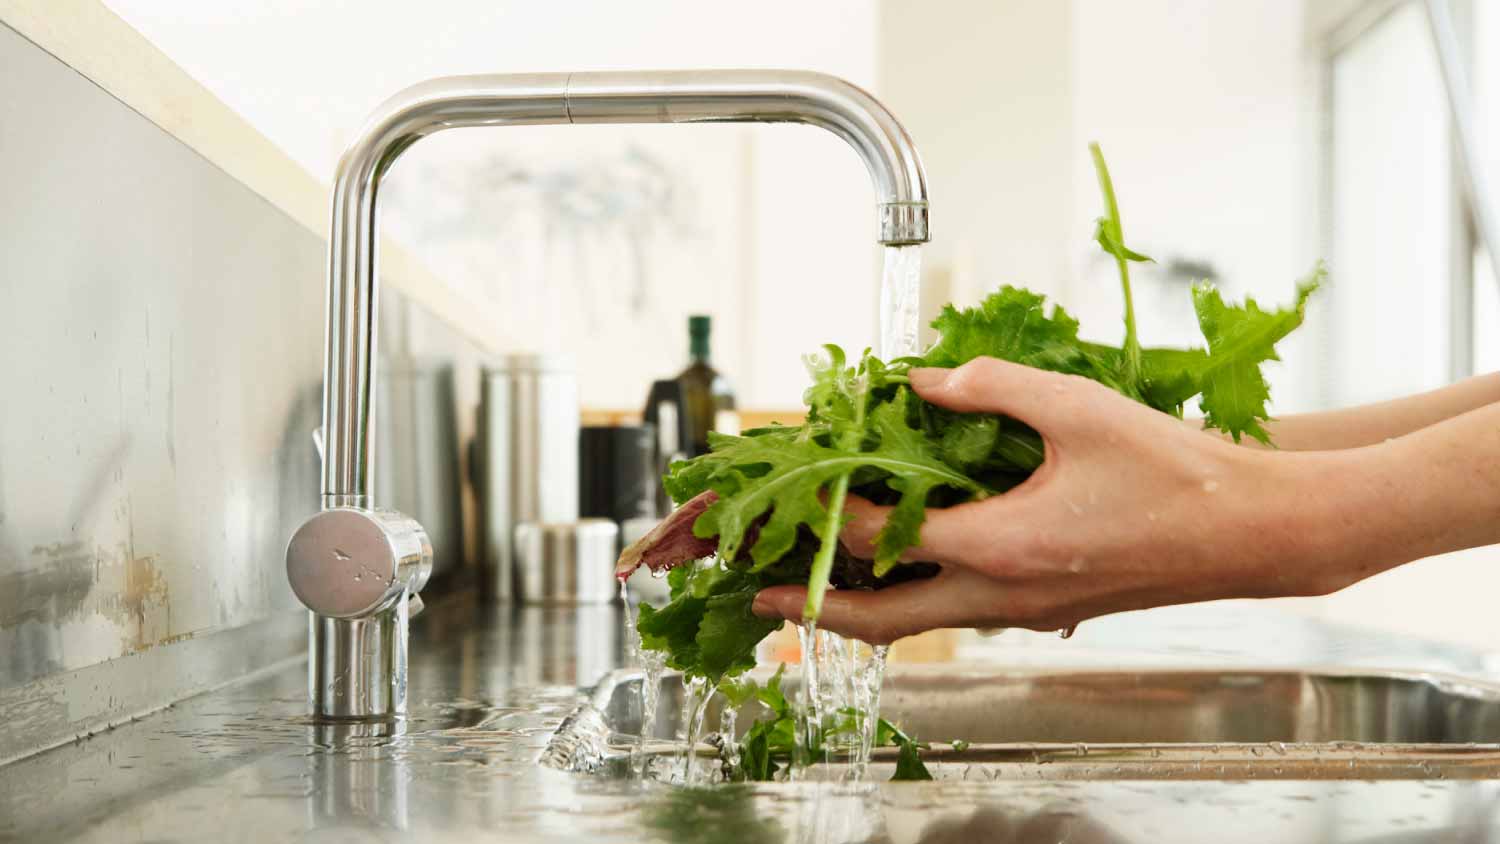
The faucet is where the water comes out of your kitchen sink, but you already know that. The kitchen faucet has multiple components, including the aerator, spout, and controls (see #2 for more).
Starting with the aerator, this small mesh piece is located at the end of the faucet. Its purpose is to break up the water flow into multiple small streams. Not only does this create the feeling of high water pressure while reducing your water usage, but it also minimizes splashing. This feature is particularly desirable when you’re bustling around a busy kitchen, where stopping and managing spills can feel like an endless chore.
The spout is the most noticeable thing about a kitchen faucet. This sink fixture gives homeowners a lot more control and flexibility in the type of kitchen faucet design. For example, you might be drawn to the modern elegance of a gooseneck faucet that’s distinguished by its elevated curve—much like a goose’s neck. Alternatively, a straight spout faucet presents a sleek, classic aesthetic, extending horizontally over the sink.
While aerators are effective, they can accumulate mineral buildup, especially if you live in areas with hard water. You’ll likely need to pencil in occasional cleaning to avoid a replacement. On the other hand, the spout on your kitchen faucet won’t need frequent replacement, but it’ll eventually succumb to regular wear and tear. If you notice any leaks or a decrease in water pressure, it may be time for some maintenance.
Fortunately, changing your kitchen sink aerator is a quick and inexpensive fix, costing between $3 to $8. On average, faucet repair costs will range between $150 to $600, but this heavily depends on the scope of the job and the cost of labor. If your kitchen sink is giving you problems, it may be wiser—and more cost-effective—to replace it entirely. The average cost to install a kitchen faucet is $261, but depending on its features, it can range between $161 and $364.
The controls of a kitchen sink regulate both water flow and temperature. You have the choice between a single-handle model and a classic two-handle setup. The single-handle option is particularly user-friendly, allowing anyone—from tiny tots filling a cup of water to adults washing dishes—to easily adjust the water with one hand. On the other hand, the two-handle setup offers a timeless charm but requires more thought during installation as you figure out the appropriate setup.
Kitchen sink faucet handles are durable and designed to withstand daily use. While they can show signs of wear, such as leaks or stiffness in the handles, they typically last between 10 to 20 years with proper care, but remember—regular maintenance can always help them last longer.
An escutcheon is a relatively obscure part of your kitchen sink plumbing that has less to do with function and more to do with aesthetics. This decorative metal piece attaches to your kitchen faucet or lever. It hides the holes used for plumbing, giving your sink a cleaner, more polished look. You’d typically find escutcheons positioned over the faucet hole or between the faucet and countertop. They can also be used where pipes enter the wall, especially if your plumbing is exposed. While escutcheons improve the appearance of your sink, they also protect any exposed plumbing from debris and moisture.
The kitchen sink spray head is a detachable fixture that can significantly improve how your faucet works. Specifically designed to streamline tasks like washing dishes and cleaning the sink, the spray head connects to the same water supply lines as your faucet via a flexible spray hose. This setup lets you effortlessly switch between using the traditional faucet and the spray head, giving you precise control over the direction and intensity of the water flow—perfect for blasting away stubborn food residue from plates.
While I can’t stress the convenience of a spray head enough, it’s worth noting that these fixtures can be prone to leaks and other issues over time, especially with frequent use. If you start to notice reduced water pressure, leaks, or difficulty switching between the faucet and spray head, it might be time for a spray head repair or replacement. Depending on the brand and features, the cost to replace a spray head can range between $7 and $294, but on average, it’ll cost you around $53.

The water supply lines deliver hot and cold water from your plumbing system directly to the faucet controls and spray head. Typically made from durable materials like copper or galvanized steel, water supply lines are designed to withstand daily kitchen activities. However, like any plumbing fixture, they can experience wear and tear, leading to issues like leaks or corrosion. But don’t fret just yet. With proper care and maintenance, water supply lines can last upwards of 100 years.
When you mention the “kitchen sink,” you’re almost always talking about the basin—arguably the most important part of your sink. It’s the part that holds water from the faucet and gives you the space to wash your dishes, rinse produce, and more. At the bottom of the basin is the drain that disposes of water.
Kitchen sink basins are built to last, but their durability largely depends on the material. Porcelain and ceramic basins—while beautiful—may crack or chip. Stainless steel basins are less likely to break, but they can get nicked with dents and scratches over time. With regular maintenance and proper care, your kitchen sink will serve you for several decades, but eventually, you may need a replacement if it becomes damaged.
If you find yourself in need of a new sink, expect to pay between $20 to $300 to remove your existing one. The cost to install a new sink can range between $216 and $648, but the final cost will ultimately depend on labor, location, and the type of sink you choose. Installing a kitchen sink doesn’t require expensive tools or tons of plumbing knowledge. Even so, you should still consider hiring a local sink installation professional to make sure you don’t make any costly mistakes during the installation.
The kitchen sink drain allows water from the faucet to flow out of the sink basin and into your plumbing system. Found at the bottom of your kitchen sink basin, the drain directs water down through the P-trap and into the hidden plumbing connections in your wall. Unlike most bathrooms, which usually feature a drain stopper to hold water, kitchen sinks have a drain stopper that serves a different purpose—to collect food waste. These stoppers aren’t permanently attached to the drain so you can easily move them to access the garbage disposal.
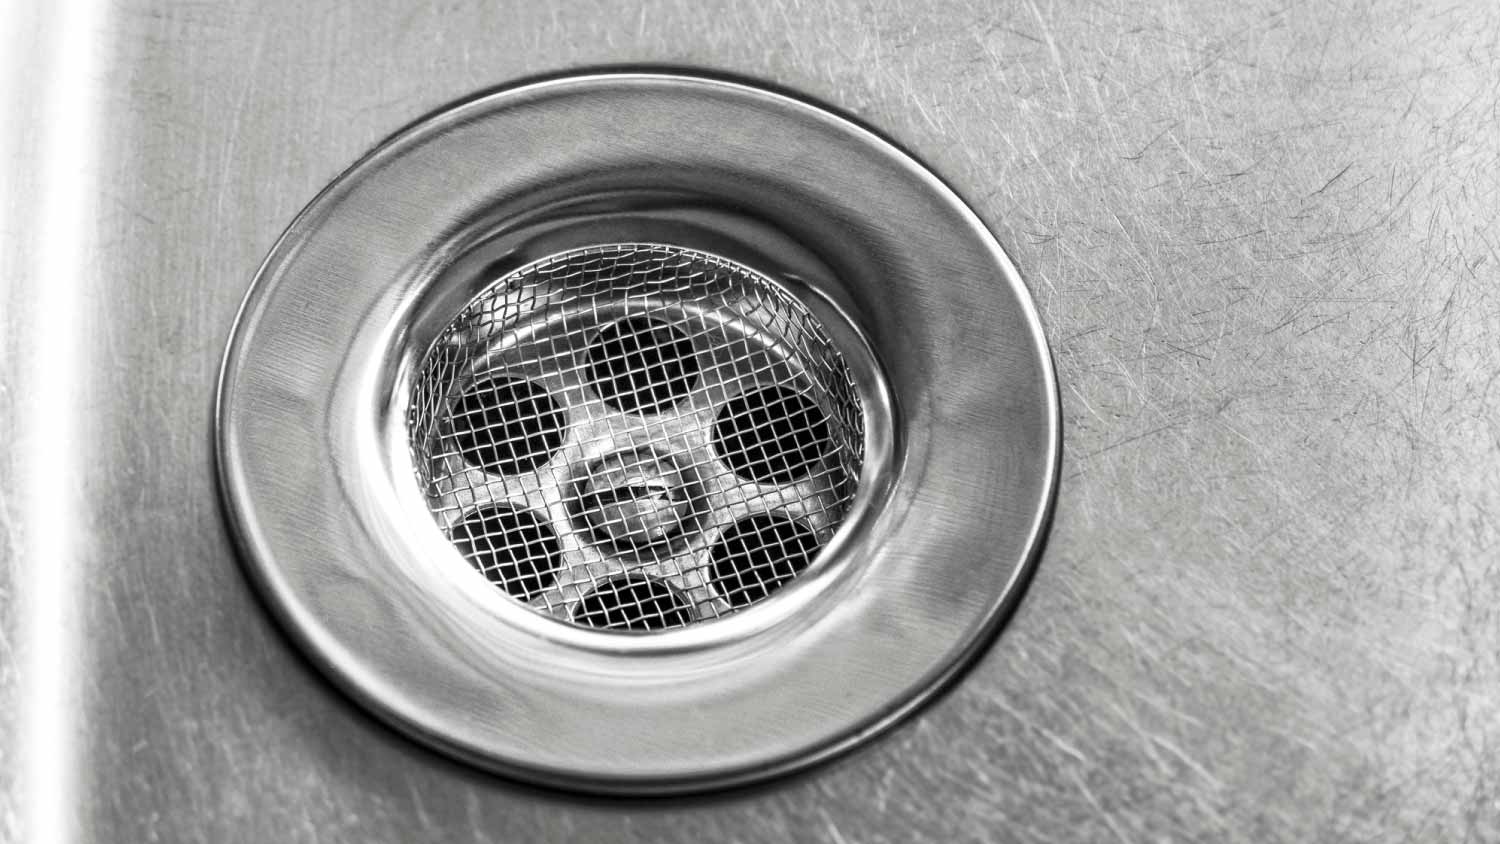
A sink strainer filters out debris and prevents clogs in your plumbing system. It’s actually made up of three parts: the strainer body, the coupling, and the flange. Together, they work to catch food particles, grease, and soap scum that could slip down the drain and lead to a clogged kitchen sink. The stainer body collects food and other debris. The coupling and flange secure the strainer in place and connect it to your drain pipe.
While strainer systems don’t need frequent replacement, it won’t hurt to replace your strainer every few years, especially if your kitchen sink sees a lot of action. Luckily, stainers won’t break the bank. You can get a new one for as little as $10.
The tailpiece is a section of piping that connects the sink’s drain fitting to the plumbing system. It’s responsible for directing water away from your sink and into your plumbing system for disposal so it’s not pooling beneath your sink and potentially causing water damage. Typically made of metal or sturdy plastic, the tailpiece is usually a straight pipe that extends downward from the sink drain, positioned just below the strainer.
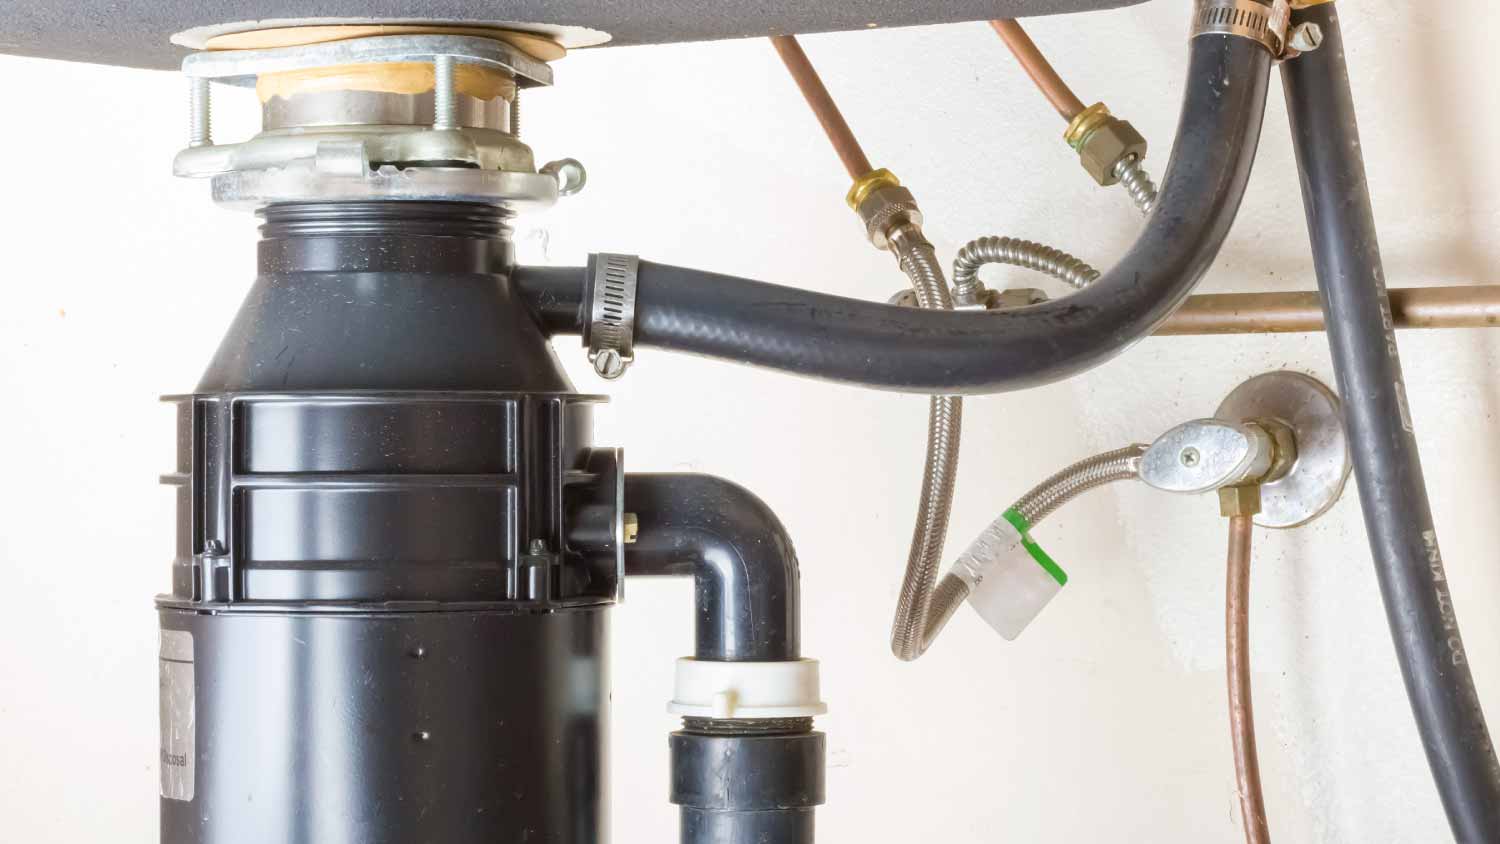
While you may not find a garbage disposal in every kitchen, it’s undoubtedly a game-changer for homeowners looking to manage food waste more efficiently. A garbage disposal connects directly to your P-trap and works by grinding down food debris, effectively preventing clogs and frankly, keeping food from stinking up your garbage. It’s particularly helpful at quickly disposing of solid food waste—think fruit peels, old leftovers, and other kitchen scraps—by mashing them into small particles in its grinding chamber.
There are almost a dozen different parts of a garbage disposal that make it work, including the upper hopper (the chamber that holds food waste), the shredder ring (which grinds food), and the impeller (the spinning wheels that break up the waste). Contrary to popular belief, garbage disposals don’t use sharp blades, but you still want to avoid putting your hands inside, as the impellers and shredder ring can cause injuries.
Garbage disposals last around 10 to 15 years, and if yours is nearing the end of its life, replacing it might be the most practical option to avoid repeat service calls to get it fixed.
On average, replacing a garbage disposal costs around $550, but prices can range from $150 to $950, depending on the model, type, and DIY or professional installation. However, if you’re handy with plumbing, you could save between $100 and $400 on labor costs. If you’re unsure, hiring a local garbage disposal installer can take the worry out of the process, ensuring expert installation and advice, for example, on what should—or shouldn’t—go down the garbage disposal.
Shaped like the letter “P,”—or a “J” if you want to get technical—the P-trap is a curved section of piping under the sink. It has two main functions. First, it acts as a barrier against sewer gases. It holds a small amount of water—typically one to two inches—creating an airtight seal that effectively blocks those harsh and smelly odors from wafting back up your drain and into your home. Second, the design of the P-trap allows it to catch debris, such as food scraps and waste, that could otherwise make its way into your plumbing system and cause serious blockages and clogs.
Fortunately, you won’t need to replace your P-trap too often. While they can develop leaks or issues with the water seal, removing and reinstalling a P-trap is a straightforward project that most homeowners can DIY.
A kitchen sink cleanout is designed to give you (or your plumber) easy access to your P-trap and drain system. This makes it a lot easier to clear out minor clogs and debris without needing to take your drain pipes apart.
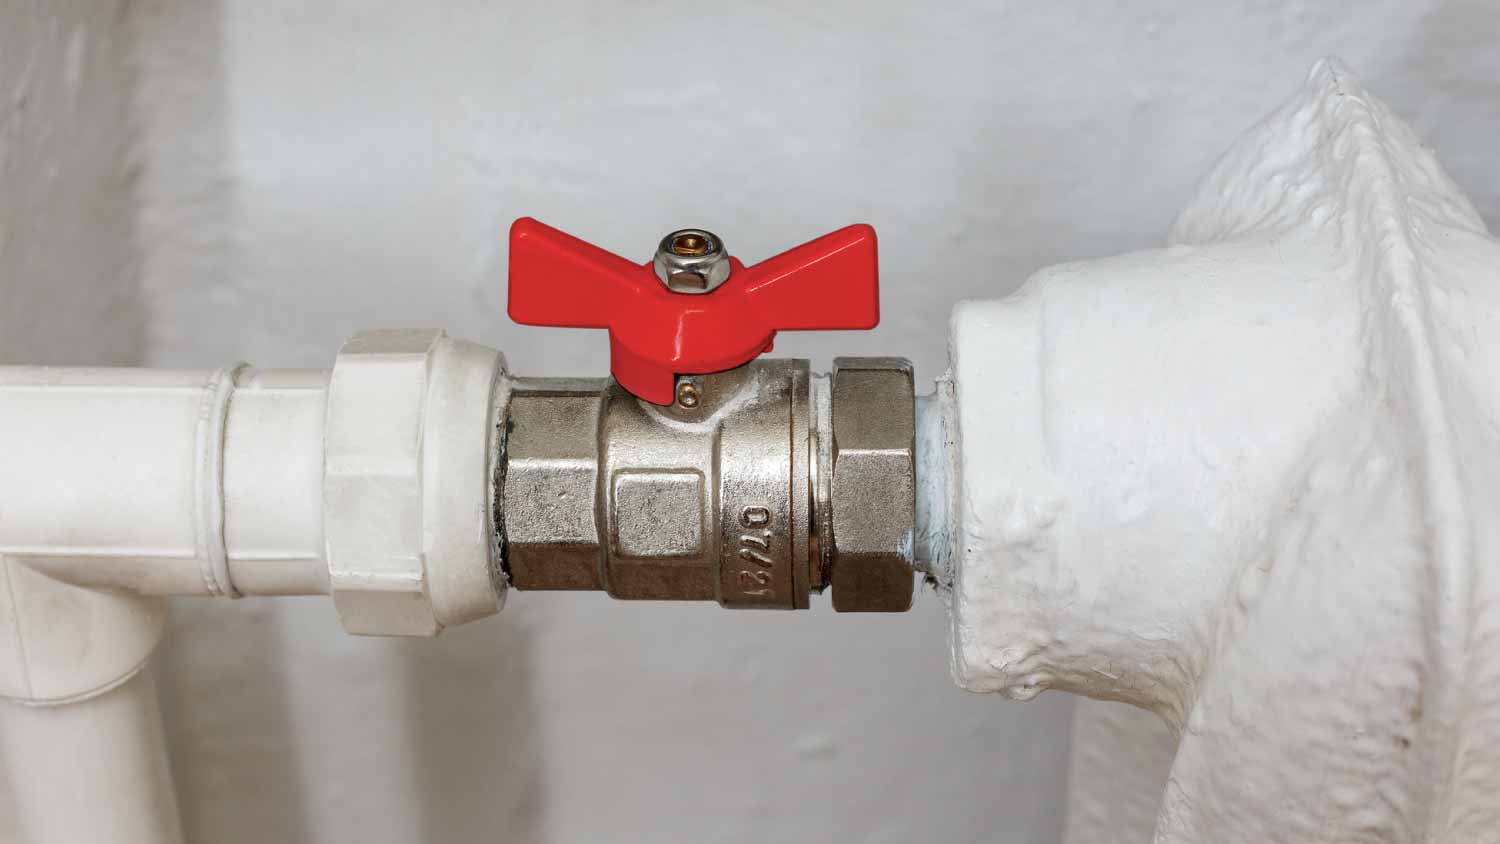
The shut-off valves control your kitchen sink’s water supply. Without them, you’d have to shut off water for the whole house every time your sink sprang a leak or when you needed to replace a faucet. With just a simple turn of the valve, you can stop or start the water flow, making them crucial for quick repairs and maintenance. You’ll always have two valves installed—one for hot water and one for cold. While shut-off valves aren’t a part of your kitchen sink plumbing that you need to worry about regularly replacing, it’s not a bad idea to keep an eye on them, especially since they’re made of metal and can have corrosion issues after years of use.
Keeping your kitchen sink and its plumbing in excellent shape is essential to prevent clogs, leaks, and other issues. While the cost for a new kitchen sink typically ranges between $216 and $648, it can soar to as much as $1,500. And if you want to avoid the extra expense of a sink repair or replacement, it’s worth adding a few maintenance practices to your routine. To maintain your kitchen plumbing, you should:
Clean the drain regularly: Make it a habit to clean your sink’s drain to prevent buildup. A powerful yet natural solution is a mixture of baking soda and vinegar. Pour half a cup of baking soda down the drain followed by half a cup of vinegar. Let it sit for 15 minutes before flushing it with hot water. This will help prevent clogs and keep odors at bay.
Say “no” to grease: Never pour grease, fats, or oils down the sink. These can solidify and cause serious clogs in your plumbing. Instead, allow them to cool and dispose of them in the trash. For small amounts, you can wipe pots and pans with a paper towel before washing them.
Check for leaks: Perform a routine check for leaks under your sink. Look for water stains, mold, or damp spots. If you spot a leak, tighten fittings or replace any worn washers. Ignoring leaks can lead to bigger problems, including water damage and increased water bills.
Flush your pipes: Every few months, consider flushing your pipes with hot water to help dislodge any build-up. Run hot water for several minutes to clear any lingering food particles and grease. This is especially important if you regularly use the disposal.
Use your garbage disposal correctly: If you have a garbage disposal, be mindful of what you put in it. Avoid fibrous foods (like celery), starchy foods (like pasta), and hard foods with bones. Additionally, running cold water while using the disposal can help it work better.
Deciding whether to tackle kitchen sink plumbing repairs yourself or hire a professional can make or break your plumbing system and your bank account. While DIY repairs can save you money—typically around $45 to $200 per hour on labor costs, which usually account for the bulk of your plumbing budget—you need to weigh the risks. A single mistake in a DIY project could lead to significant water damage and costly repairs down the line.
Professional plumbers charge based on their time, expertise, and materials needed. Their projects often require specialized knowledge, experience, and tools, such as basin wrenches, plumbing snakes, and video inspection equipment. Their services often come with the peace of mind that they’re licensed and insured. For this reason, it may be better to leave most plumbing projects to the professionals.
We needed a couple of minor plumbing repairs done. Lopez Plumbing arrived on time and was very respectful of our time and space and have reasonable advice about the maintenance of equipment and proactive steps to take.
Quality plumbing work!!! Very responsive and transparent about all costs up front. Overall I was very satisfied with his professionalism and quality of work!!!
Overall much higher quality work, now the walls are plumb and square, tile pattern is correct and well balanced. The bathroom design is exactly the same other than a few minor details where they suggested a different angle or joint but if you could see them side by side there's no comparison...
 Waxtel LLC
I have rental properties and every time I hired this company for any plumbing-related issue, they always solved the problem. I would not work with anyone else, I trust them completely. I have been using this company for years.
We purchased a home that was need of a bit of work and I had great difficulty finding good firms that charged fair prices and performed well. I first hired JMZ to clean the yard and cut the grass. I saw Jose's truck in the area and called the number on the side. In the past two years Jose and...
Andrew and his crew at Islander painting are precise and clean up after their work. I would definitely hire them again!!!
Armend Gojani at Rite Plumbing and Heating is incredibly nice, courteous, knowledgeable and honorable. He has been a pleasure to work with, and so far most of the plumbing problems have been fixed - one more to go.
 Rite Plumbing and Heating
Clayton and his associate were fantastic! He accommodated my request to remove a considerable amount of stuff from a residential home in Port Orange (even changing my original appointment date very last minute at my request). He was early to the job, careful not to remove or damage anything...
Professional, courteous and great quality. Would hire the team again.
Tell me that unless I pay $95 they will not come out to give me an estimate
 Bestwall Plastering Inc
From average costs to expert advice, get all the answers you need to get your job done.
Wondering how much it costs to reroute plumbing? We have the information you need to learn about plumbing vent pipes and cost considerations when installing them.

Making updates to your home? You may need to move your gas line to fuel new appliances or meet code regulations. We’ll cover the cost of moving a gas line, plus project tips.

This guide to toilet installation cost covers what you can expect to pay when adding a new toilet to an existing or new bathroom.

Is the water pressure in your shower lacking? Here are common solutions to increase it so you can enjoy your showers again.

You never know when learning how to unclog a toilet will come in handy. Get to know these eight methods for the next time things stop flowing.

Before purchasing and installing a new toilet, you need to know the toilet rough-in measurement to ensure proper integration. Here’s how to get it done.