

Discover the factors influencing air duct replacement costs in Atlanta, GA. Learn how to save money and make an informed decision for your home's comfort.
Keep cool and test your AC capacitor


Few things are as unnerving as the sound of a struggling air conditioner during a blistering heat wave. There are a lot of AC parts that can fail as your system tries to battle the summer heat, and one of those is the AC capacitor. You can learn how to test an AC capacitor on your own, but since these devices carry a high charge, you shouldn’t attempt the task unless you already have a solid HVAC background. It’s always safer to get in contact with a pro if you think your AC capacitor is causing problems.
To test an AC capacitor, you’ll need a multimeter, a tool used to test the voltage, current, and resistance in electrical devices. A multimeter is a small handheld device with a dial, two probes, and a digital display.
These devices cost between $10 and $50 and are available at most home improvement stores. Make sure you purchase one that allows you to test the capacitance, which is the ability to store an electric charge.
You’ll also need a screwdriver with a plastic or rubber-insulated handle.
Since you’ll be working with an appliance that uses high voltage, it’s important to take the proper precautions to minimize the risk of electric shock—including cutting off power at the breaker before you begin.
To do this, locate the breaker on your home’s electrical panel. Cut the power to the AC unit to ensure no electricity is flowing through it while you’re testing the AC capacitor. A central AC unit will be on one of the panel’s 230-volt breakers.
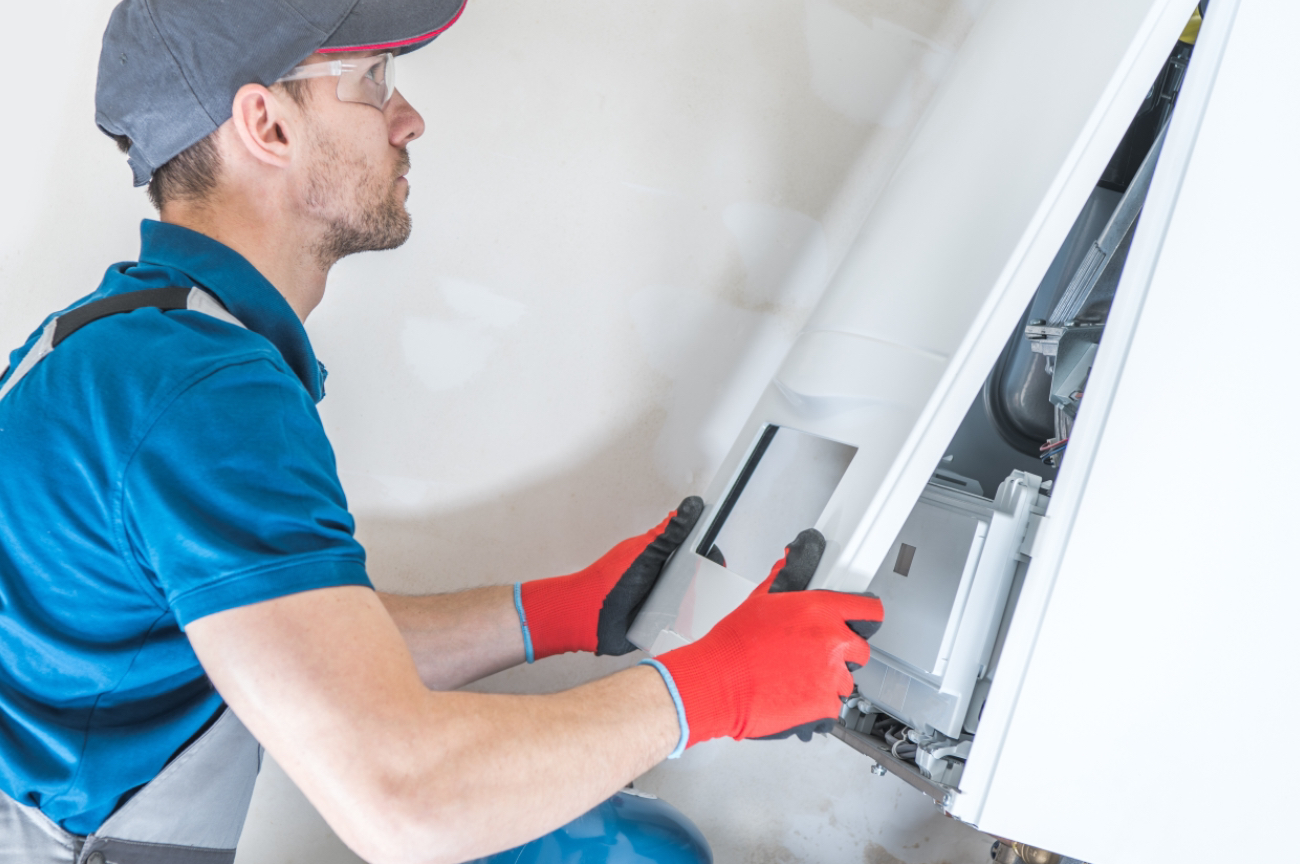
Using a screwdriver, remove the access panel on your air conditioning unit. The capacitor should be easy to spot. It’s silver, cylindrical, about the size of a soda can, and has wires of various colors connected to it.
Since an AC capacitor stores an electric charge, you’ll need to release that energy before you can safely work on it to eliminate the risk of shock. Use the metal end of your screwdriver to connect the capacitor’s electrical terminals to each other to release the charge.
Make sure you use a screwdriver with a plastic or rubber-insulated handle and don’t allow your hands to come into contact with any exposed metal on the screwdriver while you’re releasing the charge in the capacitor.
Now that you’ve discharged the capacitor, you can safely remove it from the AC unit. Begin by taking a picture of the wiring, so you can reinstall the capacitor after testing or replacing it. Next, unplug each of the wires connected to the capacitor, then unscrew the brackets holding the capacitor to the air conditioner and pull it out.
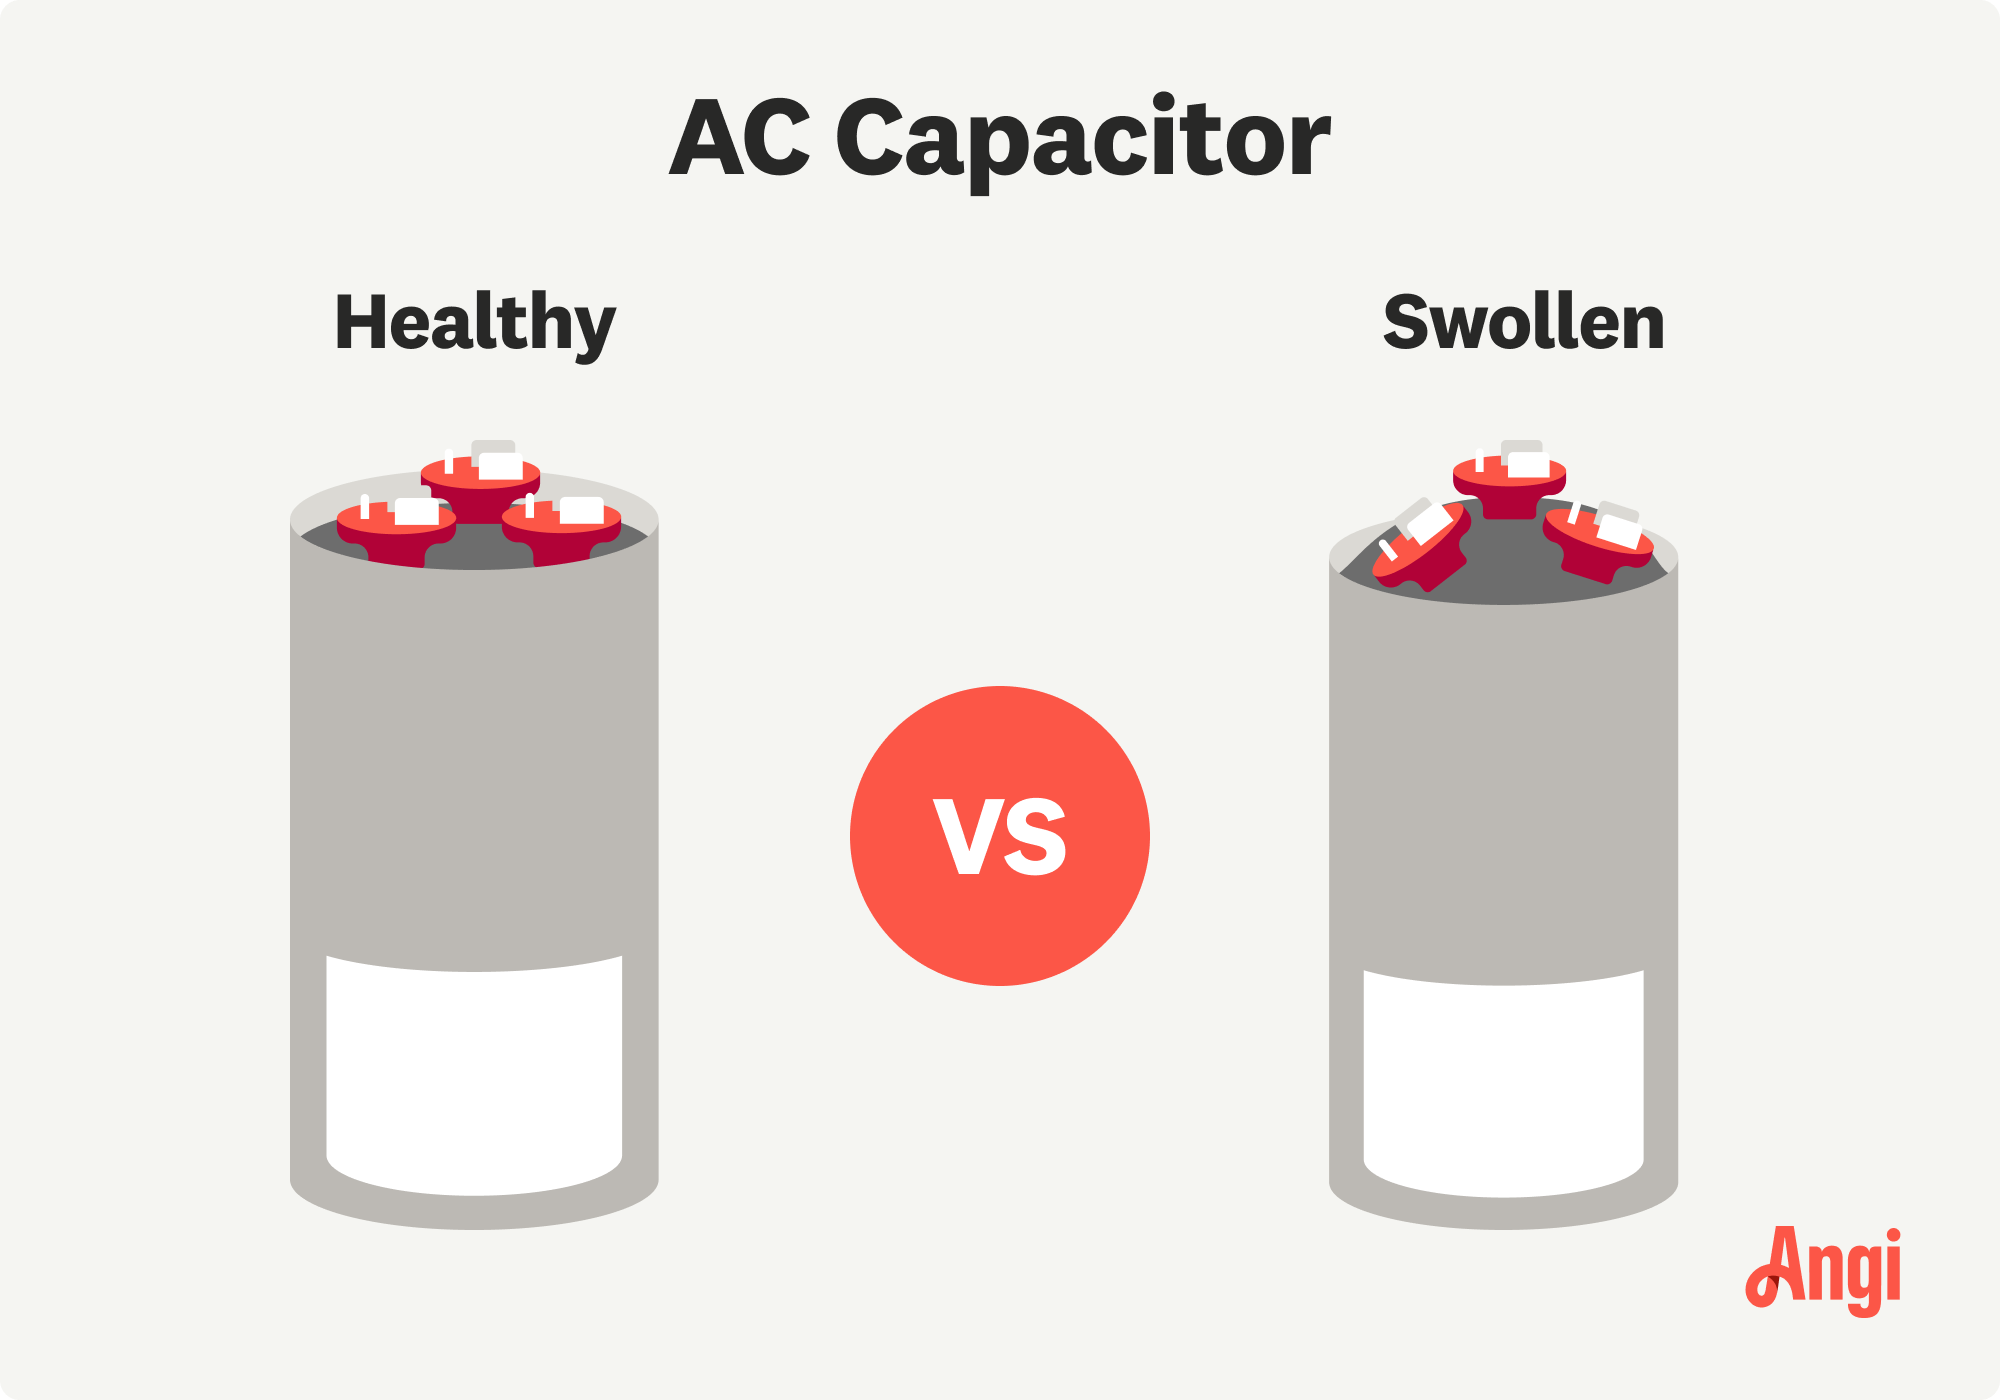
Before testing the capacitor, visually examine it. When a capacitor fails, it often bulges or leaks. If your AC’s capacitor has either symptom, you’ll need to replace it.
You’ll need to know what you’re looking for before you can test your capacitor. Check the capacitor’s label for its microfarad (MFD) rating, which is a measurement of the amount of electricity the capacitor can store.
If you’re testing a single capacitor, you’ll find a single microfarad rating on the label. Dual capacitors have two microfarad ratings; the higher rating is for the compressor while the lower rating is for the fan motor.
Next to the microfarad ratings, you’ll also see a percentage on the label with a plus and minus sign. This percentage tells you how far off the listed microfarad ratings the capacitor can be and still function properly. For example, a capacitor with a rating of 25 microfarads and a plus or minus rating of 5% will have readings between 23.75 and 26.25 microfarads on the micrometer if it’s functioning normally.
Turn the dial on the multimeter to the setting for capacitance. Most multimeters use the symbol –|(– to signify capacity. You should also see a uF symbol on the display, which stands for microfarads. If you’re not sure which setting on the dial to use, consult the multimeter's instructions for how to find the setting for testing capacitance. After you have the multimeter dialed in, plug the two probes into the meter’s outlets.
How you test the capacitor varies depending on whether you have a single capacitor, which only has two terminals, or a dual capacitor, which has three terminals.
Place the first probe on one of the multimeter’s terminals and the second probe on the other terminal, then check the meter’s digital display. Compare the reading to the rating on the label to see if it's functioning normally. Don’t forget to account for the margin of error percentage.
A dual capacitor provides a power boost for both the fan and the compressor and has three terminals. One terminal will be labeled “C” for common terminal, another labeled “FAN” for the air conditioner fan motor, and a third labeled either “HERM” or “COMP” for the unit’s hermetic compressor.
Start by testing the fan terminal by connecting one probe to the common terminal and one to the fan terminal. Next, test the hermetic compressor by placing one probe on the common terminal and the other on the hermetic compressor’s terminal.
Again, compare the readings to the rating on the label to see if the capacitor is functioning normally. If either the rating for the fan or compressor is off by more than the percentage listed on the capacitor label, you’ll need to replace the capacitor.

Most people discover a failed AC capacitor when it stops working.
However, there are ways to tell if an AC capacitor is nearing the end of its life before it leaves you high and dry. If you observe any of these AC issues, test your capacitor before it’s too late.
Dimming lights: If the AC capacitor is failing, you may experience dimming lights every time the AC unit kicks on. This means the capacitor is struggling to provide enough juice to power on the fan or condenser, forcing your home’s electrical system to work harder to get the AC started.
Humming noise: If you turn on your AC and you hear a humming noise and the unit hesitates to start, your capacitor may be nearing the end of its life.
No cold air: If your AC fan is running, but it’s not cooling the air, then the capacitor likely isn’t producing enough power to start the compressor.
AC sometimes won’t turn on: An air conditioning unit that sometimes fails to turn on is a clear sign of an aging AC capacitor.
Rising energy bills: An AC capacitor that isn’t functioning properly will put more strain on the air conditioning system, causing it to use more electricity.
You should hire an HVAC technician to test and replace the AC capacitor on an ailing air central air conditioner. Though testing an AC capacitor is relatively simple and doesn’t require any special tools beyond a basic multimeter, it can be dangerous for someone with little to no experience working on HVAC systems.
Since the bulk of AC and HVAC repair costs comes from labor, there’s good reason to take this repair job on yourself. You’ll spend between $5 and $75 for the replacement capacitor. A local HVAC repair pro will cost you an additional $75 to $200 in labor to install the part.
I needed some light fixtures fixed and some other handyman work around the clinical office and at home. I called for services to be done and this company was reliable and prompt for the services. I did not need to supply any materials or equipment to get the work done. I would recommend this...
The guys from Economy Heating and Air helped us with a emergency situation with our old furnace, including a replacement of the unit with a new heat pump. They were the only company I called that could come out immediately to look at the problem. Overall, I felt very comfortable with their...
 Gainesville Economy Heating & Air
I highly recommend the competent staff, from the service to the installation of the new air conditioning and heating system.
Jasper Colman was excellent and quick!
We had leaks around the three dormers at the front of the house, and are very pleased with our experience with Gerry and his team. We requested and received a quote very promptly. Gerry is very friendly and professional and pleasant to work with. The work was done promptly and we are very...
We have used Ace & A heating and air-conditioning for over 20 years. They are always friendly and courteous and give excellent service. Their technicians are very knowledgeable and are able to diagnose and fix any issues that we may have with our systems. I highly recommend them!
 Ace & A Heating & Air Conditioning of DeKalb
I had received three quotes from other individuals when looking to have the work done at my home. I really was keen on the amount of knowledge they had both had when it came to figuring out what exactly that needed to be done. They also walked my property and looked at the entire job and took...
Did good work at a reasonable price
CGS waterproofing was great. They installed a french drain and downspout extenders. The team that did the work was extremely helpful and explained everything they were doing and showed how all the drains worked. I highly recommend CGS.
Did a great job. No complaints.
From average costs to expert advice, get all the answers you need to get your job done.
Discover the factors influencing air duct replacement costs in Atlanta, GA. Learn how to save money and make an informed decision for your home's comfort.

What you’ll pay in Atlanta, Georgia, for furnace repairs depends on many factors. Here’s a breakdown of what can go wrong and the cost to fix those issues.

Switching from oil to gas heating could impact your savings. This guide will help you understand the cost to convert from an oil furnace to a gas furnace.
Discover heat exchanger replacement costs to learn about price factors, labor, and ways to save before hiring a pro or starting your project.
Discover the average air handler replacement cost, including labor and materials, plus expert tips to help you budget and save on your HVAC upgrade.

Baseboard heater covers can endure a lot of wear and tear, but eventually you’ll want to replace them. Here’s the best way to switch out baseboard heater covers.