Garage floor replacement costs $2,200 on average but can vary depending on several factors. Review our guide for a more accurate estimate.
Add elegance and aesthetic value to your most durable surfaces


Staining concrete is a relatively simple DIY project you can do with a sprayer, some concrete stain, and a few other tools and supplies. Adding stain to your concrete can drastically improve its appearance, add some elegance to your concrete floors, steps, patio, or retaining walls, and even add longevity to this already durable building material. In this guide, we’ll explain how to stain concrete from start to finish for total beginners.

Before you dive in and get to staining, there are a few things you need to know and do to get your concrete in tip-top shape for its makeover.
When preparing to apply finish to your concrete, you need to choose which type of stain you'll use. There are two primary types of stain:
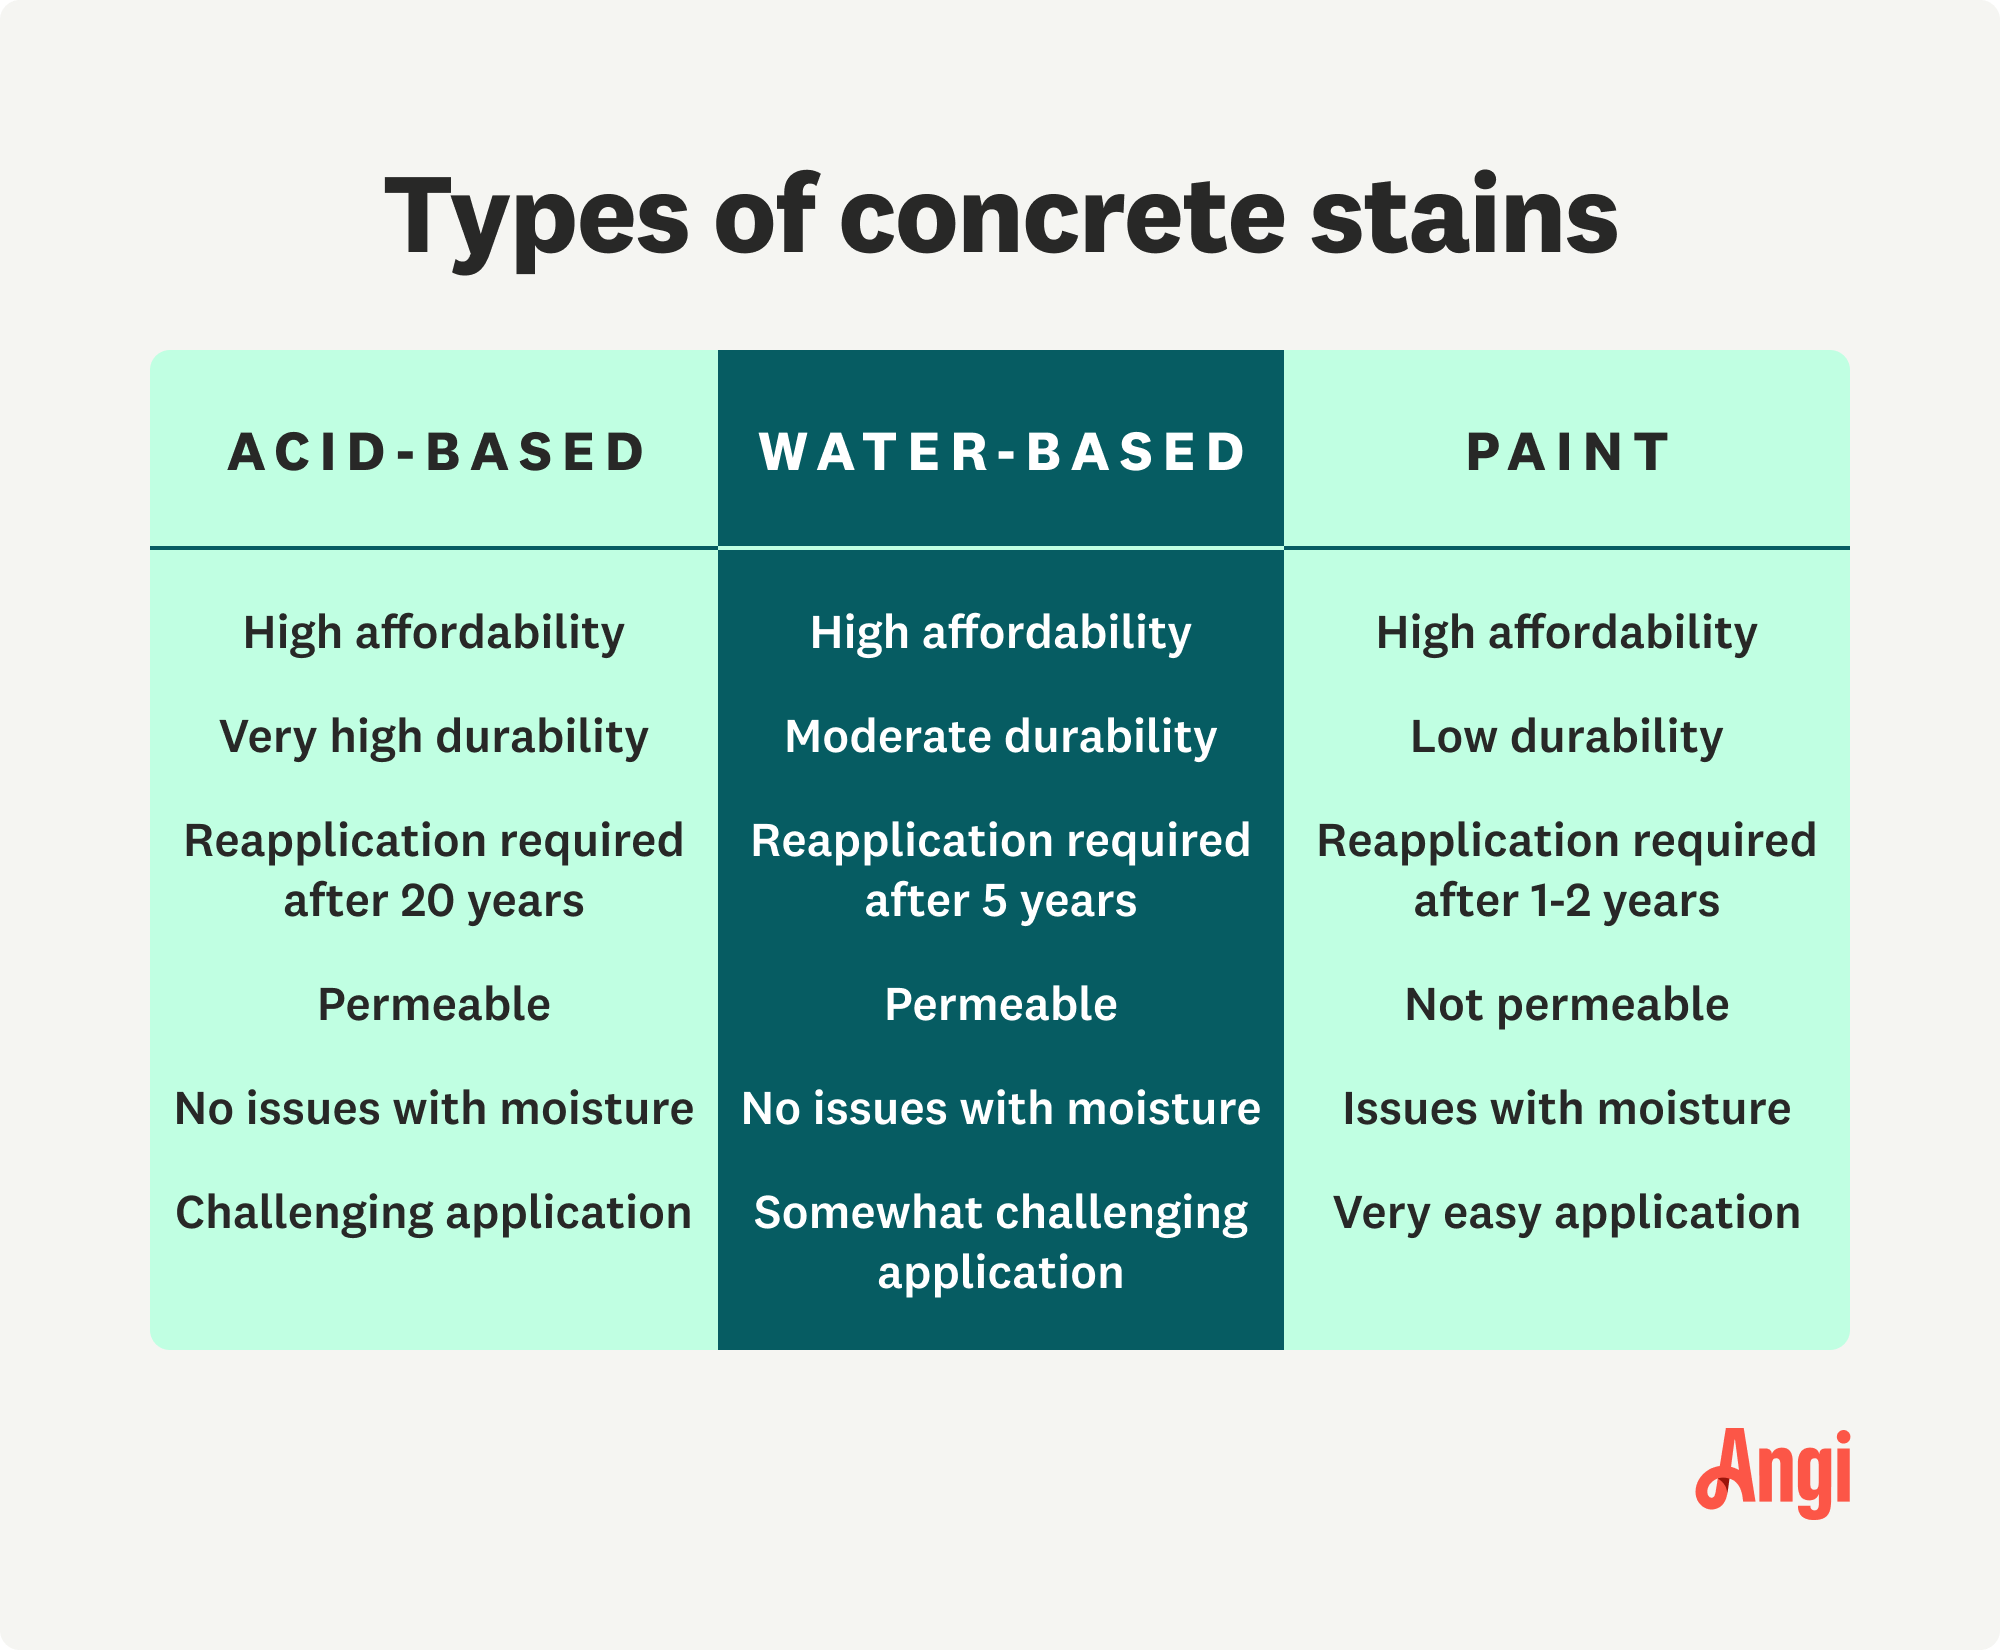
Acid-based: long-lasting, more difficult to apply, mostly earthy/natural color selection
Water-based: binds to the surface of concrete, easier to apply, has more color options
Most homeowners consider acid-based stain to be the best type of concrete finish because it helps your concrete retain the color for longer. It also tends to look better on concrete surfaces that have a few small imperfections or cracks. But a water-based stain takes fewer steps to apply, making it a more suitable option for most DIYers. Neither is likely to contain many volatile organic compounds (VOCs), so from a health and safety perspective, they’re similar.
Although not a type of stain, it’s also worth considering painting concrete. Paint application over concrete is straightforward and can add a protective layer in a single step. Paint is also available in a wide array of colors for customization. However, paint tends to seal the surface. If you aren't careful with paint on concrete, you'll trap moisture underneath, which'll wear concrete down over time. Regardless of which stain or paint you choose, we recommend applying a small amount in an area where it won’t be visible. A quick test can help you determine if you like the color.

Lastly, always read labels and do your research to ensure the stain product you choose will fit the job. For what it's worth, taking the DIY approach is worth it from a cost-savings standpoint. Installing new stained concrete floors costs around $8,000 to $15,000, so you could save hundreds by staining the floors yourself.
Acid etching is when you apply a corrosive acid to the surface of your concrete, let it eat away at the material to expose the larger aggregates and develop a texture, and then wash away the acid.
Using acid-based stain is different from applying acid etching before adding stain. You should avoid the latter, as it strips minerals from the concrete, damaging its structural strength and making it more difficult to stain.
We do, however, recommend cleaning the surface of your concrete beforehand to remove stains. You can use a mild cleaner like trisodium phosphate (TSP) for this. A concrete cleaner will not damage the concrete like acid etching will.
If staining concrete is on your list of to-do's after newly installing a concrete patio, walkway, or any other surface, be sure to wait at least three weeks before staining. This ensures your concrete has fully formed and dried.
While concrete looks strong and solid, it's actually a very porous material. This makes it good for staining, but also means if you aren't diligent about preparing the surface, your concrete stain may look uneven.
Move furniture, toys, and any other items to clear off the section you intend to stain. Use a broom to sweep the area, and go over it with a vacuum, if possible, before applying cleaner to the surface. TSP cleaner or a non-chemical alternative diluted with water (ratios determined by reading the label) are a good way to clean the surface. Use a light scrubbing brush to help the cleaner penetrate the concrete and remove dirt and grime. Rinse off any cleaner after you scrub the stains out, and let the concrete dry before proceeding.
For severely damaged sections, you can actually smooth them over with sandpaper. Fill any major gaps or holes and repair concrete cracks with a crack sealant or Portland cement. A tube of sealant costs around $15 at home improvement stores, and Portland cement costs around $20.
In some instances, you may not want to stain the entire concrete slab. If so, use painter's tape to section off these areas. Remember that stain is permanent, so think this through carefully to ensure stain doesn't end up anywhere you don't want it to be.
Additionally, keep in mind that concrete is porous, and your stain will soak under the tape to some extent. We recommend taping off an additional half-inch or so where you want borders, and then come back later to apply very small amounts of stain manually with a brush to reduce bleeding.
In our opinion, the best method to apply your concrete stain is to use a stain sprayer to get the big sections of concrete you wish to stain. Follow up any edges or hard-to-reach sections with a paint roller or paintbrush for more precision. There should never be so much stain that a puddle forms in a section. No matter which tool you use, aim for an even coating.
While a sprayer/roller combination is our preferred method, certain projects might demand you use one application method over the others. Be sure to read labels when choosing your stain to see which tool is best.
To use a roller brush, get a paint tray and put some of the concrete stain in the tray. Lightly coat your roller in the stain, and then roll it out in the tray to remove any excess. Drips and areas of over-application will likely be visible in your finished product, so avoid them at all costs. We suggest a lower-density roller to avoid mistakes, but a high-density roller will speed up your application.
With the roller wrung out, work your way over one section lightly, then roll back onto it, moving back over the stained area with a slight overlap. You can always return to areas that end up being lighter or darker after you finish your first coat.
For most homeowners DIY staining concrete, using a stain-spraying tool—like a garden sprayer—is the best route. They cost between $35 and $50 at home improvement stores. You can dilute your stain in a small basin or bucket before inserting it into the device to ensure the richness and depth of color is what you expect it to be. Practicing on an inconspicuous part of the concrete is a good idea to dial in the color.
Using a sprayer is going to be the fastest application method, so it’s ideal for larger projects, like staining concrete foundations, large patios, or full sets of steps. You will need to be aggressive with taping off anything you don’t want stained, as overspraying is easy to do.
Simply fill your sprayer, pump it to add pressure, and then spray evenly over your concrete surface. We recommend doing a light coat to begin with and then going back over the area afterward to touch up and even out the color.
A paintbrush is an ideal applicator for smaller projects, like staining individual concrete pavers as accents. But even large brushes are going to make bigger projects take a long time.
To use a brush, get a roller or brush tray, pour in some stain, dip the brush in, and wring out any excess on the side of the tray. Begin applying it on your concrete using constant pressure and aiming for an even application.
Most concrete stains will be dry to the touch in about 20 minutes, but you should wait at least 24 hours before exposing the concrete to foot traffic, water, or any wear and tear. Each stain product is different. Some quick-dry options offer 4- to 6-hour dry times. Others, especially acid-based products, will take up to 24 hours to dry. Read labels and follow them exactly for best results.
If you’re using this guide for information on how to stain outdoor concrete, like a driveway, patio, or walkway, you should also plan around the weather or be prepared with tarps to keep your project dry while it cures.
Once your concrete stain is dry, go over the stained section and apply a concrete sealant to lock in your new color. This also waterproofs the area and helps avoid the stain washing out. Remember that applying sealant to a wet section will damage the structural strength of the concrete beneath it, so be patient and ensure the stain is dry before you add a sealer.
Similar to paint, you also never want concrete sealant to be too thick in any one section. Sealant usually takes 24 to 48 hours to completely dry, and no one should walk over the surface during this time.
From an application standpoint, applying concrete stain is easy, and any DIYer can handle the project. With that being said, the risk of making mistakes is always there, and concrete stain is permanent. Unlike paint, you won’t just be able to cover up mistakes.
If you’re comfortable with the potential for mistakes and are confident you can apply the stain and sealant evenly, we recommend going the DIY route. If you know how to stain concrete floors, patios, and other large projects, you can save hundreds of dollars on the application in most cases by putting in some elbow grease.
But if you’re worried you’ll make a mistake you might regret, there’s no shame in hiring a concrete floor staining specialist near you. A seasoned expert will be able to make quick work of the job, and the labor is generally affordable.
Ben Kissam contributed to this piece.
From average costs to expert advice, get all the answers you need to get your job done.

Garage floor replacement costs $2,200 on average but can vary depending on several factors. Review our guide for a more accurate estimate.

Sealing concrete floors, patios, walkways, and driveways can keep them looking fresh for far longer. Let's break down the cost to seal concrete with a pro or on your own.

This guide breaks down the cost of installing epoxy flooring in your garage, basement, or other space. Costs depend on resin type, floor size, and more.

Looking for a way to update your concrete garage floor on a budget? From epoxy paint coatings to rubber and carpet tiles, explore the pros and cons of the top affordable garage flooring ideas, and compare prices using our helpful guide.

Whether you’re installing an epoxy floor or epoxy countertop, this calculator will help you determine how much epoxy you need to complete your project.

Will your space thrive with epoxy floors? Make sure the room's purpose and your budget align with the pros and cons of epoxy flooring.