

•
Discover the cost to weatherstrip a door, including average prices, key cost factors that impact your total price, and tips to save on your project.
Don't let it slide when it's time to replace that old sliding glass door


Upgrading your sliding glass door does more than freshen up your patio—it can also provide better insulation and welcome more natural light indoors. Home DIYers with construction experience under their belts will feel the most comfortable with this complex project. If you're removing a sliding glass door and replacing it with a new one of the same size, here's how to take on the project.
Begin by identifying your current sliding door so you can order the exact model for replacement. Find the model or serial number on the lower corner of the glass or inside one of the door panels along the frame.
If you can't find the model number, note the brand of the door and break out the measuring tape. Measure the width of the door from frame to frame, staying inside the exterior trim. Measure the height all the way to the bottom of the threshold and to the upper trim.
Your sliding door will likely come in a standard size, such as 60 by 80 inches. If your current door is a custom size, call in a contractor for assistance with choosing and installing a sliding door.
Once you have the new door of your dreams, read the instruction manual from cover to cover. There will be specific instructions regarding the hardware included in the packet.
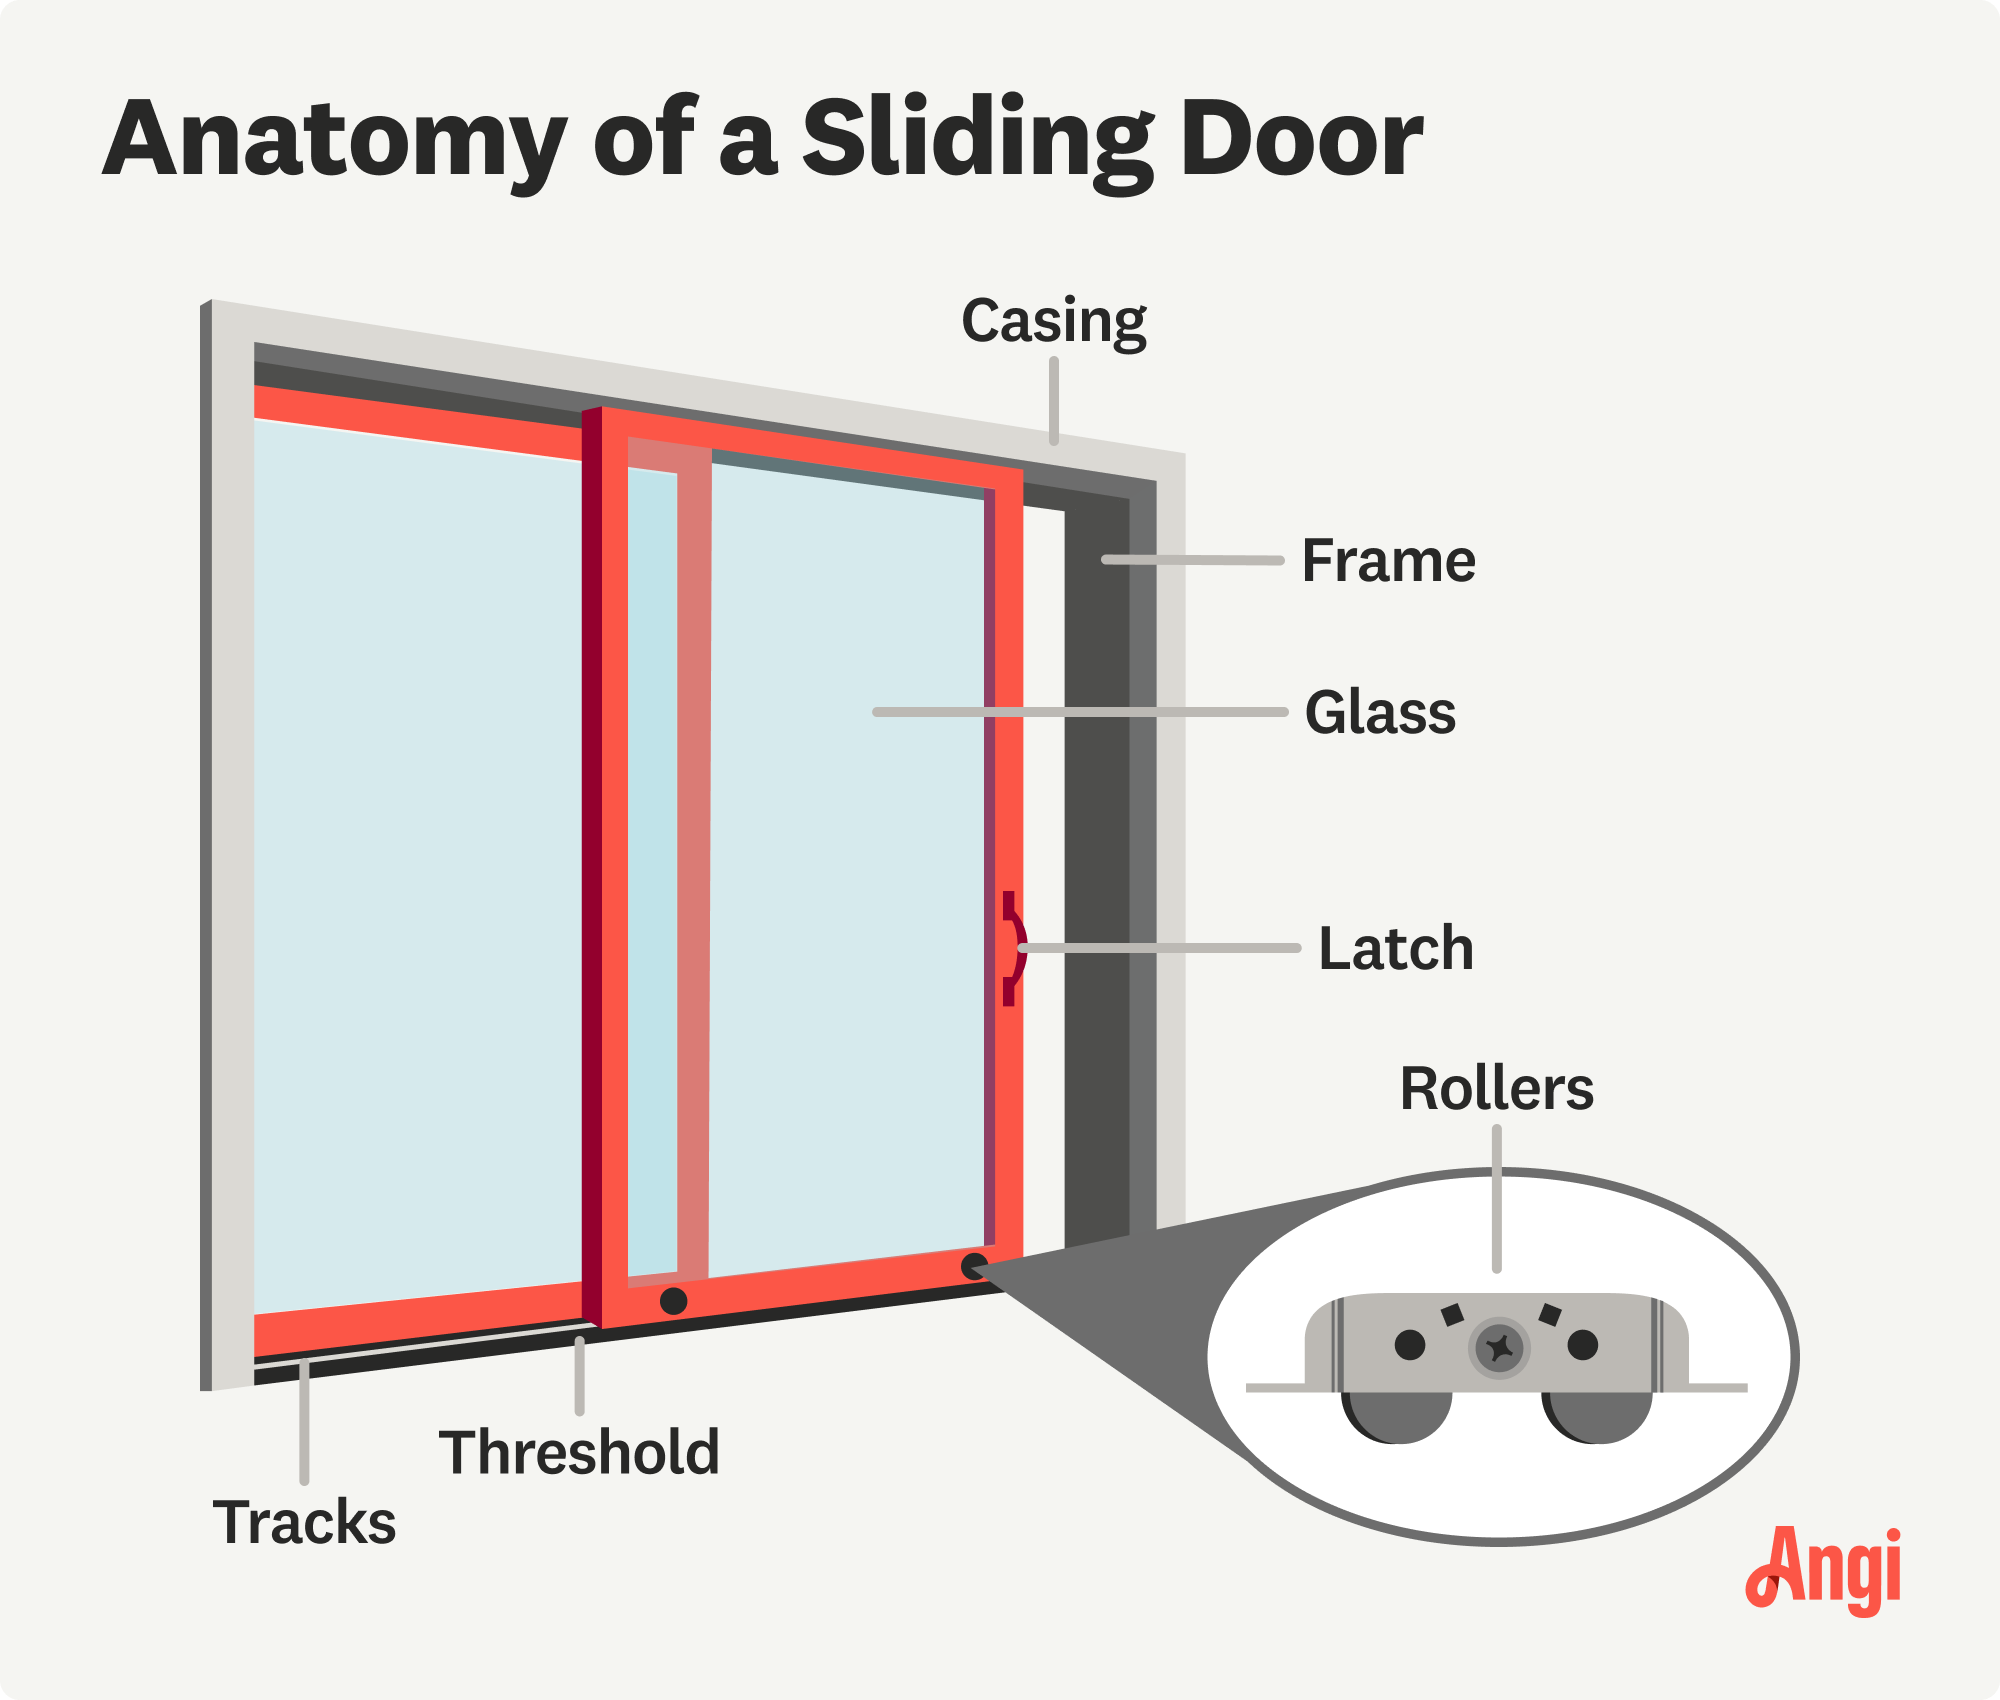
Reviewing the parts of a sliding door before starting can also be helpful. Keep in mind removing the door panels and lifting the new frame requires at least two people, so call on a helper for an extra hand.
One last caveat: if you're replacing a sliding glass door in an older home or into a visibly rotting wooden frame, it's important to call a professional door installer. Installing a new door in an old or damaged frame could put your home’s security and safety at risk.
Start by removing the fixed stationary panel of your old sliding door. Use a screwdriver to remove the stationary panel brackets, typically found at the top and bottom of the inside of the door. Tilt the door inwards—it may need a bit of a shake—and delicately remove the door with the help of a friend.

The sliding panel should be a bit easier to remove. Use a screwdriver in the roller adjuster hole at the base of both sides of your door. Lower your door as close to the track as possible by turning the screws counterclockwise. This will provide extra wiggle room between the two tracks. Just like you did before, tilt the door off its track with a lift and a push and remove it with a friend.
The exterior trim encircles the interior and exterior door frame. Delicately pry it off, taking care not to damage your home's siding or interior wall. If the trim is in good shape, save it for later in the project.
Depending on the age of the frame, you should be able to loosen it from your home with a pry bar or a reciprocating saw. Remove any visible and easy-to-access nails from the frame as well. Note that this process does take a bit of strength and trial and error—as you will be cutting through sealant, nails, and shims.
Unscrew the threshold and place your pry bar under the sill plate to loosen the caulk. The threshold was likely heavily caulked to the base of your door, so you may need to tilt it back and forth to loosen it further.
Using two sets of hands, tilt the frame toward the exterior of the house and disconnect it from the top, sides, and threshold. The whole frame should come out in one piece.
“When replacing an exterior door, whether a single door or a large sliding glass door, we plan for the worst,” says Bob Tschudi, Angi Expert Review Board member and general contractor in Raleigh, NC. “Once you remove a sliding glass door, you have a huge hole in the side of a house that needs to be protected. At a minimum, use a plastic tarp and painter’s tape to close off the opening. If the opening is going to be there overnight, you need to close it with a solid barrier, such as OSB plywood.”
Take this moment to reassess the rough opening of your door for wood rot. You may need to call a local contractor to replace or reseal the wood surrounding the frame during this phase. Also, double-check that the threshold and sides are level so you can prepare shims during installation if necessary.
Hardware stores sell rolls of waterproof flashing tape for windows and doors. Begin by covering the floor sill with tape and folding the tape over the edges to cover the whole sill. You may need flexible tape to get into the corners of the doorsill. Place the tape all the way around the rough opening, including the sides and top where the door frame will sit.
“If you’re a DIYer, this is a critical step, and doing it right will save you a lot of time and money down the road,” says Tschudi. “Take the time to research how to install waterproof flashing tape correctly.”
Choose a waterproof silicone caulk for interior and exterior use. Make sure to follow your instructional manual closely here. Add a line—known as a bead—of caulk to the inside of the new door's flange. The flange surrounds the door frame, so it mounts onto your wall. Next, add two lines of caulk to the sill itself.

With the help of your buddy, line up the door outside your home and tilt it into place so the base of the frame adheres to the caulk on the sill. The caulk of the flange should press into the sides and top of the rough opening as well.
Ask your helper to hold the door in place as you ensure your door is level and evenly upright—known as being "plumb." Use your level to test the top of the door and the surface of the door itself to ensure it’s both upright and leveled out. If not, you'll need to add shims under the sill or along the side of the frame before you secure the final screw.
Keep the shims and level in place as you screw into the precut holes on your frame. Trim the shims with your reciprocating saw so they're flush with the house.
Check your instruction manual for how to install the sliding and stationary door in the track. In most cases, this simply involves tipping each panel into place and screwing in the brackets and interior headstop—a strip of wood at the top of the frame that keeps the door from tipping out of its track.
Test your door by sliding it back and forth and making sure it lines up with the locking mechanism. You’ll find a small, adjustable screw at the base of your door that heightens or lowers the roller adjusters.

Seal up the interior and exterior seams between your door frame and the rough opening with a line of expanding foam insulation or a strip of foam insulation cut to the size of the opening. Close up the area with silicone caulk.
Attach the old trim—or cut new pieces with your circular saw—to the interior and exterior of your door frame. Use a nail gun to secure the trim in place.
Sliding glass doors cost between $400 and $10,000, depending on the size, style, and brand. Labor to install the door will cost an extra $400 to $1,400, not including having a pro haul away the old door or finish additional repairs to your home.
While you can save money by installing a sliding door yourself, it’s not always the safest or most cost-effective option. An incorrect installation could leave you with an unlevel door, a door that lets in cool breezes, or even a sliding door that leaks. Hiring a sliding glass door installer is recommended, especially if you’ve never tackled a similar DIY yourself.
From average costs to expert advice, get all the answers you need to get your job done.
Discover the cost to weatherstrip a door, including average prices, key cost factors that impact your total price, and tips to save on your project.

When adding a fresh new entryway to your home, you may be curious about the cost of sliding glass doors. Let's break it down by size, style, and design.

Sprucing up the barn or adding a rustic touch to your home? Use this guide to estimate barn door installation costs, so you can budget for your next project.

Patio doors do more than just open to your outdoor space. Learn how the type of door you choose impacts the lighting, airflow, and atmosphere of your home.

Upgrading an interior door can add character and dimension to your home. Explore these unique interior door styles to see what fits your vibe and space the best.

Is an unsightly hole in your interior door driving you crazy? Use this DIY guide on how to fix a hole in a door to get the job done in under an hour.