

Is it time for new cabinet doors in your kitchen? Let’s explore the costs of new cabinet doors so you know exactly what to expect.
Don't let this easy-to-learn DIY opportunity slide by


Learning how to replace drawer slides is an excellent way to increase your DIY skills. Once you're comfortable with the technique, the task only takes a few minutes to complete. However, the payoff can be huge in terms of saving money and frustration when dealing with damaged kitchen hardware. Whether installing new sliding kitchen drawers or replacing worn-out or broken drawer slides, follow these simple steps to upgrade or fix your kitchen's hardware.
Before replacing drawer slides, the first thing to do is remove the cabinet drawers and determine what type of drawer slides you have. Then, you must choose whether to replace them with like-kind versions or upgrade them to soft-closing or other slide types.
Whatever you decide, use your tape measure to determine the size of your existing drawer slides. Be sure to purchase the same size drawer regardless of the type you choose.

After taking the drawer out completely, remove the existing cabinet sections of drawer slides by unscrewing the front and rear mounting screws from the cabinet. If you're replacing your drawer slides with exact replacements, pay close attention to how the old slides fit when removing them. Next, remove the other side of the slides from the drawer box in the same way.

Remove the new drawer slides from its packaging and lay out two pairs of drawer slide hardware and several mounting screws. In some cases, the screws will vary in length. Check the installation instructions for which sizes go where and set them aside for now.
Separate the drawer slide halves from each other by sliding them apart. You may need to disengage a locking lever to separate them. Determine which side of each slide pair is the cabinet-mounted side and which is the drawer-mounted side using the product instructions as a guide. Typically, the drawer side will fit into the cabinet side of the slides.
Measure and mark the height of the new cabinet slide halves on both sides of the inside of the cabinet. Depending on the type of new slides, the height can be near the bottom, top, or center of the drawer box location. For many soft-close drawer models, the precise height makes no difference except that both sides of the drawer should be at the same height. However, positioning the slides at the bottom of the drawer makes the rest of the installation easier.

Using your marked height as a guide, use scrap lumber to create a height template to rest the slides on to ensure level and precise installation. Another option is to use your level to mark a line corresponding to the installation height of the slides. Rest the cabinet half of one slide on your template or against the marked line, and mark at least two mounting holes corresponding to holes in the slide.
Use painter's tape on a drill bit to set the pre-drilling depth. Pre-drill the mounting screw holes on your marks. Use a screwdriver to install the provided screws fastening the slide half to the cabinet. Repeat the procedure on the opposite side of the cabinet.

Start by marking the center height of the cabinet drawer slides on each side of the drawer box. If you're positioning the slides at the bottom of the drawer box, transfer the marks to each side of the drawer by lining up the drawer side of each slide to the bottom of the drawer box. Otherwise, carefully measure the drawer's height when inside the cabinet and mark the slide positions on the drawer sides accordingly.
With the slide half in place, mark at least two mounting holes. Set the depth of your drill bit using painter's tape to avoid drilling through the side of the drawer, and pre-drill the mounting holes. Use the screws to attach the slide halves to both sides of the drawer.

Insert the drawer by lining up the drawer slide halves and applying pressure to push the drawer inward. For some drawer slide models, the initial push may give some resistance. You may or may not hear a click, meaning the drawer is locked into the slides and ready for use.
One-for-one replacement of drawer slide types can be a simple matter of reusing the same screw holes to mount new hardware. Replacing drawer slides that differ from the old ones takes some measuring skill but is a relatively straightforward DIY project.
However, if you're planning to replace many of them in your kitchen or if your kitchen drawers are particularly challenging to work with, a local handyperson service can offer solutions and install them efficiently. Professional handypeople typically charge an average of $90 per hour, ranging from $40 to $140 depending on the task at hand.
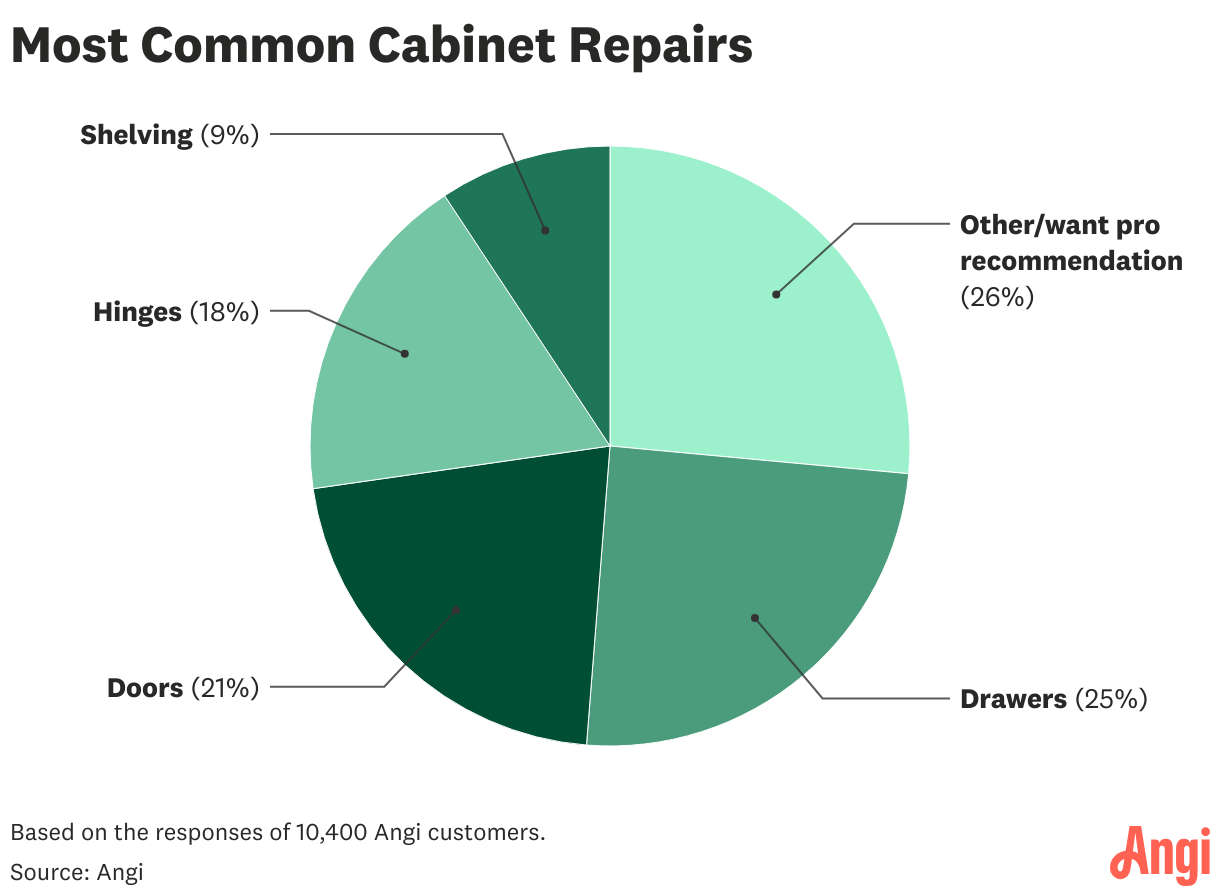
Based on the responses of 10,400 Angi customers, drawer repairs are a common concern, representing 25% of all cabinet repair requests. This emphasizes the value of routine maintenance and selecting durable materials to ensure drawers continue to function properly.
From average costs to expert advice, get all the answers you need to get your job done.
Is it time for new cabinet doors in your kitchen? Let’s explore the costs of new cabinet doors so you know exactly what to expect.

The cost to replace the bottom of kitchen cabinets often isn’t too high, but depending on the damage, a full cabinet replacement can cost thousands.

The cost of garage cabinetry and storage depends on the size, materials, labor, and more. Our guide will show you how much garage cabinets cost.

Any handy homeowner can tackle their own cabinet drawer replacement. Check out this helpful guide if you need to replace your cabinet drawers.

Face frame vs. frameless cabinets offer two very different looks for your kitchen. Here are the pros and cons of these two common choices.

Need to know how to hire cabinet contractors you can trust? Here’s a guide to hiring the right pro for your cabinetry job.