

•
Both materials and labor determine hardwood floor installation costs. This guide breaks down all the prices you need to know before starting your new flooring project.
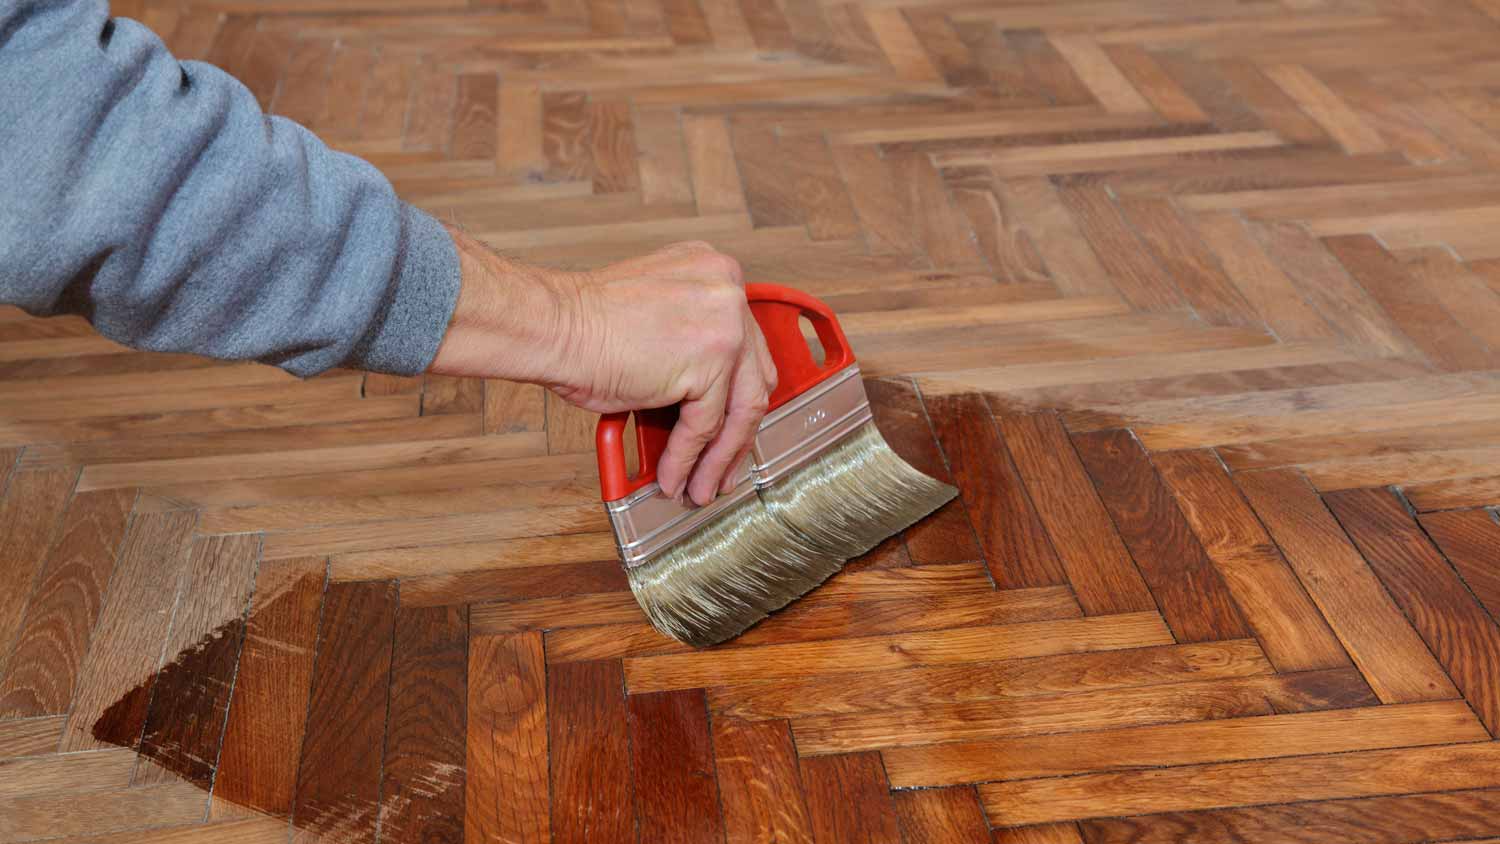
With a little elbow grease and sandpaper, your hardwood floors can look brand new


Although DIYers may be able to repair shallow scratches on hardwood floors, more extensive damage requires the skill and precision of a professional.
Sanding hardwood floors before repairing them can be dusty work, but a flooring pro has the right tools to limit dust and thoroughly clean the floors.
Refinishing hardwood floors costs somewhere between $1,100 and $2,700 to hire a pro.
Hiring a floor repair pro provides the best chance to match the existing flooring material and stain color to ensure seamless results.
Hardwood flooring is an asset that can increase the value of your home. It actually has a shockingly long life span—up to 100 years—if you take care of it properly. Nonetheless, there comes a time when all hardwood flooring needs some repairs, whether it’s fallen victim to your pet’s nightly zoomies or simply worn down from years of foot traffic. This guide will show you how to repair hardwood floors, no matter the type of damage.
Enduring small scratches from moving furniture or tiny dents from dropping heavy objects is just part of having hardwood floors. That kind of damage is cosmetic, and you may not like the way it looks, but it doesn’t really pose a risk.
The real problem occurs when damage becomes a hazard. Splintering floors can injure someone’s foot, and gaps and warping can become trip hazards. Certain types of damage can get worse over time and spread, leading to more expensive repairs.
You can repair cosmetic damage whenever you get sick of looking at it—but always repair hazardous damage ASAP.
Your total floor repair costs will depend on the extent of the damage. Most repairs cost somewhere between $5 and $25 per square foot, but that cost could rise by thousands if you need to repair the wood floor’s supporting structure. Surface repairs are generally the most affordable fixes. For most homeowners, refinishing hardwood floors costs somewhere between $1,100 and $2,700.

It’s generally easier to repair hardwood floors than it is to repair laminate and other flooring materials that you can’t resurface. Though you can replace damaged planks, you can also sand out smaller cosmetic issues—but you need to know what type of hardwood floor you’re dealing with.
Site-finished hardwood flooring is easier to repair than prefinished hardwood flooring. Prefinished hardwood floors are more convenient to install, but they have thick layers of urethane and aluminum oxide that form the protective coating. This can be near impossible to sand or blend, so you may have to bring in a pro.
If you need to replace damaged hardwood planks, make sure you buy a matching floorboard that’s the same measurements and depth as your existing flooring. You’ll also need to color-match materials like wood touch-up pens, wood repair paste, wood filler, and wood stain.
Always access the damage and plan out your hardwood floor repairs in advance. If a significant portion of your flooring has staining and surface damage, it may be easier to just refinish the entire floor. Otherwise, you can pick up a wood repair kit that has most of the materials you’ll need to fix minor scratches, dents, and gouges.
Your floor typically sustains shallow scratches (less than 1/16-inch deep) from sliding chairs or light furniture. To fix these, sand the scratch by hand using a fine-grained sandpaper in the direction of the grain. Cover the sanded area using a wood touch-up pen in a matching color, then rub the area gently with steel wool once the colorant dries.
Deep scratches and gouges typically come from pet claws, sliding heavy furniture, or dropping a heavy object. If your floor has a lot of this type of damage, you may want to refinish the entire floor. Otherwise, you can fill in certain spots using wood filler:
Prep the wood filler
Use a putty knife to work the filler into the scratch or gouge
Smooth the filler down so it’s flush against the floor
Wipe away the excess
Let the filler dry
Sand down the filler so it blends into the flooring
Stain over the area using a wood stain pen
If you have significant dents in the floor, use the same method for scratches and gouges or replace the damaged floorboard. If you have minor dents, there’s a simpler DIY. It just depends on whether the wood is prefinished or site-finished.
Use moisture and heat to repair surface-level dents. Place a damp towel over the dent, then run a steamer over the spot. The dent should begin to rise. You can keep dabbing the wood with the steamer until the dent pops out.
Add a small amount of water to the dent using a pipette. The varnish may start to turn blue. This is a normal process known as blushing, and the floors will return to their typical color when dry. Dab away excess water around the dent with a dry cloth, then put a damp cloth over the dent. Press a hot iron over the dent until the cloth is dry. You may need to repeat the process to work the dent out of the wood.
Repair a wood floor with minor cracks using epoxy wood glue and filler. Fill the crack with epoxy, and cover the crack with wood filler. Once both products have fully hardened, sand the area. You may need to use a stain pen to conceal discoloration.
How you repair hardwood floors with gaps depends on the size of the gap. Significant gaps may require work on the subfloor, but you can usually repair gaps with one of the following methods.
Fill the gaps with wood filler or putty (if the gaps are small) or a mixture of wood dust and resin (if the gaps are large). If necessary, mix your filler, then:
Apply filler to the gap using a putty knife
Let the filler dry per the manufacturer’s instructions
Sand the filler so it’s flush with the floor
Apply a finish that matches your existing finish
For mid-size gaps, you can use wood strips:
Apply wood glue to the gap
Insert the strip
Gently hammer the strip into the gap, leaving it slightly above the surface
Allow the glue to dry
Sand down the wood strip until it’s flush with the floor
Apply a finish that matches your existing finish

If your floor has significant water damage, you’ll need to replace the warped planks—and sometimes even the subfloor. If water damage is limited to the surface, like a watermark from a mug or a spill from over-watering your plants, you can typically fix it DIY.
Rub mineral oil (for light stains) or mineral spirits (for heavier stains) over the area with a microfiber cloth. Let it sit for 24 hours.
If the stain is too deep for mineral spirits to penetrate, you can sand off the finish. Soak a sponge in vinegar and scrub the area. Once the stain lifts and the area dries, apply a matching finish.
If vinegar isn’t strong enough to get rid of the stain, you can use a 50-50 solution of water and bleach. Let the mixture sit for a few hours on the stain before wiping it away with a damp sponge. Once it’s dry and the stain has lifted, apply a matching finish.
If the finish is peeling off your hardwood, sand down off the existing finish. Apply a new coat of finish.
Hardwood flooring is prone to UV damage. Over time, you may notice that the flooring under your furniture is a different color than the rest of your flooring. When this happens, you have two choices. You can paint your flooring (a more temporary solution) or you can refinish your floors.
As long as the damage is surface level, most homeowners can repair wood floors on their own. Fixing a small scratch can be as easy as using a wood touch-up pen. That said, if you have to replace planks or have more significant damage that points to structural problems, it’s best to bring in a pro. If you spot issues like warped or rotting planks, sunken or bulging areas of your floors, excessively creaky floors, numerous holes, large gaps, or significant cracks, call a floor repair company near you.
Hardwood floor repairs are the first step—but proper maintenance is really what lets your flooring live up to (or even exceed) its expected life span. These tips will help:
When cleaning hardwood floors, avoid abrasive cleaning chemicals.
Avoid dragging items across your floors, like furniture or heavy boxes.
Put felt protector pads under your furniture.
Remove footwear before walking on floors, especially if shoes have a hard sole.
Wipe away spills and moisture immediately.
Sweep with a soft-bristle brush.
Use microfiber mops instead of steam mops.
Never use a soaking wet mop on hardwood floors.
Consider placing rugs in higher-traffic areas.
If your floors are in a high-traffic area or you have pets, you may want to finish them with epoxy to add a layer of protection. The right epoxy floor idea can transform your home or—at the very least—have it hold up better to your lifestyle.
From average costs to expert advice, get all the answers you need to get your job done.
Both materials and labor determine hardwood floor installation costs. This guide breaks down all the prices you need to know before starting your new flooring project.

It’s impossible to keep floors damage-free over the years. Thankfully, the cost to refinish hardwood floors is far less than the price tag to replace them altogether.

Hardwood floor repair costs depend on the problem. This guide breaks down common costs based on factors like the type of problem, repair method, and whether you hire a pro or DIY.
Planning a refinishing project? This guide will walk through how long it takes to refinish hardwood floors, including what will slow down your timeline.
Before repairing or partially replacing flooring, make sure to discuss these hardwood floor repair questions with a pro.
Moisture and heat can cause buckled hardwood floors. Learn why this happens, how to prevent it, and what to do if your hardwood floor is buckling.