

If your sprinkler system isn’t working, it may be time for a new pump. Find out sprinkler pump replacement costs with this guide.
This is a big job that may be better left to the pros


This project requires a lot of experience, so we don’t recommend DIYing it. Hire a pro with the special skills and tools necessary to complete the job safely.
Maybe you’re envisioning a yard full of native plants (instead of grass) to attract pollinators, or you’re simply tired of taking care of a sprinkler system. When it’s time to remove your lawn sprinklers, there is a lot of hard work ahead of you. While you can learn how to remove a sprinkler system pretty quickly, the reality is this job takes several hours over multiple days to fully dig out all of the sprinkler heads and water lines.
With this guide, you can learn more about the process, but to save yourself some agonizing work, we highly recommend hiring a local sprinkler repair company to remove your lawn sprinklers. Not only does it take a lot of sweat and hours of your time, but one wrong move with your shovel could lead to a costly leak. If you’re still determined to give it a shot, read on to learn how to remove a sprinkler system.
Before you start digging holes all over your lawn, see if you can track down your sprinkler system documentation or a blueprint from the permit holder with your local government’s building planning department. With a map or blueprint in hand, you’ll have a much easier time following along the water lines to remove all parts of the sprinkler system. You may also need to request a permit before performing any sort of construction underground, including digging out and removing the sprinkler lines.
With the blueprints and any necessary permits sorted, you’re almost ready to dig. But before you do, make sure to call 811, the call-before-you-dig hotline. This is essential—you need to call this number and determine where any utility lines are on your property to mark them. This ensures you don’t hit a utility line when you are digging.
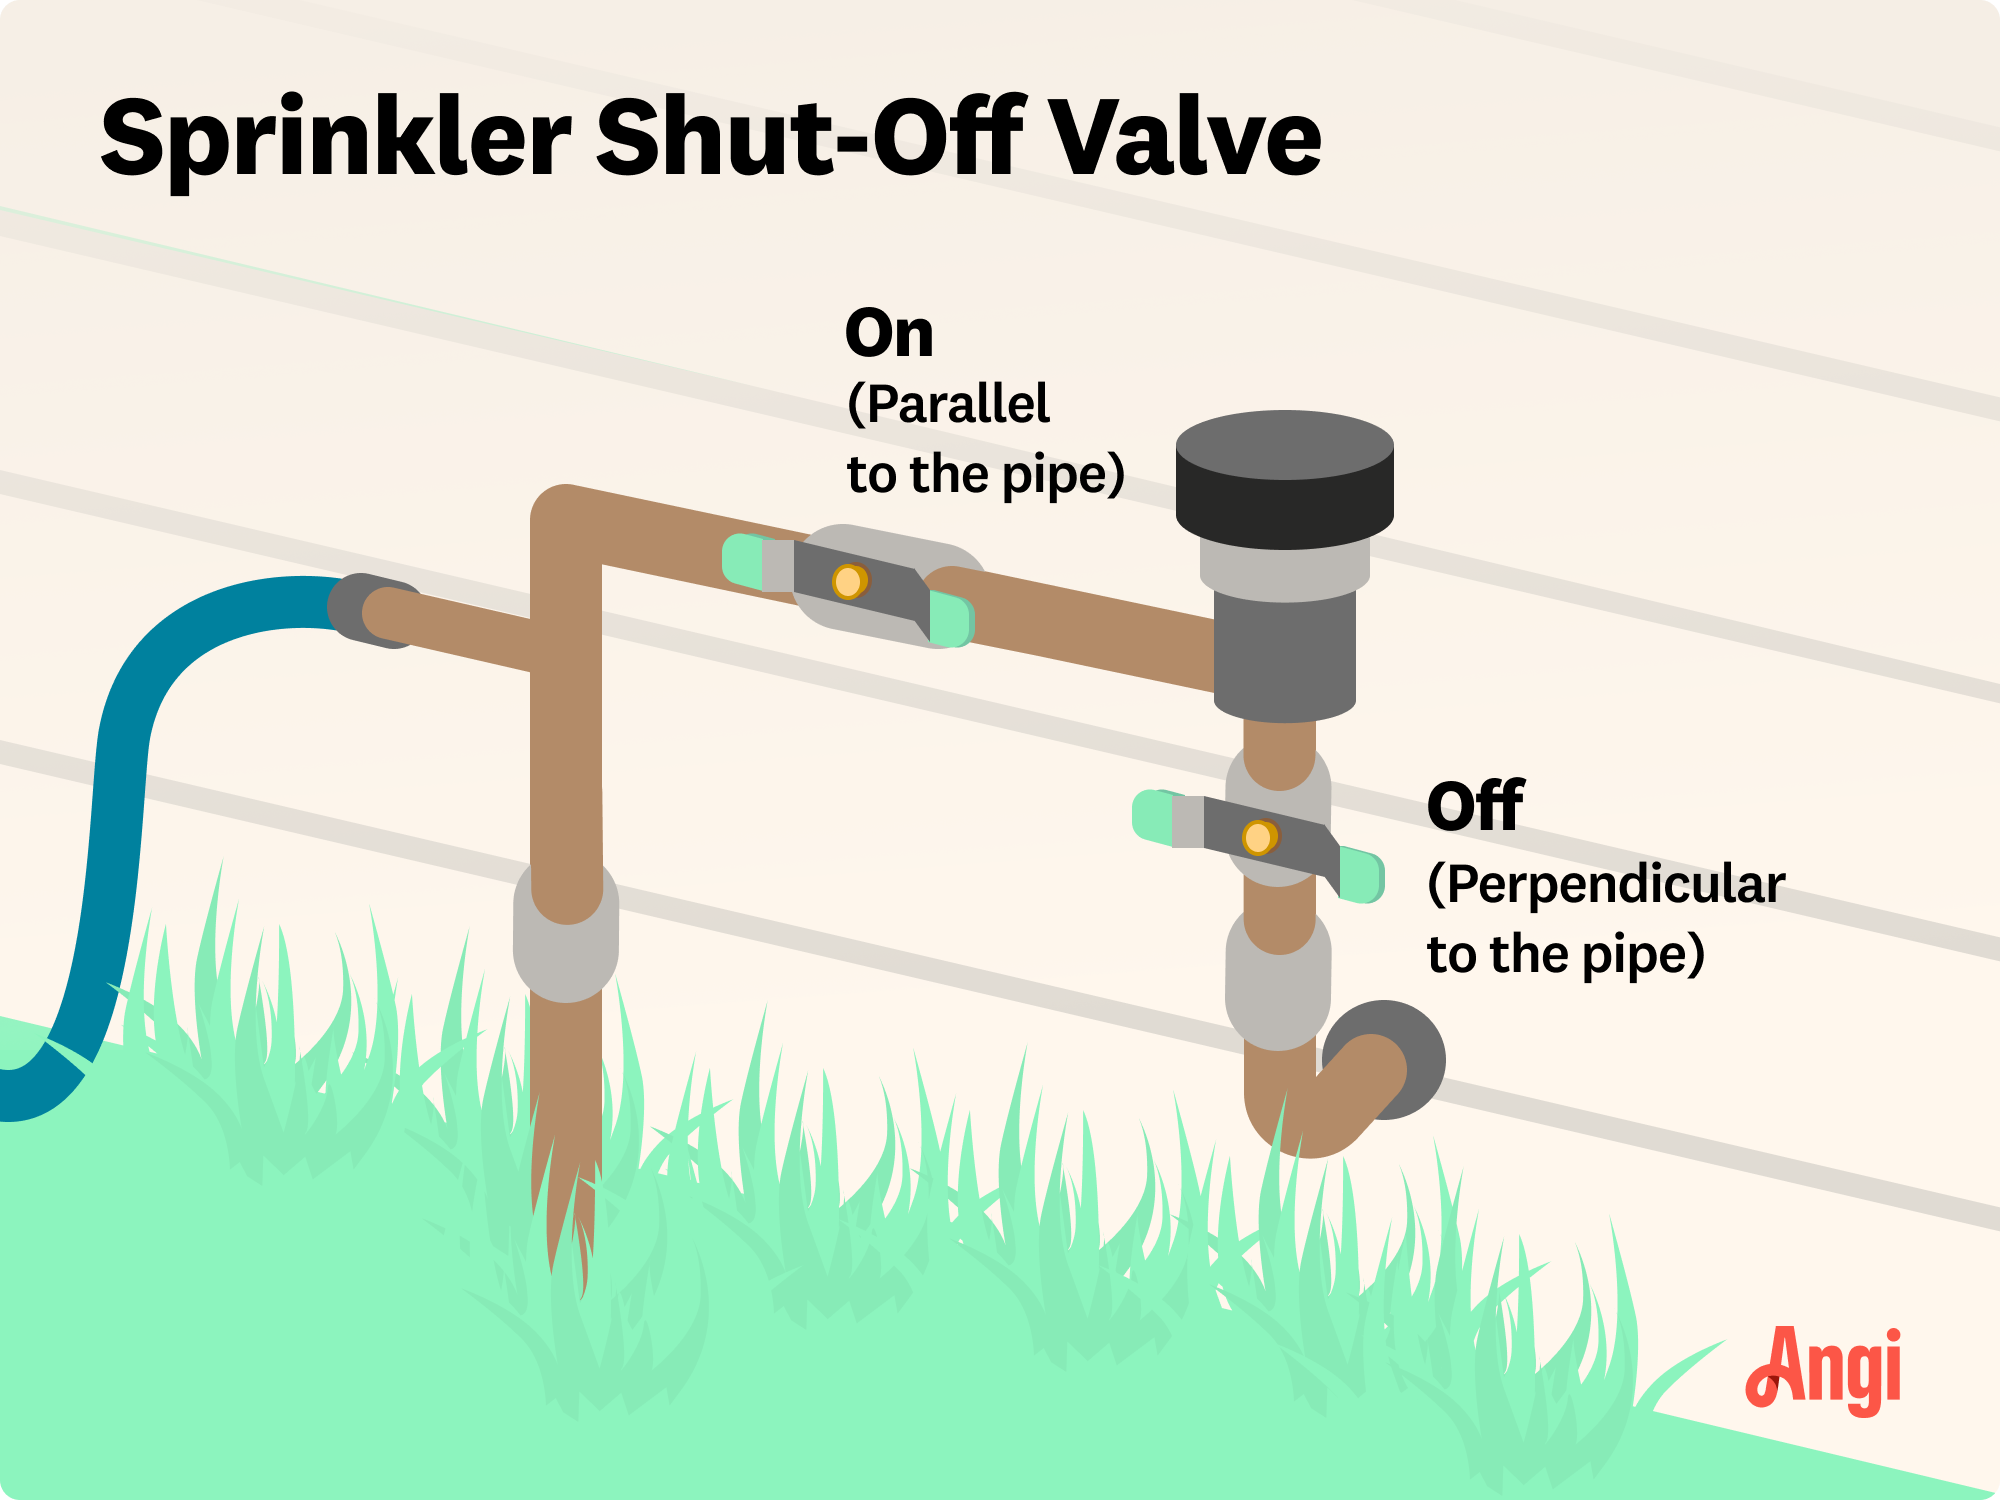
Before you get started, find the irrigation shut-off valve location to stop water from flowing to your sprinkler system. Turn the valve 90 degrees until it stops. At this point, it should be perpendicular to the pipe, which will let you know it’s off.
This valve is usually located inside a valve box, which is buried partially or fully underground and is identifiable by its green lid. Otherwise, you may also find the shut-off valve indoors, like in a utility closet or garage, or around the perimeter of your house. If you can’t track down the location, call in a sprinkler repair pro or a plumber to assist you.
Once the power is turned off, you’ll next want to shut off the controller to the sprinkler system. This is where you program the day and time schedule for the sprinklers. Power off the system and unplug it. Use a screwdriver to remove the sprinkler controller from the wall.
Use a trowel to carefully dig out the soil around each sprinkler head. Clear an area of about 7 inches around the sprinkler head and about six to 7 inches deep, until you uncover the riser that the sprinkler head is attached to.

Twist each sprinkler head counterclockwise to remove it. You can also twist off the risers beneath the sprinkler heads for removal.
If you have a blueprint of your sprinkler system, be sure to follow along with it to determine where the water lines lay. Otherwise, dig carefully from the site of each sprinkler head along the water lines that the sprinkler heads were connected to. These water pipes are usually buried between six and 10 inches below ground, so you’ll need to dig about that far down. Clear about three to four inches of dirt away from each side of the pipe.
Using a pipe cutter, make cuts about every few feet or up to 10 feet. This will make it easier to pull the pipes out of the ground for removal, compared to trying to remove pipes that are dozens of feet long all at once.
With the cuts along the lengths of the sprinkler lines, carefully pull out the pipes. You may want to wear protective, cut-resistant work gloves to protect against the sharp edges of the cut pipes. Pipes may be slippery to handle, so it’s better to take extra care during this step.
The water pipes will lead from the site of each sprinkler head all the way to the control valves that control water flow to the sprinkler heads. These control valves are located in the valve box, which you may have already visited in step one when turning off the sprinkler shut-off valve.
With the pipes disconnected, you can pull the valve box out from underground. Use pipe cutters to cut off the remaining pipe connectors from the valves.

Take a push-fitting or push-to-connect pipe cap to close the exposed pipe. Make sure this connection is tight to prevent any leaks. Even if you’ve learned how to remove a sprinkler system on your own and followed through every step to this point, it’s still wise to call in a professional to inspect that the pipe is securely capped off.
After hours or even days of pipe removal, you’re still not quite ready to kick back and admire your sprinkler-free lawn just yet. Now, you’ll need to refill the holes and trenches with soil and apply new sod or begin planting the native pollinator garden of your dreams. This can take several more hours to complete without professional installation, plus months for everything to grow in properly.
When it comes to removing a sprinkler system, the best option is to hire a professional sprinkler repair company near you. Professional removal will cost about $50 to $110 per hour, but the job will be done safely and quicker than if you try to do it alone.
If you do decide to DIY, this project can come at a high cost, both financially and time-wise. The pipe cap itself is just $5 to $30, but you’ll also spend about $0.35 to $0.85 per square foot of lawn for the cost to lay new sod. If you’re planting new grass seed to restore the yard, plan to spend anywhere from $190 to $1,400 for the cost to seed a lawn yourself.
Excellent work couldn?t be happier with the service I received from The House of Irrigation!!! From the start to finish, very profesional, punctual and incredibly thorough.
The quality of the work by Ronco over the past 15+ years has been outstanding and the entire staff has been very easy to work with and super friendly! If we were moving to a home that has a lawn, it would be a no brainer for us to install a system and service from Ronco Irrigation!! Cannot...
They completed a 40 foot plus storm drain, digging it all by hand. Additionally, very serviced and upgraded my entire irrigation system
A very good company to work with: professional, reasonably priced, and willing to go above and beyond to satisfy the customer. We had rotted wood and new aluminum roof trim installed, and the result is perfect and done on time. I definitely recommend them and will certainly use them for...
The service was excellent! Norwin's trap caught the dangerous bob cat in short order. I am very thankful!
Brandon Burnette did such a great job. I'm so happy I had him as my worker today. Very nice and friendly young man. 10 star in my book.
We had LHR install a new roof and gutter system. While they were not the cheapest, they were considered the most reliable and fetish for using only high-value products that would last for many years. Additionally, they were highly professional and never tried to push their services or any...
 Liberty Home Remodeling
One call for professional landscaping, irrigation, fencing and much more.
We are rolling into our second year with Experigreenâ s amazing lawn care. Not only does our lawn look incredible, Mike Wilson is very thorough, knowledgeable and very helpful! Thanks again!
Q Lawn performed a variety of services for us. Aeration, tree planting and new sprinklers for the trees. Lawn dethatching. New road base for our driveway. We have been very pleased with Q Lawn and would highly recommend.
From average costs to expert advice, get all the answers you need to get your job done.
If your sprinkler system isn’t working, it may be time for a new pump. Find out sprinkler pump replacement costs with this guide.

Discover the cost to winterize a sprinkler system, including average prices, key cost factors, and tips to save. Learn what impacts your estimate and how to budget.

Discover yard drainage cost estimates, including average prices, key cost factors, and tips to help you budget for your yard drainage project.

French drains help keep water away from the interior and exterior of your home. There are three different French drains to choose from, based on where water collects.

Sprinkler systems offer lots of variety in sprinkler heads. Learn the differences between sprinkler head types to find the best one for your watering needs.

When your sprinkler head is not rotating, the common culprits are debris, dirt, or low water pressure. Read on to learn how to solve a sprinkler head problem.