

Discover the cost to remove asbestos siding, including average prices, key cost factors, and tips to help homeowners plan a safe and budget-friendly project.
This project is best left to the pros


Ensuring the safe removal of asbestos siding is a meticulous process that demands strict adherence to specialized procedures and regulations. In this comprehensive guide, we'll walk you through how to remove asbestos siding safely. Each step plays a vital role in mitigating the health risks associated with the dangers of asbestos exposure. It's essential for homeowners DIYing this project to navigate the intricate process of asbestos removal with utmost caution and adherence to safety protocols.
Leave asbestos removal to the professionals. Long periods of exposure to a high volume of disturbed asbestos can have harmful effects on your health, including serious diseases like asbestosis, mesothelioma, and lung cancer.

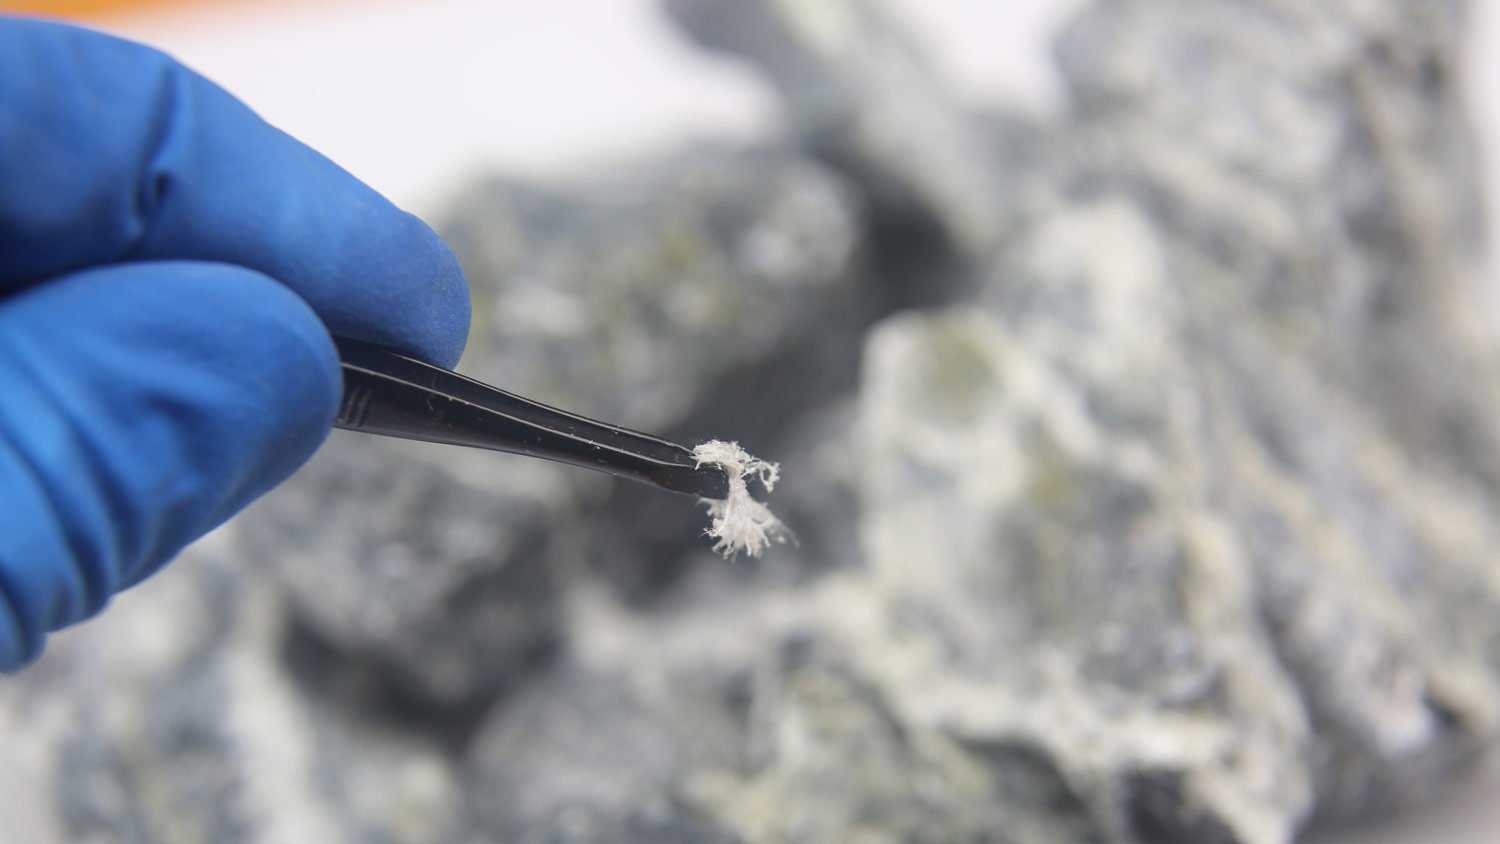
Asbestos exposure poses significant health risks that are exacerbated when in close contact with the material. It is highly recommended to hire an asbestos abatement professional to remove asbestos siding. If you choose to DIY this project, do so with an abundance of caution and only if you are confident in your skills to complete the job with minimal risk. You should feel as though you can complete each step without question, as leaving room for error could significantly increase your risk of exposure.
Before you begin removing the asbestos siding, there are three things you should do: obtain all of the required permits, prep the area, and protect your body with the proper personal protective equipment (PPE). These are discussed in-depth below, and it’s imperative that you follow them closely.
It's important to note that this work can be quite extensive. Aside from possibly using a ladder, you will work in full protective gear–which can get stuffy after a while. The project will also take at least two full days, but could extend to four days, depending on the extent of the removal.
Before you begin the process of removing asbestos, it is mandatory that you obtain a permit. This permit is typically issued by your local building permit officer, or another relevant agency. The cost of the permit will vary based on where you live, and the nature of your project. Generally, the fee is based on an estimate of the amount of debris to be removed. Additionally, the permit application process may require notifying your state’s Department of Health.
To ensure the safety of everyone who could be impacted by the asbestos–and to reduce the risk of releasing asbestos fibers into the air–properly prep the area. You can post signs for family, friends, neighbors, and others that notify them of the work taking place, and advise them to steer clear of the work area. Also, place a 6-foot wide strip of 6-mil sheet plastic in the shade, running along the removal site, to maintain moisture in the siding. Set up a transitional zone for entry and exit beside the plastic strip, and equip it with a plastic disposal bag.
Full personal protective equipment (PPE) is required before working with asbestos siding. Every person working on the project must wear the PPE gear. This includes safety glasses, rubber gloves, and disposable coveralls.
A purple, half-face dual-cartridge respirator with a high efficiency particulate air (HEPA) filter is recommended to protect the lungs. A proper fit is crucial for maximum protection, and you should request a fit test from the vendor. If the respirator doesn't fit properly, it won't provide adequate protection. It's important to note that individuals with beards may not be fitted properly with this type of respirator, and should avoid asbestos abatement work if they choose not to shave their facial hair.
Start the removal process by drenching approximately 50 square feet of siding. To prepare a solution, blend ½ cup of liquid dish-washing detergent with water in a garden pump sprayer. Continue spraying the solution on the siding as you work, as wetting the siding can prevent the spread of asbestos fibers.
During the removal of asbestos, exercise caution to prevent the release of asbestos fibers. To minimize breakage, the siding pieces should be removed by either pulling out nails or cutting nail heads. If necessary, a pry tool can be used to carefully lift the siding and expose nail heads.
Immediately address any cracking or crumbling by wetting the affected areas with a garden pump sprayer on the front and back sides of the siding. When lowering the siding, care should be taken to avoid throwing or dropping it, as breakage can release asbestos fibers. All debris should be confined to the plastic strip at the base of the wall and kept wet until it is packaged and sealed.
To maintain safety standards, remove your disposable coveralls and other protective equipment in the transition zone–before leaving the work area. You should don a new set of coveralls and gloves each time you re-enter the work area.
To safely dispose of wetted debris and other contaminated materials, load them into sturdy containers, such as steel drums, cardboard boxes, or burlap sacks. These containers should be lined with 6-mil polyethylene bags or sheets, ensuring that there is enough excess plastic to cover the debris. Seal the containers with duct tape. For boxes, wrap them in an additional layer of 6-mil plastic or insert them into a pre-marked asbestos waste disposal bag.
For other filled containers, double-bag or double-wrap them in pre-marked 6 mil asbestos waste disposal bags. Twist the top of each filled bag, bend the twisted part in half, and seal it closed with duct tape. If containers are wrapped, use 6-mil polyethylene plastic and ensure all seams are sealed with duct tape. Each sealed package should have an asbestos warning label attached.
Once you're standing on the last piece of plastic, spray water onto any asbestos debris or fibers that are on the outside of your respirator and disposable coveralls. Peel off your boots, coveralls, and gloves while turning them inside out, stepping off the plastic sheet as you do so. Discard the filters from your respirator and dispose of them. Clean tools, respirators, goggles, and boots, removing each item from the plastic as you finish.
Place any remaining debris and disposal items in bags that are labeled for asbestos disposal, or wrap them twice in the 6-mil thick plastic sheets, and seal each bag or package tightly with duct tape. Label every airtight container immediately after sealing. To clean up additional areas, use damp rags rather than a vacuum or broom to avoid releasing asbestos fibers. Finally, shower to ensure that you're personally decontaminated.
The total project will span 2–4 days. Repeat these steps each day until completed.
Proper disposal of asbestos debris is essential, and it must only be carried out at authorized disposal sites or transfer stations equipped to handle such waste. To locate licensed sites and obtain information on disposal fees, you may contact your local clean air agency. Disposal requires a waste manifest, and the necessary forms are available at the disposal sites.
Proper labeling is required for each container, which must include your last name, address, and date of removal. It is crucial to legally dispose of debris within 10 calendar days of its removal, and keep it stored in a secure area such as a garage before disposal. When transporting double-bagged or wrapped debris, ensure that it is done in a covered vehicle to comply with disposal regulations.
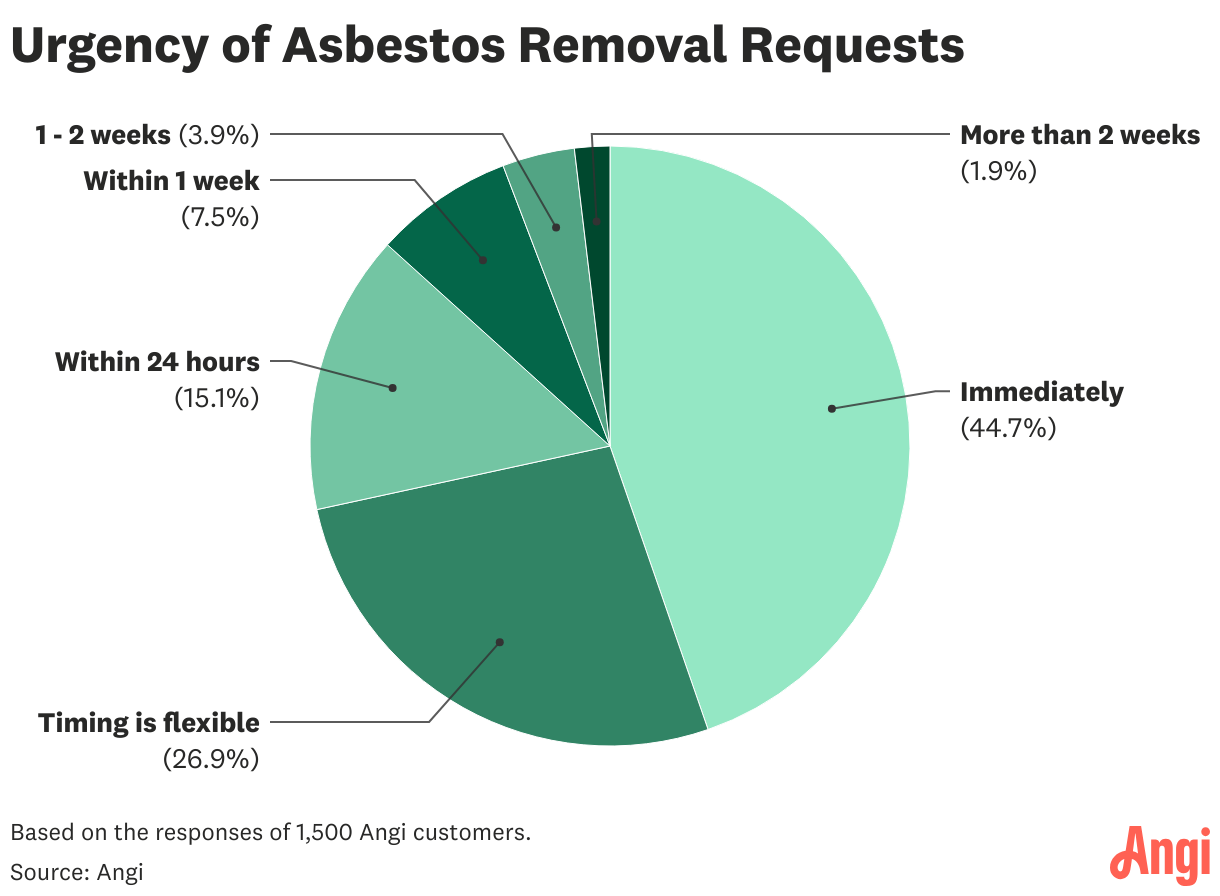
According to data from Angi customers, 44.7% of homeowners request immediate removal of asbestos in their homes—only 26.9% of homeowners say the timing is flexible. Asbestos removal isn’t an emergency in the same sense as a house fire, but long-term exposure can cause significant respiratory issues, so you should at least consult an asbestos removal company as soon as you get an inkling that there’s asbestos in your home.
It is strongly recommended that you hire an asbestos abatement professional for the removal of asbestos siding rather than attempt to DIY. Asbestos removal poses serious health risks, and mishandling can lead to the release of hazardous fibers into the air.
Professionals possess the necessary expertise, equipment, and knowledge of safety protocols to ensure the proper containment, removal, and disposal of asbestos-containing materials in compliance with stringent regulations. DIY asbestos removal not only lacks the specialized training and protective measures required, but also increases the likelihood of exposure, endangering the individuals involved with the removal, and others in the community. The average siding asbestos removal cost ranges between $7 to $9 per square foot. The cost to replace asbestos siding will range between $5,600 and $17,500, on average.
Given the potential health consequences, the complexity of the process, and the legal restrictions surrounding asbestos removal, hiring a licensed asbestos abatement professional is the safest and most prudent course of action.
From average costs to expert advice, get all the answers you need to get your job done.
Discover the cost to remove asbestos siding, including average prices, key cost factors, and tips to help homeowners plan a safe and budget-friendly project.

The cost of asbestos testing varies based on location, property size, test type, and other factors. Here’s a breakdown of the costs to conduct an asbestos survey.

Discover the cost to replace asbestos siding, including key cost factors, and tips to help homeowners budget for safe and effective siding replacement.

If you suspect there is vermiculite insulation in your home, you likely want it gone. Learn how to remove vermiculite insulation safely and quickly.

Understanding the difference between asbestos siding versus fiber cement siding lets you recognize dangerous asbestos material. Learn how to spot the differences.

Having an asbestos roof isn’t necessarily a hazardous situation. Use this step-by-step guide to learn how to remove an asbestos roof safely.