
How much does it cost to insulate a wall? This guide breaks down the associated costs and variables to consider when setting your project budget.
There will be no huffing and puffing to blow these walls down

Insulating existing walls helps you avoid the mess and cost of removing drywall, saving time while improving your home's energy efficiency.
Professional wall insulation costs range from $1,150 to $6,000, ensuring proper fill levels and preventing damage from overfilling or underfilling spray foam.
Drill small access holes, wear protective gear, and fill wall cavities carefully with spray foam or loose-fill insulation to avoid gaps and settling.
Hiring a local insulation company provides confidence when filling wall cavities evenly, handling expanding materials safely, and achieving maximum energy efficiency for your home.
Be it your finished basement or those drafty walls that give you the chills in your living room, one thing’s for sure—knocking down drywall to install insulation can be a major pain (and come with a high price tag). Before you crank out the hammer and start busting through your drywall, you have a few options to avoid the mess and hassle. Use this guide to help you learn how to insulate existing walls without removing them.
Correctly installing insulation can be difficult. Health and safety risks are involved; therefore, we highly recommend contacting a pro to ensure the job is completed safely and correctly.

Insulating a wall without removing the drywall, also called retrofit insulation or re-insulation, is useful for homes with existing drywall. Instead of knocking down the existing drywall and then installing new drywall, you can save on the cost of your project by navigating around your drywall.
The average cost to insulate a wall is between $1 and $4 per square foot, depending on the type of insulation used, such as blown-in insulation or spray foam. Cellulose and fiberglass cost the least, while blown-in insulation blankets and spray foam insulation cost the most to install. Drywall installation costs an extra $1.50 to $3 per square foot, so avoiding these extra steps can greatly decrease the total cost of your project.
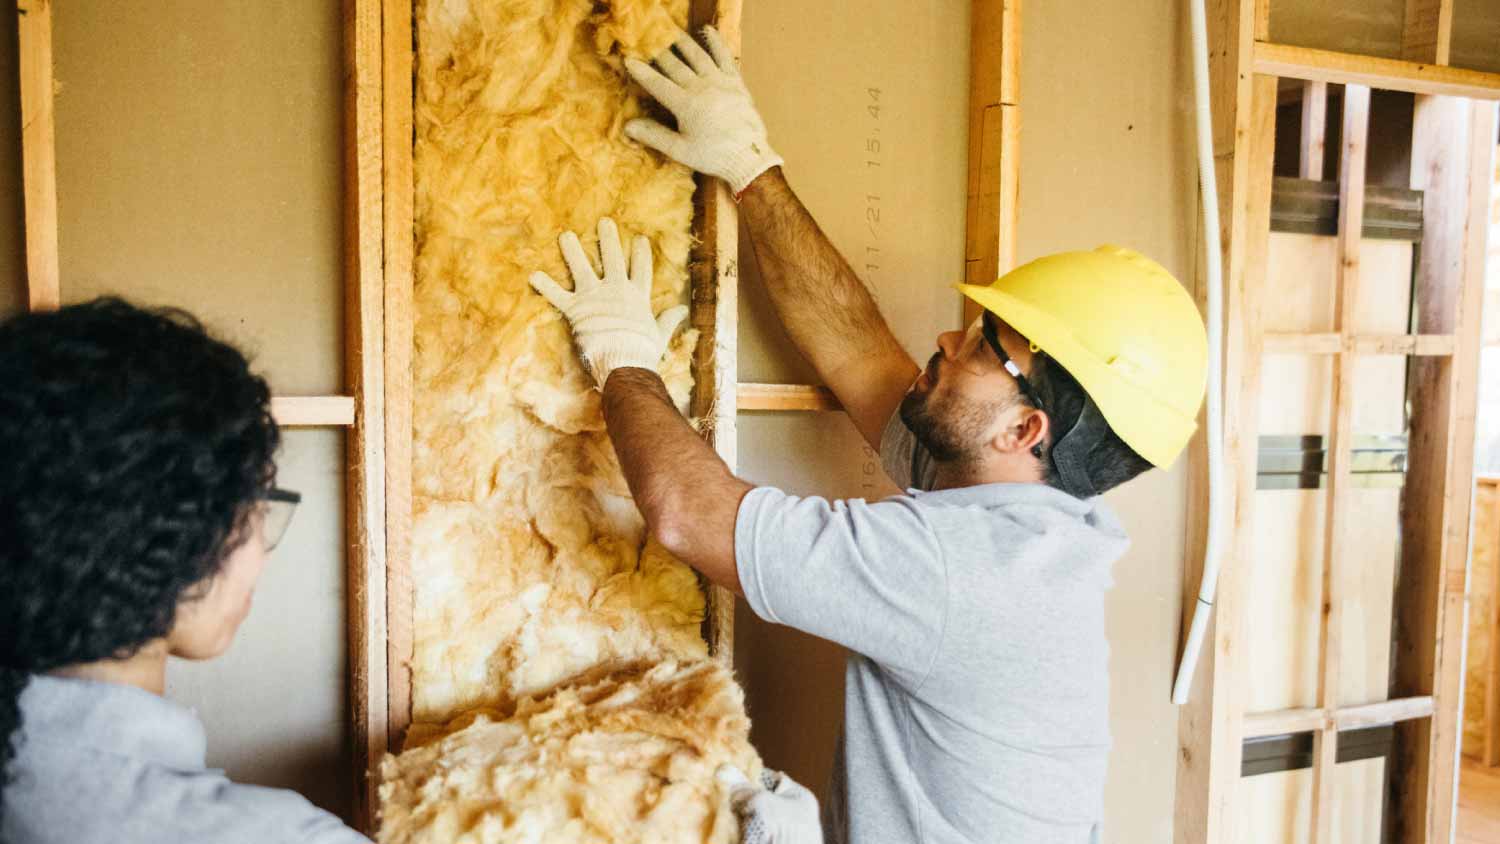
Preparing for insulating a wall is an important step that you don't want to overlook. You'll want to lay down drop cloths for an easy cleanup when you drill holes into the drywall and when you install the insulation, as both of these steps can be a messy process. It's also a good idea to wear safety glasses, a mask, long sleeves, long pants, and closed-toed shoes when handling insulation to protect yourself from insulation particles.

To insulate existing walls with spray foam insulation, you’ll need to drill small access holes, apply insulation carefully, and take steps to patch and clean up afterward. This method allows you to add insulation without fully removing your wall. Spray foam kits, available at most hardware stores, make it possible to fill wall cavities with closed-cell polyurethane spray foam, the most effective DIY spray foam insulation option. However, handling spray foam requires caution due to its expanding properties and chemical makeup.
Here’s how to insulate your walls with spray foam insulation:
Drill access holes: Measure the diameter of the spray foam nozzle, then use a matching or slightly larger hole saw to drill access holes in the marked spots on the drywall.
Prepare for patching: If you plan to reuse the drywall cut-outs, carefully set them aside for patching at the end.
Wear protective gear: Use personal protective equipment, including a mask, gloves, and goggles, to shield your skin, eyes, and lungs.
Insert and fill: Place the spray foam nozzle into a top hole and apply foam evenly into the wall cavity. Start filling from the top, then switch to a bottom hole to ensure the foam covers the entire cavity and reduces gaps.
Avoid overfilling: Stop when you feel slight resistance on the nozzle, as the foam will continue to expand.
Clean excess foam: Use a paint scraper to remove any foam that oozes from the holes, then allow it to cure for about an hour.
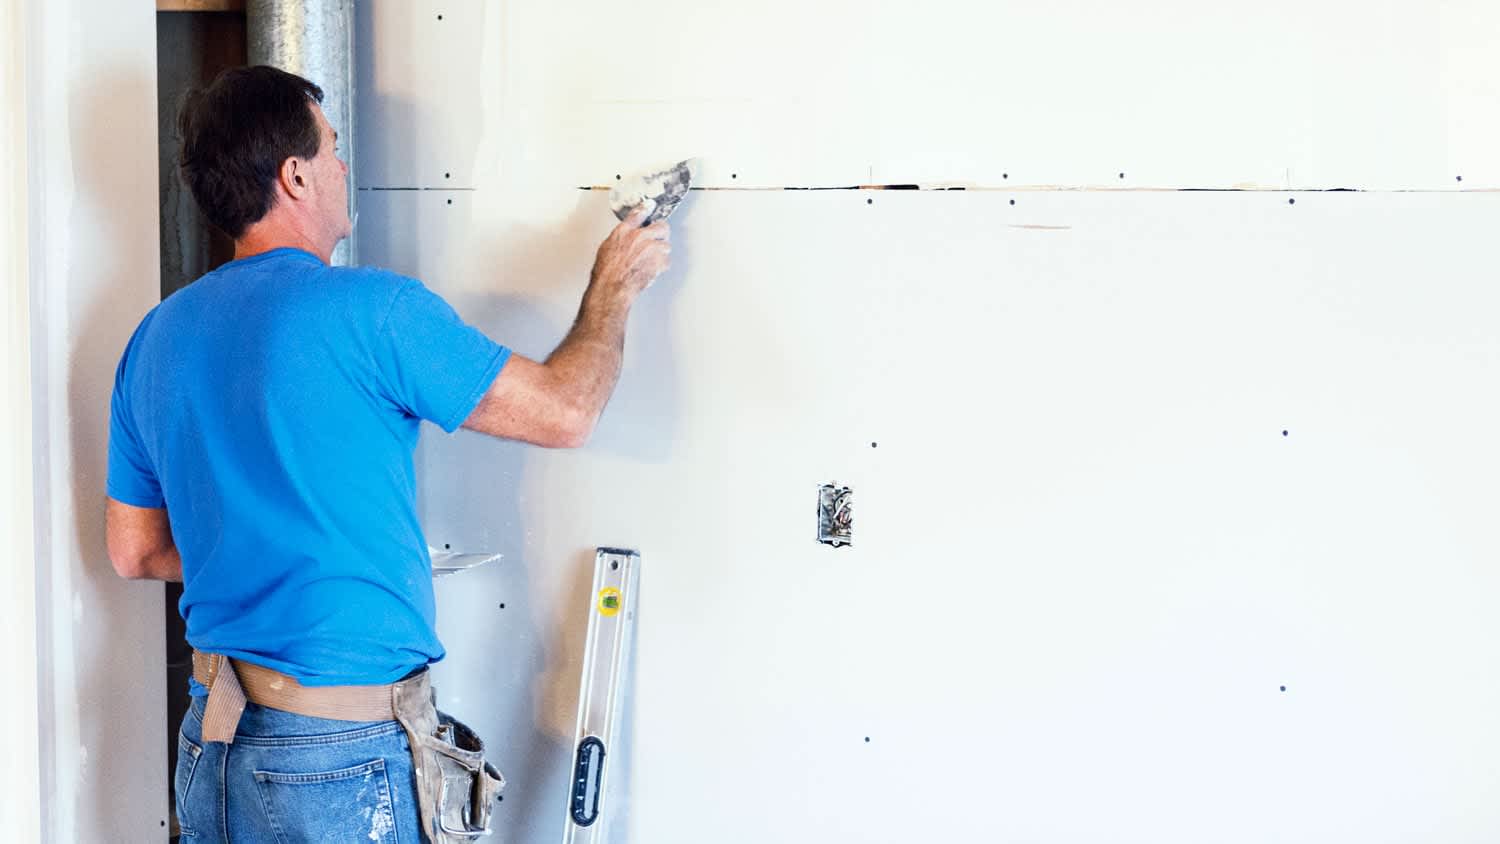
Once insulated, repair the walls by reinserting cut-outs, taping, spackling, and sanding smooth. For a seamless finish, paint the wall. Clean up carefully using a HEPA vacuum or a wet cloth to avoid spreading dust particles.
According to Angi data, spray foam insulation is most commonly installed in walls, as reported by over 29% of homeowners. But spray foam can be used in other areas of the home. Other common locations reported by users include attics at 21% and ceilings at over 20%.

Insulating existing walls with loose-fill insulation has a similar process to using spray foam but requires a few adjustments to handle the difference in materials. The average blown-in insulation cost ranges between $1.75 to $7.50 per square foot. Loose-fill insulation is blown into wall cavities through drilled holes, filling gaps effectively without removing drywall. This method is ideal for adding insulation to existing walls, though it can be messy and requires careful cleanup.
Here’s how to insulate your walls with loose-fill insulation:
Drill access holes: As with spray foam, use a hole saw that matches the diameter of the loose-fill blower nozzle to create access points in the drywall. Drill one hole near the top of each wall cavity and consider a second hole at the bottom if you need to monitor fill levels.
Prepare the loose-fill blower: Set up your loose-fill blower according to the manufacturer’s instructions. This machine is necessary for spreading loose-fill insulation evenly and is available for rent at most hardware stores.
Wear protective gear: Loose-fill insulation can be dusty, so wear a mask, gloves, and goggles to protect your skin and lungs.
Blow-in insulation: Insert the blower nozzle into the top hole and turn on the blower to fill the cavity. Move the nozzle slowly to ensure even distribution. The insulation should settle naturally into gaps and fill the entire cavity without packing down too tightly.
Monitor fill levels: Unlike spray foam, loose fill doesn’t expand after application. If possible, check the fill levels through lower access holes to ensure the insulation reaches the bottom of the cavity.
Patch excess material: Use a putty knife to gently push any excess material that may settle out of the holes back into the wall, if possible. Be careful not to overfill as this can cause the insulation to spill out.
After filling the walls, follow up by patching the drilled holes using drywall discs, tape, and spackle. Smooth the surface, sand, and paint for a clean finish. Clean up thoroughly by vacuuming with a HEPA filter or using a damp cloth to avoid spreading dust. Avoid sweeping, as loose-fill insulation particles can easily become airborne.
The right insulation can make all the difference when it comes to keeping your home's temperature the way you want it. Here are a few tips on how to choose the best insulation type for your home.
Consider the R-value. Not every insulation performs equally. If you want insulation that will keep your northern house warm in harsh winters, choose BIBS or cellulose insulation over fiberglass.
Look at the complexity of the installation. If you want to install BIBS or open-cell spray foam, then you'll want to work with a pro.
Determine your skill level. Sometimes, doing it yourself can prove to be too tricky. Working with a professional can help you choose the best insulation and installation method for the project.
Knowing if you've properly filled the cavities when you can't see inside the wall makes this project more advanced than simply laying batts or rolls of fiberglass into a wall cavity. If you use spray foam, you run the risk of overfilling the cavities, which can cause the walls to buckle or crack and the joists and studs to become damaged from the pressure.
On the contrary, underfilling the walls with spray foam or loose-fill insulation can make the insulation less effective, increasing your energy bills and leading to a drafty, poorly insulated home.
To install the right amount of insulation, only complete this project if you feel confident knowing how to tell if you’ve filled the cavities correctly. Leave room for the spray foam to expand, pack loose-fill insulation well to avoid settling and gaps, and of course—when in doubt, contact a local insulation contractor for the best installation. The cost to insulate a wall ranges between $1,150 and $6,000.
I would recommend this company to anyone! He showed up on time, was friendly, completed a very difficult repair on our dryer vent cover, was responsive, and pricing was extremely fair and competitive. I would have him back to do any of our repairs or cleanings without hesitation!
Best cleaning I've had at my property
I conferred with 2 other contractors before Armstrong Electric. Nick and his crew showed me that the project was not as convoluted as the other contractors made it appear to be. They completed the entire project on time. They were professional, friendly and cleaned up after at completion. I...
The technician was very professional and friendly. He answered all my questions and was very thorough. He left the fireplace area very clean . He inspected from the roof and advised me as to other work that might need to be done. There was no pressure there. I was very satisfied with the...
 Supreme brick & chimney
Our exterior looks brand new thanks to Custom Paint Jobs LLC. Theyre the best in town!
Excellent experience with hiring Tether House to Mount our 77’ Samsung TV in our bedroom. Fast, friendly, and knowledgeable. Highly recommend.
The techs on my project, Shawn and Cliff, were great. They were prompt, courteous, and efficient. I am very happy with the results and would definitely contact Mr. Electric for any future electrical projects.
We had our houses windows and back door replace this summer by Window Depot USA of Central. He gave us grate advise and saved my family lots money. The team did a fantastic job with installation. If you need help, they sure get job done right!
Beginning with the estimate, Larry and Peyton were super helpful in getting my new condo's interior re-painted. Not only was the job well done, but also done in a super timely manner as promised.
 Five Star Painting of Plain City and Powell
Great job...edging and pre clean up went well with a great job with seal coat. Friendly, efficient and professional.
 All Star Paving and Sealing
From average costs to expert advice, get all the answers you need to get your job done.
How much does it cost to insulate a wall? This guide breaks down the associated costs and variables to consider when setting your project budget.

Need to open up your living space or make room for a home addition? Use this guide to estimate the cost to remove a wall in your home before you start.
Learning how to insulate plaster walls can help improve your home's energy efficiency. However, there are crucial cautions to consider before attempting.

We’ll walk you through how to install spray foam insulation in your home—and when it makes sense to call in a pro.
Thick gaps and extra joint compound can alter the look of drywall. So, should drywall be butt up against a wall? Review this guide for seamless installation.

Removing old insulation may be necessary for upgrading your insulation. Keep reading to see if you should remove old insulation before adding new insulation.