Learn about the different factors that go into water heater gas valve replacement costs to see if you should DIY the project or call a pro.
Installing a water heater expansion tank requires you to expand your skills


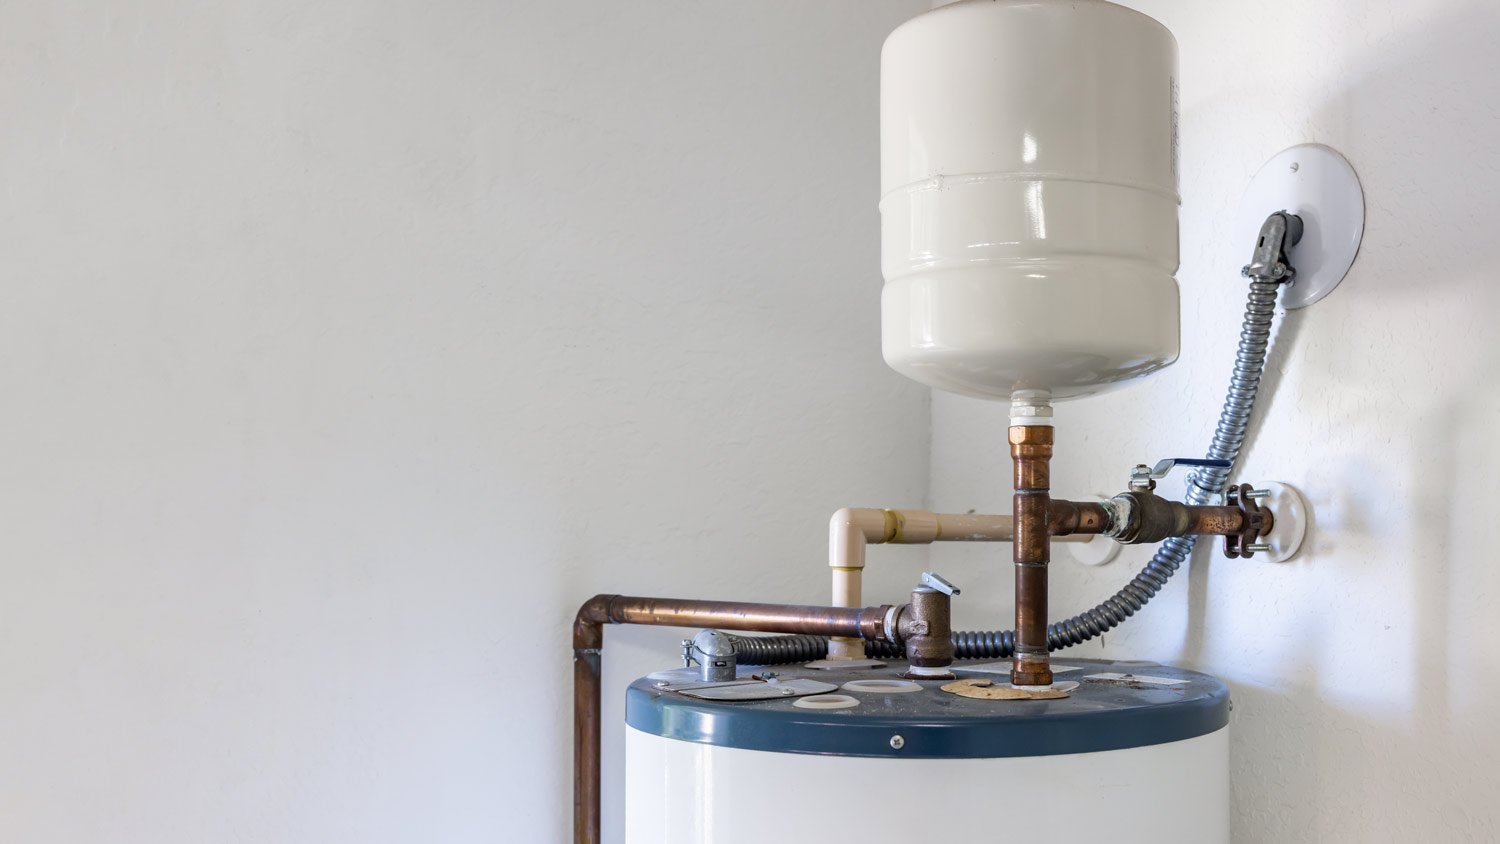
Don't put excess pressure on your plumbing system by skipping an expansion tank! A water heater expansion tank protects your plumbing system's fixtures and pipes by preventing excessive water pressure as the water heats up. You need one if your water heater is part of a closed system. Local building codes may also dictate that you need to install one. While this task is best left for professional plumbers or experienced DIYers, this guide to how to install a water heater expansion tank will walk you through all the steps!
When many people think of plumbers, they are often associated with repairing faucets and toilets or unclogging pipes. However, due to the certifications and intensive training required for this trade, plumbers have diverse skill sets and can also assist in areas like HVAC, water testing, and appliance installation, among others.
Start by sketching out your plan for how to install a water heater expansion tank. Create a diagram of how you intend to run a branch line from your hot water tank's cold-water supply to your expansion tank. Expansion tanks should be mounted as close to the water heater as possible. Ideally, you'll place your expansion tank at a vertical angle of at least 19 inches above your water heater. Don't hesitate to bring a plumber in to help you map everything out if placement isn't your specialty!

The first step is turning off the water supply to your home! Turn off your hot water heater next. You should also open the lowermost faucets in your home to drain pressure from your water line.
Think of the dielectric union as the translator between your water heater and expansion tank. This special adaptor is used to isolate the connections of dissimilar metals. With your water heater in the correct position, attach a dielectric union to its cold-water entry port. Next, use pipe-sealing tape to wrap the dielectric union's threads. The union can then be threaded into the cold-water inlet port on your water heater using pliers or a pipe wrench.

Carefully wrap a series of loops of pipe-sealing tape over the top threads of your dielectric union. Next, thread a female threaded copper adapter over the union. The last part of this step is tightening the copper adapter securely using your wrench or pliers.
Also known as a pipe tee, a tee fitting is a T-shaped pipe with two outlets that connect to the main line. The purpose of the tee fitting is to connect piping with a right angle linearly. To attach a tee fitting, install a short length of copper pipe and your tee fitting to the adapter on the dielectric union located on the water heater. When installing piping, you have the choice to either use the sweat-soldering method that involves a propane torch or purchase plastic or copper fittings offering push-fit connections.
Attach a short length of copper piping to the outlet on the tee fitting you just installed. When selecting your copper length, you'll need to improvise based on how much space is available. However, it's recommended to avoid going longer than 6 inches. The next part of this step is attaching a female threaded adapter. You again have the choice to either use the sweat-soldering method or push-fit connections.

Locate the threaded fitting on your expansion tank. Next, wrap pipe-sealing tape around the fitting. Carefully screw the fitting into the threaded adapter that is located on the unit's horizontal pipe. Be careful about over-tightening when screwing the fitting in place. While tighter is often better in most things related to home DIY, this is one case where you can easily damage pipes and fittings by being too aggressive.
In this "almost final step" for how to install a water heater expansion tank, connect the top outlet on the tee fitting to your cold-water supply pipe using your pipes and fittings. While you have the freedom to select the materials you want to use with this one, one pro tip is to use a flex line instead of a rigid line. Next, finish the connections between the hot water pipe and the water heater.

It's important to test your work before walking away. To do this, turn on the water heater. You'll then want to open the water valve that connects your home to its water supply to observe the unit's operation. Monitor the faucets that were opened to drain out at the start of the project. You can shut them once you observe a steady stream of water coming out from them. Finally, confirm that no leaks are occurring as the unit is operating. If you find that your water heater keeps tripping the breaker after your DIY installation, this is usually a sign that water is leaking onto electrical lines.
The complexity of this project isn't the only reason why hiring a local plumber that specializes in professional water heater installation is highly recommended. A pro can also help you to ensure you're addressing the right problem. After looking at your situation, a plumber can provide you with a quote for water heater repair cost, tankless water heater cost, or another service that will leave you with the best outcome.
From average costs to expert advice, get all the answers you need to get your job done.

Learn about the different factors that go into water heater gas valve replacement costs to see if you should DIY the project or call a pro.

Tankless water heater costs in Columbus, OH depend on the size of your water heater, location, fuel type, and more. Keep reading to calculate your expenses.

Find out the average tankless water heater repair cost, what impacts pricing, and how to save. Get expert tips to plan your repair budget with confidence.

What size water heater you need depends on the number of people in your household and how much water you use. Keep reading to learn about water heater sizing.

Water heater tank expansion installation diagrams can be helpful to have on hand whether you’re replacing an old unit or installing a new one.

If your water heater is getting warm but not hot, a faulty thermostat, sediment, or more could be to blame. Learn how to spot and solve the problem of a water heater that’s not hot enough.