Add a wow factor to your home with a chandelier. Chandelier installation costs depend on style, location, and labor, so learn what you can expect to budget.
Create interest in an empty space


You've made a home curated with unique pieces: It's time to highlight them. The wall sconce adds soft lighting with understated decorative flair to any space. Our easy guide can show you how to install a wall sconce in your home.
Once you've picked out your sconce, it's time to get prepped. Wall sconce installation is not that different from installing any light fixture—it starts with safety measures.
Before you start any project that involves electrical wiring and wall cutting, make sure you’ve got protective gear ready. Cut the power at the breaker box for starters. Protective work gloves, safety glasses, and a respiratory mask will help keep particulates and sharp edges from poking around where you don’t want them. Then, be sure your workspace is clear of clutter and tripping hazards.

Set yourself up for success with an organized work area. Create a workspace using a small table, and lay out your tools and supplies so they’re easy to find.
If light is an issue in your workspace, and it likely is if you are installing lighting, set up a floor lamp or other type of lighting using an extension cord to an outlet in another room. A well-lit space can make all the difference in a DIY project.
Unless you're replacing an existing wall light with a sconce, the location of your fixture will depend on where you find wiring. The simplest way is to run a wire from an outlet to the light switch and then run another wire from the light switch to the fixture.
Find an outlet close to your ideal location. Use your non-contact voltage tester to locate the path of the live wire up the wall and mark it. Use your stud finder to identify the studs on either side of your outlet. Mark them both. And when we say mark them, we mean make any marks with painter's tape—it's easy to remove and won't damage the paint surface.
If your preferred sconce location doesn't have a nearby power source to draw from, you may be wondering how to wire a sconce. Without previous electrical experience, this task may be a job for an electrician. They know about local regulations and required permits.

Plan to install the sconce above the outlet and between the wall studs. Generally, the ideal height for a sconce is between 48 and 72 inches from the floor. The light switch height should be about 48 inches from the floor.
If your sconce is going to serve as bedside lighting, choose the lower height, and place your light switch at a height that is comfortable to reach from your bed, around 36 inches.
Choose your ideal location for the switch and the sconce and mark them.
It's always a good idea to review the manufacturer's instructions and follow their safety precautions before installing new equipment, and wall sconces are no different. Note the recommended power requirements to ensure you aren't over capacity. You can check the requirements against the amp in the breaker box.
The dedicated switch for your outlet will likely say 15 amp or 20 amp. Set aside the mounting plate and any included screws for the plate installation, as well as any light bulbs or light shades.
This is also the ideal time to pre-assemble any parts that go together, depending on the type of sconce you choose.

Use your light switch device box as a template and outline it on the wall at your installation site using a pencil. If your sconce comes with a template, use it to trace an outline on the wall. If not, use the canopy or mounting plate to trace the hole for your light.
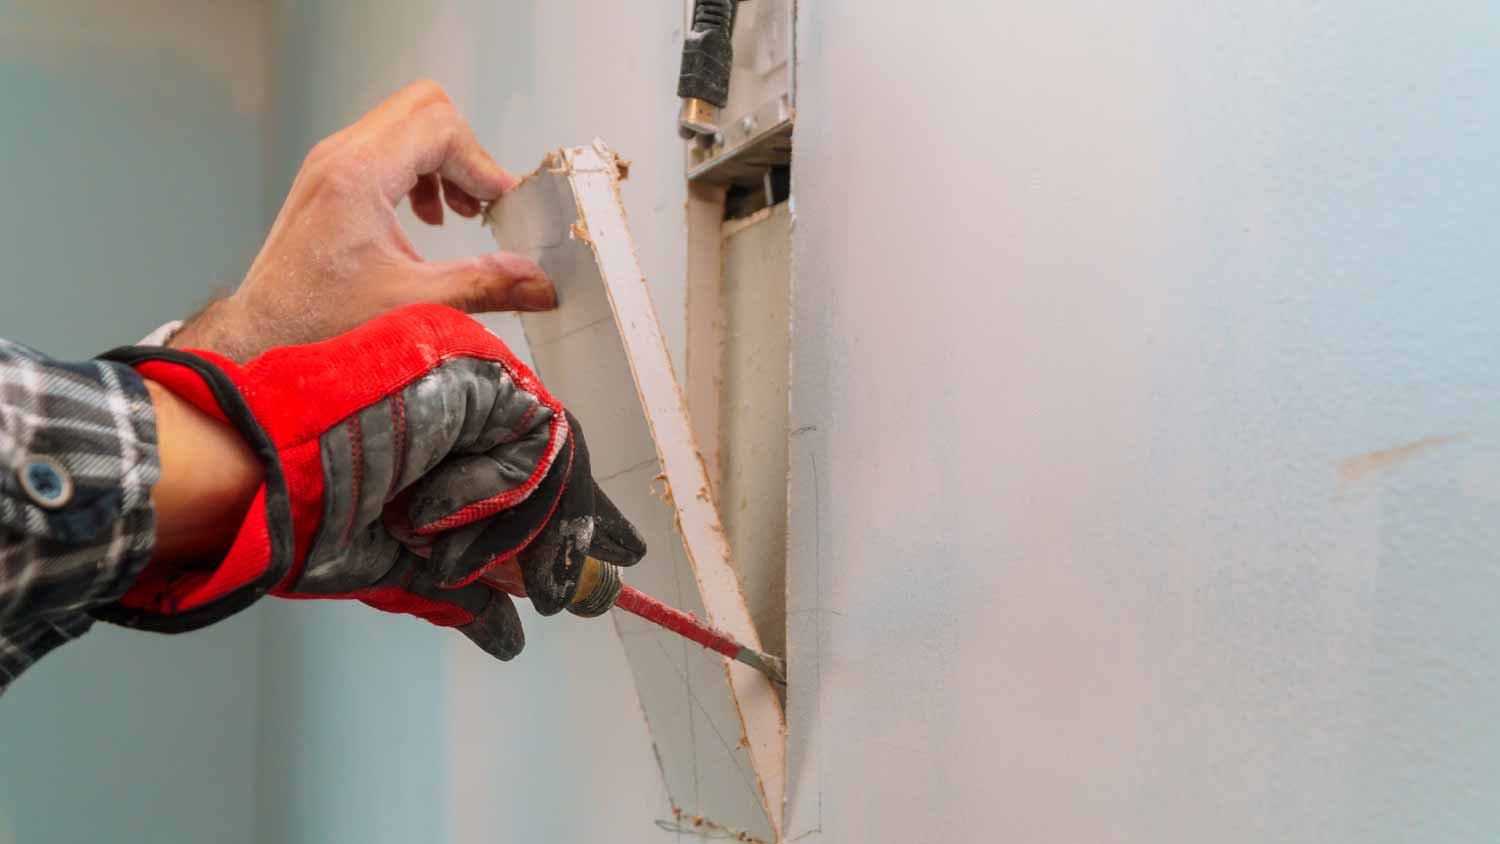
Use your drywall saw to cut the holes. Try not to jab too deep into the wall, or you may damage the insulation or other utilities running there.
Measure the amount of wiring you’ll need to hook up all the parts from the outlet to the sconce. It never hurts to cut a little more than you think you need in case of a calculation error.
This is when you double-check that the power in your work area is off. Then, it’s time to start wiring.
Use your screwdriver to remove the cover to the outlet. Unscrew the outlet and gently wiggle it out of the device box, leaving the ground wire in place. Remove the outlet to ensure you don't accidentally exceed the circuit capacity by plugging something into it. You'll put a blank wall plate on it at the end.
Getting the wire through the wall can be frustrating, but fish tape is sturdy enough to make the job easier. Using the fish tape, thread the new electrical wire from the light switch hole to the outlet. You'll want some excess to work with later, so leave about four to six inches of new cable hanging out both spots. This one is your incoming wire because it brings power from the outlet to the switch.
Repeat these steps to thread the electrical wire from the light switch to the sconce. This one is your outgoing wire because it takes power from the light switch to the fixture.

Familiarize yourself with the device box. Locate the back holes for the wires and the mounting screw holes. With the device box in your hand, thread both incoming and outgoing wires into the device box. Nest the box into the wall hole, and be careful not to let the wires fall into the wall.
Affix the device box to the wall using the included screws. Leave the four inches of wire hanging out of the wall.
Once you have the wires threaded through and the device box in place, you can connect the wires.
These are general instructions. Your sconce may be slightly different, so follow the manufacturer's instructions for the best results.
Holding the mounting plate in one hand, run the wire through the hole in the middle.
Anchor the mounting plate either into a stud or using drywall anchors: Don’t rely on drywall to hold the weight of your fixture.
Use your wire stripper to strip the electrical wire and expose the black and white wires and the ground wire.
Strip 3/4 inch of coating off of the black and white wires.
Locate the related wires in your new fixture.
Connect all the like-colored wires using the wire nuts.
Follow the manufacturer's instructions to finish the fixture installation.
Strip and expose the wires like before. Twist the old and new ground wires together with a wire connector. Do the same with the white wires, then tuck them all into the box.
Make J-hooks at the ends of the black wires. Attach the wires to the side of the light switch at the screws, and tighten the screws.
Inset the light switch and wires into the box. Lightly secure it at the top and bottom. Place the plate over the switch to check that the switch is centered. If it needs adjusting, gently wiggle it until it is centered. Tightly fasten the screws to secure the switch in place. Install the faceplate and gently fasten it in place. If you twist too tightly, you will crack the plate.
To connect the wire from the light switch to the outlet:
Strip the new wires like before.
Use wire connectors to connect the white wires.
Do the same with the black wires.
Add the new ground wire to the old ground wire and secure them back into place.
With all the wires connected, tuck them into the box.
Gently attach the blank plate using care not to crack the plate.

Now for the fun part. Head to the breaker box and flip the breaker back on. Turn on your wall sconce and enjoy your new lighting.
With the right tools and step-by-step instructions, you can DIY a sconce installation in as little as one afternoon. If you aren't comfortable with electricity or your home needs wiring installed, an electrician near you can tackle a job like this quickly and safely. They can also assess the ampacity of your wiring, help rough in the wiring, and set you up for success.
The average cost to install a wall sconce is $200. The cost of a sconce ranges from $10 to $1600 and the average cost is $75. The labor takes about 1.5 hours per light. An electrician will charge between $85 and $200 an hour. More experienced tradespeople tend to charge a higher rate to reflect their knowledge and expertise.
From average costs to expert advice, get all the answers you need to get your job done.

Add a wow factor to your home with a chandelier. Chandelier installation costs depend on style, location, and labor, so learn what you can expect to budget.

Discover the average wall sconce installation cost, key price factors, and ways to save on your lighting project. Get transparent, expert-backed cost info.

Discover the average cost of lighting design, including price ranges, key cost factors, and tips to help homeowners budget for their lighting project.

If you’re planning to install recessed lighting, one of the first things you’ll do is figure out how many recessed lights you need. Here’s how to do that.

Learn how much a light costs a year, so you can learn how to calculate the annual price for light fixtures and decide on the right bulbs for your home.

The right lighting can greatly enhance every living space in your home. Here’s a guide to help you choose between soft white vs. daylight light bulbs.