
Cedar, pine, cypress, or fir—wood siding is a durable and elegant choice for the outside of your home. Here are the wood siding costs to expect.
Protect and beautify your home the cost-effective way


Vinyl siding installation costs an average of $3 to $12 per square foot, but is worth the price considering how time-consuming the project is.
If you’re replacing existing vinyl siding, you’ll first need to remove it, which will add even more time to the project.
Installing vinyl siding requires precise measurements, so you’ll need to cut each piece accordingly with a circular saw.
To prevent water infiltration, window and door flashing must also be installed.
Installing siding for an entire house is a complex process, and a pro can tackle this job much faster with a team than by trying to DIY.
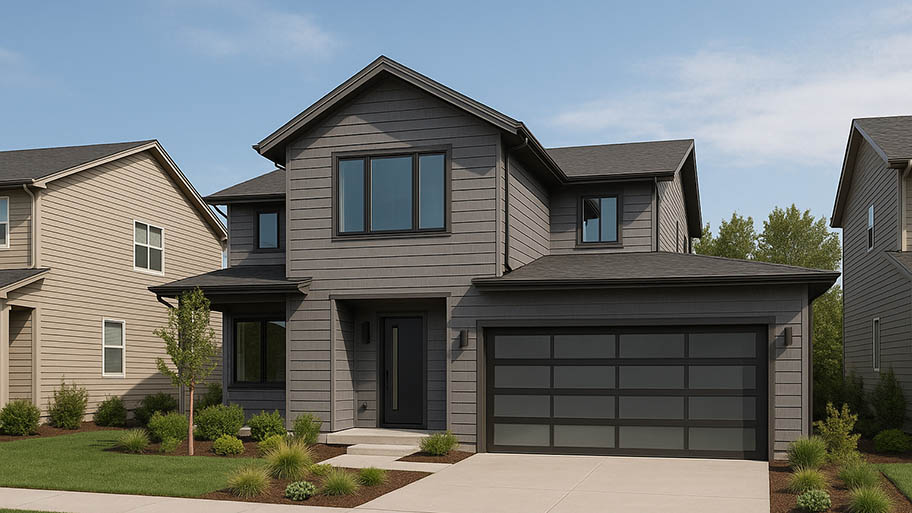
If you’re a handy homeowner looking to update your home’s exterior, it’s worth learning how to install vinyl siding as a DIY project. Before you take on this big home improvement job, it’s important to know how much it’ll cost and what the work entails. Read on for everything you need to know about installing your own vinyl siding—including how to install vinyl siding on a house.
There are a few vinyl siding pros and cons to consider. The dominant factors that make vinyl siding worth considering are its relatively low installation costs and virtually maintenance-free good looks. Vinyl siding is durable, too, but not so much so that it never needs replacing. Expect around 40 years of service before needing to replace vinyl siding due to fading, warping, and general deterioration.
Vinyl siding prices range from $3 to $12 per square foot, including installation, depending on style, quality, and options for insulation underneath. On average, vinyl siding material itself costs about $4 per square foot. Vinyl siding is designed to look like high-quality wood siding but costs an average of 25% less for the materials and is easier to install than other types.
Like any major DIY project, installing vinyl siding requires plenty of preparation. To avoid multiple, expensive delivery charges, measure twice and order once. Here are steps to take to prepare your home’s exterior for new vinyl siding.
Before installing vinyl siding on your home, it is crucial to acquire the necessary building permits from your local municipality. Building codes and regulations related to vinyl siding can vary by location, so it's essential to check with the appropriate authorities to ensure compliance. Obtaining the required permits ensures that the installation meets safety standards and legal requirements, providing you with peace of mind throughout the process. Check with your neighborhood’s HOA as well, as changes to a home’s exterior likely fall under HOA rules.
Recording accurate measurements is vital when planning for a vinyl siding installation. It goes beyond measuring the square footage of the walls. You need to consider the dimensions of soffits, the number of corners both inside and outside, and the total length of various trims like j-channel, undersill trim, and starter strip. Taking precise measurements helps you determine the necessary quantities of materials, ensuring a smooth and efficient installation process.
If you are replacing vinyl siding, it is essential to remove the old vinyl siding before installing the new one. However, if you plan to install vinyl siding over existing wood or other materials, you may not need to remove all the old siding. In such cases, it is crucial to inspect the existing siding and replace any rotten or damaged boards before proceeding with the installation. This ensures a solid and stable foundation for the new vinyl siding.
Before installing any type of vinyl siding, it is recommended to remove downspouts and exterior lights attached to the walls. By temporarily taking these fixtures down, you provide easier access to the siding installation area, allowing for a more precise and efficient installation process. Removing these items also prevents any damage to them during the installation and ensures that the siding is properly installed around them, providing a seamless and visually appealing result.
Installing a water-resistant barrier, such as a house wrap, is crucial when replacing old or inadequate siding. This barrier acts as a protective layer, preventing water from infiltrating behind the new vinyl siding and causing potential damage to the underlying structure. While some homes may already have a functioning moisture barrier, older properties or those with outdated siding may require a new installation. Adding this water-resistant barrier ensures the longevity and durability of your vinyl siding, providing an added layer of protection against moisture intrusion and potential issues like rot and mold.

Vinyl siding is a waterproof material. However, proper installation is crucial to protecting the walls underneath it from damage. Regardless of the style of vinyl siding, here are the steps to ensure an effective and long-lasting installation.
Soffit and fascia installation
Window and door flashing installation
Corners installation
Starter strips installation
J-channel and undersill trim installation
Horizontal vinyl siding panels installation
Vertical vinyl siding panels installation
Soffit and fascia go on first and are available in vinyl and aluminum options. Soffit and fascia are essential components of a building's exterior. The soffit is the underside of the roof overhang, while the fascia is the vertical board that runs along the edge of the roofline. These elements not only enhance the aesthetics of a home but also serve practical purposes by protecting the eaves, providing ventilation, and acting as a finishing touch.
Mark a level line on the wall under the eaves denoting the location of the aluminum f-channel that will hold one edge of the soffit.
Nail the f-channel in place with the tab reaching toward the roof if possible. In some areas, you may need to install the f-channel upside down.
Span the eave at the corners with aluminum j-channel either at a 45-degree angle or perpendicular to each other. Nail in place to the sub-fascia and tuck the other end into the f-channel.
Measure and cut each soffit panel to span the eave. The panels will reach from inside the f-channel to the outside, lower edge of the sub-fascia.
For each soffit piece, slip one edge of it into the f-channel and nail the other side to the sub-fascia. A trim nail set tool can come in handy here.
Continue until you cover all the eaves with soffit material.
Cut and measure each piece of aluminum fascia to fit the height and length of the sub-fascia.
Install each section of fascia by slipping the top edge under the roof’s drip edge and nailing it on the underside lip below the edge of the sub-fascia. You’ll be nailing through the lip of the fascia and the soffit’s edge.
Mark a level line on the wall under the eaves denoting the location of the vinyl f-channel that will hold one edge of the soffit.
Nail the f-channel in place with the tab reaching toward the roof if possible. In some areas, you may need to install the f-channel upside down.
Nail a second f-channel on the bottom edge of the sub-fascia. This channel will hold the other side of the soffit and create a lip for attaching the fascia.
Measure and cut the vinyl soffit leaving 1/8-inch clearance on the front and back to allow for expansion.
Slide the house-side edge of the soffit pieces into the f-channel on the wall. Gently bend the soffit material to slip the other side into the channel on the sub-fascia. You may also need to hold back the edge of the outer f-channel for enough clearance.
Continue until you cover all the eaves with soffit material.
Install undersill trim around the perimeter of the roofline on the sub-fascia’s front side.
Measure and cut the vinyl fascia to match the height of the sub-fascia from inside the undersill trim to under the soffit’s outer f-channel. Deduct 1/8-inch from the height measurement.
Use a snap lock punch to create a protruding tab every 16 inches along the top edge of the facia, starting at one inch from each end.
Slip the top edge of the fascia into the undersill trim until it locks. Then wrap the lower edge around the f-channel to snap the fascia in place.
Even if your moisture barrier is rock solid, your windows need extra protection from water. Window and door flashing is a protective barrier installed around windows and doors to prevent water infiltration and direct it away from the building, ensuring a watertight seal and preventing potential damage to the structure.
Check your local building code for guidance on installing flashing around windows and doors. The process varies for new and old windows and their types.
Install flashing, flashing tape, or both around each window and door according to the building code relating to your situation.
Install the corners before any other trim to ensure that they’ll be plumb and straight at the end of the project.
Cut the outside corners to length plus four inches to create a cap at each end.
At each end, remove two inches of the j-channel part of the corner piece and make a 2-inch vertical cut at the corner's apex.
Fold the two tabs inward to create a cap for the corner post. You may choose to rivet the tabs together. Trim the length of the tabs to fit snugly against the wall.
To extend a corner higher than the length of one corner piece, make the same cuts as you would if making a cap but don’t fold the tabs over.
For tall corners, insert the lower piece’s cut tabs from the earlier step into the uncut bottom of the higher corner piece.
Install the corner piece with roofing-type nails at the top of the holes in the nailing flange to allow it to hang. Don’t hammer the nails flush. Allow a small gap between the nail’s head and the PVC so the vinyl can expand and contract without obstruction. Check both sides of the corners for plumb as you go.
Measure and cut the inside corners with aviation snips.
Install them by nailing loosely at the top of the holes on the nailing strip.
Measure and cut two pieces of j-trim to match the length of the inside corner.
Decide which side of the corner you want the j-channel to be exposed.
Install the “hidden” side j-channel by nailing it loosely at the top of the holes.
Install the second side directly adjacent to the first in the same way.
Installation starter strips are the foundational components of a vinyl siding installation, serving as the base where the first row of siding is secured and providing a level and secure starting point for the rest of the siding installation. The starter strip may be aluminum, steel, or vinyl and is available in various widths.
Snap a level chalk line where the top of the starter strip will be on each wall. The bottom of the starter strip should be 1/4 inch above the bottom of the corner trim. Overhang the foundation block by at least one inch. More is better.
Nail the starter strip to the wall every 16 inches. Nail metal starter strips tightly, and vinyl strips loosely.
J-channel trim installation can make or break the beauty of the installation.
J-channel is a vinyl trim used in siding installations that creates a finished edge around windows, doors, and other openings, providing a neat and clean appearance, while undersill trim is a vinyl accessory that is installed underneath the bottom edge of the siding panels to enhance the overall aesthetic and provide a smooth transition between the siding and the foundation or soffit. Take plenty of time to get this step right.
When installing j-channel, keep water flow in mind and create tabs on the perpendicular side of the channel where two pieces meet at a corner to direct water away. Fold the tab over into the lower piece of trim.
Loosely nail j-channel around all sides of each window, door, and other obstructions.
Install j-channel along sloped edges of the wall.
Install wired lighting mounting boxes and gable vents while installing the j-channel.
Leave a small gap where the j-channel meets vertical channels, such as corner posts, to allow water to escape.
Install undersill trim under each window and along horizontal tops of walls. Nail in place loosely.
“One tool that I always carry is a vinyl siding removal tool, also called a zip tool,” says Tschudi. “It’s inexpensive and if you have to undo a panel, you won’t get pinched fingers.”
Here’s how to lay your horizontal vinyl panels.
Install the first row of siding panels by snapping the bottom edge to the lip of the starter strip and loosely nailing the top edge. Leave a 1/8-inch gap at corners and edges for expansion. Place the nails towards the center of the nailing holes.
Overlap each successive panel by at least one inch, but not more than 1-1/2-inches.
Stagger the edge seams by two feet from one row to the next.
When you reach the window bottoms and the top of the wall, use your snap lock punch to create tabs to lock the panels into the undersill trim.
Tuck angled edges of the siding panels into the j-channel and fasten the panels using whatever nailing strip length is available.
Putting up vertical vinyl panels is similar to installing horizontal ones. Here are the main differences:
Hang vertical siding by nailing at the top of the nailing strip holes instead of the center.
Undersill trim locations on vertical panels are different from horizontal panels; they hold one side of the panels rather than the top edges in place.

“If you are installing vinyl siding for the first time, save the front of the house for last,” says Bob Tschudi, Expert Review Board member and North Carolina-based home builder and remodeler. “By the time you get to the front, you’ll have made your mistakes and you can maximize your home’s curb appeal.”
Keep the following tips in mind to make the process as smooth as possible.
Purchase and use a vinyl siding blade for your circular saw for making panel cuts.
At angled edges, use the discarded portion of the last panel as a template for the next panel’s cut.
Check the siding panel often for level as you work your way up the wall.
Never pull hard on a panel to “stretch” it back into a level position.
For added style, you can install horizontal vinyl siding at an angle. Remember to nail towards the top of the nailing holes and let the panels “hang.”
When installing a panel towards the top of a gable end, use the top of the previous row as a measurement for the bottom of the next row.
In some cases, to avoid placing a nail through the panel at the apex of a gable end, hide two small pieces of undersill trim under the j-channel to secure the last piece of siding.
Although the material is nearly maintenance-free, keeping your vinyl siding clean and promptly repairing siding damage will make it last for several years.
Most homeowners opt to hire a local siding company to install vinyl, but it’s not an out-of-reach project for highly skilled DIYers. You can save $2.15 to $5.25 per square foot in labor costs if you do the project yourself. However, it will cost you your free time and a bit of elbow grease. Professionals have the tools and the multi-person teams to ensure that the final product is perfect.
From average costs to expert advice, get all the answers you need to get your job done.
Cedar, pine, cypress, or fir—wood siding is a durable and elegant choice for the outside of your home. Here are the wood siding costs to expect.

Learn about the average siding repair cost to expect based on siding type, repair type, and extra labor when getting estimates to fix siding from contractors.

How much does liquid siding cost? Our liquid vinyl siding price guide breaks down material and labor costs—and points to potential savings.

Frieze board can transform a home by adding depth and style. Keep reading to learn what frieze board is and how to use it to enhance your home’s appearance.

Covering homes in asbestos siding was common before its health risks were revealed, but what is asbestos siding? Find out what it is and what to do if you have it.

Need new siding but want a unique appearance and boosted home value? Use this guide on mixing siding types to nail that aesthetic and curb appeal.