How to Install a Pre-Hung Door in 11 Steps
Be prepared to install your prehung door in less than a day


- Electric drill and drill set
- Circular hand saw
- Reciprocating saw
- Measuring tape
- A 4-foot carpenter’s level
- Pre-hung door
- Wood shims
- 2 1/2-inch finish nails
- Door hardware (optional)
- 3-inch head screws (optional)
If you’re tired of staring at a door that’s seen better days, you might decide to tackle this project on your own. Before starting, you need to know how to install a pre-hung door. In this guide, you’ll get a step-by-step plan for hanging a pre-hung door and guidance on when to call a pro for a door replacement.
Sketch the Door
If you haven’t already removed your door, you’ll want to follow this step first before installing your pre-hung door. If you’ve already removed your door, door trim, and jamb, skip ahead to measuring the rough opening. Start by making a rough sketch of your door. On it, you’ll jot down if you have an inswing or outswing door, a right-hand or left-hand door, as well as the placement of your door handle. You’ll need this information to order a pre-hung door.
To determine the handedness and swing of your door, stand outside the room. Then, place your back on the hinged side of the door and note which hand is closest to the doorknob. If your right hand is closer, it's a right-handed door, and vice versa. Now, open your door. If it swings toward you while standing outside the room, it’s an outswing door. If it swings away from you, inside the room, it’s an inswing door.
Remove the Door
To remove the door, take off the hinge pins with a screwdriver and hammer. Have a friend on hand to steady the door and work upward, starting with the bottom hinge. Don’t be afraid to use a bit of force to remove the pins if they’re stuck.
Remove the Door Trim and Jamb
To remove the door trim, cut around the edges using a utility knife—this will separate and loosen the trim. Remove the door header and side trim using the back of your hammer as leverage. Put the trim you removed to the side. Once all the trim is removed, focus on the door jamb.
First, remove any screws (including the hinge screw and plate) and loosen the nails that hold the door jamb in place. Use your hammer as leverage to pull the jamb away from the wall and completely remove the door jamb. In some cases, with older or thicker door jambs, it may be necessary to use a reciprocating saw to remove the jamb. If needed, carefully make a cut halfway up the door jamb on each side. This will make it easier, so you can remove the door jamb in pieces. Make sure a friend supports the upper pieces of the door jamb so they don’t fall.
Once you’ve successfully removed the door jamb and trim, carefully remove any remaining nails or screws from the wall and clean away debris from the rough opening. If you plan to smooth, paint, or make any alterations to the surrounding wall, now’s the time. You can always make touch-ups later if necessary.
Measure the Rough Opening
 Photo: yamasan / Getty Images
Accurate measurements are key to learning how to hang a pre-hung door. Double-check your measurements before purchasing your door, and when in doubt, ask a pro. To measure the width of the rough opening, measure the two-by-four present at the door header or the distance between the two existing door studs. The pre-hung door needs enough clearance so you can square it. The rough opening should be 1 ½ to 2 1/2 inches larger than the pre-hung door, including the jamb.
Then, you’ll want to measure from the floor to the top of the rough opening to get its height. Pre-hung doors will have extra space at the bottom of the side jambs for minor adjustments. Keep in mind that there will be a difference in the measurements if you’re also installing new flooring versus working with existing flooring. The door must clear the floor by about 1/8 to 1/2 of an inch (check your local building codes). Leave approximately 2 inches if you’re installing a new floor.
Then, measure the wall depth so you can match the door size and avoid the door or jamb protruding from the wall. Compare your measurements to the previous door and allow for adjustments.
Double-Check Measurements
Take the time to double-check your measurements and measure at different points on your door. Buildings can settle over time, resulting in some inconsistencies in level and plumb. Knowing about these factors beforehand can help you troubleshoot any issues with your pre-hung door.
Set the Door in the Rough Opening
If you purchased an unpainted door, you’ll need to learn how to paint your door first. But if you’ve prepped and measured your door and it’s already painted, it’s time to install it. You’ll want a friend on hand to help with the heavy lifting.
Before you begin, ensure the door you ordered meets your desired specifications. Assuming all is well, remove any packaging or cardboard that could interfere with installation. When in doubt, refer to the manufacturer’s instructions. Then, with a friend, position the pre-hung door in the rough opening. Check to make sure the door can open and close freely and that the door jamb is the correct height.
Adjust and Secure the Door Jamb and Shims
Next, adjust the door jamb as needed. If it’s too tall and won’t fit in the rough opening, measure the height difference and use your circular saw to remove extra wood from the end of your door jambs. If the side jambs seem too short—or you need to leave room for flooring—use wood shims underneath the side jambs to raise the height for the pre-hung door.
Install Your Pre-Hung Interior Door
Now comes the tricky part: installing your pre-hung interior door. Don’t worry, we’ve got the details ready for you. First, you’ll level it using your carpenter’s level and measure the door to see if it’s level and plumb. You’ll need to do some adjusting so your door is square and the jambs are flush with the wall. If the top of the door is not level, add shims at the bottom jamb to raise the uneven side until the door is level.
Then, you’ll need to ensure it's plumb. Start at the top of the hinge side jamb and add shims above each hinge between the jamb and the wall. Use your level to check that it’s plumb and adjust as necessary. Use a finish nail to secure the shims. You may want to avoid driving the nail completely into the wall so you have some room to make adjustments after you shim the other side.
Next, add shims on the latch side of the door directly across from the hinge side shims. Measure with your carpenter's level and add extra shims to plumb the door where necessary. Secure this side with finish nails, just as you did on the hinge side.
Check the manufacturer’s guidelines for other suggested shim locations for your pre-hung door. There may be locations along the top or bottom of the door. You’ll want to have shims in place anywhere you’ll use a finish nail—which can vary—but it’s usually at intervals between 12 and 16 inches.
Double-Check Adjustments
Once you think your door is adjusted and in place, use your carpenter’s level to double-check the adjustments you made. Use a carpenter’s square to check that your doorframe is 90 degrees in each corner, AKA square. Now is also a good time to check that your reveal—the gaps between the door and the doorframe—is even all the way around the door.
Then, open and close the door, confirming that everything aligns and the lock side of the door is making aligned contact with the jamb stop. Adjust the shims as needed. This will help ensure that your door hardware lines up once the door is in place. This is also a great time to double-check the swing and floor clearance of your door. If you make any adjustments to the shims, you should re-check that the door is level, plumb, and square.
Secure and Trim Shims
Once you’re sure, nail your wood shims to the wall with finish nails. You or a friend may want to hold the shims to prevent them from spinning. Then, carefully trim the edges of the shims using whatever method you are comfortable with. Make sure to cut your shims so they don’t reach beyond the drywall and won’t interfere with installing your door trim. We recommend carefully scoring the shims with a utility knife so they can be easily snapped off. For safety, close your utility knife before snapping off the shims.
Add Door Trim and Door Hardware
 Photo: Maksim Kostenko / Adobe Stock
Now that your door is installed, it’s time to add the finishing touches, trim, and door hardware. First, have your helper steady the door and replace the hinge screws, starting with the bottom screw plate. Unscrew the center screw and remove it. Drill a pilot hole, then replace the center screw with a 3-inch head screw for extra stability. Repeat this process on all of the door hinges.
Next, you’ll want to install your door hardware. Often, you’ll need to buy these finishing touches separately. You’ll want to attach the doorknob, lockset, and strike plate. This step should be a cinch if you’ve done a good job keeping your door level, plumb, and square. Finally, as a finishing touch, add trim. If you saved your original trim, you can reattach it. Some pre-hung doors come with pre-installed trim, in which case you might be set—or the trim might simply snap into place.
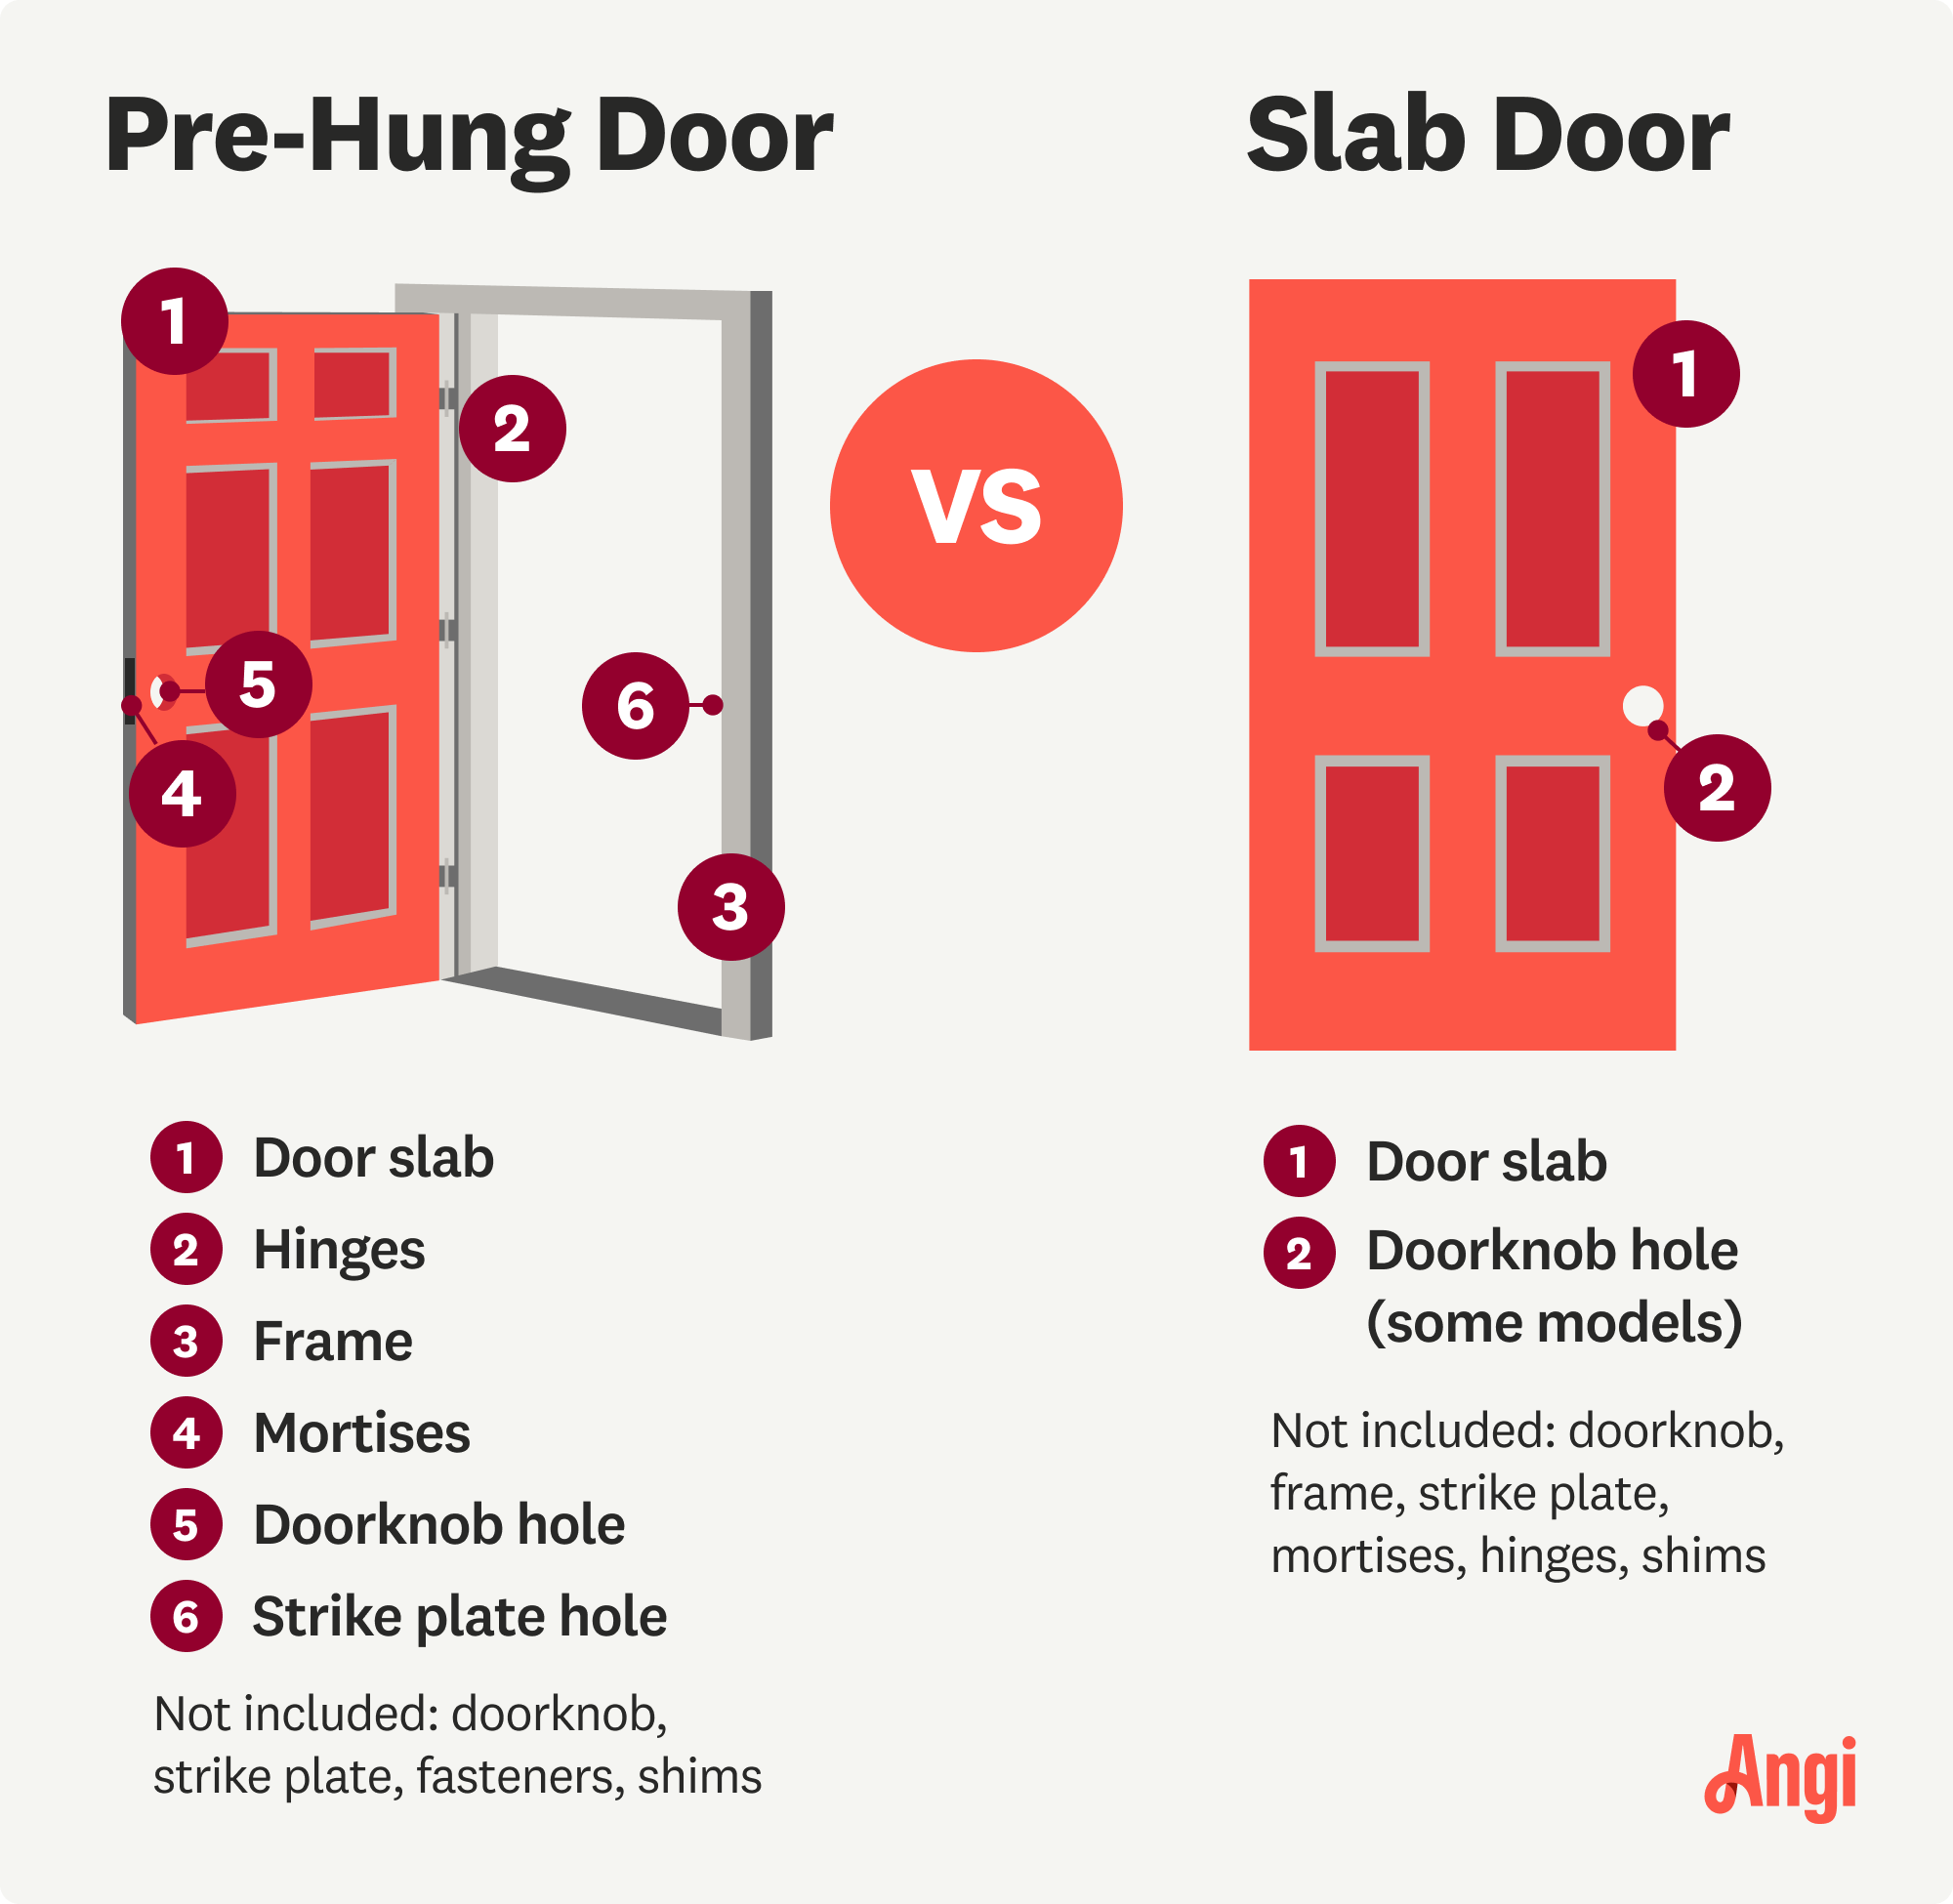
Benefits of Installing a Pre-Hung Door
The greatest benefit of installing a pre-hung door is that it’s much easier for a DIYer to do than installing a slab door. It comes with a frame, pre-attached hinges, a cutout for the strike plate, and a hole for the doorknob. This comes in handy when tackling a home renovation and needing to install multiple doors. Pre-hung doors are also the go-to for exterior doors because the tight fit in the frame offers more weather resistance.
However, before choosing a door, take some time to weigh the disadvantages of pre-hung doors. They’re heavier to handle than a slab door, so you might need a buddy to help move it during the installation. They also cost more, although it might be worth it since you won’t have to build a frame or worry about proper hinge installation.
Installing a Pre-Hung Door: DIY vs. Hiring a Pro
This project is doable once you know how to install a pre-hung door and are ready to roll up your sleeves. You can save on labor fees and spend up to $500, with the bulk of that price going to the door itself. However, measuring (and measuring again) and making the necessary adjustments for a level and plumb door is essential to this project’s success. If you’re not confident you can install a properly functioning door, contact a local door installer for help.
These pros have the skills and tools to handle all the measuring and adjusting your door needs. They can also safely pick up and position your door for you, which is key if someone can’t be there to help you install it. An interior door installation costs about $800.
How Much Does It Cost to Install a Pre-Hung Door?
It costs between $300 and $2,400 to install a pre-hung door, including labor. The biggest factor influencing cost is whether this is an exterior or interior door—the former will cost much more. Other cost factors include the door’s width and material.
Frequently Asked Questions
Technically, you can install a pre-hung door in an existing frame. However, the hardware from your new door might not align with your existing hinges, lockset, and strike plate. You’ll need to reconfigure it for a better fit. If you only need to replace the door, consider getting a door slab. It’ll be easier to work with and more wallet-friendly.
You’ll need screws and nails to install a pre-hung door, since they serve different purposes. Screws will help you hold up your door on the hinge side and provide additional strength against brute force on the latch side. Meanwhile, nails are more flexible and are needed to secure your shims and door jambs.
It’s easier to install a pre-hung door than a slab, especially if it’s on the exterior. Pre-hung doors come with hinges and hardware installed, and exterior pre-hung doors are already weatherproofed, so you won’t need to worry about waterproofing the jamb. Pre-hung doors are heavier, so handling them can be a little harder, but they’re quicker and simpler to attach.


Get our Angi-powered app


