The cost of siding repair varies depending on material, design, and damage. This helpful guide covers the siding repair costs to expect in Columbus, Ohio.
What’s old is new: Board and batten is back in style


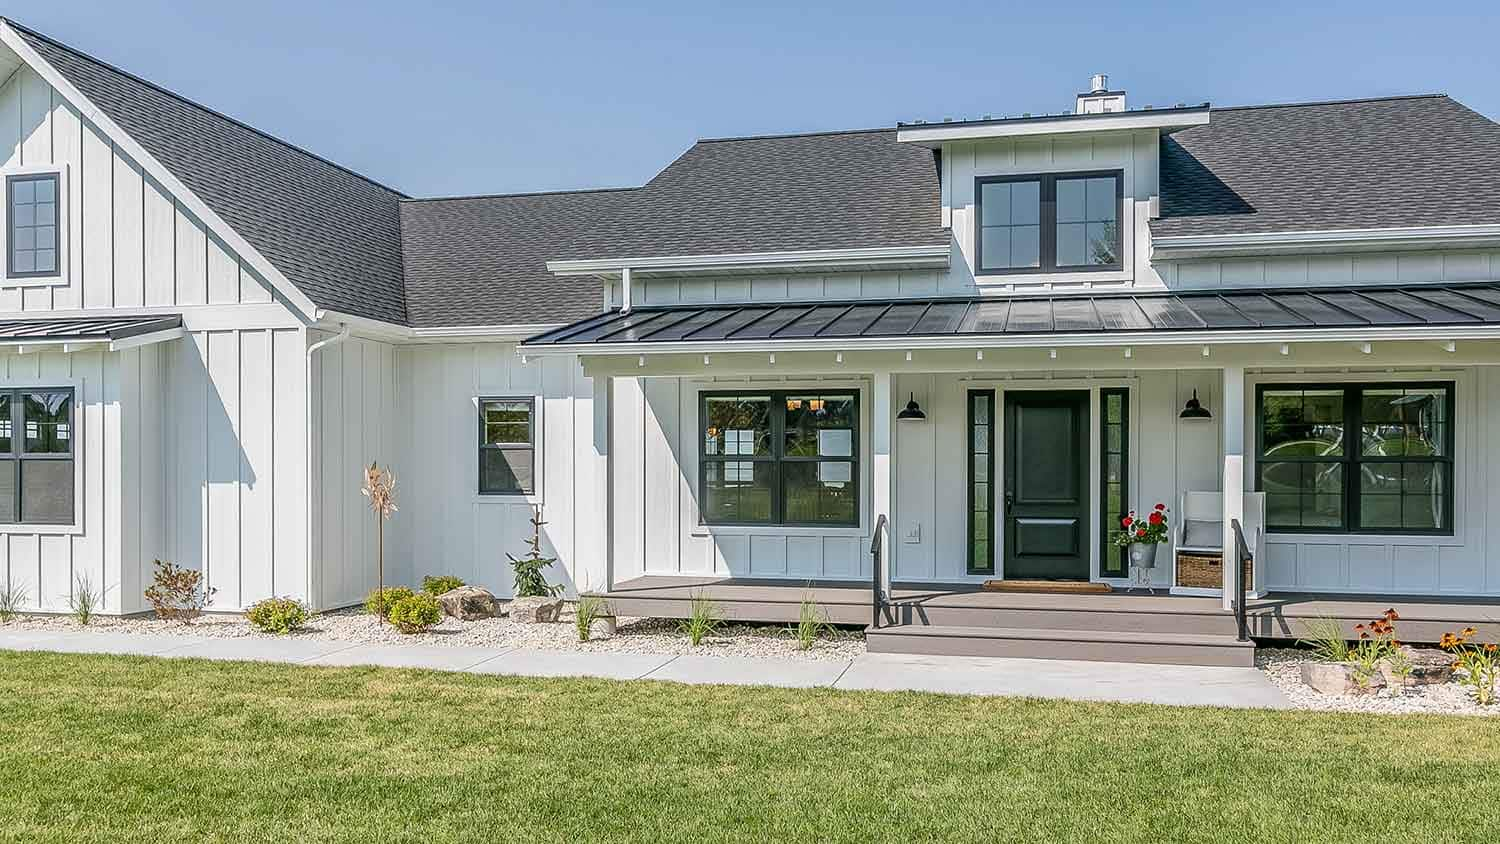
Board and batten siding is having a renaissance moment. Originally, barns, sheds, and older homes in the United States might have used board and batten siding—vertical wood boards separated by a thinner strip of molding (batten). Today, homeowners sometimes replicate that style for a charming, rustic exterior. Below, we’ll show you how to install board and batten siding on your own—though it’s a more complicated project that might be better suited to a local siding contractor.
You can install board and batten siding over the entire exterior of your home or choose to use it strategically on certain portions of your exterior, as an accent piece. While wood is still as popular a choice for board and batten as it was two centuries ago, you can also choose from other types of siding, including vinyl, metal, and fiber cement.
Before you can begin installing your board and batten siding, you’ll need to do some prep work, including:
Figure out how much materials you’ll need for your siding by measuring each of the walls included in the project. The lengths and height of the walls will determine what size boards (and battens) you purchase—and how many.
For example, you could use 1x12-inch boards and 4-inch-wide battens. Because you want your battens to overlap your boards on either side by at least ¾ of an inch, you can plan for 2½ inches of space between each board. Knowing the size of the walls you’re covering and the dimensions of your boards and battens, you can figure out just how many of each to order.
You’ll need to use a level and carpenter’s square for any gables, since you’ll need to cut boards and battens at an angle for the install. This will lead to some wasted material, so it’s always smart to order 10% to 20% more than you actually need.
At this point, you’ll also want to decide what type of boards you want to use. You can choose from several types of wood siding, including engineered wood. Alternatively, you can use fiber cement, metal, or vinyl siding; all of these are more low-maintenance siding options but might not have the same rustic charm as true wood siding.
A major component of any siding project is removing the old siding before installing the new siding. If you’re doing this work yourself, this won’t add to your overall siding replacement costs—but it will increase the overall project time. It could take half a day or more, depending on the size of your home.
Depending on the siding you ordered, you may want to paint or stain it. We recommend doing this treatment before installing it, as it’s easier and faster.
Alternatively, you can hire a local painter to paint the siding after it’s installed—or at any point down the road if you’d like to change up the look of your board and batten exterior.
Once your preparation is done, the real work can begin. Here’s how to install board and batten siding in six easy steps.

Before you can start installing the boards, protect your home by applying a water-resistant barrier over the wall sheathing. You can fasten it with staples and cut out openings for doors, windows, and vents with a utility knife.
You should also install self-stick flashing around windows and doors and at the corners of walls.
To start, you’ll need to install a skirt board around the perimeter of the house, right below where the siding will bottom out. Make sure the lumber you use for the skirt board is wider than the boards you’ll be installing above. If your siding is going all the way down the house, you’ll want the bottom of your skirt board to hit 2 inches below the sill plate.
Snap a chalk line to ensure you install the skirt board straight across. Check your work with a level. To attach the skirt board, hammer in two or three vertical nails roughly every 1½ to 2 feet. You can also use a nail gun for this work—it’ll make a huge difference if it’s a big project and you’re tackling it solo.
For long sections of skirt board, join multiple skirt boards together with a scarf joint. You’ll need a miter saw to cut this joint.
After you’ve installed the skirt board, create a drip edge by installing metal flashing on top of the skirt board.

For board and batten installations, you’ll nail in the lumber to solid plywood or oriented strand board (OSB) behind the wall sheathing. If there isn’t plywood or OSB behind the sheathing, you’ll need to install vertical wood strips, called furring strips, at intervals ½- to 2-foot intervals up the wall so you have something to nail your boards and battens into.
You should also install furring strips around all windows, doors, and air vents.
Install your first board at the edge of the wall, about ¼ inch in from the corner if you plan to add corner trim. The bottom of the board should rest atop the drip edge you created in step 2. Use a level to ensure the board is perfectly plumb, then nail it into place at 1½- to 2-foot intervals. (If you installed furring strips, you’ll be nailing the board into these strips, rather than plywood behind the sheathing.)
Use two nails at the top, bottom, and at each interval. Either nail should be about ⅓ of the way in from the side of the board. For example, if you’re using 1x12-inch boards, you’ll hammer your nails in at the 4- and 8-inch marks.
Use a piece of lumber with the width of your planned gaps to serve as a spacer. Wedge this spacer up against the first board you’ve installed, then line your second board up with the other side of the spacer.
Nail in the second board as you did the first, move the spacer to the other side of the second board, and continue down the row, installing more boards in this fashion.
You may need to make special, angled cuts to work around gables, doors, windows, and air vents.
Use a batten to install a top trim, butted up against the soffit. This will cover any gap between the boards and the roof and will serve as a top piece for the battens to be installed vertically.

Place your battens over the gaps between boards. Ensure each batten is dead center over the gap, leaving at least ¾ of an inch on each side to overlap with the boards. You’ll need to use longer nails than you did for installing the boards.
Once you’ve installed the last batten, you can also install corner trim for your walls, if desired.
Installing board and batten siding is more manageable for the average homeowner than other types of siding installs, like installing brick veneer. Board and batten installs are more complicated, however, than installing other types of wood siding.
If you don’t have prior experience with siding a house, it’s usually a good idea to hire a contractor. They’ll be able to tackle the job more quickly and ensure a proper install that doesn’t risk water damage.
From average costs to expert advice, get all the answers you need to get your job done.

The cost of siding repair varies depending on material, design, and damage. This helpful guide covers the siding repair costs to expect in Columbus, Ohio.

In addition to protecting against extreme Midwest temperatures, new siding in Columbus adds curb appeal. Learn about siding replacement cost in Columbus.

New vinyl siding adds value and curb appeal to homes in Columbus, Ohio. Learn about average vinyl siding installation costs in Columbus, Ohio.

Knowing whether to install windows or siding first can save you time and money on your renovations. Here’s everything you need to know before you get started.

Determining how much EIFS costs per square foot is the key to predicting your bottom line when replacing or installing this long-lasting home cladding option.

If you have woodpeckers pecking on your house, you may be at your wit's end. Read this to learn how to stop woodpeckers from pecking your house.