

•
Discover how much under-cabinet lighting costs. Discover installation prices, key cost factors, and expert tips to save on your kitchen or workspace lighting project.
Shine a light on your well-styled home


Ready to illuminate a dark space in your home? If questions like this have you wondering how hard it is to install a light fixture, we've got the answer and a step-by-step guide on how to do it. Learn more about installing a light fixture to see if you feel comfortable doing it on your own.
Once you know how to install a light fixture, you’ll have a little more info in case you ever want to change a light fixture. In any electrical project, safety is a top concern. Always start by shutting off power to your work area.
Wearing protective gear like work gloves, safety goggles, and a respiratory mask helps protect you from fiberglass insulation that might fall, sharp edges, and any other particulates you might run into. You should also keep your workspace safe by removing clutter and tripping hazards and using caution on ladders.
Set up your workspace, so everything you need is within easy reach. Use a table to set out your materials in a way that makes them quick and easy to find—small containers like tin cans or plastic tubs keep smaller objects such as screws and rings in one place.
If there are no windows in the space, you can set up a flood or floor lamp using an extension cord to an outlet outside of your work area. Working in the dark is an added challenge you don’t need.
If your home isn’t pre-wired for a new light, the location of your fixture depends on where you find power. A non-contact voltage tester can help you find a power source—look for an outlet closest to where you want to install your fixture.
Use painter's tape to mark the fixture location, where you want your light switch, and the power source you are taking from. Keep it simple and put the light switch directly above the outlet. Plan to run the wire from the outlet or junction box to the new fixture and then to the light switch. It's easier if you have access to an unfinished attic or crawlspace above or below your work area. Otherwise, you can make holes in the drywall for every stud you want to cross.

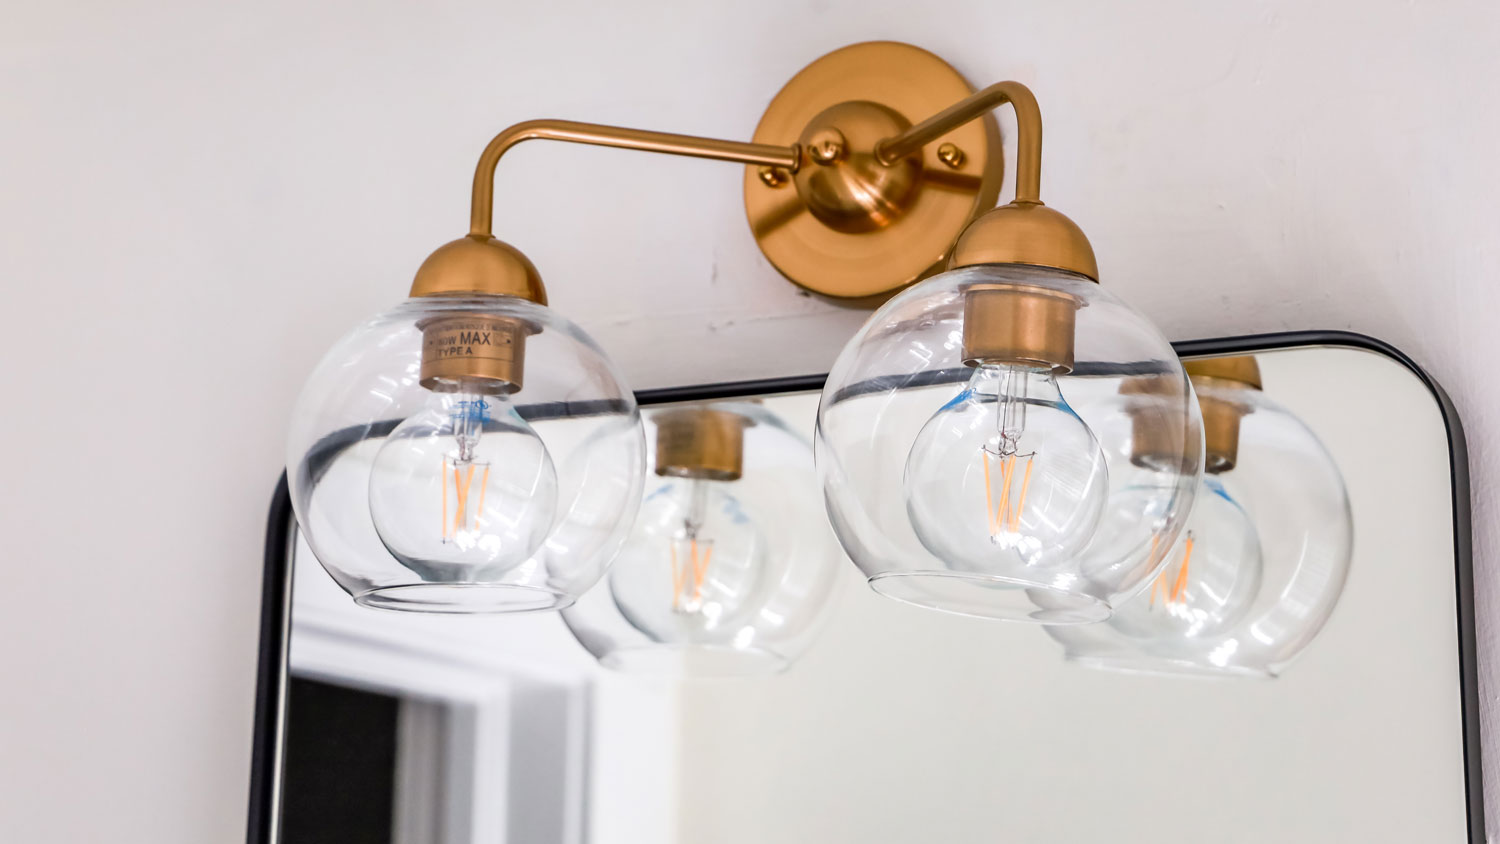
Take your light fixture out of the box and review the manufacturer’s instructions. Depending on the type of light fixture, pre-assemble any parts that can go together now. Double-check that your fixture doesn’t require more power than you have. And be sure to set aside the mounting plate and any included screws for the plate installation.
You don’t want to add drywall repair to your list of things to do for this project, so plan carefully. Use your drywall saw to cut the holes for your light fixture and light switch box. Try not to jab too deep into the wall, or you may damage the insulation or other utilities running there.
Measure the length of electrical wire you need to run from the outlet to the light switch and from the light switch to the fixture, along the route you planned. Add extra for error and cut your wire. Use your tape to mark both wires at both ends, so you know which is which.

Remove the cover to the outlet and remove the outlet, leaving the ground wire in place. You don’t want to exceed the circuit capacity, so remove the outlet and put a blank wall plate on it at the end.
Here’s where things get tricky, but fish tape can be a big help. Use the fish tape to thread a new electrical wire from the outlet to the light switch hole. Leave 4 to 6 inches of new cable hanging out of the junction box and the light switch box, and move to the next step.
While you can DIY this all on your own, this part is best done with a helper. If you are working from an attic, have one person use the fish tape to run one end of the wire into the wall through the ceiling, along the joist, and down the light switch hole. The other person will watch for the wire and pull it through the light switch hole. Repeat for the fixture hole.
Once the wire is through both the fixture hole and the switch hole, tack it to a joist in the attic to keep it from being pulled either way. Now, you should have one old wire and one new wire at the outlet site, two new wires hanging out of the light switch hole, and one new wire hanging from the light fixture.

Start by running the new wire through the mounting plate. Anchor the mounting plate to the wall stud: Don’t rely on drywall to hold the weight of your fixture.
With the wire hanging down from the hole in the mounting plate, you can attach the fixture.
Strip the electrical wire to expose the black and white wires and the ground wire.
Locate the related wires in your new fixture.
Connect all the like-colored wires using the wire nuts. You may need a partner to hold the fixture while you connect the wires.
Follow the manufacturer’s instructions on the best place to put the wires, either in the ceiling or in the fixture.
Attach the light fixture according to the instructions.
First, knock out the cable holes in the device box. Thread the two electrical wires through the holes in the box and secure the box to the wall. It should be as flush to the wall as possible.
In the device box, strip the wires exposing the three smaller wires, then strip the white and black coated wires exposing about 3/4 of an inch of raw wire. Twist the old and new ground wires together with a wire connector. Do the same with the white wires. Tuck them all into the box.
Make J-hooks at the ends of the black wires. Attach the wires to the side of the light switch at the screws, and tighten the screws. Install the light switch into the box and lightly secure it into place at the top and bottom. Check that the switch is centered by placing the plate over top. If it needs adjusting, you can wiggle it gently left and right until you have it centered. Tightly fasten the screws, and then place the plate over top and fasten it in place.
Now connect the wire from the light switch to the outlet. Strip the wires as you did in the section above. Use wire connectors to connect the white wires together and the black wires together Add the new ground wire to the old ground wire and secure them back into place. With all the wires connected, tuck them into the box. Attach the blank plate.
At the breaker box, flip the power back on. Flip your light switch on and enjoy your new lighting.
If you have the tools and intermediate knowledge of electrical wiring and local building codes, installing a light fixture is a simple task that can save you a couple hundred dollars. Most of the cost to install a light fixture professionally is labor. The average cost is $550 and can range from $150 to $950. The labor takes about 1.5 hours per light at up to $200 an hour.
If you are wondering how to install a light fixture without existing wiring, contact an electrician near you. They will know the local building codes and the permits required for the job. They can even attain the permits for you, assess the ampacity of your wiring, and help rough in the wiring.
From average costs to expert advice, get all the answers you need to get your job done.
Discover how much under-cabinet lighting costs. Discover installation prices, key cost factors, and expert tips to save on your kitchen or workspace lighting project.

Add a wow factor to your home with a chandelier. Chandelier installation costs depend on style, location, and labor, so learn what you can expect to budget.
Discover the average cost of lighting design, including price ranges, key cost factors, and tips to help homeowners budget for their lighting project.

You don’t always need a pro for recessed lighting fixes. Learn how to change a recessed light bulb on your own for an easy, affordable home repair.

Discover how to hang string lights from any spot in your yard for an instant glow up that feels warm, cozy, and downright fun.

If your ceiling fan light flickers, something may be wrong with the equipment, circuit, or electrical system. Use this guide to find the cause and the solution.