
•
Discover the cost to weatherstrip a door, including average prices, key cost factors that impact your total price, and tips to save on your project.
You’ll want to hang around for this


Start by removing your old door, if it hasn’t already been taken down. Place your new door in your existing door’s opening. Line it up against your door frame, and with a pencil, mark where you’ll need to shave your door down, if necessary, to have a perfect fit. Also, if your door doesn’t have clearance at the bottom to help it open and close properly, mark off 3/4 to 1/2 of an inch. Once you’ve marked off how much to remove, place your door on a flat surface and use a straightedge to draw a straight line across its length or width.

If you need to remove more than five inches from your door so it can fit, put on your safety goggles and ear protection and use your circular saw to cut it. To remove a few inches, use your electric planer. Either way, take your time and slowly go through this step so the final product is even.
After shaving it down, place your door back in its opening and see how it fits—confirm that it is level, too. If it still needs adjusting, repeat the previous steps. Once you have the perfect fit, lay it back on a flat surface to sand down any rough edges.
Before you can install your door hinges, use your measuring tape to see where they’ll go. The rule of thumb is to place the top hinge five inches from the top of your door, the bottom hinge 10 inches from the bottom, and the middle hinge in the middle of your top and bottom. Once you know where to place them, trace their length, width, and thickness for every hinge on your door.
Use your flat-edge chisel and wooden mallet to carve out the area you marked off. You’ll start along the outline and then chisel out the middle. Make sure to get as close to the hinge thickness as possible. After, put your hinge back in its recess to ensure it’s flush against your door.

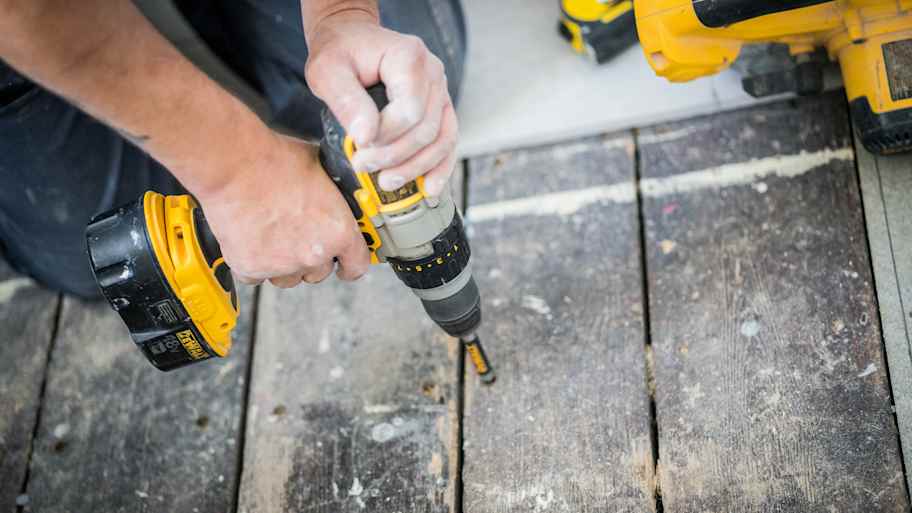
If everything checks out, use your cordless drill and a drill bit, that’s thinner and slightly shorter than your screw, to drill a pilot hole. If your pilot hole is too large, you risk giving your screw nothing to grip onto.
Take this time to finish the areas of your door that you cut down with paint or stain. Allow the paint to dry before moving to the next step.
If your door didn’t come with a doorknob cut out, use the templates provided by your doorknob’s manufacturer and your hole saw to drill its hole. You’ll also need to chisel out your door latch carefully.

Put all of your hardware—hinges, latch, and doorknob—on your new door into its rightful place.
Use your door stoppers to help keep your door steady while you hang it up. Line up your hinges on the door jamb side of your door and screw them in place, starting with the top hinge.
Hanging a door requires precision and patience. Before embarking on this project, you should be aware of and avoid a few mistakes that DIYers often make.
Incorrect measurements: Doors that haven’t been measured correctly will have gaps, create drafts, and not open or close properly. Double-check your measurements, and if a friend or family member is around, ask them to confirm them, too.
Using weak hinges: If your hinges aren’t strong enough to hold your door’s weight, the door might sag. Choose hinges that match the material and weight of your door.
Over-tightening screws: Screws that have been tightened too much can cause stripped holes, weakening the door over time. Tighten screws so they are in place and secure, but don’t overdo it. If you think you have stripped the hole, you can try using a longer screw.
If you know how to trim a door to fit your frame accurately, have the time to install the hardware properly, and can pick up a door easily, this DIY is a cinch. However, if your door is heavier and the thought of picking it up doesn’t sound like your definition of a good time, call a pro. Your local door installer will have the tools needed to hang your door so that it correctly fits into the frame. Plus, they’ll have a helper to work on heavier doors safely.
From average costs to expert advice, get all the answers you need to get your job done.
Discover the cost to weatherstrip a door, including average prices, key cost factors that impact your total price, and tips to save on your project.

The cost to install a pocket door includes a few more line items than other designs. Here's what to expect from pocket door costs at each stage in the process.

Discover fire door cost data, including installation, materials, and tips to save. Learn what impacts fire door pricing and how to budget for your project.

You’re not imagining it: The door that previously fit your frame is suddenly too big. Learn how to fix a door that sticks using multiple methods here.
Screen and storm doors offer protection and allow more natural light into your home. Uncover the critical differences between storm doors and screen doors.

Squeaky doors are something we’ve all heard before, and it’s irritating every time. Use this guide to learn how to fix a squeaky door–your nerves will thank you.