

The cost to move an electric meter depends on how far you’re moving it, whether it needs replacing, and the cost of labor near you.
Stop the shock!


While the cost to ground an outlet professionally is about $75 to $480 per outlet, it might be worth hiring a pro to protect yourself and your home.
Unless you have the original building codes for your home, it’s hard to tell if your wires are grounded without hiring a local electrician.
While grounding a wire is a relatively doable DIY, electrical work can be dangerous and requires prep, including wearing safety gear and cutting off power to the outlets.
If your home is very old and can’t support today’s technology, hire a pro for a full rewire.
The National Electric Code® requires that the vast majority of residential circuits include a grounding wire for safety. However, this regulation only applies to newly-built homes, so if you live in a house built before 1974, chances are your circuits remain ungrounded. You’re under no legal obligation to install grounding wire, but grounding your outlets is still a great idea, as ungrounded outlets can lead to shocks, power surges, and fires. Luckily, learning how to ground an outlet without a ground wire isn’t too complex.
This is a quality electrical company with very professional and well-trained technicians. They installed new switches, outlets and light fixtures in my 2nd floor, removing the knob and tube wiring and installing new grounded lines. I will be recommending them to all my friends and family.
A grounding wire is a wire that goes into the ground. It really is as simple as that. Modern power outlets feature three prongs and three wires. Two of the wires provide the charge, and the third carries excess electrical power into the ground, where it disperses naturally via a grounding rod.
The solid ground beneath us has a negative electrical charge, so the positive electrical charge from the outlet is attracted to the earth below. However, it requires a bit of help to get there. That’s where grounding wires come in. Electricity can use the grounding wire as its own personal road to travel along until it reaches the ground.

There’s a reason why it’s mandatory for newly built homes to have grounded outlets. A ground wire helps excess positive charges travel to the ground in a direct and controlled way, where it disperses without any danger to yourself or your loved ones.
Ungrounded outlets are much more susceptible to electrical fires, power surges, shocks, and more. Wires are subject to the passage of time like everything else, and eventually, connections loosen, insulation wears down, and internal parts break. Each of these issues can cause an incredibly unpleasant shock when you touch any device with a residual current, so the grounding wire makes sure that doesn’t happen.
There are two surefire ways to identify ungrounded outlets in your home. The easiest way is to just look at the outlets. Do they have two slots or three? If they have two slots, they’re definitely ungrounded. If they have three, the round D-shaped slot likely indicates the existence of a ground wire.
Three-pronged outlets don’t always mean there’s a ground wire, however, as they could simply be GFCI outlets. These outlets mimic grounded outlets in many ways, but the third wire doesn’t lead to the earth; it leads to a dedicated GFCI circuit breaker.
Another way to tell if an outlet is grounded is to check your home’s schematics or any original building documents. These should show the status of your electrical system, but you can also just look at when the home was built. If it was built prior to 1974 and the outlets don’t have that third D-shaped slot, you likely have ungrounded circuits. The best way to be absolutely certain of the status of your outlets is to hire a local electrician for an inspection.
You have a few options here, and they vary in complexity. Here are some “ground” rules before we begin.
Exercise caution: Electricity makes much of our daily lives go round, but it’s also dangerous. Wear insulated rubber gloves and rubber-soled footwear when working with electricity. Turn off power at the breaker box before you start, and work slowly.
Don’t just replace outlets: Replacing two-prong outlets with three-prong outlets gives you more options to plug in appliances, but it exponentially increases the danger of electrical overflow. This is not only dangerous, but it’s also illegal in some parts of the country.
Read up on wire colors: Wire colors are a big deal and indicate the overall purpose of a given wire. Hot or live circuits are colored black and red, but sometimes they may be blue and yellow. Neutral wires are either white or gray, and ground wires are green, green with a yellow stripe, or bare copper.
Invest in a multimeter: These handy gadgets usually cost $10 to $20 and test the efficacy of a given circuit. You’ll need one before starting to make sure no power is flowing through the outlet before you start (you can also use it after you finish to test your work).
Keep a pro on speed dial: If at any point you are not 100% (or 1,000%) certain of what to do next or how to go about it, contact an electrician. Shock-related injuries are no joke.
GFCI outlets provide the same shock and fire prevention that a ground wire provides, but the installation process is much simpler. They work by monitoring the current going in and out and tripping a breaker when the difference exceeds a preset limit. The major downside is that none of the many different types of GFCI outlets protect against power surges, so keep that in mind. In other words, they protect you and your family but not your computer.
GFCI outlets cost around $4 to $10 each, but there are many different designs, so the price you pay may vary. Overall, most people find that they’re the most cost-effective way to protect themselves and their homes from the dangers that come with an ungrounded outlet.
Before you begin, shut off power at the breaker box and test the fixtures with your circuit tester to make sure no electricity is running through them. Read the instructions thoroughly before you begin, and call a pro if you’re ever unsure of the next step.
Here are the basic steps:
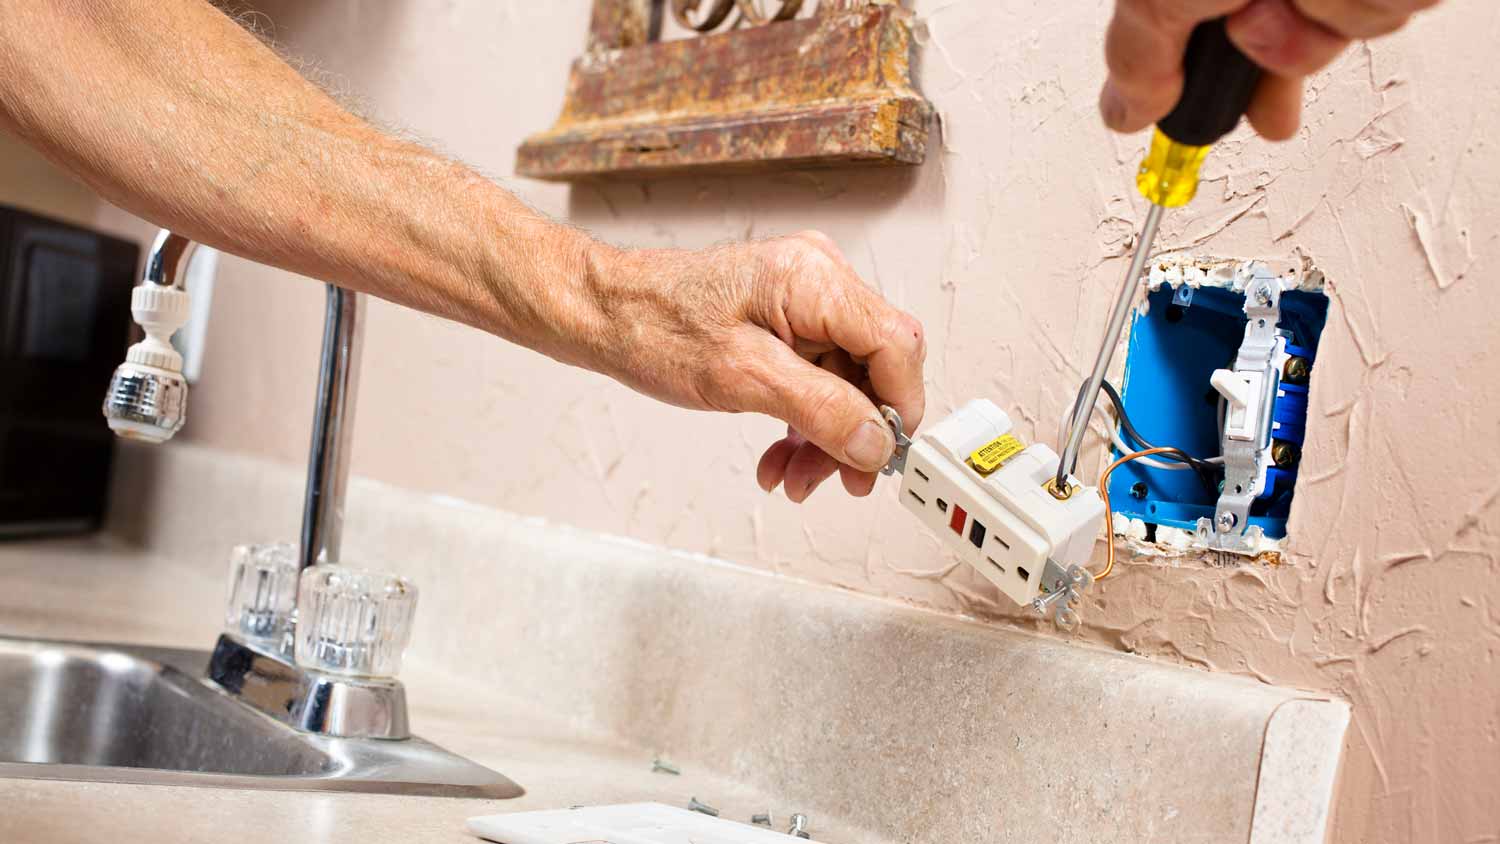
With the power off, use a screwdriver or power drill to remove the old outlet.
Unwire the hot/live wire (black or red) and remove any additional screws from inside.
Disconnect the neutral wire, which is typically white.
Take out the pre-existing box and install the new one.
Reconnect the wires per the instructions. This usually requires reconnecting the hot wire to the brass LINE terminal and the neutral wire to the chrome LINE terminal, but not always.
Turn the power back on and test the outlet with a circuit tester.
Label the outlet to warn people that this is not a true ground outlet and, as such, offers no protection from surges.
Repeat these steps for every ungrounded outlet you have.
If you have a branch circuit with multiple chained receptacles running throughout, you don’t have to replace every outlet with a GFCI. Instead, replace the first receptacle in the stream. Follow the above steps to replace the outlet and make sure it connects to each subsequent outlet in the chain. You should be good to go; just make sure to label each outlet appropriately.
Generally speaking, the GFCI outlet gets a “No Equipment Ground” tag, and the remaining outlets get a “GFCI Protected” tag. This is to let people know that these GFCIs are not true grounded outlets, despite the three prongs. GFCI receptacles typically ship with these labels.
The most extreme option, though the best for long-term safety and satisfaction, is to rewire your whole home and add legitimate grounding. This involves a pro installing a grounding rod, otherwise called an earth rod, and connecting it to your electrical panel. Next, they’ll replace all of the wires and outlets running from the panel with grounded wires and grounded three-prong outlets. Grounding wires cost $6 to $8 per linear foot, which works out to around $130 to $170 per outlet.
Rewiring an entire home with grounding wire costs anywhere from $4,000 to $8,000, depending on the size and the number of outlets. If this sounds like a whole lot of dangerous and confusing work, that’s because it is. Hire a pro for this one unless you’re actually a licensed electrician.
GFCI outlets serve an important purpose, particularly for those living in older homes. However, there are many different designs out there, so check out some general use tips for GFCIs.
Safety first: Not to get too repetitive, but practice extreme caution when working with electricity. Power down the main circuit and wear protective gear like rubber gloves and shoes if you’re installing an outlet on your own.
Read the instructions: The installation process differs slightly depending on the specific design of the outlet. Familiarize yourself with the instructions and proceed slowly and carefully.
Look for specialized designs: Just like other types of outlets, GFCIs ship in a variety of specialized designs for modern homes. There are tamper-free outlets to protect children, weather-resistant outlets for outdoor use, and arc-fault circuit interrupter (AFCI) outlets to provide further protection against electrical fires.
Check for any required work permits: If you’re doing some serious work, like actually adding a ground to an older home, it may require a work permit. Check with your local regulatory agency for detailed information.
When in doubt, contact a pro: Nobody knows this stuff better than a professional electrician. They have hundreds upon hundreds of hours of schooling, apprentice work, and lived-in experience required for the job. If you’re unsure of anything, and we mean anything, contact a local pro for advice.
Electricity is dangerous. This cannot be overstated. In other words, you should only attempt this type of work if you have the appropriate experience. Even simple jobs get hairy really fast if you aren’t careful. So only take on what you can handle and always, always (always) wear appropriate safety gear, like rubber insulated gloves and dielectric shoes (sometimes called work safety shoes). Before you start, cut off the power to any outlets you’re working on.
Professional electricians cost between $50 and $100 an hour, and many charge a minimum service fee of at least two hours to cover overhead costs. Going the DIY route saves this money, but your personal safety always comes first. If you have rubber gloves and are just replacing an outlet fixture with no heavy wiring involved, give it a shot, but work slowly and methodically. If the job turns out to be more complicated or you get lost at any point, leave it alone and call a pro.
From average costs to expert advice, get all the answers you need to get your job done.
The cost to move an electric meter depends on how far you’re moving it, whether it needs replacing, and the cost of labor near you.

The average cost to replace an electrical mast is around $750, depending on the size and extent of the replacement. Read on to budget for a meter riser.

Find out how much it costs to install a cable outlet for TV or internet. Our expert guide breaks down the costs involved in installing a new coaxial outlet and explores how you can save and if you can do this project yourself.

Selecting the right wire size helps your electrical system run safely and efficiently. Find out the correct wire size for 100-amp service panels.

Learn how to wire an outlet switch combo receptacle in various ways to adapt an existing wired location for several applications.

Discover how to upgrade your electrical panel for added convenience and to help increase the safety of the electrical system in your home.