How to Glaze Windows in One Hour
A little window glazing goes a long way in sealing the deal


- Safety glasses
- Work gloves
- Respirator (optional)
- Drop cloth
- Putty knife
- Oil-based or latex-based glazing compound
- Thin sheet of metal or aluminum foil
- Sandpaper (120 or 150 grit)
- Oil-based primer (optional)
- Glazing points or spring clips
Windows are meant to keep the weather out, but over time, seals break and let in unwanted cold air or moisture. Fortunately, you don’t have to replace the whole window to fix it. Glazing your windows is a simple and effective way to restore that tight seal, especially in older windows. In just about an hour per window, you can restore your windows and keep those pesky drafts out without breaking the bank. This guide will walk you through how to get your windows sealed up tight again.
Choose Your Glazing Compound
The first step of window glazing is to pick the right glazing compound. You have two main options: oil-based and latex-based. Oil-based compounds are ideal for old homes and wood window frames. They offer a durable, long-lasting seal, though they take their sweet time to cure. Alternatively, latex-based compounds offer faster drying and a much easier cleanup—all you need is water. They’re flexible and perfect for newer windows, but they don’t quite hold up as well long-term.
Wear Protective Gear
Gear up. Safety glasses are a must to shield your eyes from flying debris and glass shards, especially when scraping off old glazing. Wear gloves to protect your hands from sharp edges, rough surfaces, and irritating compounds. They also improve your grip, reducing the chance of accidents. If you’re working with older windows from before 1978—from when it was common to use lead-based paint and putty in window glazing—a respirator will protect your lungs from dust or chemicals.
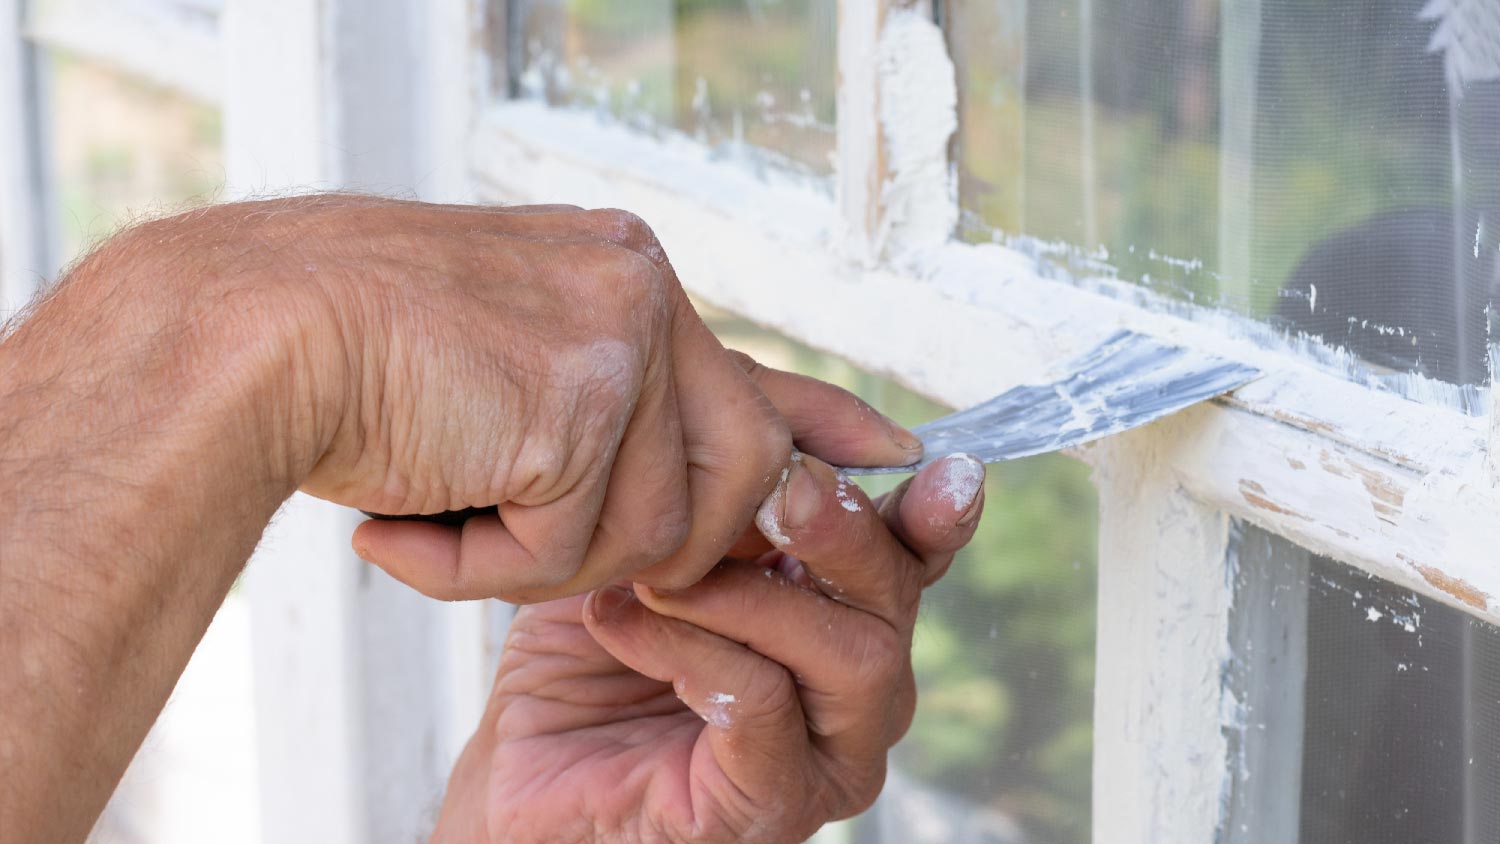
Scrape Off Old Glazing
 Photo: ogiana / iStock / Getty Images Plus / Getty Images
Remove the sash (the movable part of a window that holds the glass) for easier access, and protect your workspace with a drop cloth. Carefully scrape off the loose or peeling glazing with a putty knife. For stubborn, hardened spots, use a heat gun to soften the material, working slowly and steadily to avoid overheating and damaging the glass. Protect the glass with a thin sheet of metal or a few layers of aluminum foil to help prevent cracking. Continue scraping until everything is clean, paying special attention to the edges and corners.
Remove the Glazing Points
These little metal pieces hold the glass in place, so it’s important to get them out carefully. Find the glazing points (for wood) or spring clips (for metal) around the frame—usually six to eight inches apart. Gently slide your putty knife under each one to loosen it. Then, use needle-nose pliers to pull them out. If they’re stubborn or corroded, a little wiggling may do the trick. Be gentle to avoid cracking the glass or bending the points, especially if you plan to reuse them.
Remove the Glass
With the old glazing and points gone, you can remove the glass. Always wear gloves to protect your hands, and be mindful of sharp edges. Gently lift the pane from the frame. If it’s stuck, tap the edges lightly with a putty knife to loosen it. Apply even pressure to avoid breaking it. Once free, place the glass on a soft, padded surface to prevent scratches or damage.
Prime the Sash
It’s time to prep the wooden sash for the new glazing compound. Priming improves adhesion, helping the glazing stick and last longer. It also seals the wood and keeps moisture out to help prevent rot.
Sand any rough areas with fine-grit sandpaper—#100 to #120 grit works well. This smooths out the surface, allowing the primer to stick better. After sanding, wipe away any dust with a clean cloth.
The next part is optional. Use a small brush to apply a thin, even coat of oil-based primer to the rabbet (the groove where the glass sits). Make sure the primer covers all areas that will come in contact with the glazing. Let it dry completely before moving on. If you’re working with a vinyl or aluminum sash, priming is generally not necessary.
Apply a Back Bedding
Apply a thin layer of the glazing compound to the rabbet. This back bedding creates a solid cushion between the glass and sash, improving the seal and reducing the risk of drafts or water leaks. Use a putty knife to spread a smooth, even layer—about ⅛ inch thick—around the bottom and sides of the rabbet. Make sure it’s evenly distributed, especially in the corners. If you’re working with wood, keep the compound off the visible wood and wipe away any excess.
Put the Glass Back Into the Frame
Carefully lower the pane into the frame, starting with one edge and working your way across. Once it’s in position, press it evenly into the back bedding for a snug fit. You’ll notice some glazing compound squeezing out—that’s normal. You can clean it up later. Just make sure you apply consistent pressure to avoid cracking the glass.
Install New Glazing Points
Secure the glass in place using either glazing points (for wood frames) or spring clips (for metal frames).
For the glazing points, locate where the old slots were (typically spaced eight inches apart). Gently press each point into the frame at a slight angle, using the flat side against the glass. Use a putty knife to help push them in.
For spring clips, slide each clip into its designated slot in the metal frame, compressing it slightly to hold the glass securely in place. In either case, make sure the points or clips are spaced evenly for proper support. Double-check the glass for any movement and add more if needed.
Apply the Glazing Compound
 Photo: Westend61 / Westend61 / Getty Images
Now that your glass is securely in place, apply the glazing compound. This process can vary depending on the compound you’re using: oil-based or latex-based.
For oil-based compounds, roll the compound into a rope shape—about ½ to ¾ inch. If it’s hard to shape the glazing putty, knead it with your hands to warm it up. Press it into the gap between the glass and the frame. Make sure it fills the entire space. You want to apply firm, even pressure to make sure there are no air pockets or gaps.
If you’re using a latex-based compound, you’ll need a caulk gun—if your compound comes in a tube—for a smooth application. Squeeze a steady bead of compound along the joint so it evenly fills the gap. Regardless of the method, apply consistent pressure to ensure that no air pockets are left behind.
Smooth the Glazing
Whether you’re using an oil-based or latex-based compound, the process is nearly identical. Hold your putty knife at a 45-degree angle and use smooth, firm strokes to create a clean, beveled edge.
For oil-based glazing compounds, dip your knife in mineral spirits to clean the knife and keep the compound from sticking to it. For latex-based compounds, use water instead. Repeat this until you’ve got a clean, even finish that slopes away from the glass so water can run off.
Remove Any Excess Glazing
After smoothing the glazing, you’ll likely see some excess compound. For larger amounts, grab a sharp putty knife and carefully slice away the excess. You can then peel off the extra by hand or scrape it away if it’s starting to harden. For smaller amounts, dampen a rag with mineral spirits (for oil-based) or water (for latex-based), and gently wipe the excess off the glass. Be sure not to disturb the smoothed glazing as you work. Any flaws now will be visible once it dries.
Let the Glaze Dry
Let the glaze dry completely to form a strong seal. If you’re using an oil-based compound, it could take two to three weeks to fully cure—even though the surface may dry within days. Latex-based compounds dry faster, usually within hours, and fully cure in a few days. While drying, you can carefully return the sash to the frame, but make sure you don’t touch or disturb the glaze.
Paint (If Necessary)
If you used an oil-based glazing compound, now’s the time to paint over it. This step helps protect the glazing and frame from the elements. Latex-based glazing compounds don’t need painting, so you can skip this step entirely. Just make sure the glaze is fully dry before you pick up the paintbrush.
Mistakes to Avoid
Glazing windows may seem simple, but it’s easy to make mistakes that can lead to bigger issues down the road—like costly repairs. Watch out for these common DIY problems to ensure your glazing goes smoothly and your windows stay intact.
Don’t glaze in extremely hot, cold, or humid weather. Extreme temperatures or humidity affect the glazing compound’s curing process and can lead to cracks or peeling.
Don’t try to move large panes alone. Heavy glass can break easily and cause injury — always ask for help.
Don’t apply pressure to the glass’s center. The middle is the weakest part, and applying pressure here can cause the glass to shatter.
Don’t ignore cracks in the glass. Unnoticed window damage can worsen during glazing or prevent a good seal.
Don’t bend glazing points. Bent glazing points won’t hold the glass securely.
Don’t force glazing points or spring clips into place. Forcing them can crack the glass or damage the frame.
Don’t glaze over rotten wood. Weak or rotted wood can’t support the glazing and will cause it to fail prematurely.
Don’t store your glazing compound in the heat or areas exposed to sunlight. Keep your glazing compound in a cool, dry place, or you’ll risk them drying out.
Don’t avoid lead precautions. Older homes might have lead-based products, which are extremely harmful when distributed, and proper technique and equipment are needed to handle them.
If you’re unsure about the glazing process or want to avoid all the potential problems, hire a local window company. They have the know-how, the right tools, and the experience to make sure your windows are sealed properly with a flawless finish. Plus, their work often comes with a warranty, which is a huge relief if something goes wrong, like the glass breaking.
DIY vs. Hiring a Pro
When glazing your windows, there’s more at stake than just the price of materials. Sure, DIY might seem like the cheaper option up front, but there’s a hidden cost in time, mistakes, and the potential for things to go wrong.
For a DIY job, you’ll spend up to $60 on supplies, but the real expense comes from wasted materials, redos, and your valuable time. Alternatively, if hiring a professional, the cost to repair your drafty windows averages $100 to $400 per window, depending on the size and complexity. That’s significantly more, but again, you get expertise, the right tools, and peace of mind knowing the job’s done right. Professionals handle tricky details like reglazing different window frames and using proper sealants. Plus, they’re insured. Sometimes, paying for a professional isn’t just about the convenience. It’s an investment in your window’s—and your home’s—integrity.
Frequently Asked Questions
Glazing compounds and caulk each have their specific job in window work. Neither is “better” than the other—they just do different jobs. Glazing compound secures glass panes within wooden frames, especially in older, single-pane windows. It forms a tight seal between the glass and frame. On the other hand, caulk seals gaps around the window frame to prevent air and water leaks between the frame and wall.
Glazing is always done from the outside of the window, while the inside doesn’t require any glazing. This is because the main purpose of glazing is to create a weather-tight seal where the glass meets the frame, protecting against drafts and moisture. Since the exterior is exposed to the elements, that’s the side that needs the weatherproofing.
Window glaze can last anywhere from five to 20 years, depending on the type of glazing compound and environmental factors. Oil-based glazes, when applied correctly, can last 15 to 20 years—though they may crack in extreme weather. Latex-based glazes, while more flexible, typically last five to 10 years. Keep in mind that regular window maintenance, like inspecting the seals and fixing cracks early, will help extend their lifespan. Timely repairs ensure your windows stay sealed, saving you from unnecessary drafts and damage down the road.


Get our Angi-powered app


