

Your cabinet removal cost will depend on kitchen size and labor expenses. Find out what your budget could look like.
Prep for new hardware in no time with this DIY project


Swapping out your cabinet hardware can often change the look of your kitchen without a hefty price tag. If you’re switching from knobs to handles or vice versa, you’ll need to learn how to fill in cabinet holes to make way for new ones once you install new hardware.
Luckily, learning how to fill cabinet holes is a simple process fit for even the most inexperienced DIYers. With a few tools, supplies, and a little patience, you can have your holes filled and looking seamless in less than a day.

This project will be eons easier if your cabinet doors are flat. Using your screwdriver, remove your cabinet doors from their hinges and set them on a flat surface. You’ll also need to use your screwdriver to remove any hardware so that the screw holes are exposed.
Take your sand block and 120 to 150-grit sandpaper to sand down the holes on each cabinet door. Make sure the surface around the hole is smooth and flush with the wood around it on both sides of the door. The less debris you have near or in the holes, the easier they will be to fill and the better your paint or staining job will look. Once you’re done sanding, wet your microfiber cloth and remove any leftover dust or debris.

Grab your putty knife and apply a dollop of wood filler over the screw holes on both sides of the cabinet door. You’ll want to overfill the hole a bit since you’ll be sanding it down flush later. After you’ve applied wood filler in all of your holes, wait about one to two hours for the filler to dry.
Make sure the filler in each hole is dry and hard, then take your 220-grit sandpaper and sand in circles over the holes so that each one is flush with the door. Check for any dips—if you notice any, you must apply a second layer of filler. Otherwise there will be a noticeable difference once paint or stain is put on. Wipe off any dust or debris before moving on to the final step.

Once the holes are filled and sanded, take your matching paint or stain and apply it over the discolored wood filler so that the hole matches the rest of the cabinet. If you’re painting, you can complete this step with a roller brush. If you’re matching wood stain, you will need a sponge and a towel to apply the solution. Note that if you don’t have the name of the paint color or stain used on your cabinets, you can take a cabinet door to your local hardware store and they can color match it for you.
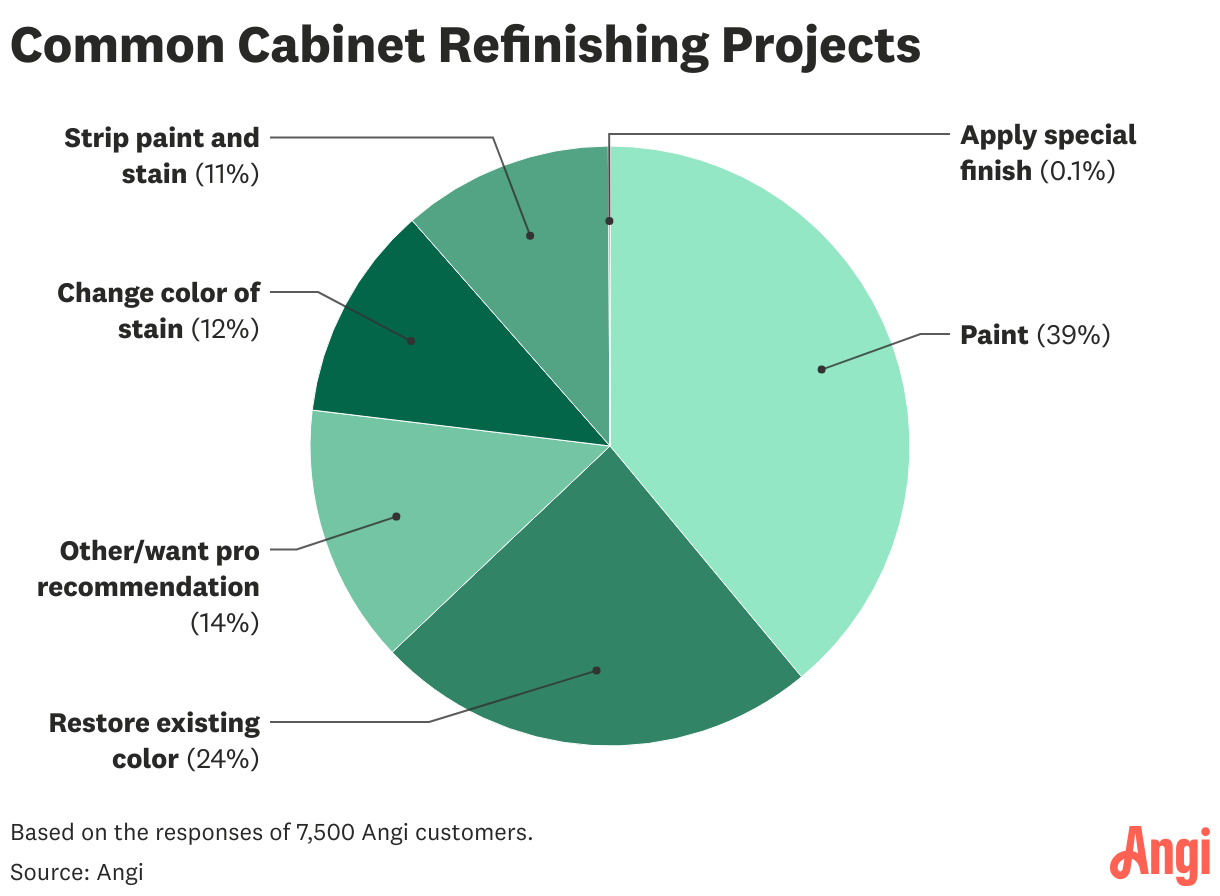
According to responses from 7,500 Angi customers, 39% of homeowners reported painting their cabinets as their preferred refinishing project. Meanwhile, 24% chose to restore their existing cabinet color, preserving the natural wood look while giving the kitchen a refreshed appearance. Additionally, 12% of homeowners opt to change the color of the stain on their cabinets.
You may not have the time to complete this project, in which case you can enlist the help of a local cabinet repair company to fill your cabinet holes for you. Although this is a relatively simple project, you’ll pay more for the labor it takes to have the holes filled, which can add up once you include the time it takes for the wood filler and paint or stain to dry. You can expect to pay around $100 to $300 for a professional to fill in cabinet holes, depending on how many holes need to be filled and the complexity of the task.
From average costs to expert advice, get all the answers you need to get your job done.
Your cabinet removal cost will depend on kitchen size and labor expenses. Find out what your budget could look like.

When refinishing your cabinets, you’ll need to consider the condition of your cabinets, budget, color, and stain preference. Find the cost to refinish cabinets in this guide.

Choosing new cabinet hardware is a fun balance of practicality and design. Costs range between under $100 and up to five figures, though, so budgeting and knowing which materials you can afford is key. This cost guide breaks it all down.

Getting stunning glass cabinets doesn’t have to be complicated. Use this guide for seamless cabinet door glass insert installation.

Learn how to install kitchen cabinets like a professional to save money on your next remodel and take your DIY skills to the next level.

Discover how to build cabinets for your kitchen, bathroom, or anywhere to save money on your next remodel or just to show off your skills.