

Before you hire a licensed electrical contractor, you should learn the cost to run electric from the road to your house so you can budget for the project.
Stretch your home’s style with new electrical options


Never work on a live electrical circuit.
Locate and turn off the breaker switch for the circuit where you’ll work.
If you’re uncertain which circuit to shut off, turn off the main breaker switch to cut power to the entire house.
Use your non-contact voltage detector, multimeter, or both to ensure there is no current where you’re working.

Running a new cable and making connections is more manageable after removing the existing box.
Remove the existing fixture or socket and wire caps using your multi-bit screwdriver.
Loosen and remove the retaining ring of the cable connector on the side of the box.
With a stud finder, determine which side of the box the wall stud is on.
With a pry bar or screwdriver, coax the box away from the stud enough to see the mounting nail or screw.
With a metal blade on a reciprocating, oscillating, or keyhole saw, cut the nail or screw. Be careful to avoid hitting the electrical cable.
Pull the box out of the hole while leaving the wire in the wall cavity.
Loosen and remove the cable clamp connector.
Getting the new wires in place can be the trickiest part of the project.
Using fish tape, run the new non-metallic electrical cable from the location of the new fixture to where you're connecting it to the existing circuit.
Through the back of the old work electrical box, slide the new and the old cables through the clamping tabs. Leave about six inches of the cable coming out of the box.
Insert the box into the wall and tighten the securing wings with a screwdriver.

The old wires may not need much preparation. However, it’s easier to work with untwisted wire ends.
On the old cable wires, trim the twisted end off and strip about a 1/2-inch from the wire covers.
On the new cable wires, Use a cable ripper tool or utility knife to remove the protective cable casing as far back in the box as you can reach with tools.
Strip the hot and neutral wire ends to about 1/2 inch.
If you’re reinstalling the old fixture, support it from below while connecting its wiring.
Gather the bare copper grounding wires and twist them together tightly with a linesman’s pliers. If you’re reinstalling the old fixture, include its ground wire in the connection. If not, simply connect the new wire to the old wire.
Twist the proper-size wire nut (or cap) over the twisted end.
Repeat steps one and two with the black and neutral (white) wires. Again, if you’re reusing the old fixture, include its wires.
Tuck the wires into the electrical box.
If you choose not to reinstall the old fixture, you must cover the box with an NEC-approved cover.
Attach the old fixture or new cover plate to the electrical box.
Turn the electricity back on to the circuit.
Extending electrical wiring in your home as a DIY project usually costs less than $50 for materials. The cost to hire an electrician is around $200 for a typical circuit extension. The price will vary depending on the difficulty of getting the new wire where it needs to go. Electrical wiring costs between $0.15 and $3.50 per foot, which does not include the cost of labor, so make sure you measure appropriately to save.
Going DIY to extend electrical wires can save you some money, but there are many risks associated with electrical work, especially for those who don’t have experience. Electrocutions, fires, and even explosions are all shocking ways you can hurt yourself and your home if you don’t know how to extend electrical wires properly. If running new electrical cables feels daunting, hire a local electrician to handle it for you.
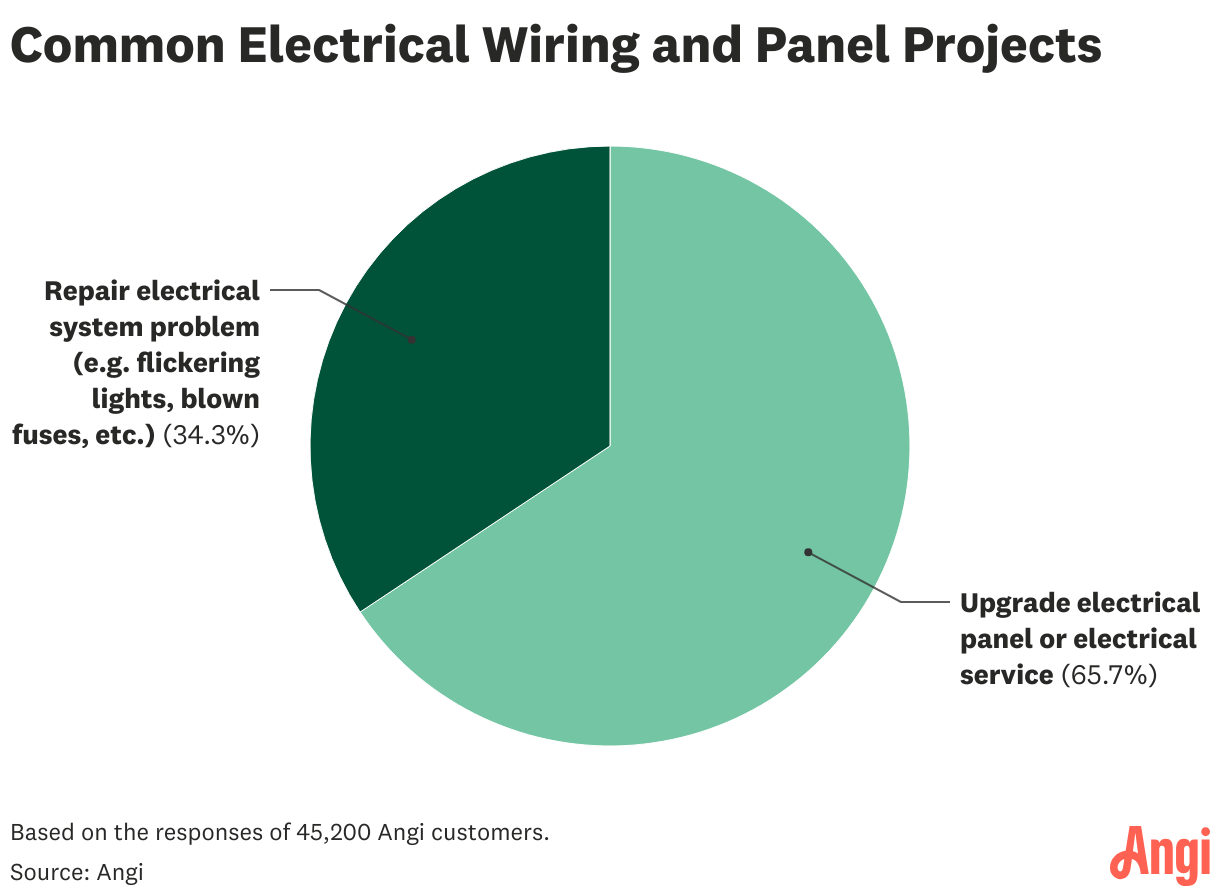
According to data from Angi customers, most wiring and panel projects (65.7%) involve upgrades to existing service. On the other hand, 34.3% of people need general electrical repairs, such as fixing blown fuses and flickering lights. If any of this sounds familiar, get in touch with an electrician for assistance.
From average costs to expert advice, get all the answers you need to get your job done.
Before you hire a licensed electrical contractor, you should learn the cost to run electric from the road to your house so you can budget for the project.

Electrical subpanels allow you to use appliances and electronics safely. This cost guide explains the important factors to consider when installing a subpanel.

If your outside electrical meter box has sustained wear and tear, it might be time for a replacement. How much it costs to replace an electrical meter box depends on labor, model, and box type.

When you need to choose between a 100-amp versus 200-amp electrical panel, check out our easy-to-understand explanation of your home’s power options.

Downed power lines are very dangerous. Stay safe by following these instructions if you ever encounter a downed power line.

When it comes to precise measurements, you need a precise tool. A micrometer can definitely come in handy, so learn how to read a micrometer here.