How to Design a Sprinkler System: 7 Tips for Your DIY Sprinkler Project
Add a sprinkle of genius—not just water—to your lawn


If you’re a gardener with a knack for design, mapping out your own sprinkler system could be a fun and rewarding undertaking. Plus, it’ll mean you never have to lug a garden hose or haul a watering can around your garden again. If you’re up to the task, here are seven tips on how to design a sprinkler system.
1. Put in the Right Prep Work
Designing a sprinkler system involves a good amount of prep work. Before you start mapping out your system, be sure to tackle these tasks first:
Gather your tools and supplies: You’ll need a pencil, graph paper, measuring tape, and a water gauge.
Determine your water pressure: Your home’s water pressure can impact the kind of sprinkler equipment you use in your system. It can also affect its layout. Reach out to your water provider and request a water pressure report for your property, or measure it yourself at your outside spigot.
Find your flow rate: You should also check your flow rate—measured in gallons per minute (GPM)—at the spigot. This will help you figure out how many sprinklers you can run at once.

2. Check Your Local Regulations
You don’t need a permit just to design a sprinkler system, but you’ll need one to install a sprinkler system. It’s a good idea to sort out any permitting requirements while you’re in the planning phase so that you don’t face any delays when you’re ready to break ground.
3. Map Out Your Yard
To create a sprinkler system layout, you’ll need a detailed map of your property, but you don’t necessarily have to draw it yourself. If you can find an aerial-view image of your house online, you can print it out and mark it with the yard measurements you take.
(By the way: It’s a good idea to double-check those measurements before you start ordering piping and other sprinkler materials.)
You should also mark up the map with must-know details about your property, including:
Areas that receive lots of sun exposure or little sun exposure
Locations of water-loving plants or plants that don’t need much water
Different soil and terrain types
Hills or slopes
Unusual property lines
You can create just about any landscape design on a hill, but if you have a severe slope a professional landscaper can help install new drainage. Pooling water can lead to damaged plants and yards.

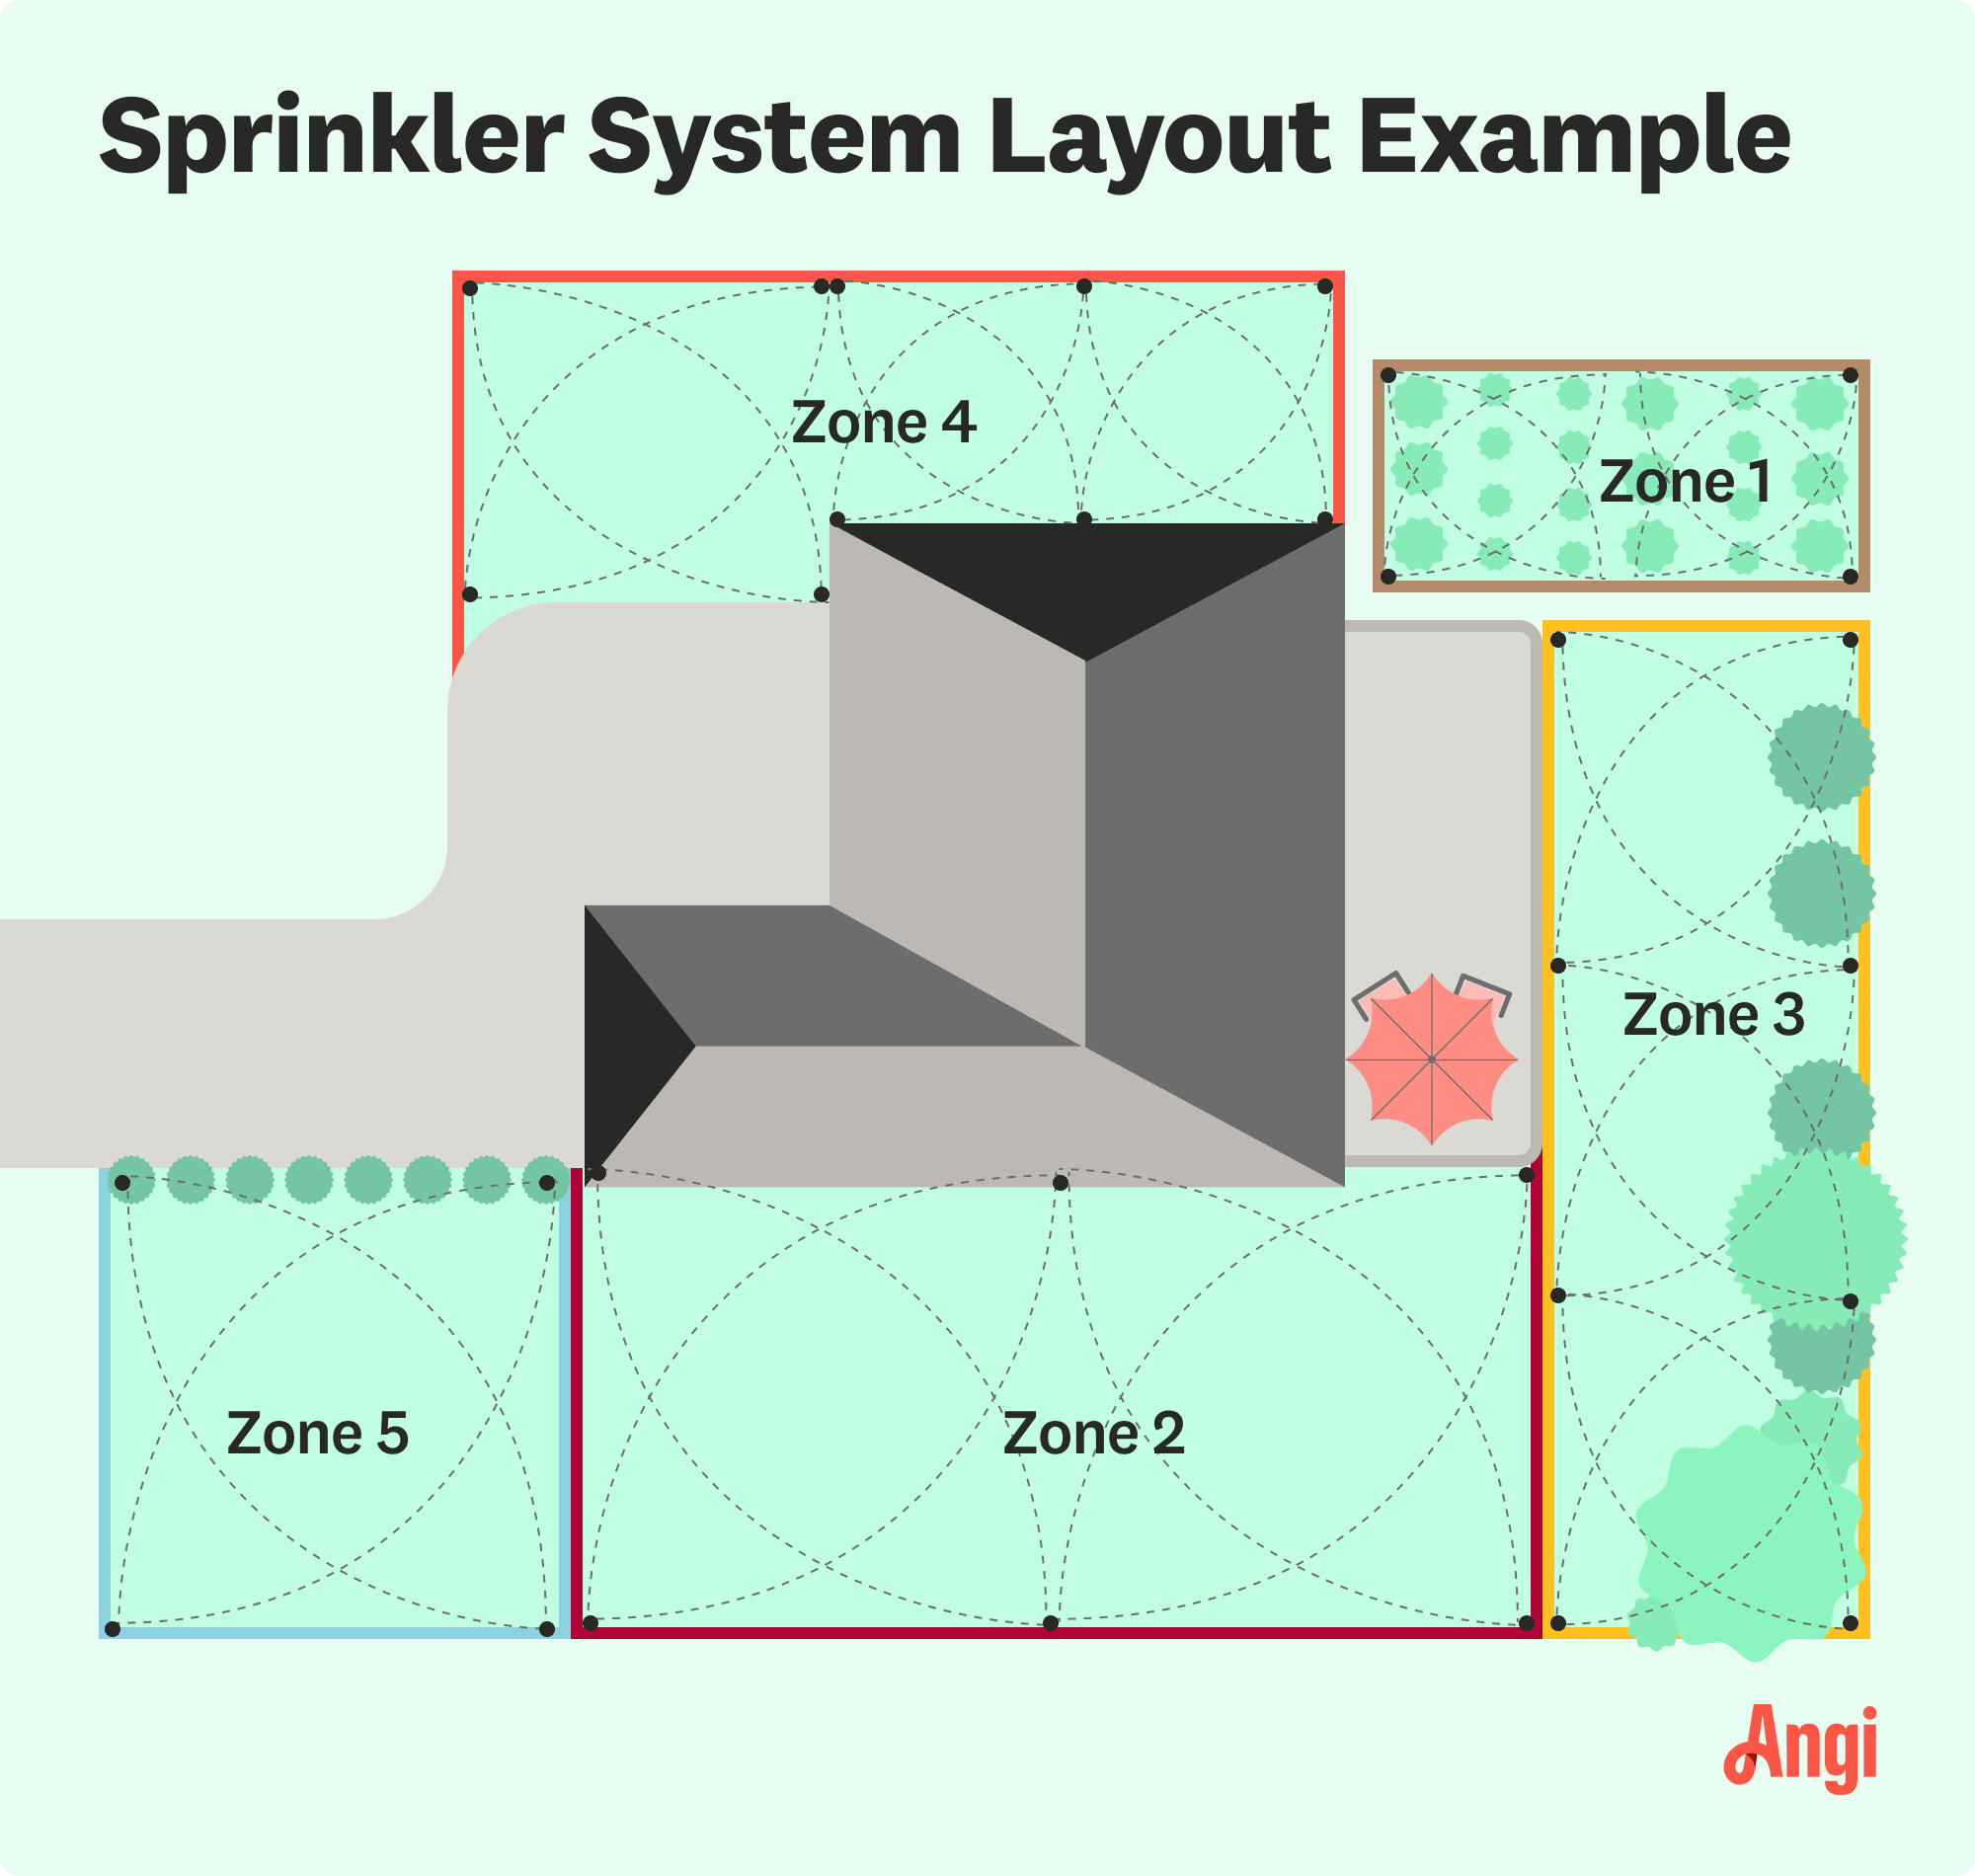
4. Use Multiple Sprinkler Zones
Sprinkler zones accommodate the unique watering needs of different parts of your yard. For example, if one section of your lawn receives a large amount of sunshine, it will have different watering requirements than the rest. When designing a sprinkler system, the goal is to group plants with similar needs in the same irrigation zone.
5. Choose Your Sprinkler Heads Wisely
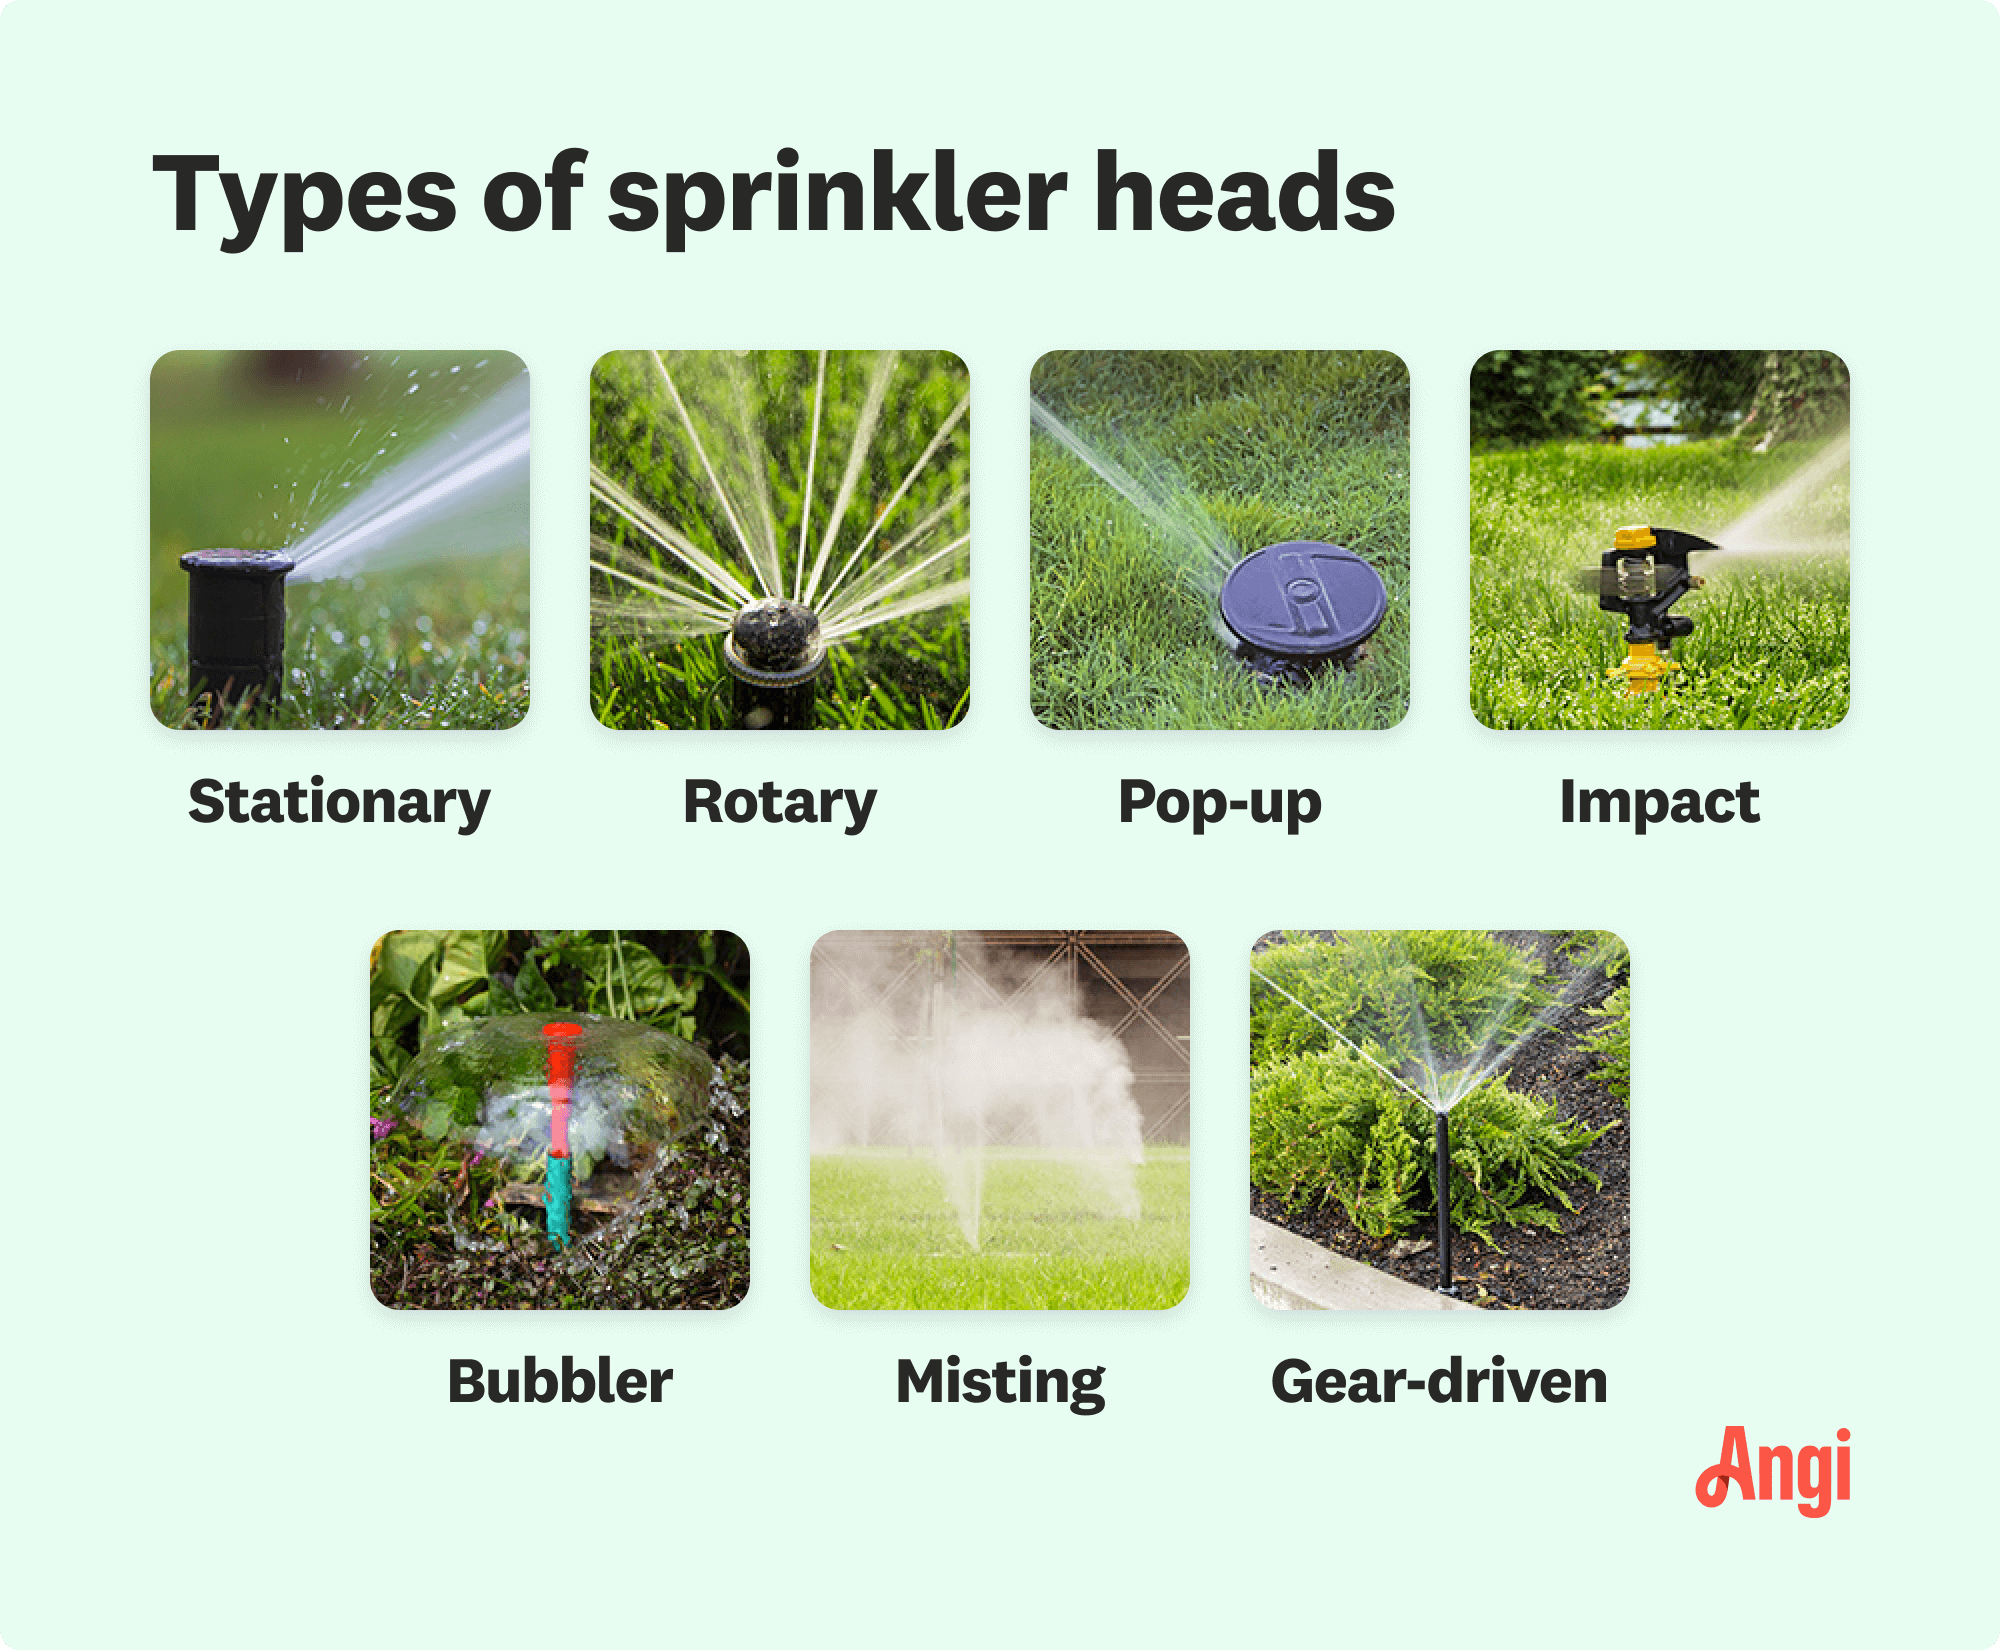
You’ll have five to 10 sprinkler heads per zone, but how do you know which sprinkler heads to choose? It depends on a few factors, including the size of the zone, the type of plants the zone contains, and your sprinkler system’s water pressure and flow rate.
Some of the most common types of sprinkler heads include:
Rotary
Pop-up
Impact
Bubbler
Gear-driven
Spray
It’s okay (and often encouraged) to use multiple types of sprinklers in the same zone, but they should all be the same brand.
6. Customize Your Sprinkler System
A huge benefit of sprinkler systems is that they can run automatically, so your grass, plants, and crops always get the right amount of water at the right time. If you want this type of functionality, don’t forget to include a programmable sprinkler timer in your design plans.
There are other ways to customize your sprinkler system, too. For example, you could invest in smart sprinklers, which pull real-time weather data to adjust watering patterns based on the forecast. Alternatively, you could install a rain sensor, which detects if it’s raining—and, if so, shuts off your sprinklers to prevent overwatering.
7. Create an Installation Plan
Once you’ve finalized the layout, secured the required permits, and received your supplies and materials, you can begin the installation. Just make sure to call 811 several days to a week before you start digging.
Otherwise, you can hire a local sprinkler installer to set it up for you. These pros charge between $50 and $100 per hour for their services. Assuming that your design works, it takes two to four hours to install an aboveground system or eight to 16 hours to install an underground system.


- How to Build a DIY Sprinkler System and Water Your Whole Yard at Once
- How Much Water Does a Sprinkler Use for Lawn Irrigation? (And How Much Is It Costing You?)
- Who Do I Hire to Turn on My Sprinkler System After Winter?
- Who Do You Call to Turn On a Sprinkler System? Hiring Guide and DIY Tips
- Sprinklers 101: The Key Parts of the Sprinkler System
- How to Clean Sprinkler Heads and Filters to Keep Your System in Perfect Condition
- Do You Know Who to Call for Sprinkler Repair? What to Do When Your Irrigation System Is Out of Commission
- Sprinkler Water Valve Is Leaking: Common Causes and Signs
- How to Replace Sprinkler Heads to Irrigate Your Lawn Like a Pro
- How to Set a Sprinkler Timer: A Guide to a Well-Watered Lawn
Get our Angi-powered app


