
Ozone treatment can help with lingering smoke odors. Learn about ozone smoke removal costs to get an accurate idea of how to budget for this service.
See through the smoke with this simple cleaning guide


Dealing with smoke damage can feel overwhelming, especially when your walls and ceilings are covered in soot. But the good news is, you can often fully remove the damage and restore your living space to its original appearance. This simple guide will explain how to clean smoke damage on walls and ceilings to help you DIY your way to a solution.
Before you start cleaning, make sure you have all of the above-mentioned tools and supplies at the ready. You should also protect yourself from fumes and soot by wearing a long-sleeved shirt, safety gloves, safety goggles, and an N95 mask. Finally, cover any nearby furniture with a dropcloth so it doesn't get dirty during cleanup, and consider removing and disposing of smoke-damaged furniture to make room to work.

Start by opening windows to get fresh air flowing. You should also turn off your HVAC system to prevent soot from seeping into your ducts and other areas in your home. This step can also help protect you from inhaling smoke particles while expediting the cleaning process.
Assess the smoke damage to identify all areas affected by soot. In some cases, the soot is difficult to see and might look like a shadow, so take time to inspect every potentially affected area. This process is usually easiest when there’s plenty of daylight to illuminate your walls and ceilings.

Before applying a cleaning solution, use a vacuum with a HEPA filter and a hose attachment to vacuum up any loose soot on the floor and furniture. Hold the hose about a half-inch away from the soot, vacuuming from the top down since some soot is likely to travel downward during vacuuming.
Next, use a dry soot sponge, also called a chemical or dry-cleaning sponge, to lift soot away from the wall. Make sure you don't wet the sponge, as it will inhibit its cleaning ability. Instead of rubbing the sponge on the walls and ceiling, use light, quick downward strokes to lift the soot. Once the sponge becomes discolored, switch to a clean side or slice away the dirtied part to reveal a clean surface and resume cleaning.

If you can't remove all of the soot using the dry sponge method, mix a cleaning solution of one cup of bleach, one tablespoon of Trisodium Phosphate (TSP), and one gallon of water. Since TSP is caustic, wear gloves and goggles during this step.
Dip a microfiber cloth or regular sponge (not the soot sponge you used previously) into the solution and gently scrub the affected area using a circular motion. Work from the top down. Rinse the sponge or cloth frequently under a faucet or in a clean bucket of water to avoid redepositing soot on the walls and ceiling while cleaning.

Once you clean off all of the soot, dip a cloth or sponge in clean water and give your walls and ceilings a final rinse. Keep the windows open and turn on any nearby fans to expedite the drying process. You can also turn your HVAC system back on.
Cleaning smoke off walls and ceilings is a pretty straightforward process, but there are a few common mistakes to avoid.
Not ventilating the room: Soot is dangerous to breathe in and spreads easily. If you don’t ventilate your space while you’re using your soot or chemical sponge, you’ll put yourself at risk of inhaling the soot and also make more work for yourself in the long run.
Oversaturating the walls: Once you get to the point of using your wet sponge and TSP cleaning solution, be careful not to oversaturate the walls. Putting too much cleaning solution on at once will lead to paint bubbles and drywall damage, and it may even promote mold growth over time.
Cleaning the wrong surfaces: Make sure you know what type of paint you have on your walls before you start scrubbing. Avoid using a wet sponge on flat or matte paint, as you’ll damage the paint and may end up just rubbing soot further into the material. For these paint finishes, use a dry soot sponge and then prepare to paint over the smoke-damaged walls.
Failing to call in a pro for extensive damage: DIYing minor soot cleaning is simple, but if you have heavy soot accumulation or fire damage, suspect the fire may have caused structural issues, or can’t seem to get rid of smoke odors, call in a local smoke restoration company right away.
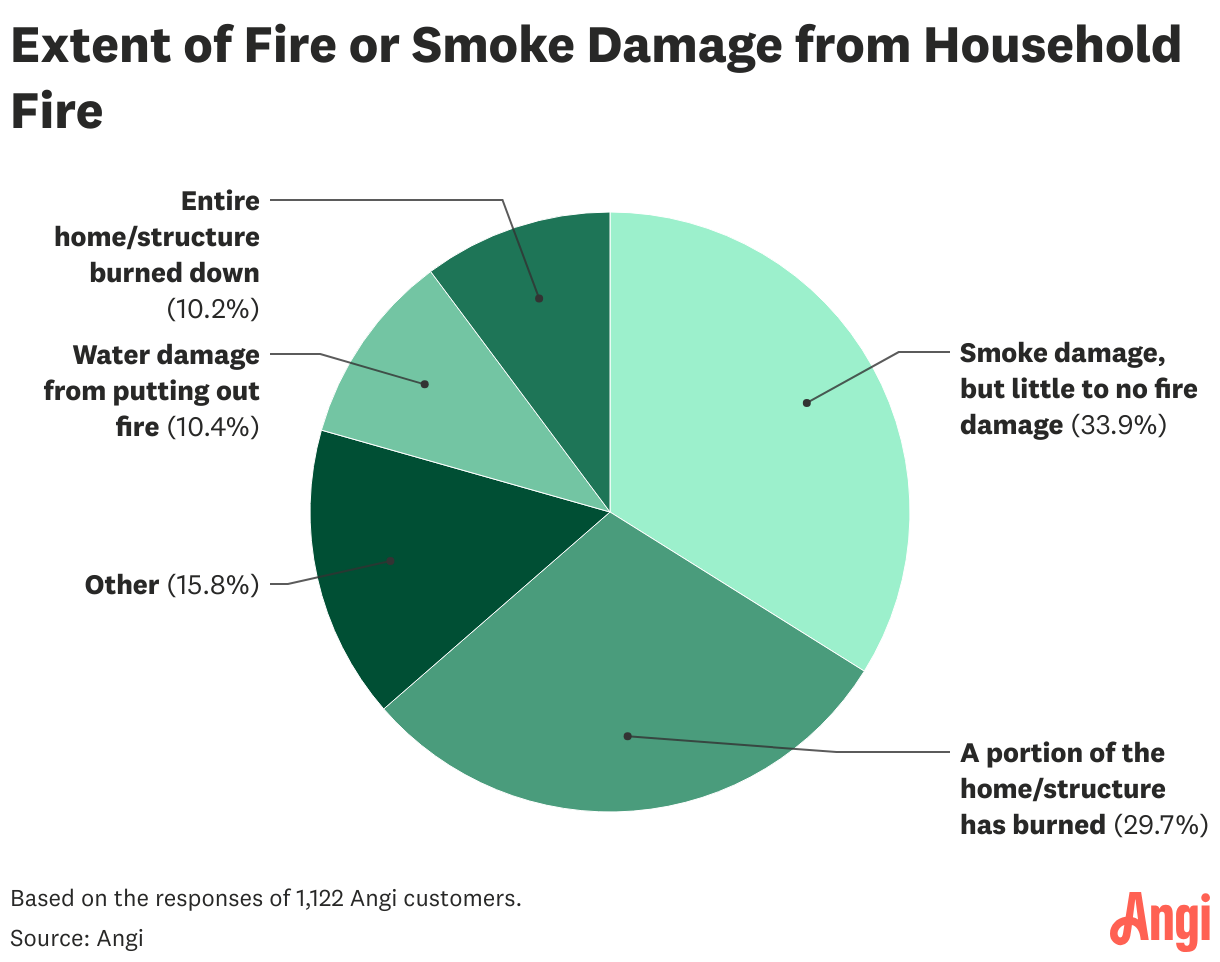
Not all fires cause total destruction, and the amount of damage impacts how much you’ll pay for restoration. More often than not, you’ll see smoke damage but little to no fire damage (33.9% of pro visits). Only about 10% of fire restoration projects focus on repairing structures that have burned down completely.
In many cases, you can clean light or moderate smoke damage yourself using the method mentioned above, but this is best if you’ve only had a minor fire or just have minor smoke damage from a nearby wildfire. If you have extensive smoke or fire damage, save yourself the trouble and call a fire restoration company for the best and safest results. They can often get the work done much more quickly, and they can employ methods like ozone smoke removal to eliminate tough odors.
Additionally, consider hiring a professional if you or someone in your home has a respiratory issue. Smoke remediation costs are well worth it in these cases, as soot can cause further complications. Hiring a pro to treat smoke damage to ensure everything is removed will keep you and your family safe.
From average costs to expert advice, get all the answers you need to get your job done.
Ozone treatment can help with lingering smoke odors. Learn about ozone smoke removal costs to get an accurate idea of how to budget for this service.

Your dry rot repair cost will depend on factors such as the extent and size of the damage and its location within your home. Here's what you need to know.

Fire damage restoration costs vary widely based on the extent of the damage. Learn how to assess your home and estimate your total after a fire.

Wondering how to stop wood rot from spreading? Use this DIY guide to stop wood rot in its tracks and minimize the damage it does to your home.

A small ceiling leak could be the sign of a large problem and potential water damage. Use this guide to learn how to find, fix, and prevent a leaking ceiling.

How do you know what to throw away after smoke damage? This guide will tell you what can be salvaged after a house fire.