

•
Discover the average hot tub maintenance cost, what impacts pricing, and how to save money. Get expert tips to keep your hot tub running smoothly all year.
The luxury of a steamy relaxation room right at home, no spa membership required


From relieving sore muscles to promoting blood flow and relaxation, sauna rooms are increasingly popular amenities in fitness and wellness spaces. Why not reap these health benefits in the comfort of your home? You can learn how to build a sauna in your backyard or spare room.
Whether you’re a handy woodworker or prefer finding a sauna installer near you, this guide walks you through the planning process, step-by-step construction, and customization to make it your own.
There are several ways to go about building a DIY sauna. You can start from scratch, construct a sauna kit, and even convert an indoor space into a spa-inspired bathroom. No matter which direction you go, here are the fundamental steps.
As a room that requires temperature settings, you can’t just put a sauna anywhere. Plan for a space where there is level ground and easy access to a power source for electricity—for example, a converted indoor space or a backyard addition in close proximity to the house.
Next, your sauna’s dimensions should allow at least two people to sit inside comfortably. The North American Sauna Society (NASS) recommends a minimum of 4 feet by 6 feet and at least 7 feet high. Keep in mind that the size of your sauna will influence the cost and size of your heating source.


For saunas, it’s important to choose softwoods that are moisture- and warp-resistant in temperatures of at least 150 degrees Fahrenheit. Popular options include cedar, aspen, spruce, and hemlock for their uniform textures and subtle scents. There are pros and cons of each panel type, so choose the one that works best for your style and budget.
As with any home improvement project, there are a few considerations to keep in mind.
The cost to build a home sauna heavily relies on how many materials and tools you already have, and performing all installations and customizations on your own.
Depending on the type of wood you choose, tools you purchase, and labor costs from hiring professional electric or plumbing installation, you’ll want to budget at least $1,000 for an at-home sauna. You can save money by converting an indoor space that already has accessible plumbing and electricity, or cut down on lumber costs by using a wooden shed.
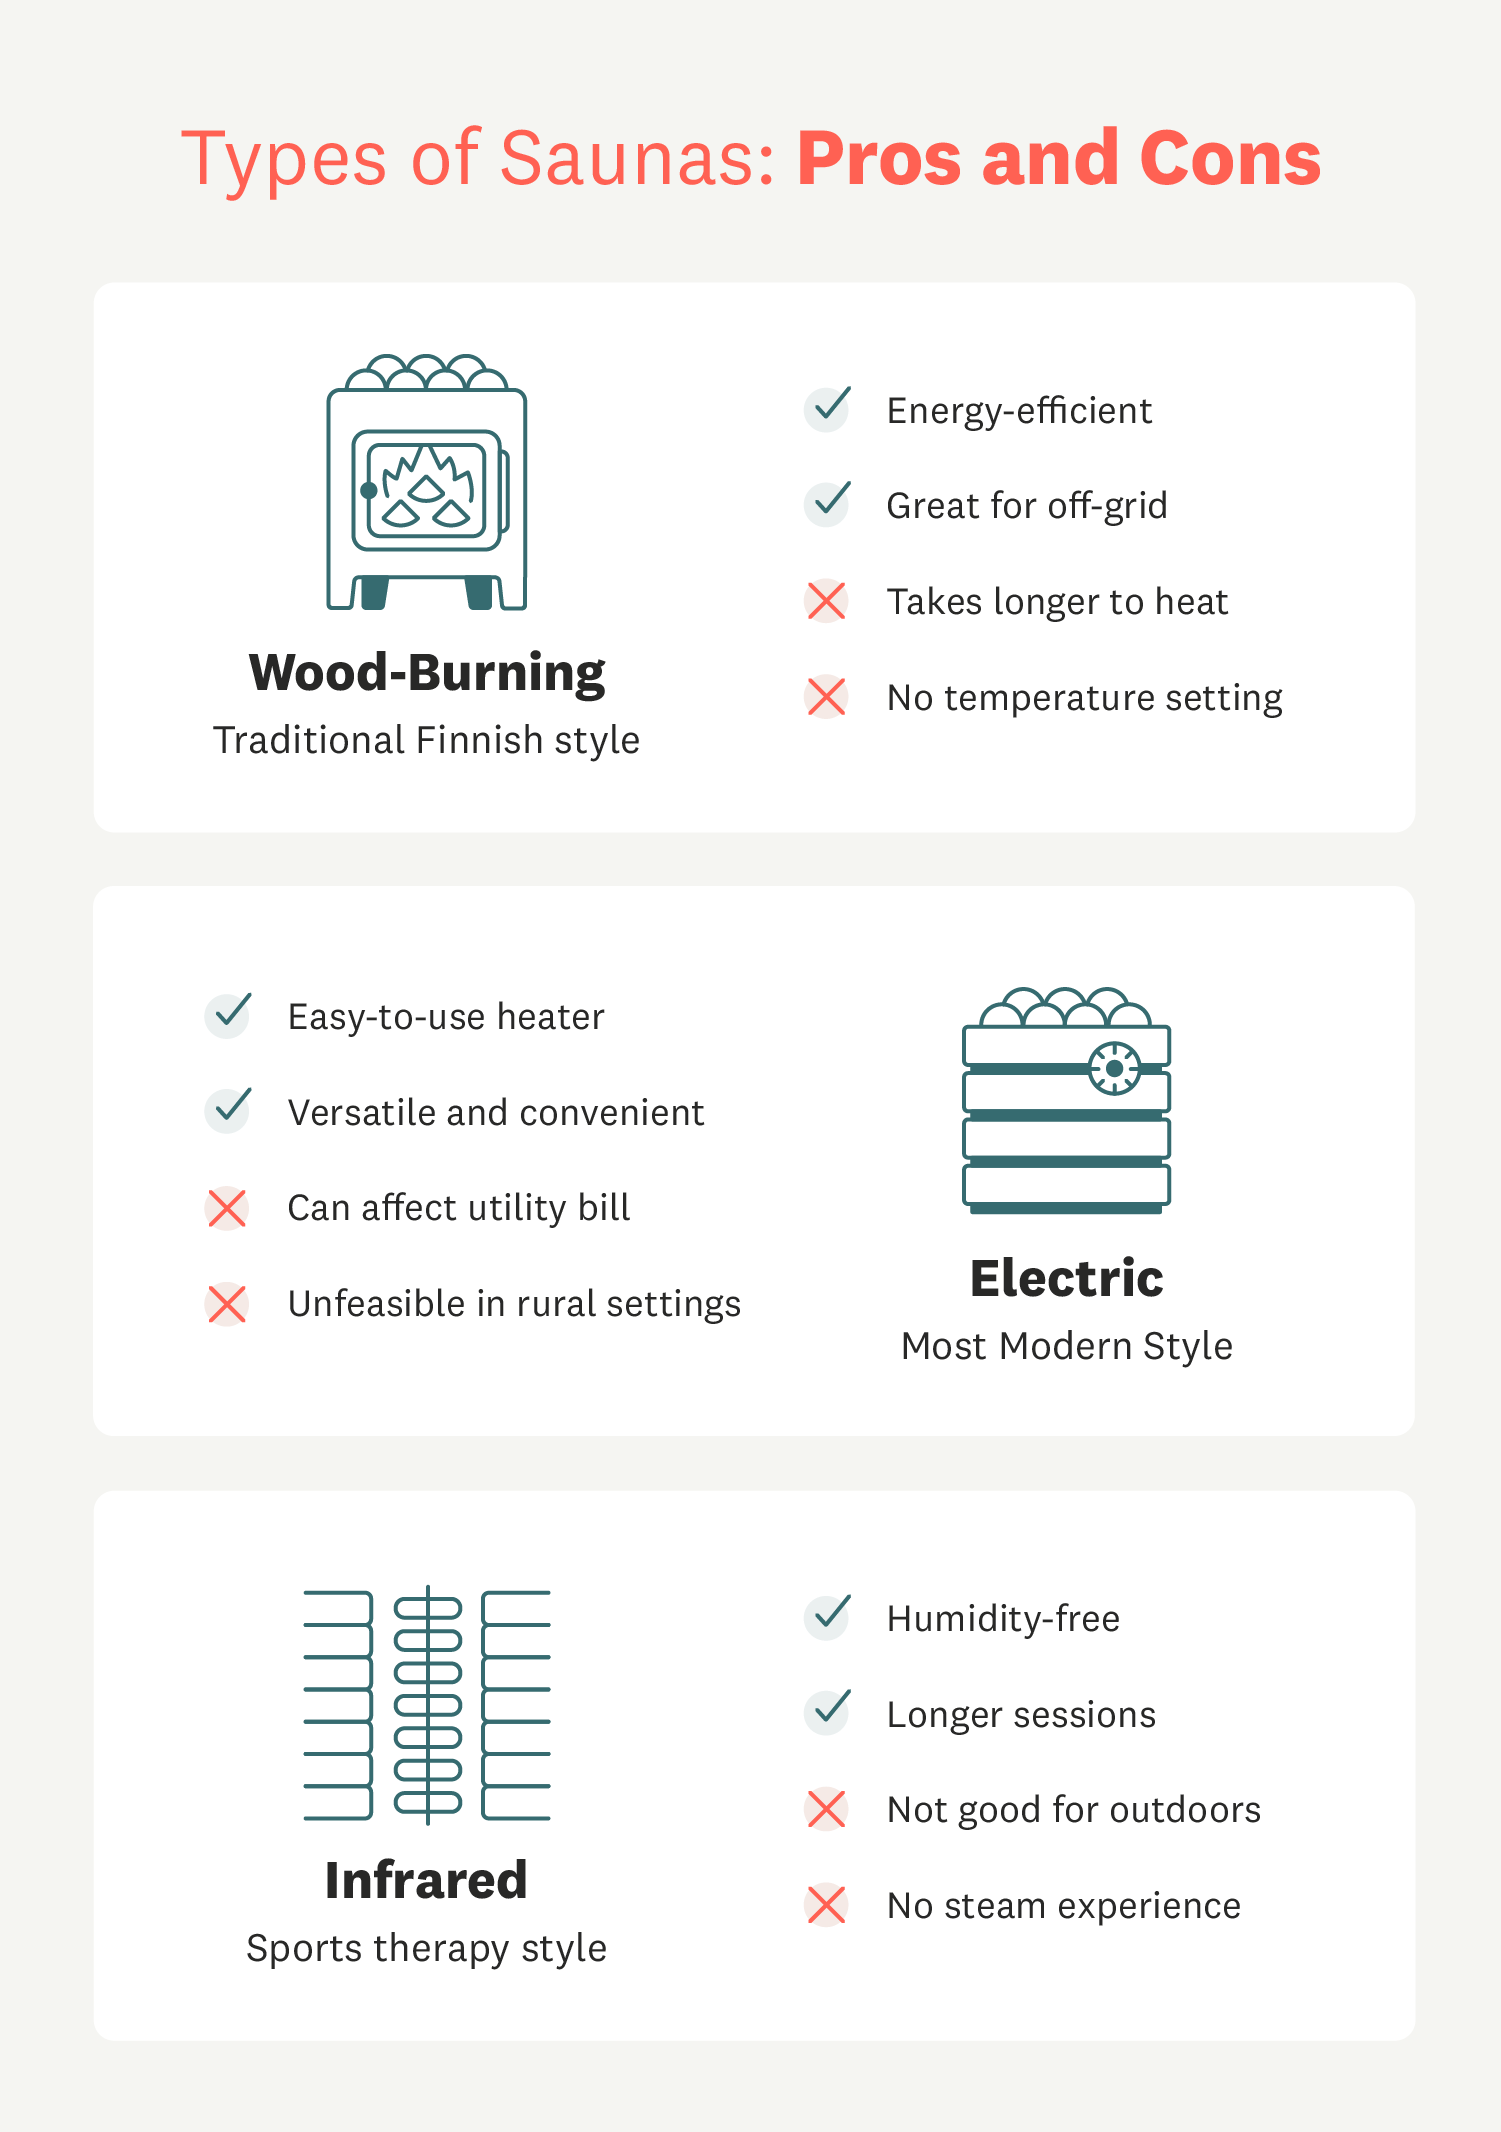
Sauna types are named for their heating methods. You can opt for the traditional wood-burning or electric stoves, or increasingly popular infrared heaters. The difference between infrared and traditional saunas comes down to the heat therapy preference: radiant heat emission or convection heat.
Infrared heaters are the most efficient, heating quickly and using less electricity. Electric heaters are easier to maintain and more convenient. Wood-burning stoves are a better option if planning to build off-grid.
You may need a building permit for your sauna project, especially if it’s a conversion within the home or will have electrical installations. These permits are to make sure you’re abiding by safety standards in residential areas. It’s a good idea to research your city’s construction guidelines beforehand.
Understand how to use your heating unit and what to do to avoid fires and other hazards. Equally important, know when to call an electrician for complex wiring or electrical problems.
You’ll need to build on a solid foundation, such as concrete, to frame the walls and roof securely. You can hire a woodworker to have an extra set of hands during this step. If you’re converting an existing space, such as a room, you’ll need to strip it down to the bare wall studs and ceiling joists.
To allow proper ventilation inside, NASS recommends including an air inlet of about 4 to 6 inches near the floor level, and an outlet on the opposite wall beneath the top bench.

After the framing is in place, you can run wires into the sauna space. These will be for any interior lighting and electrical devices you plan to include. Consider hiring an electrician to make sure this step is done safely and properly.
While plumbing for a sauna isn't mandatory, adding a drain inside can be helpful for water use and cleaning. A plumber in your area can provide guidance on the ideal pipeline for your particular structure.

Insulation is a critical step, as it helps retain the heat inside your sauna. Fiberglass batt, a popular and preferred choice, is non-flammable and comes in rolls of 16- and 24-inch widths. Line the inner wall frames and ceiling with rolls of batt insulation, covering the entire inner walls from floor to roof. Trim the width based on the distance between the wall studs.
Next, follow it up by installing the aluminum vapor barrier over the wall insulation, stapling it to the walls and ceiling with 3 inches of overlap. This helps keep moisture from seeping out, prohibiting mold growth.

Tongue-and-groove panels are ideal for the ceiling and interior walls. These unique planks have one “groove” side and the other is a “tongue” side that sticks out, enabling the panels to link together like puzzle pieces.
Starting with the ceiling, install cedar tongue-and-groove panels by nailing them perpendicular to the wall studs. You can measure the width of the area ahead of time to have a count of the number of panels you’ll need.
Next, begin paneling the walls starting with the back wall. Remember to cut around the locations of lights, vents, and electrical outlets. As you’re paneling, check the leveling every three to four boards.

Depending on the sauna style, your heating source may be wood-burning, electric, or infrared. Remember to determine the size of your heater by that of the sauna. A heater that is too small will take hours to heat and vice versa if it’s too large. It’s ideal to have 1 kilowatt for every 45 cubic feet of room space.
Be sure to follow the manufacturer’s instructions for the heater installation, as they’ll require specific clearance from the walls and seating.

Plan the spacing of your benches, such as the height in relation to the heating source, based on the heater’s instructions. Drill and mount two benches into the wall, one high and one low. The lower bench will serve as a step to the upper bench, which will be the hottest area within the sauna.

Fasten a pre-hung door to the frame with screws, ensuring it swings open from the outside. Glass doors are the most popular option for saunas, since they add natural light to the space and can help it feel less stuffy. Make sure it is tempered glass so it doesn’t crack from the heat.

The final step of the sauna is to make it your own. Many people enjoy adding scented herbs or essential oils for aromatherapy, including lavender, peppermint, and eucalyptus. You can also add backrests, music, and even the traditional water bucket and ladle for the ultimate sauna experience.
For a free-standing outdoor sauna, feel free to paint the exterior as a lovely backyard aesthetic. You can even decorate it with earthy elements, such as stones from your rock garden.
While a DIY job can initially save a few hundred (or thousand) dollars, we highly recommend not to handle your home’s electrical wiring or plumbing unless you truly know what you’re doing. Water damage and electrical issues are among the top most expensive home repairs, not to mention the most dangerous if improperly installed.
Hiring a professional may cost more money up front, but can save a ton from damage repair down the line.
From average costs to expert advice, get all the answers you need to get your job done.
Discover the average hot tub maintenance cost, what impacts pricing, and how to save money. Get expert tips to keep your hot tub running smoothly all year.

We could all use some relaxation, but we don’t always have the budget. This guide will show you how much an in-ground hot tub costs—no matter the build.

Hot tub repair costs will depend on the type and severity of the issue. Our cost guide will help you decide whether to DIY or hire a professional.

Wondering who to hire for sauna repair? Learn which pros to call, when to use an electrician, and how repairs get done. Get expert guidance now.
Find out the average pool pump repair cost, key price factors, and ways to save. Get expert tips to budget for your pool pump repair.

Knowing how to fix a crack in a hot tub can save you a lot of money and lengthen the life of your hot tub. Here is what to expect.