

The cost to renovate your lawn depends on the extent of the damage. Our guide will show you how much lawn renovation costs.
Poking holes in your yard might sound silly—but it can encourage future growth


Weird but true: Poking holes in your lawn can help your grass grow longer, stronger, and happier than ever. By allowing air, water, and nutrients to penetrate deeper into the soil under your grass, you can provide greenery with more materials needed to thrive.
Better yet, aerating your lawn is a relatively simple process that doesn’t need to be done often. Once you purchase (or rent) the aerator itself—there are a few different types to choose from, which we’ll get to below—very few expenses are involved in the project. In short: a DIYer’s delight. Let’s dive in, shall we?
Before we get into the steps, let’s talk more about why aerating your lawn can be so good for it—and when you should do so.
Over time, soil can become compacted—packed tightly together so no water, air, or nutrients can penetrate beneath the surface. It’s hard for plants, including grass, to root firmly into compacted soil, which is one primary reason aeration is beneficial.
Aerating also helps to reduce the buildup of thatch, the layer of shoots, stems, roots, and other plant material, both living and dead, that accumulates between the top of the grass and the surface of the soil. While some thatch is beneficial, too much thatch can trap moisture and keep oxygen from reaching the roots, which is another good reason to aerate your lawn.
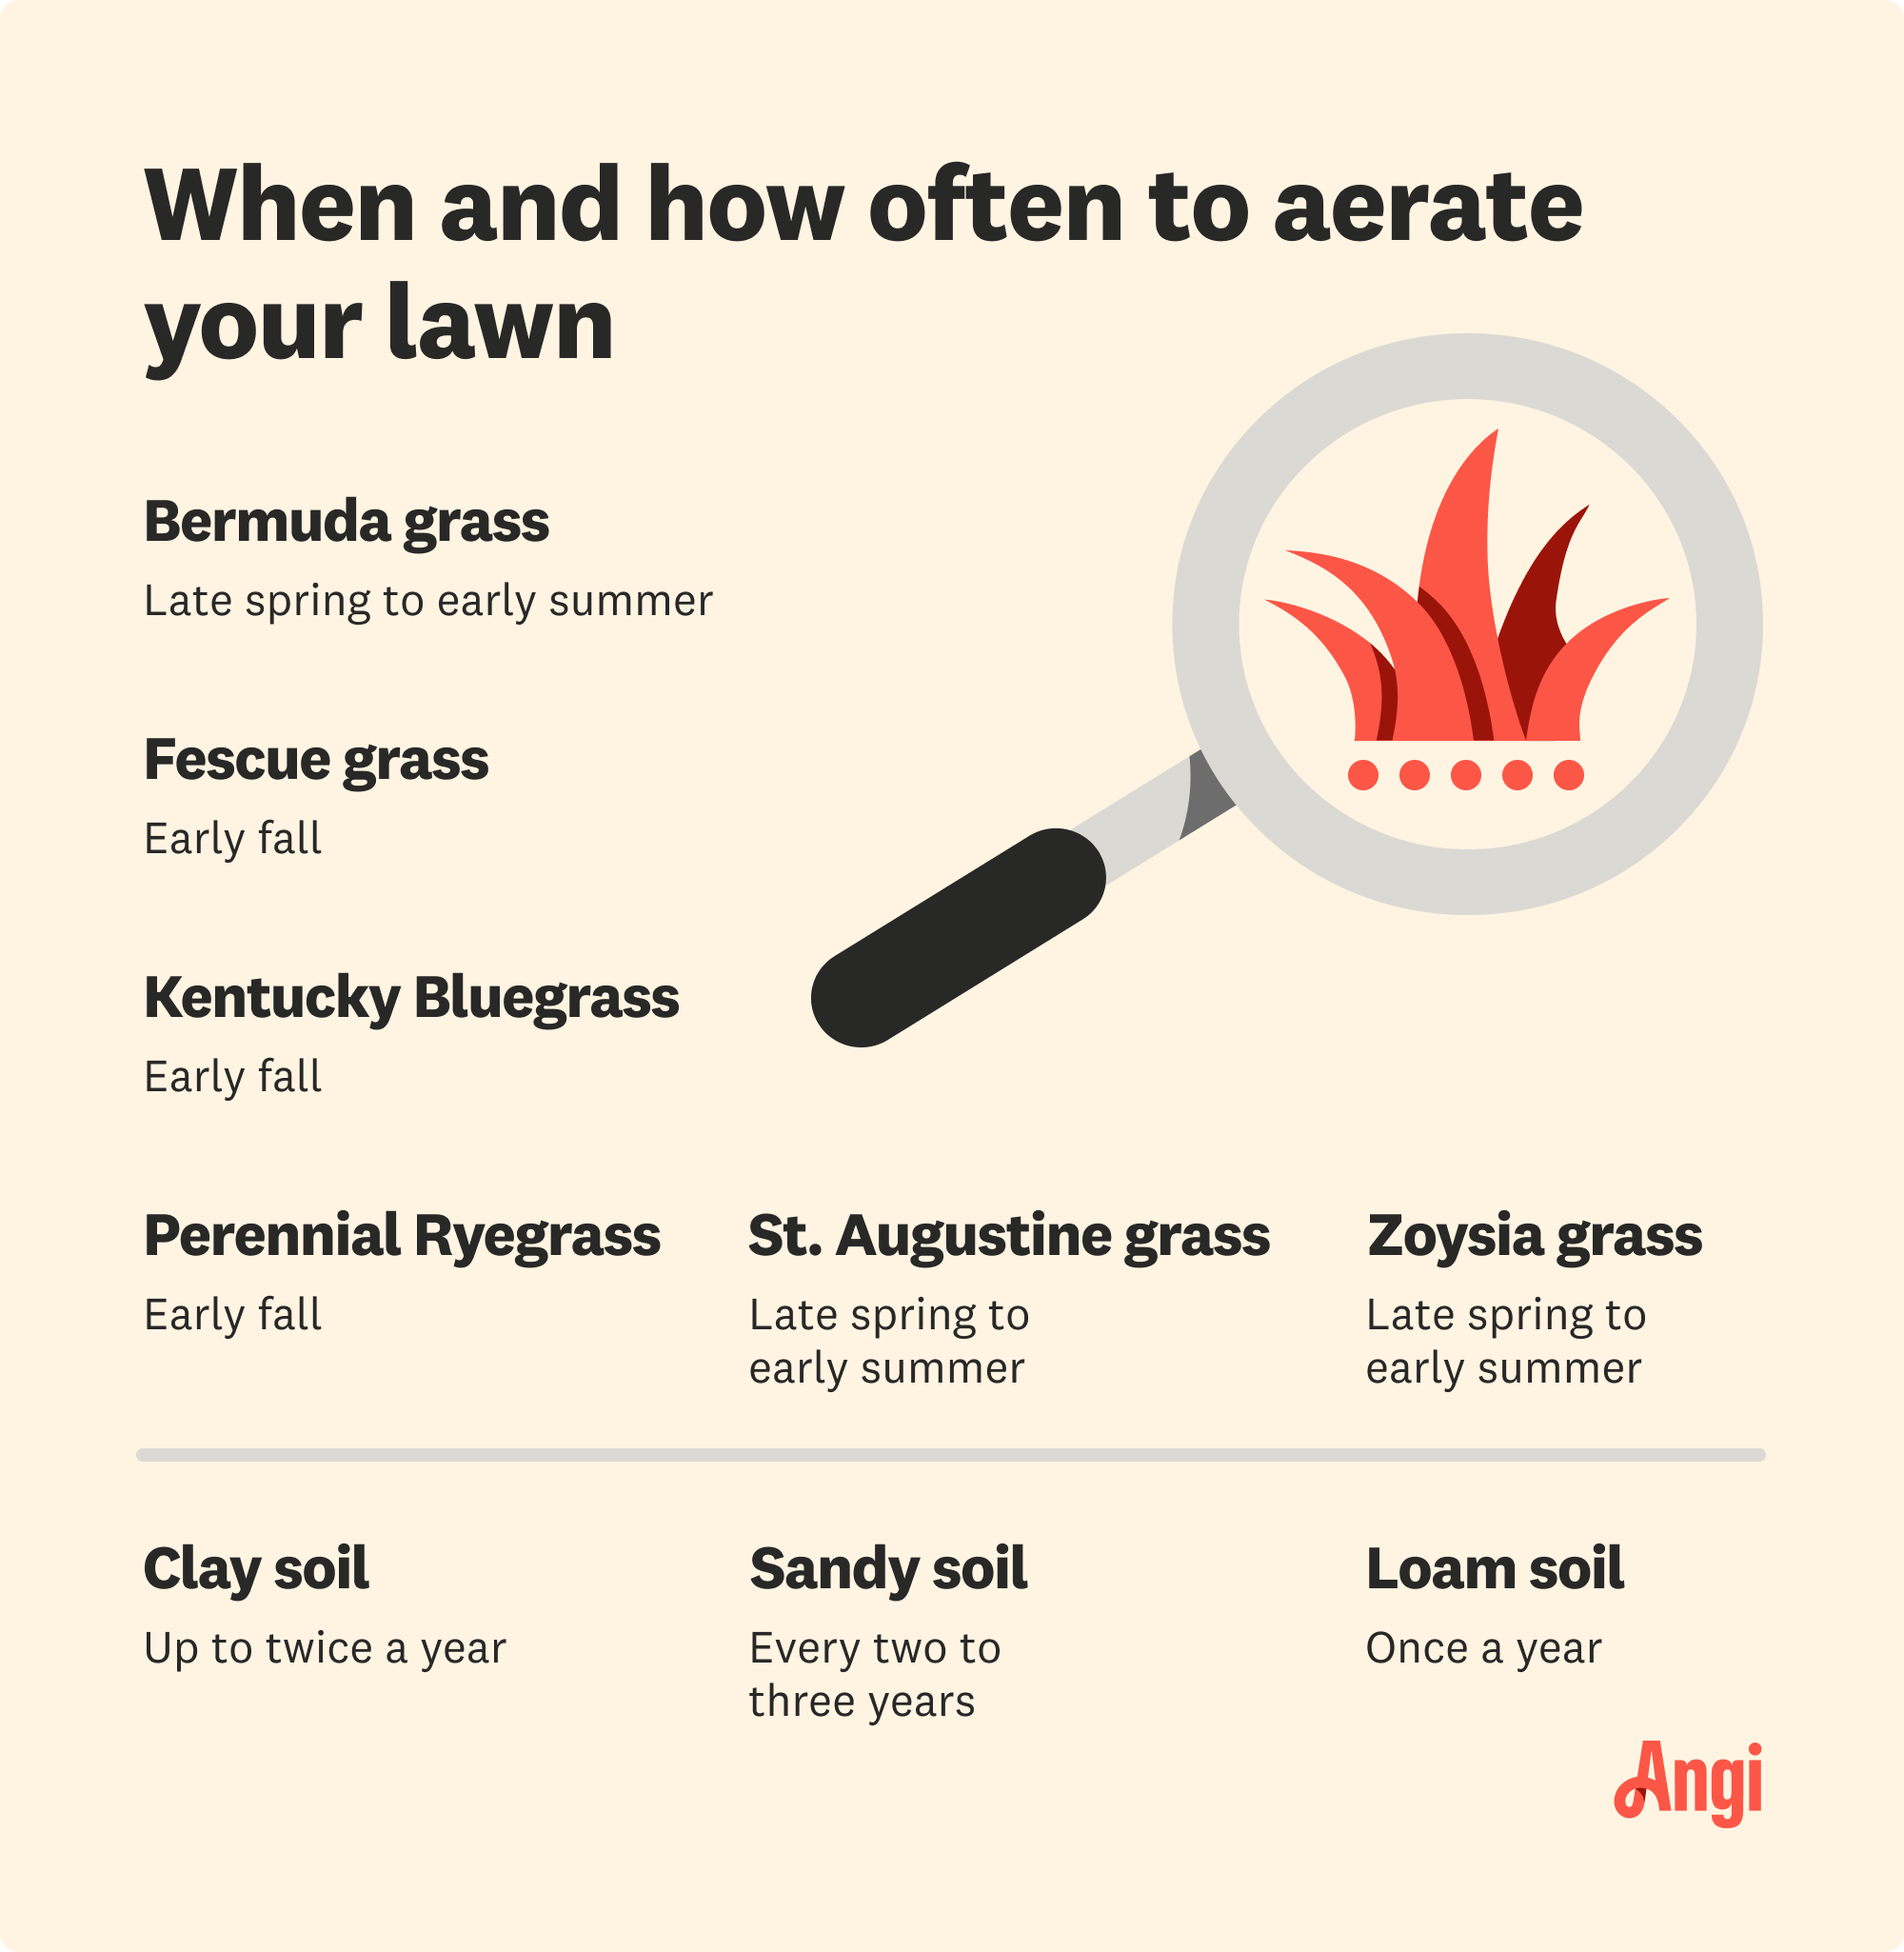
While most types of grass can benefit from aeration, the timing depends on various factors, including what type of grass you have and how it appears to be doing. In addition, the aeration should be done during the growing season—aerating dormant grass can add stress and give you an even patchier-looking lawn.
Different types of grass have different specific growing seasons, but generally, the ideal time to aerate your lawn is late summer or early fall.

Check out your lawn to see if it needs to be aerated. Some signs it might benefit from aeration include:
Noticeable soil compaction in the form of water pooling on the ground’s surface or excess thatch buildup
Weak, thin, or browning grass that doesn’t seem to be responding to watering and other care
The lawn hasn’t been aerated in a while—most types of grass should be aerated every one to three years.
Again, remember that different grass types have different growing seasons and ideal aeration timing, and different soil types have different aeration frequency needs.
Once you’ve determined that your lawn could benefit from aeration, it’s time to choose your aerating method. There are several options to consider:
Spike aerators use, well, spikes to press holes into your lawn. They might be a manual type that you stamp down into the lawn using your hands or a push/pull-behind type that works similarly to a manual lawn mower.
Core aerators use hollowed-out spikes to take out a core of the soil in the areas you aerate rather than simply poking holes. Again, a core aerator might be manual or a type you can pull or push, and motorized core aerators are also available. Some consider the left-behind cores to be an eyesore for a while, but eventually, they decompose back into the soil.
Slice aerators aerate using blades instead of spikes to slice diagonal cuts into the soil, and, like spike aerators, don’t leave visible evidence of the aeration.
Aerator shoes are spiked attachments you can strap to your boots, making aerating your lawn as simple as walking around. While they won’t penetrate as deeply as other aerators, they are affordable and straightforward.
Garden forks and pitchforks can also be used to aerate a lawn, especially if you only work with a small lawn or a specific problem area. However, they will give you less even, consistent coverage than other types of aerators, and they can increase the time your project requires by quite a lot. That said, if you already have one of these tools, it could save you the money you’d invest in buying or renting an aerator.
Liquid aerators are liquid solutions you can spray on your lawn to help break down thatch. Although they’re easy to use, they do little to help with soil compaction and aren’t necessarily a great replacement for traditional aerating methods.

Once you’ve chosen your aeration method, it’s time to prepare your lawn for aeration. The first step is to trim it using your lawn mower to help ensure the surface will be nice and even for the aeration process and that the aerator can penetrate to the right degree. For most types of grass, you’ll want to trim the lawn to two to three inches in height.
A well-watered (but not soggy) lawn responds best to aeration, so the next step is to go ahead and plug your sprinkler into your garden hose and give the lawn a drink. Ideally, you’ll want the soil to be soft and moist but not saturated with water, so it’s usually a good idea to wait about a day (or up to two) after watering your lawn to begin the aeration process.
Once your lawn is just moist enough for aerating, take a moment before you begin to use irrigation flags to mark any obstacles you don’t want to aerate over. For example, you might mark sprinkler heads, stumps, or areas where you know utility lines run shallowly underground.

All the preparation pays off now: It’s time to aerate the lawn!
Don your gardening gloves and then use your aerator of choice to poke even holes throughout your lawn’s surface. (The process will depend on what kind of aerator you’re using, but it might involve stamping down a manual spike aerator or pushing a core aerator, for example.)
To ensure you thoroughly aerate the entire lawn, make even passes that overlap each other by half the width of the aerator and apply a steady, even pressure the whole time. Many people aerate their lawn twice, making one pass vertically and then one pass horizontally as if drawing out a chessboard pattern.
Voila: Your lawn is aerated! Now’s a great time to provide some additional aftercare to your lawn.
Firstly, if you use a core aerator, leave the cores where they are until they’re dry enough to pick up—usually a few days or so—and then use the blunt end of a rake or another garden tool to break them up and spread them out across your lawn. Eventually, these plugs will decompose and return to the soil, adding additional nutrients to your grass roots.
After that’s done—or anytime after aerating, if you used a different kind of aerator—you can apply fertilizer and, if needed, grass seed to further promote healthy growth. Always water your lawn after applying fertilizer to keep it from chemical burns.
Finally, give your lawn a break during this time, avoiding heavy foot traffic by pets, kids, or adults. Once the lawn settles in with its stronger grass, it’ll be ready to host the best Labor Day picnic or Thanksgiving football game ever—but it needs a few weeks to do its thing first.
While aerating your lawn is a fairly straightforward DIY process, some homeowners prefer hiring a professional to save time and effort. Fortunately, your local lawn pro will be happy to help you poke some well-intentioned holes in your yard.
From average costs to expert advice, get all the answers you need to get your job done.
The cost to renovate your lawn depends on the extent of the damage. Our guide will show you how much lawn renovation costs.
Artificial grass is a low-maintenance alternative to traditional turf. Learn how much artificial grass installation costs and what affects your price.

Removing an old lawn is often necessary to plant new grass or build a new outdoor structure. Find out what to budget for your lawn removal cost.

Learn how to get rid of quack grass and keep it from returning once you discover how to identify it in your lawn. Read on to learn more.

Want to know how to get rid of Johnsongrass in your lawn? Here’s how to control this noxious weed, from identifying this invasive grass to using chemicals against it.

Does mowing less sound appealing? Here are the no mow grass pros and cons and alternative choices for a lawn that requires less maintenance.