

A basement bar can add value to your home and serve as a great place to entertain. Use this guide on the cost to build a bar in your basement to get started.
Step in and submerge yourself in this thorough process


You’ve been dreaming about remodeling your basement so it (finally) becomes a livable space, and to save costs, you want to DIY the bathroom. Learning how to add a bathroom to a basement is no small feat. To help you on your journey, we’ll provide a step-by-step guide on how this project is done.

This project's planning phase requires lots of research to ensure your bathroom will work in your space. You’ll need to create a detailed outline of how you want your bathroom to look. It must cover where you want walls to go, how your door will swing, the space between each fixture, the type of fixtures and finishes, and where your plumbing is located.
Since you’ll likely need permits for a project of this size, your plan can’t skip out on essential details. The more information your city or county’s office will need before they approve it, the longer it can take to get this project off the ground. Also, since this project requires plumbing and electrical work, you may need a licensed plumber and electrician to sign off on your plan to get it approved.
One thing to consider is that you can save time and money by installing your bathroom next to your existing pipes.
Once you’ve taken the time to make a detailed (don’t skip that step!) project plan, you’ll need to obtain the necessary permits. Each jurisdiction might have specific requirements, so it’s important to familiarize yourself with them to know which permits you’ll need to pull and get approved.

Contact an inspector near you to assess the site and your plan to ensure it’s feasible. They’ll let you know if something needs to be changed. This step is vital for older homes with unforeseen issues that could make the project dangerous.
Here’s the truth: this project will not be completed in one (or two) days. However, it’s best to gather all your tools and supplies and have everything you’ll need for the entire project close by. Though you won’t need everything within reaching distance all the time.
Use a measuring tape or ruler, measure 4 inches from your existing exterior walls, and then mark it. You’ll repeat this at each corner. Then, use a marker and a straightedge to draw lines to connect each mark. You’ll also need to mark off your interior wall now, making sure to account for your door, fixtures, and existing pipework in case you need to break up concrete along your wall.

To frame your wall, first, measure and cut pressure-treated 2-foot by 4-foot or 2-foot by 6-foot boards to create the perimeter of your bathroom walls using a miter saw. Once finished, conduct a dry-fit test to ensure everything will fit as intended. Then, use a cordless drill and a masonry drill bit to pre-drill where you want the concrete anchors to go. Typically, you must drill holes 3 inches from each end and every 2 feet. Then, apply subfloor adhesive to the back of each piece of lumbar and use 3-inch anchors to secure it to the floor.
Measure, cut, and attach the top plates to your basement’s ceiling with framing nails, ensuring they’re level and install backing as needed. Then, install your studs based on your local building code requirements. You’ll use framing nails to attach them to the bottom and top plates.
Once your top and bottom plates and studs are in place, measure, cut, and place your king, trimmer, and header studs to provide your door with the support it needs.
Look at your markouts for the fixtures and ensure they follow your building code requirements. Also, look over your framing work to ensure it’s sturdy, level, and plump.
Use a drop cloth and tape to section off where your new bathroom will be. Since you’ll be breaking through concrete, this step will help keep all the dust contained in one area.
Since you’re getting ready to rough-in plumb your bathroom, now’s a good time to turn off your water supply line so water isn’t flowing through the pipes as you work.

Put on a dust mask and goggles to protect your eyes from wayward dust and chipped concrete. Use a jackhammer to break the concrete until you can access the main drain line. If you’ve never done this before, take your time and work slowly.
Put on knee pads and use a shovel to dig trenches for all your fixtures where the drain and vent pipes will go. Ensure your trenches are pitched 1/8 of an inch per foot so your pipes can properly drain. Periodically check its slope to make sure it’s correct.
Once the trenches are in place, cut the existing drain pipe that connects with your sewer line so you can connect the old with the new. If there’s a size difference between your drainpipe and new PVC pipes, use a flexible, no-hub coupling with the correct size to connect them. Then, tighten it with a torque wrench on one side. Your toilet should be 12 1/2 inches from the studs, the sink drain must be 16 to 20 inches from the floor, and the tub drain must be 10 to 14 inches from the wall. Keep these requirements in mind when positioning your drain pipes.
Next, you’ll work on assembling the drainpipes to their respective fixtures. As a note, the first pipe from the existing drain pipe will have a wye fitting. Start at where your fixture will be located and confirm that it’s in the right spot to meet code requirements. Then, measure the distance between that pipe’s location and the pipe from the drain line. Typically, you’ll need a 3-inch PVC pipe for the toilet, a 2-inch pipe for the shower, and a 1 and 1/2-inch pipe for the vanity. However, refer to the code requirements to see if you need specific sizes and pipes.
Based on your measurement, cut a pipe to join them. You’ll work on one fixture at a time, then use a utility knife to deburr (clean) the inside and outside of your pipe.

When installing your drain pipes, you should also install your vent pipes. The Uniform Plumbing Code (UPC) recommends using a 2-inch PVC pipe for toilet venting. Ensure you adhere to local building codes on specifications like how you’ll install it, the material you’ll use, and the distance between your fixtures and pipes. Measure the distance between your vent pipe and your vent stack to know how much material you’ll need and how you’ll run it. Once you’re confident in your measurements, cut your material, deburring each piece as you go. Connect your vent pipe to your main stack. using PVC couplings or connectors.
Now, conduct a dry-fit test on your drain and vent pipes. If everything checks off and is leveled, connect the PVC pipes to the main drain line using the correct fittings, purple primer, and PVC cement. Also, during this time, tighten the other end of the coupling. Now, you need to install a pipe extending above ground for each fixture and cap its top to prevent dirt and debris from entering it.
Once your plumbing is in place, contact an inspector to check and approve your plumbing work. And yes, putting a bathroom in a basement does require multiple interactions with an inspector. These pros are here to give you the go-ahead on your project and make sure your new bathroom lasts more than a few days. After inspection, take images of your approved pipe assembly in case you have issues you need to fix in the future.
Start backfilling your trenches with enough gravel to support and cover your pipes. However, be careful not to throw the rocks too hard and accidentally break the pipes.
You want to double-check that everything up until now is still in line with your plan. Ensure your framing is in order, and that your pipes are connected and sloped correctly. Taking some time to check your work now can save you headaches in the long run.

First, put on a dust mask. Measure the water you need and then pour it into a large bucket. Then, place your unopened concrete bag on top, cut it from underneath, and pour around 70% into the bucket. Next, you’ll use a power drill with a paddle mixer attachment to mix it. Once mixed, pour the concrete into the hole and use a 2-foot by 4-foot board to spread and smooth it out. Repeat this process until your floor is covered.
Once your concrete has dried and cured, it’s time to connect the vent pipes to your existing vent stack. Since you planned how your pipes will run in the previous steps, the focus now is to assemble all the parts during a dry-fit test. If you need to reach your vent stack through your framing, use a cordless drill and a 2 1/2-inch hole saw attachment to make the connection. If everything checks out, use PVC primer and cement to join them and metal straps to hold them in place.
Next, install five water supply lines. You’ll need a hot and cold supply line for the shower and vanity, and only a cold supply line for the toilet. While you can use any material for your supply lines, we’ll continue this step with PEX pipe since it’s flexible and easy for DIY installation.
You need to run your lines to the main water supply line. Your toilet line must be 6 inches to the side of its centerline. The lines for your vanity will be 4 inches to the right (cold) and left (hot) of the centerline of your sink drain, and 18 inches from the floor. The water supply lines for a shower/tub combo will be similar to the vanity in placement. The tub lines will be 20 to 22 inches from the floor, while the supply line for the shower will be 80 inches from the floor. Check with your local building codes to see if they have different requirements.
If you need to run your pipes through the wall, use a cordless drill and 1 1/2-inch hole saw to get the job done. Also, make sure to install a shutoff valve near each fixture, use fittings to connect your water lines, and finally, pressure test it.
Given that electric work is a pretty big job, we recommend calling your local electrician to make sure your new bathroom is wired correctly.

First, put on your goggles and protective gloves. Then, install your insulation and vapor barrier based on the type of material you have. Be careful when installing your insulation around your electrical wires.
With the insulation up and ready to go, next is your flooring. Check and see if it’s level. If it’s not, use a Tapcon screw to gauge how much self-leveler you’ll need. Then, sweep it to remove any loose dirt and debris and use a damp sponge to pick up lingering dust. You’ll also caulk the bottom perimeter to prevent runoff leveler.
Now, prime your floor using the primer that came with your self-leveling kit, and let it dry for 24 hours. Then, mix your self-leveler according to the instructions and pour it over your flooring, using a floor squeegee to smooth and spread it out. You’ll repeat this process until your floor is level.
Read the manufacturer’s instructions to see if your tub requires a mortar base. If it does, mix thin-set mortar in a bucket and apply a 2-inch thick layer on the floor to install your tub. Be mindful not to put it too close to the drain pipe. While the mortar is still wet, place your tub in its bed. Use 2-inch galvanized screws to secure your tub to the studs.
Since the tub will get wet (of course), use HYDRO BAN boards around it to create a waterproof barrier between it and your wall. Measure and cut your boards, then apply the HYDRO BAN sealant to the tub lip and use those galvanized screws to attach it to the studs. You’ll do this on each side of your tub, and use the sealant to fill in gaps between the boards and your wall.

With your insulation in place and your tub secured, it's time to install your drywall. For this step, put on your dust mask, goggles, and gloves. First, you may forget where your electrical and plumbing lines are after completing this project, so it’s worth nailing a protective metal plate over your lines to cover them. Also, you want to avoid creating too many joints and cutting into them frequently. Measure your wall to see if installing your drywall boards vertically or horizontally is best. When planning how to lay your drywall, avoid having joints line up with the edges of your basement door to prevent cracks.
Once you’ve planned its installation, use a pen to mark where you’ll need to cut it and use a utility knife and straightedge to help you cut through it. Then, grab its corners and pull down to break its core. Next, cut your board again, where it broke off, to separate the pieces.
Install the drywall on your ceilings first, using drywall screws that you’ll space every 12 inches. Ensure you’re drilling it deep enough to be below the drywall surface but not so tight that it tears the paper level. You should be able to run your finger over the screws and not feel a hump.
Then you’ll install the top panels first, pushing the top edge seamlessly, connecting it to the ceiling panels, and installing a screw every 16 inches. While you want no gaps between your wall and ceiling panels, you want to leave a 1/2-inch gap between your walls and floor.
To make cutouts for your electrical boxes and fans, you need to measure the distance of where it’s located on your wall and line it up with your drywall panels. From there, use a pencil to draw the cut out and then use a keyhole saw to cut it out. Use the HYDRO BAN sealant to fill in gaps between your drywall and HYDRO BAN boards.
You’ll use the proper joint compound for your drywall type to fill the gaps in the wall, and then it’s ready to prime and paint.
Depending on your flooring choice, follow the manufacturer’s instructions on how to install it. Before you begin, give your chosen adhesive a clean base by sweeping the floor and passing a damp sponge over it to remove any dirt, dust, and debris.
Now that your flooring is in place, it’s time to install your remaining fixtures. Install a 3-inch toilet flange where the drain pipe is, then its bolts, and tighten them with an adjustable wrench. Next, install the toilet seal or wax ring on the bottom of the toilet bowl to ensure the best seal. Then, align the bowl with the holes, install the washer and nuts at the base using a hacksaw to remove excess bolt material if it sticks out too much, and install the tank, seat, and lid based on the instructions. Attach the toilet to its supply line and conduct a test run to check for leaks. If everything works, caulk your toilet base and let it dry.
Depending on the type of sink you’re installing, there are different ways to install a bathroom sink. Follow the instructions for your sink, and connect your vanity sink to its supply lines, and use a J trap to connect the drainpipe.
Next, connect the tub and shower fixtures to their drain pipes and supply lines. Following the manufacturer's instructions, use this time to install the exhaust fans, lighting, and shower curtain rod.

Now, you’ll install the trims, baseboards, and door and make any final finishing touches before finishing this project.
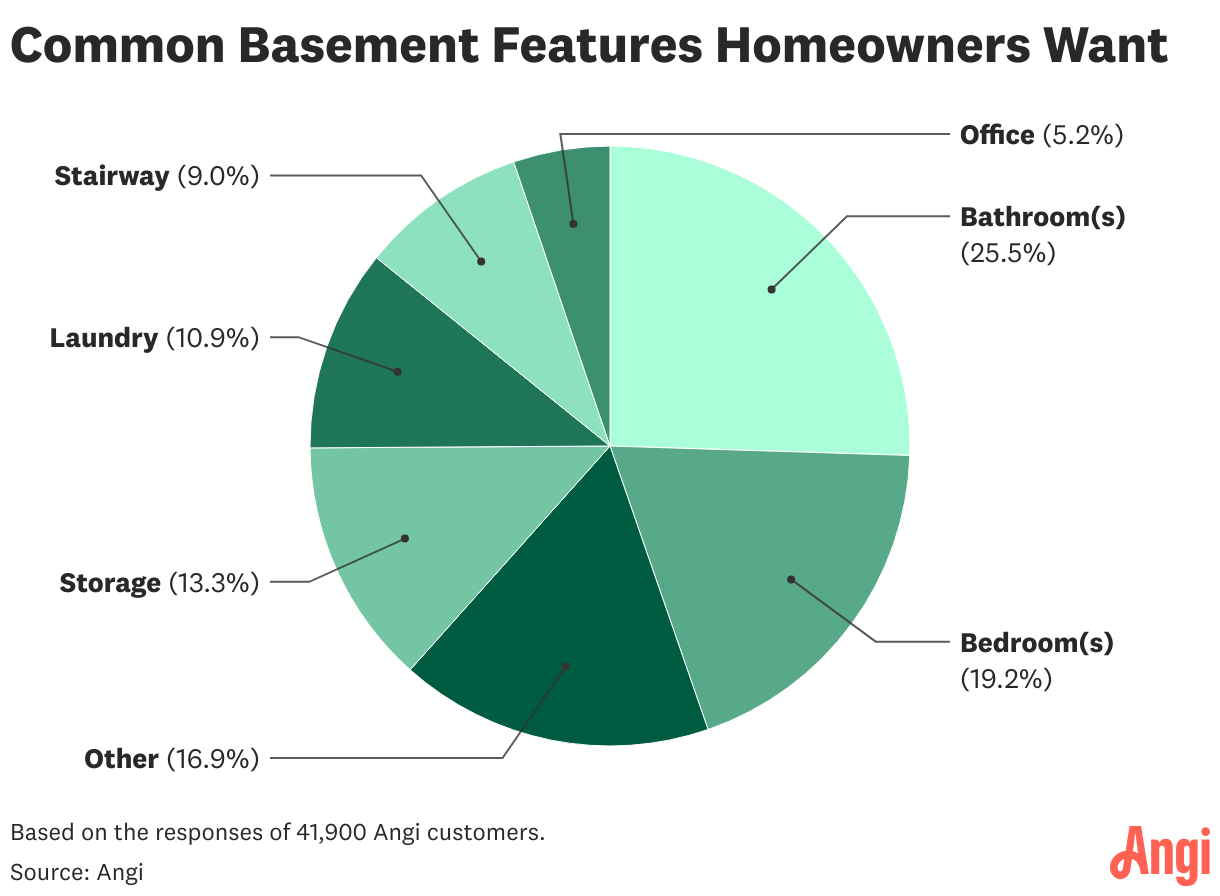
According to data from Angi, about 26% of homeowners want to add a bathroom to their basement. Roughly 19% want to add a bedroom, 13% want storage, and 11% want a laundry room. Check out the chart below to see what features other homeowners want.
It goes without saying that building a bathroom in the basement is a long and tedious process that requires multiple expert-level skills to complete. There’s far too much room for error. That’s why we recommend letting the professionals tackle this project for you, and a local basement remodeling company oversee the project.
However, we understand wanting to save money. After all, the cost to add a bathroom to your basement is $8,000 to $15,000. Undertaking this entire project might not be doable. But once the groundwork is complete, you can install the drywall, trim, flooring, and paint to lower your total project cost.
From average costs to expert advice, get all the answers you need to get your job done.
A basement bar can add value to your home and serve as a great place to entertain. Use this guide on the cost to build a bar in your basement to get started.

The cost of installing a wine cellar varies based on square footage, the type of wine cellar or wine cave, materials used, where it is located in the property, and where you live. Use this guide to find how much your wine cellar will cost.
An unfinished basement has a lot of potential for a family room or guest suite. So how much does it cost to finish a basement? Read on for all cost factors.

Thinking of finishing your basement? Before you do, learn about when permits are required and what happens if you don’t get one before beginning construction.

Thinking of refinishing your basement and looking for basement remodel ideas? Check out 25 ways to transform your subterranean space.
Finishing a basement isn’t always ideal. Learn about the differences between a finished and unfinished basement and which is right for you.