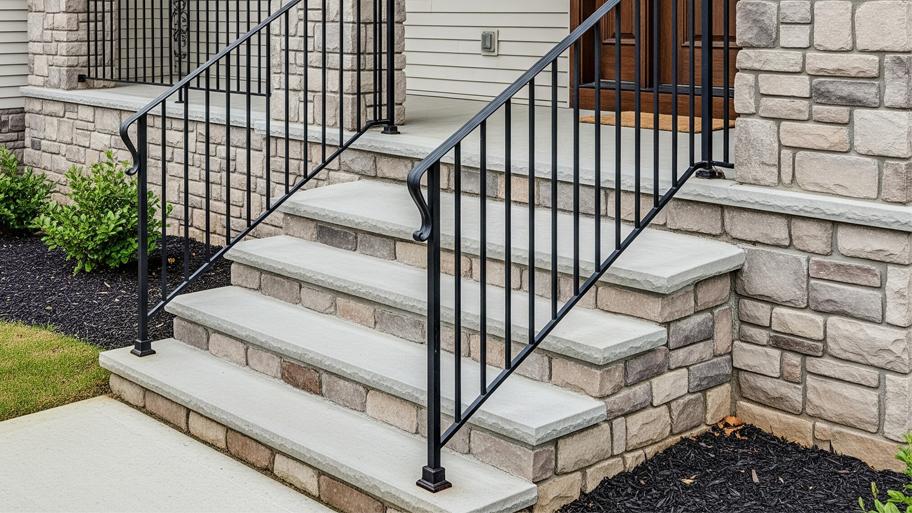
How much does outdoor railing installation cost? Find out the cost to install a railing on concrete steps, porches, and patios, including material and labor.
A few tools and a free Saturday are all you need to restore your banister


Making a grand entrance down your old oak staircase has a greater impact when your banisters look the part. Imagine a beautiful, elegant, and natural-looking focal point that only gets better with age. Staining a banister is a simple DIY staining project that will restore and modernize your outdated handrail and spindles in just under a day. And while this project requires a bit more prep work than other painting projects, the effort is well worth the final result.
Before beginning any paint project, it's important to protect your stairs and the surrounding walls with a plastic or cloth covering. Extend the drop cloth slightly above and below your banister to protect the floor from stain splatters. Then, secure the edges with painter's tape.
Decide whether you plan to repaint the handrail, balusters—aka spindles—or both. You might also consider mixing and matching the colors of your handrail and spindles to make your banister stand out.
Lastly, staining your banister to last requires a few potent chemical strippers, stains, and sealants, so ventilation is key. Ensure your workspace has ample airflow, and if you have kids or pets, consider keeping them distracted in another room for the duration of this project.

Fight the urge to jump right into the staining process. Your new stain will not grip onto your surface properly unless you remove the old finish first. Some quick prep work can help ensure you aren’t dealing with uneven, peeling, or chipping paint a few months down the road.
Remove the old finish using a chemical stripper or by direct sanding. Whichever you choose, grab your safety gloves, goggles, and a mask for this step.
This method removes the varnish layer—and a bit of the stain— to expose the wood for painting. Some bottles will instruct you to dilute the solution with water, but properly applying the chemical will vary based on the solution you chose. In general, you’ll start by applying a thick layer of solution using one of your paintbrushes. Take extra care not to drop liquid onto other parts of the stairs. Let the solution sit on your banister for 15 to 30 minutes, depending on your bottle’s specific instructions.
Next, grab a scrubbing pad, a plastic scraper, or soft-grade steel wool to remove the loosened varnish. Use a clean cloth for those hard-to-reach places around the balusters.
Wash off the remaining chemical solution with water—again, this may vary depending on your instructions—and then take a break while you wait for the wood to dry.
Direct sanding is a bit easier if you stripped the railing with the chemical solution first. But if you prefer to skip the chemicals, you can start by sanding off the old varnish and staining using sandpaper.
Run medium-grit sandpaper over handrails and spindles, making sure to get into all the small corners and crevices using the corner of the paper. If you have a large banister or thick varnish, a power sander might be a handy tool.
Finish with fine-grit sandpaper to get any remaining bumps, splinters, or patches of old stain until the wood is smooth. Use a clean damp cloth to catch any lingering dust or bits of sandpaper.
Your stain will adhere to your wood surface more evenly if you apply one or two thin layers of sanding sealer first. Also known as wood conditioner, this acts as a primer and costs under $20.
Add a thin layer of the sealer to the wood, wiping off any excess with a clean cloth as you go. Depending on the instructions, you can add a second layer, but avoid letting extra sealer pool in banister carvings. Once applied, take another break while this layer dries.

At long last, it's time to add the stain. Choosing a new stain color is a great way to modernize your banisters. Don't be afraid to go lighter or darker than before. A rich brown or java stain would pair nicely with crisp white walls. Darker colors can cover up existing imperfections and help hide dings and scratches that accumulate over the years. Whatever tone you choose, follow these tips for how to stain a banister:
Add the stain with an angled paintbrush, moving with the grain and layering over your last brush stroke to cover every open spot
Make sure your first coat is thin and even
Avoid letting the stain pool in nooks and crannies, as well as at the bottom of the banister
Darken the stain by applying a second coat and lightly sand in between layers for lasting results
You'll have your pick between oil or water-based stains, but your final choice will ultimately come down to your preferences. Water-based stains are generally easier to clean up and are way less potent. You could also opt for a gel stain that applies more evenly with fewer drips.
However, a raised grain effect is common with water-based stains. This is when fibers in the wood stick to the water-based layer, dulling away the original color and natural grain appearance.
An oil-based stain provides a more even appearance, but some DIYers prefer to skip it due to its potency and occasionally high levels of chemicals that can irritate your eyes and skin.
Once the stain has fully dried, apply a polyurethane sealant. Use a new clean paintbrush to add one or two layers, allowing the coats to dry in between.
Each layer of sealer and stain should take a couple of hours to dry. But with a little bit of patience and precision, you can have your banister looking like something out of a grand ballroom without having to break the bank.
From average costs to expert advice, get all the answers you need to get your job done.
How much does outdoor railing installation cost? Find out the cost to install a railing on concrete steps, porches, and patios, including material and labor.

Discover the cost to install a stair railing, including average prices, key cost factors, and tips to save on your project.
Discover the cost of widening a doorway, including average prices, key cost factors, and tips to help you budget for your project.
Learn how to measure baseboard trim of any style or size to help speed up installation, save on materials costs, and look amazing anywhere in your home.

Does crown molding add value to your home? It adds aesthetic value to some designs, but you should install it less because of ROI and more because you love it.

Stair railing heights can be adjusted somewhat, but building and safety codes have parameters to obey. Read on and learn how to arrive at precise, usable measurements.