Cleanout cost may be one of your first thoughts when left in charge of an estate. We walk through factors to expect, the professional estate cleanout services cost, and ways to save.
Have your silver looking lustrous again in a snap


Polishing your silver may not seem like a fun way to pass an afternoon. But if you do it correctly, you won’t need to worry about it again for a long time. With just a few items, you’ll have your silver glowing again in no time. Here’s how to clean, polish, and maintain your silver to keep it looking like new.
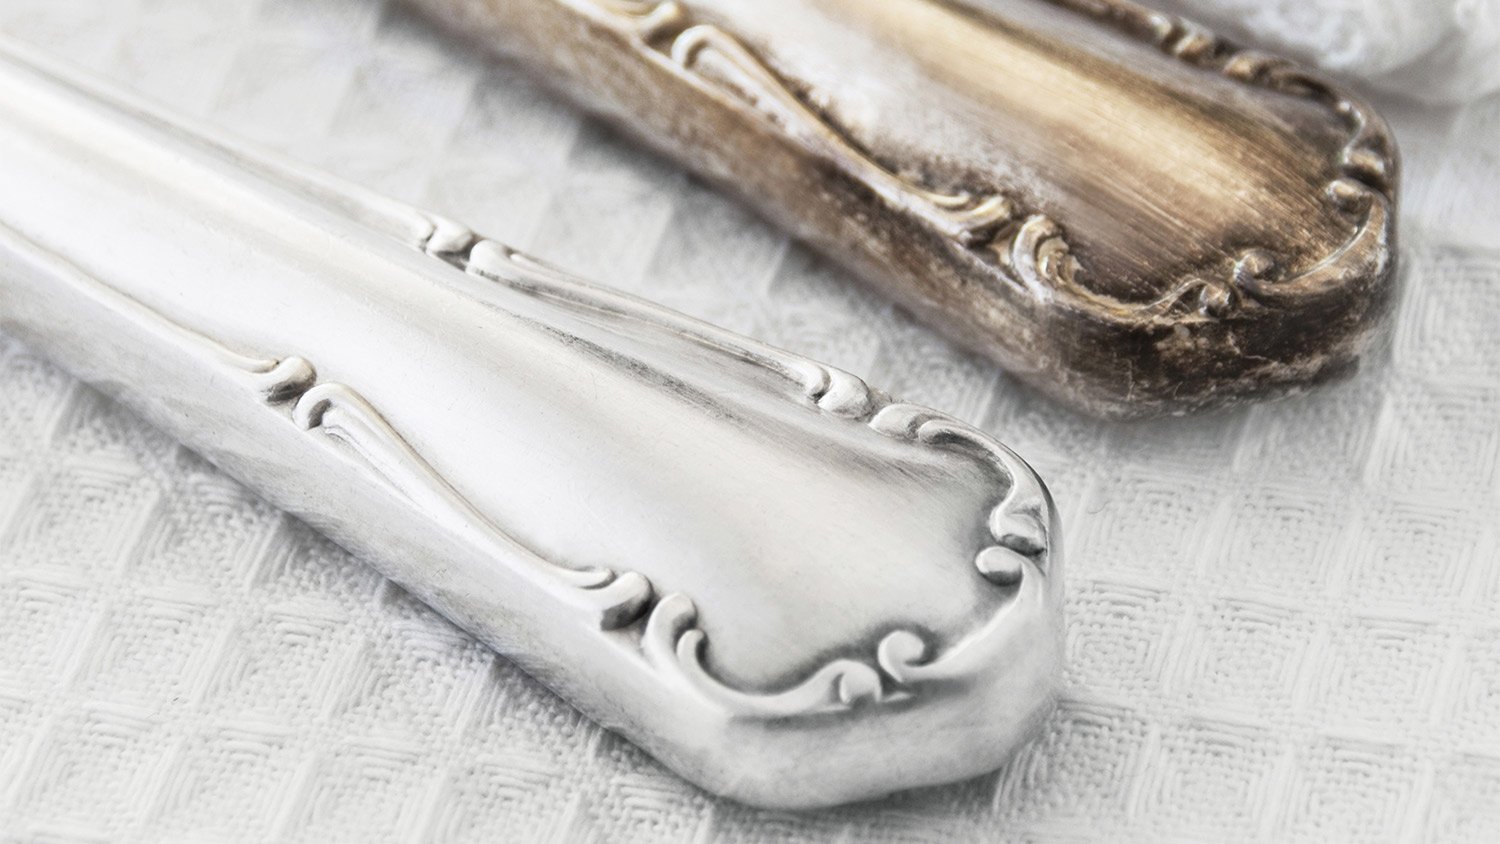
Silver tarnishes when it comes in contact with sulfur in the air and light. Moisture can also accelerate it, so your pieces might tarnish faster if you live in an area with high humidity. To prevent tarnishing, keep your silver away from chlorine, another chemical known to react with silver. This means you’ll need to remove silver jewelry before diving into any indoor or outdoor pools.
We recommend testing your chosen cleaning method in a small area or on a single piece before dunking your entire collection into one of the cleaning solutions below.
While you might be tempted to grab some gloves and clean your silver at the first sign of tarnish, practice restraint. Polish is naturally abrasive, and you can actually clean silver too much. A gentle scrub two to six times a year should suffice.


There are several methods for cleaning your silver with items around the house. Here are some easy ways to clean silver.
Note: The six ideas below are their own separate cleaning methods and should not be mixed with anything other than the ingredients listed for each method.
1. First, boil some water in a kettle or large pot.
2. While you’re waiting for the water to heat, line a glass baking dish with aluminum foil, and place the dish in the sink.
3. Once your water is boiling, pour it into the baking dish. Add 1 tablespoon of baking soda for every 1 cup of water you use.
4. Add your silver pieces to the baking dish, ensuring they’re in one even layer and touching the aluminum foil. There’s a chemical reaction that happens when silver, baking soda, and foil touch, turning the tarnish (silver sulfide) back to silver.
5. Once you’ve got your silver in the baking dish, let it sit for up to 10 minutes. If your silver is badly tarnished, you may need to repeat this process more than once.
6. After letting your silver sit, use tongs to remove the pieces. Or if you don’t have tongs, wear gloves to reach into the mixture, as baking soda can be very drying for your skin.
7. Rinse your silver with warm water, then dry and buff with a clean, soft cloth.
If your silver isn’t badly tarnished, dish soap and warm water may be all you need to clean up your pieces.
Apply a drop of soap and some warm water to a soft cloth, and rub to emulsify the soap.
Then, clean your silver with the cloth, rubbing carefully at the spots where there’s tarnish.
Once you’re finished, rinse with cold water and dry with a clean cloth.
"The trick to using a dish soap solution for cleaning and maintaining silver is to make sure there’s just a small amount of dish soap in the solution,” says Asya Biddle, Angi Expert Review Board member and manager of The Dust Busters janitorial company in Williamsport, PA. “If it’s too soapy, there will be a residue left behind on the silver."
The laundry detergent method is similar to the baking soda method since you’re creating a chemical reaction using foil here as well. You’ll follow the same steps as the baking soda method:
1. Boil water, line the baking dish with aluminum foil, then add the boiling water and 1 tablespoon of powdered detergent per 1 cup of water.
2. Ensure the detergent dissolves completely before adding your silver pieces, and check that the pieces are touching the foil.
3. When using laundry detergent, you only need to let your silver sit in the solution for one or two minutes.
4. Afterward, remove them from the solution with tongs, and set out to air-dry.
This may seem odd, but you can use fountain soda for several cleaning tasks around the home. When using it to clean silver, place your pieces in a glass baking dish or large bowl, fill with soda, and let it sit for an hour. Rinse the silver with water—you don’t want it to be sticky—then dry with a soft cloth.
Cleaning with vinegar and baking soda is a classic method for many household items, including baked-on foods, countertops, carpets, and more. This is another easy method that doesn’t require much elbow grease, just some time.
Add 1/2 cup of vinegar and 2 tablespoons of baking soda to a large bowl or baking dish filled with warm water and your silver pieces. Let them soak for two to three hours, rinse with cold water, and air-dry.
Home hack: Most window cleaners are ammonia-based if you don’t have ammonia in your cleaning cupboard. You can spray it on a soft cloth and buff your silver with it. This method requires 1/2 cup of clear ammonia per 1 cup of warm water. Combine the two in a large bowl or baking dish, add your silver, and let it soak for 10 minutes. Dry and buff it with a soft cloth.

There are many effective and inexpensive products designed explicitly for polishing silver. However, when used with a soft cloth, you can enlist items around your house to get rid of the tarnish and leave your silver crystal-clean.
Most of us now have hand sanitizer handy, and you can use it for buffing your silver as well. Just take a dry cloth, squeeze on a few drops of sanitizer, and rub away any tarnish or dirt on your pieces.
Like baking soda, cornstarch isn’t just for cooking. In a small bowl, combine 3 parts water and 1 part cornstarch to form a paste. You’ll want to use a damp cloth for this method, applying the paste to the areas of your silver items that are tarnished. Wait for the mixture to dry, then rub away using a terry cloth towel or a more abrasive type of cloth (though nothing that might scratch your pieces).
Toothpaste is another household product that does double-duty. Just like it polishes your teeth, it can also polish your silver. A word of warning, though: Some kinds of toothpaste are very abrasive, so be careful which one you choose. Try one with tartar-control ingredients because they have hydrated silica, which polishes your teeth. Avoid whitening formulas, as their ingredients might be too abrasive.
Apply some toothpaste to a dry cloth, polish your silver until it’s clean, rinse with warm water, and dry with a soft cloth.
Use this method less often than others, and spot-test on your silver before proceeding to ensure it doesn’t get scratched.
The chemicals in plastic will cause permanent discoloration in your silver pieces. The best way to store silver is in a dresser or cabinet drawer in a room with low humidity and heat.
If you need to store it in a plastic bag, make sure you wrap your silver in tissue, paper towels, or cloth before putting it in the bag to help slow tarnishing.
If you think this will loosen the dirt and grime on your silver, it won’t. Your silver may melt if it’s in the oven long enough, leaving you with a big old mess.
You can easily scratch silver, so if you’re unsure about the polish you’re using, do a spot test. Treat your silver with care when you’re cleaning, and it can last a lifetime.
Each time you polish silver, you remove metal from the piece. Therefore, you should only polish silver two times a year or up to six times a year if using natural cleaning solutions.
Vinegar is a great method for cleaning silver because it is naturally acidic. This means it will spark a chemical reaction (the good kind) when it contacts tarnished silver. Pure distilled white vinegar will be your strongest tarnish fighter because it’s safe to use with other commonly trusted cleaners like baking soda.
Dry silver won’t tarnish, so you should limit its exposure to air and moisture. The best way to store silver is in a storage box with a tarnish-proof cloth. You can also use jewelry boxes lined in silver cloth. Place a desiccant packet in your jewelry box to lessen moisture and avoid contact with rubber bands and products, which are filled with sulfur that promotes tarnishing.
From average costs to expert advice, get all the answers you need to get your job done.

Cleanout cost may be one of your first thoughts when left in charge of an estate. We walk through factors to expect, the professional estate cleanout services cost, and ways to save.

Curious how much it costs to hire a housekeeper? Discover 2026 prices, key cost factors, and tips to save on professional housekeeping for your home.

Mattress cleaning cost depends on the number of mattresses being cleaned and the size of each. Use this guide to better understand mattress cleaning prices.

Need to bring in professional help to clean your home? Use this list of questions to ask a house cleaner to make sure you hire the best one for the job.

Hiring a house cleaner can save you time while making it easier to keep up with your home chores. Find out how much to tip house a cleaner for a job well done.

If your kitchen or bathroom tiles need some TLC, consider hiring a pro to help. Here are the tile and grout cleaning questions to ask before starting.