

•
Discover the cost to install a gas cooktop. Learn about average prices, key cost factors, and tips to save on your gas cooktop installation project.
A clogged or broken dryer vent can turn out to be a much more serious problem


Since dryers don’t use water, the last thing homeowners may expect to see is their dryer vent leaking water. But surprisingly, when dryers get backed up or clogged with lint, fabric, and debris, or if the vent itself gets damaged, the moisture your dryer removes from your clothes can condense and leak out of the vent.
There’s also another potential problem: if backed-up lint is causing the leak, your home is at risk of a fire. There are nearly 3,000 home clothes dryer fires each year, according to The U.S. Fire Association, so neglected dryers can be a serious hazard.
In this guide, we’ll walk you through the process of fixing a leaking dryer vent and making sure the underlying issue isn’t putting your home at risk of serious damage.
Dryer vents aren’t plumbing pipes and don’t hold liquid water, but they do transport humidity and water vapor from your drying laundry to the outside of your home. Water leaking from a dryer vent indicates that condensation is happening inside the duct, and you need to take action. There are several reasons that condensation could occur and cause leaking:
Trapped lint: This is the most common way water gets trapped in a dryer vent. The lint builds up and prevents water vapor from moving outside, which is a major fire risk.
Pinched flexible ducting: This issue occurs behind the machine, in the wall, or the attic. It slows airflow, creating a trap for lint and water, which can be dangerous.
Inoperable flapper: An inoperable flapper at the vent exit on the roof or the exterior wall obstructs humid air from escaping, and it can leave water droplets in the duct.
Uninsulated vent: This type of vent issue travels through cold spaces like the attic or near cold objects such as cold water plumbing lines or air conditioner ducts. The hot air inside the vent condenses when it hits the cold vent walls.
Tight or multiple bends in dryer vent: Abnormalities in the dryer vent can slow airflow, allowing lint to build up and condensation to pool.
Poor vent construction: If a vent isn’t made or installed properly, including exposing foil tape to the inside of the duct or screws that protrude through the vent, it causes lint to become trapped and ultimately trap water.
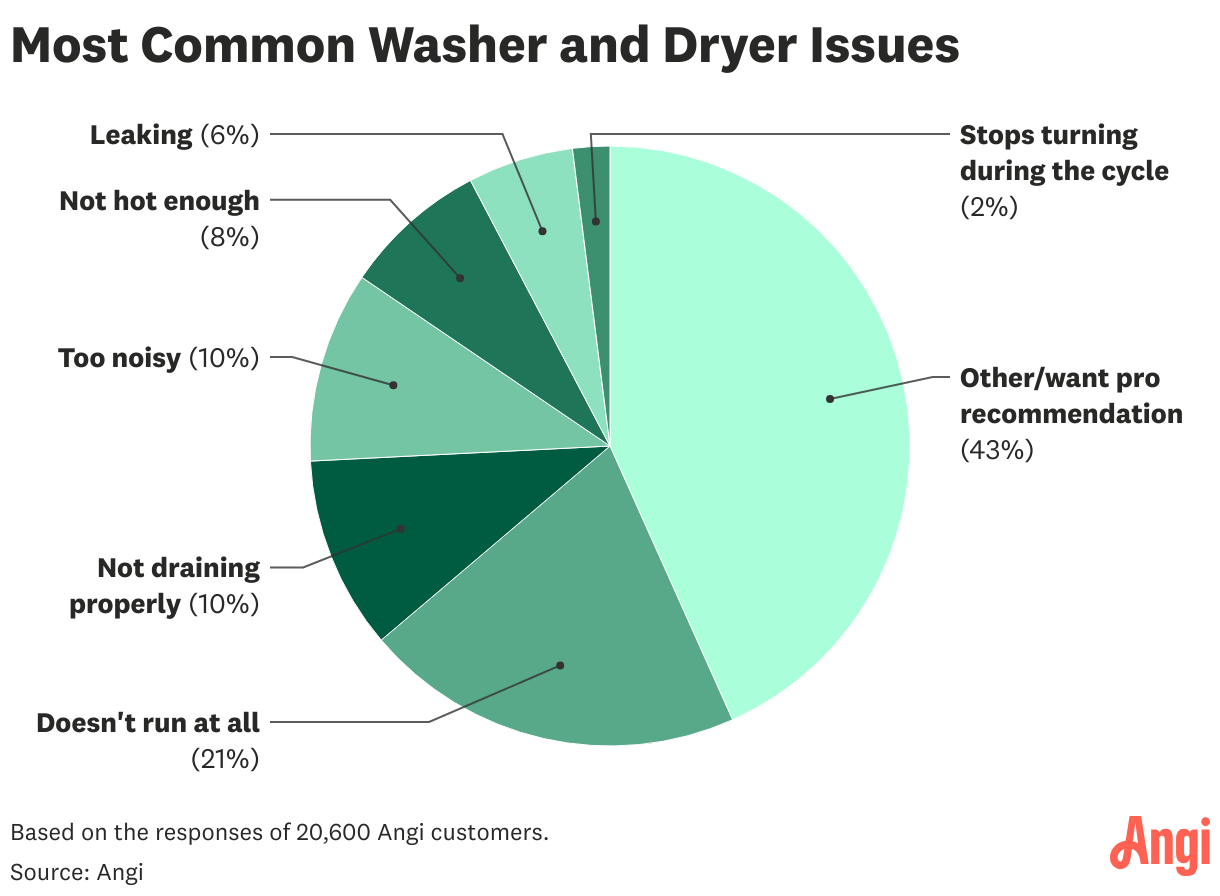
According to Angi customers, about 21% of washer and dryer problems involve a system that doesn’t work at all. Other commonly cited problems include being too noisy and not draining properly, at 10% each. Check out the most commonly requested projects:
The first step to cleaning out dryer vent clogs is to inspect your dryer ducts to find where the blockages are. This will take just a few minutes. Remove the duct connecting your dryer to the duct in your wall, making sure to handle the materials gently. You don’t want the duct to detach from the wall or the dryer, and you should avoid denting or crushing the vent.
Since the dryer vent gets quite hot during operation, avoid touching or working inside the vent until about a half hour after you use your appliance.
You can also check for mold around your dryer, which could indicate an ongoing dryer vent leak, and check the area for water damage. If you have extensive water damage, you might be able to make a water damage insurance claim to reduce the out-of-pocket cost of your solution. Homeowner’s insurance covers water damage, but your specific policy and provider will dictate if water damage from a dryer vent leak is covered, as the issue might fall under negligence.
Basic blockages often cause these perplexing leaks. Once you’ve removed the duct, look inside for lint, loose pieces of fabric, and other types of debris. All this “gunk” impedes the passage of humid air and causes dripping condensation.
With a vacuum, suck up the debris, shaking the duct as gently as possible to make sure nothing stays lodged inside. Regularly checking pipes and removing these accumulations can ensure the safe passage of air and can even prevent fires.
While checking the condition of your pipes or making repairs, look for any existing vent holes where water may be escaping from or where pests might be entering your dryer. Before you put everything back, seal these holes with aluminum tape to prevent outside dirt from entering (and getting stuck inside) the duct.
If your dryer vent is so long that it sags or bends multiple times on its way to your home’s exterior, there’s a higher chance of lint and fabric getting caught. One solution may be to shorten your dryer vent hose by cutting it—with a utility knife or shears—to a more appropriate length. You may also be able to find a pro to install your dryer vent after you adjust the length.
Ideally, you want enough length where you can pull your dryer about a foot away from the wall. You don’t want to pull it so much that there isn’t a mostly direct route from your dryer to your exit point.
If you live in an area known for its low-dipping temperatures, you may experience a leaking pipe more often than most. That’s because cold temperatures can give rise to a leak simply by providing enough of a contrast between outside conditions and the hot air that runs through the pipes. When the air from the dryer hits an exterior's chilly climate, condensation can begin to drip off the pipes.
Protect your vents by insulating them with fiberglass pipe wrap. This process is easier with a rigid dryer vent duct that has smooth sides rather than a slinky, bendable one with folds. (Rigid ducts also tend to have fewer blockages compared to the flexible ridges that trap more lint.)
Make sure to insulate all existing parts of the pipe, not just those closest to cold air.
Dryer pipe leaks are often the result of the pipe’s proximity to water sources or condensation. Believe it or not, air conditioner pipes and cold water pipes that touch or lean against dryer vents can cause leakage, thanks to humidity and evaporation.
Try putting some distance between the dryer vent and air conditioner or plumbing lines—ideally six inches or more. For best results, secure them in their new locations to reduce the chances that they return to their original, trouble-making positions.
All parts of a pipe must function properly for the successful release of dryer air, including flappers that open and shut depending on the passage of exhaust. Parts like these remain integral components to the appliance. Malfunctions can also encourage pipes to trap water from outside sources like rain, sprinklers, or even a wayward garden hose.
Inspect your dryer vent and flapper for proper functionality and replace any damaged or missing components as soon as possible.
Because dryer safety is so important, you may be weighing the option of getting your dryer vent professionally cleaned rather than DIY-ing it.
Generally, a DIY dryer vent pipe cleaning kit costs about $35 to $45. Costs vary based on region, but a ballpark estimate for a professional dryer vent pipe cleaning (including mold and bacteria disinfecting) is about $150 to $220. For the average dryer vent pipe cleaning job, you may be able to save well over $100 by DIY-ing it.
However, it may be worth paying a pro to come and save you some time—especially if it’s been a while since you last cleaned the vent. Plus, given the high risk of severe property damage and personal injury involved if you make a mistake, it’s never a bad idea to have a professional tackle it for you. If so, find a local dryer vent cleaning company to get the job done correctly.
From average costs to expert advice, get all the answers you need to get your job done.
Discover the cost to install a gas cooktop. Learn about average prices, key cost factors, and tips to save on your gas cooktop installation project.

Dryer repair costs as little as $10, but sometimes, replacing your dryer is more cost-effective. But if you have to make repairs, here’s how much it’ll cost.

Several factors impact dryer vent installation cost. Use this guide to learn what affects the cost, and how much you should budget for this project.

Learning how to install a washing machine standpipe drain is not the most complicated task, but you need to follow the steps precisely to ensure nothing leaks or breaks.

Learning how to determine washer box height in your laundry room will come in handy when you need to access your washer connections.

Your gas oven might not heat up for various reasons, such as problems with the circuit breaker, igniter, or gas supply. You can troubleshoot to figure out why your gas oven won’t heat up, but you may need to reach out to a professional.