

The cost to paint the interior of a house in Baltimore, MD depends on size, layout, type of surface, and more. Learn what factors can influence your total in this guide.
Make your fireplace blaze anew with a fresh coat of paint


A fireplace provides warmth and creates a comfortable gathering place in a room where memories are made. While red brick on a fireplace gives off a cozy look, it can pull in unwanted red tones. Fortunately, you can give your fireplace a makeover by painting over the brick to brighten up the space and personalize your interior design. Use this guide to learn how to paint a brick fireplace.
If you’re painting a fireplace that gets a lot of use, choose an interior, latex paint that can withstand high temperatures (up to 250 degrees Fahrenheit). If you don’t use the fireplace, simply pick any indoor, latex paint. Choosing an eggshell finish provides a warmer glow that hides imperfections yet looks natural when applied to the surface.
When choosing a color, consider your style preferences, the amount of use the room gets, and your current color scheme.
White paint is a common color choice for brick fireplaces, but there are other shades that may work well too. If you want to learn how to paint a fireplace in order to brighten the space but don’t want to overwhelm the room with lightness, choose a creamy off-white or light gray. For a dramatic statement, opt for a dark gray, navy, or even black and contrast with the wall above the fireplace to create an accent wall.
Follow these steps to easily paint over brick and transform the look of your fireplace.

Start your project by prepping the area for paint. Examine the fireplace and check for cracks in the mortar (the sealant between the bricks) and the bricks.
If you notice any cracks or gaps, use acrylic caulk to seal in the space and wait for it to fully cure before cleaning and painting.
Lay down a drop cloth to protect your floors from debris and paint.
Apply painter’s tape to areas you want to keep free from paint, such as the walls surrounding the fireplace, edges of the mantel, and fireplace doors and inserts.
Dust the surrounding walls and mantel with a microfiber towel or duster.

Before you apply any paint, thoroughly clean the surface of the brick. This step removes any soot, debris, and buildup, allowing the primer and paint to adhere better. When cleaning the brick, always start with a mild solution first and work your way up to stronger methods to avoid damage to the bricks. Opt for a sponge rather than a wire brush to avoid leaving behind small metal fragments that can damage the brick.
Use your wet-dry vacuum to remove any loose dust, ash, and debris from the bricks and the surrounding area.
Fully saturate the bricks with warm water, allowing the cleaning solution to fully penetrate the surface.
Mix a solution of equal parts of dishwashing soap (or vinegar) and water in a bucket.
Apply the solution to the bricks in a circular motion with a sponge, working with a few bricks at a time to ensure they don’t dry out.
Rinse the area with warm water and allow it to fully dry.
If you still have stubborn soot stains, spot clean the area or use a stronger cleaning solution.
Mix together a paste made with cream of tartar and water. The consistency should be somewhat watery so that it’s easy to apply.
Apply the paste to the brick and allow it to sit for about 10 minutes to fully saturate the stain.
Rinse the area with water and scrub using the abrasive side of the sponge to remove the stain.
Repeat on other stubborn areas.
If you have brick that is still resistant to these methods, you may need to repeat these steps using a stronger type of cleaner. Opt for cleaners like trisodium phosphate or boric acid (making sure to adequately ventilate the room and use protective equipment like waterproof gloves). Never mix these cleaners together. Remember, strong cleaning solutions can damage older bricks, so only use them if it's completely necessary.
After the surface of the brick has been cleaned and is completely dry, apply a primer base coat. Primer is a specialty type of paint that creates a layer between the base and topcoat, promoting better adhesion. Because brick is a porous material, primer is a necessary step and you may even need two coats of primer to perfect the look of your project.
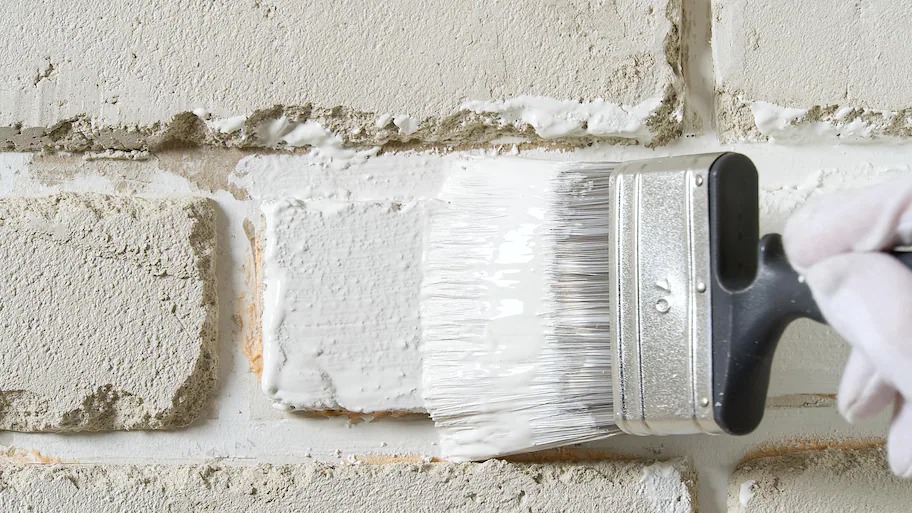
With an angled paintbrush, begin by applying the primer to the mortar lines between the bricks, working in small areas at a time.
Then, use a small paintbrush or small roller to apply an even coat of primer to the individual bricks.
Allow the primer to dry completely, then repeat these steps with the second coat of primer.
Clean your paintbrushes and rollers thoroughly to reuse when applying your topcoat.

Once the primer has completely dried, you are ready to apply your topcoat.
Use an angled paintbrush to paint the mortar lines, painting around a few bricks at a time.
Dip a flat paintbrush or small roller into the paint and apply it to the face of the bricks.
Repeat until the entire fireplace is completely covered with the topcoat.
Wait for the paint to dry, then apply a second coat, repeating the same steps.
Once the paint is completely dry, you can remove the painter’s tape and drop cloth, and enjoy your new fireplace.
From average costs to expert advice, get all the answers you need to get your job done.
The cost to paint the interior of a house in Baltimore, MD depends on size, layout, type of surface, and more. Learn what factors can influence your total in this guide.
The cost to paint the interior of a house in Orlando, FL depends on size, layout, type of surface, and more. Learn what factors can influence your total in this guide.

An accent wall is a great way to elevate any room. Find out how much it costs to paint an accent wall and what factors affect how much you’ll pay.

You’re ready to paint, but how do you protect your floors? Follow these seven tips to keep them in tip-top shape from start to finish.

Are you ready to enliven your bathroom and protect it from moisture? Learn how to paint a bathroom with the right tools and techniques to give you peace of mind.

Revitalize your stainless steel with a fresh coat and color of paint. Find out how to paint stainless steel and create a new look for your appliances or countertops.