

This guide will give you an idea of how much you can expect to pay when getting new seamless gutters installed when accounting for removal, labor, and different gutter materials.
This DIY project could be a downpour-tunity to save some cash


First, determine the gutter size you need. They are available in four, five, and six-inch sizes. Remember that the larger the gutter, the greater its capacity to hold and redirect water. The sections are typically pre-cut in eight or ten-foot lengths and are priced according to linear feet. For most homes, a gutter length of 150 to 200 feet is necessary. To ensure you purchase an adequate amount, measure your home's roof line and height or measure the length of your current gutter system.
Additionally, make sure you have the appropriate tools for the type of gutters you purchase and the level of effort you are willing to invest. Aluminum or copper gutters can be cut using tin snips, aviation snips, hacksaws, or jigsaws equipped with a metal-cutting blade. While you might already own a pair of tin snips, keep in mind that using them will require the most energy and labor, exerting pressure and strain on your fingers, wrists, and hands.
On the other hand, if you have steel or zinc gutters, you will need a more robust cutting tool. Regardless of the material, all gutters can be cut quickly and effortlessly using a power saw.

Due to the use of sharp metal and blades during the gutter installation process, it is crucial to prioritize your safety by wearing appropriate protective gear. We highly recommend wearing safety goggles and cut-resistant gloves to shield your eyes and hands from any potential harm. Additionally, it is important to wear heavy boots to protect your feet in case any small metal shards fall to the ground—stepping on them can cause injury.
Wearing a mask is also essential, and working in a well-ventilated area is highly advised. Dust can accumulate rapidly during the gutter-cutting process, and inhaling it can be harmful. Ensuring proper ventilation in your workspace will assist in maintaining clean and breathable air. Prioritizing your safety by wearing the recommended safety gear and working in a well-prepared environment will contribute to a successful and injury-free gutter installation.

Place your gutter on a stable, flat service such as a work bench (or power saw table if you’re using that). If you’re employing a hacksaw, clamp the gutter onto two sawhorses.

Next, you’ll want to mark where the gutter needs to be cut. You should measure and make a pencil mark where the gutter will be cut, and trace the cut mark around to the back of the gutter so you know where to cut on either side. Measure a second time to be sure you have it marked correctly. Cut the gutter along the traced line, working slowly to keep your cut as clean and straight as possible.
If you’re using a jigsaw, secure the gutter with clamps. Set the saw for zero oscillation so the blade cuts up and down rather than in an elliptical pattern. Proceed to cut along the line or mark you drew.

Once your cut is complete, you’ll want to smooth out any rough spots. This is a very important step if you’re using tin snips, which leave a jagged edge as they require a higher number of cuts. Filing down rough edges will prevent injury when it comes time to attach the end caps, seal any joints, or handle the gutters during the installation process.
With aluminum, copper, or steel gutters, you can file down the rough edges using a metal file until it is as smooth as possible without sacrificing your measurement.

Finish cutting your gutters until you have the necessary pieces for installation. Because there is no edge to start from with the downspout, you should mark a cutting line along all four sides using a combination square and then cut with a hacksaw or snips. With snips, you’ll need to punch through where you want to start the cut—alternately, you could drill a small hole through the metal to start the cut.
The work of cutting metal is no small feat and is a very detailed, dangerous job involving heavy, cumbersome materials. While you’ll save some money on labor, it might make the most sense to hire a gutter installation pro near you to ensure they are cut and installed correctly to prevent any long-term issues. The cost to replace gutters is approximately $4 to $30 per linear foot, depending on the materials used, such as basic aluminum or high-end copper.
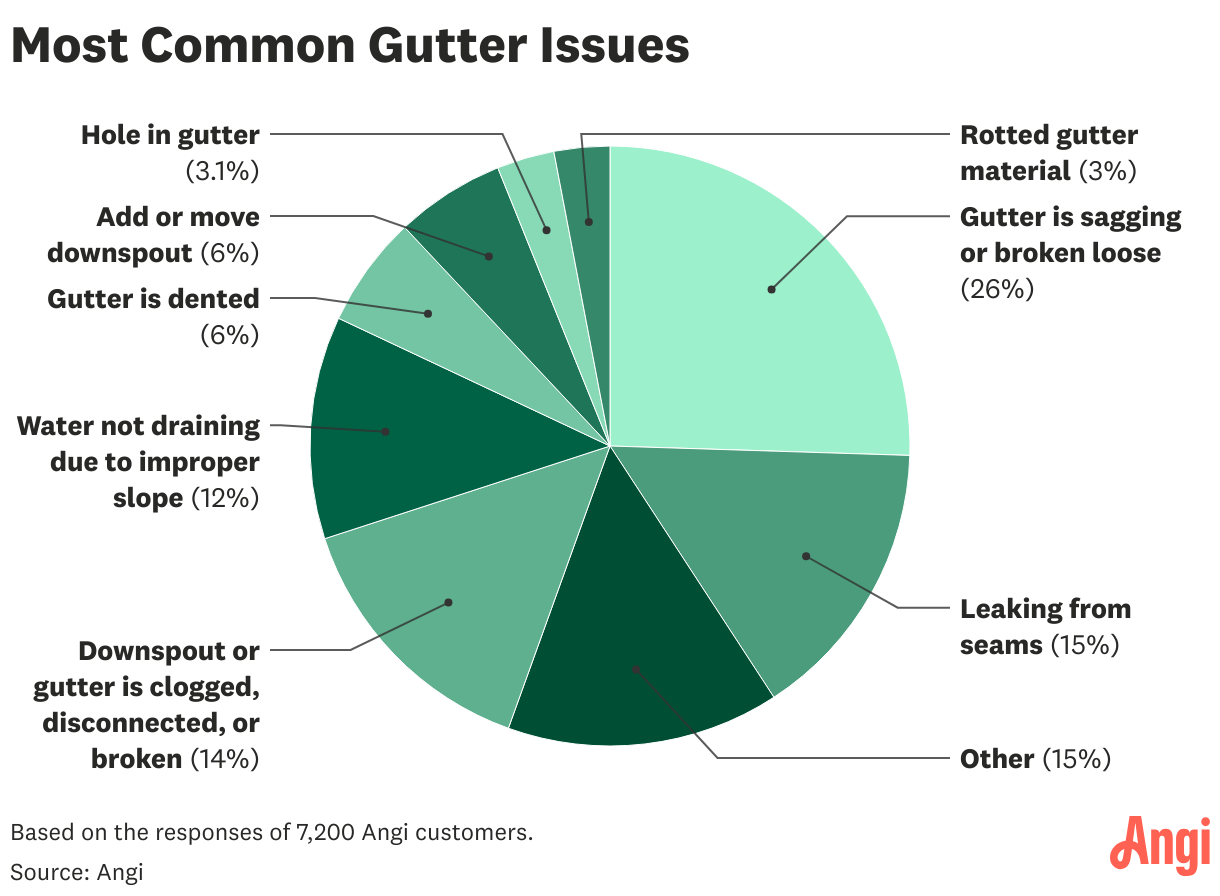
Gutter repairs are a common part of home maintenance. While gutters can last 20 years or more with proper care, they often need attention along the way. According to responses from 7,200 Angi customers, the most frequently reported issue is sagging or loose gutters, cited by 26% of homeowners. Another 15% reported leaks at the seams. In many cases, proper cutting and installation techniques can help reduce the likelihood of these issues over time.
From average costs to expert advice, get all the answers you need to get your job done.
This guide will give you an idea of how much you can expect to pay when getting new seamless gutters installed when accounting for removal, labor, and different gutter materials.

Installing copper gutters adds beauty and value to your home. The cost of your project will depend on the size of your home, the size of your gutters, and the thickness of the material.

Are gutter guards worth it? The average gutter guard installation cost is $650 to $2,000 but varies depending on types, materials, home height, and other factors.

Vinyl gutters are solid, low-cost alternatives to expensive metals like steel and copper. Learn what makes up the total project cost for installing them—and where you can save.

It’s not uncommon for gutters to pull away from the house. Use this guide to learn why it happens and how to fix gutters pulling away from your house.

Review the pros and cons of the five main types of gutter hangers available when installing new gutters for your home.